1. Introduction
This manual provides essential information for the safe and efficient operation of your EROMMY 20 Inch Ventless Fireplace Logs Set. Please read all instructions carefully before installation and use. This appliance is designed for use with LP/Propane gas only and features a 30,000 BTU vent-free burner, capable of heating spaces up to 1,000 square feet without external venting.
The set includes 7 hand-painted birch wood ceramic logs for a realistic appearance and durability.
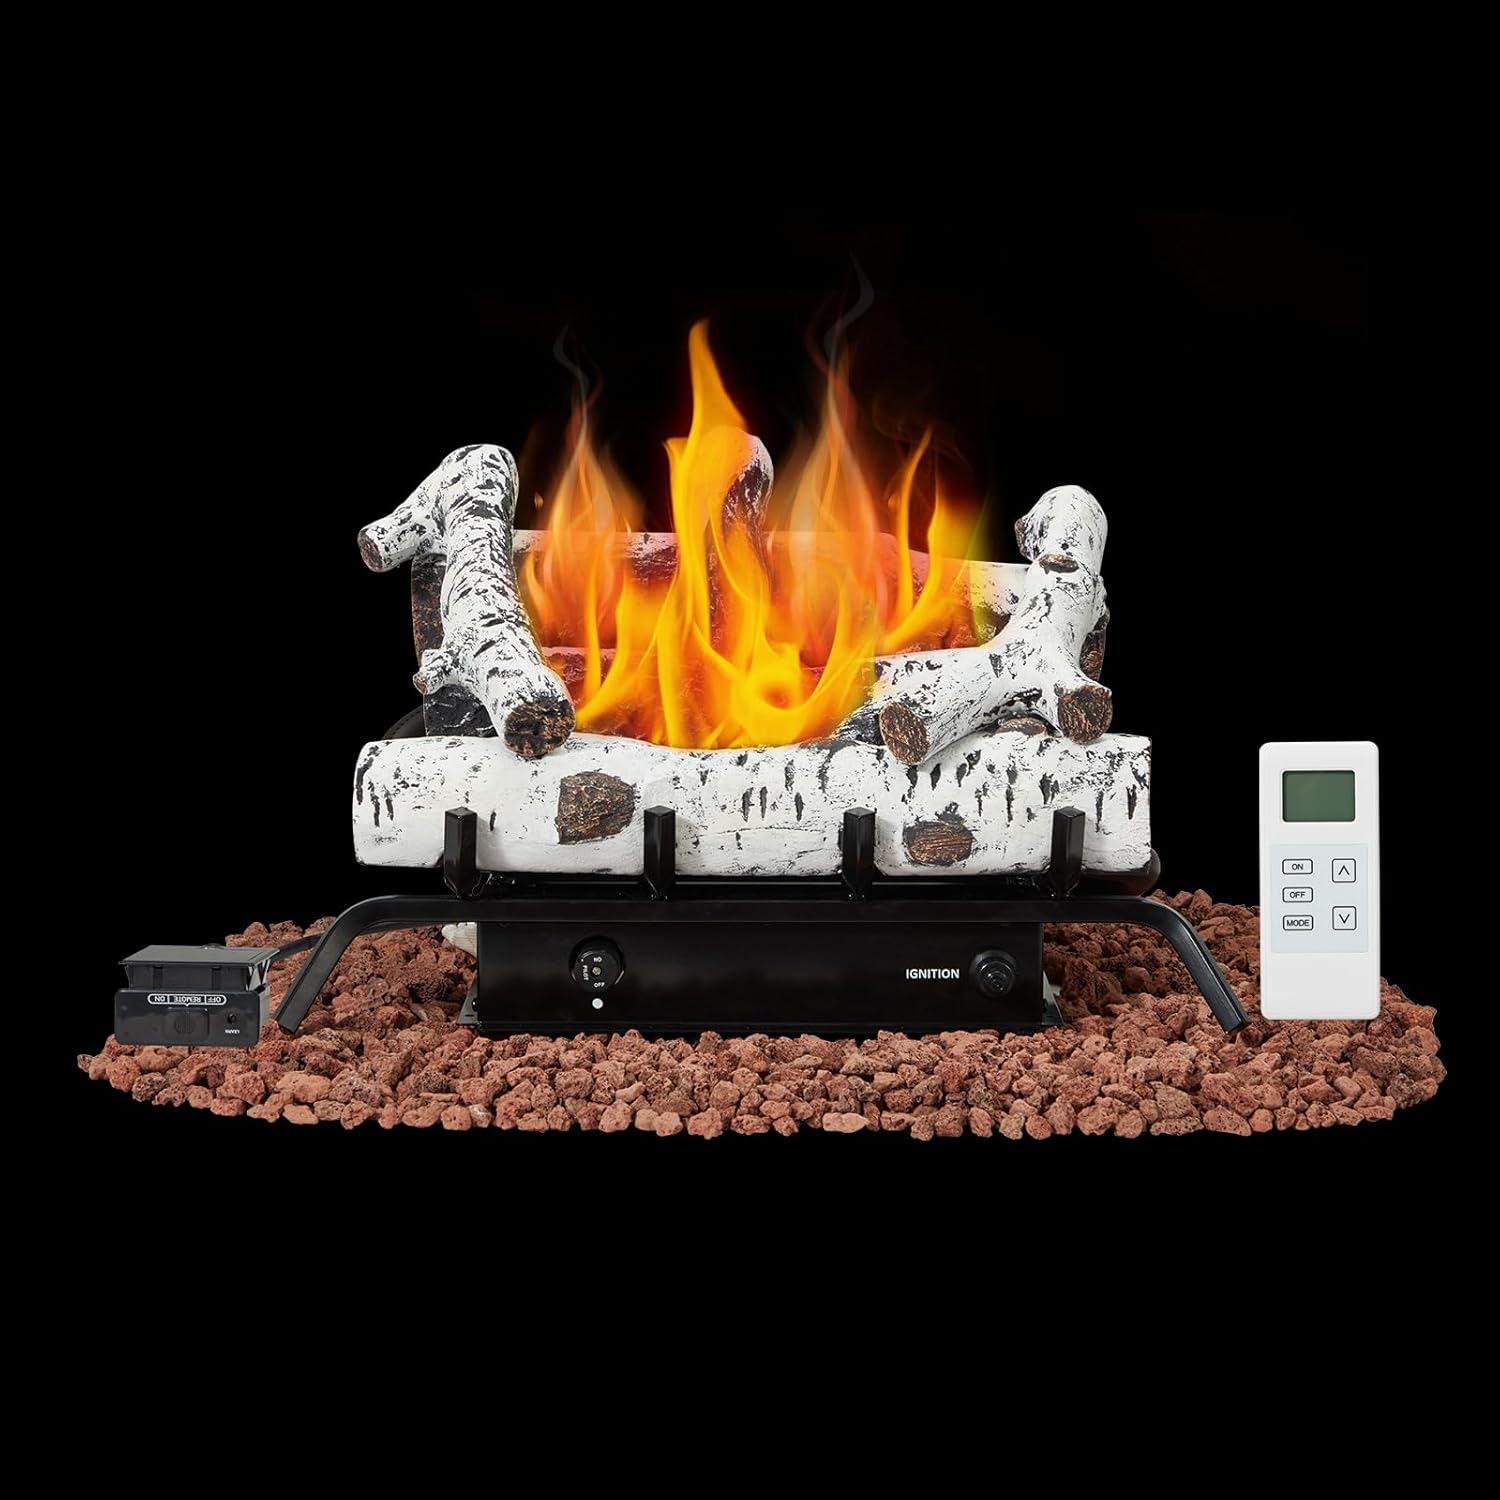
Image: EROMMY 20 Inch Ventless Fireplace Logs Set with Remote Control, showcasing the logs, burner, remote, and lava rocks.
2. Important Safety Information
WARNING: Improper installation, adjustment, alteration, service, or maintenance can cause injury or property damage. Read the installation, operating, and maintenance instructions thoroughly before installing or servicing this equipment.
- This appliance is for use with LP/Propane gas only. Do not attempt to use with natural gas or any other fuel.
- Ensure adequate ventilation. This is a vent-free appliance, but proper air circulation is still necessary.
- Oxygen Depletion Sensor (ODS): The unit is equipped with an ODS system that automatically shuts off the gas supply if oxygen levels in the room drop below a safe threshold. Do not tamper with or bypass this safety feature.
- Glass Doors: If your fireplace has glass doors, they must be fully opened when the heater is operating to prevent overheating and ensure proper air intake.
- Keep children and pets away from the appliance when it is in operation.
- Do not place clothing or other flammable materials on or near the appliance.
- Regularly inspect the gas connections for leaks using a soap solution. Never use an open flame to check for leaks.
3. Package Contents
Verify that all items listed below are present and undamaged before proceeding with installation:
- Gas Burner Assembly
- 7 Hand-Painted Ceramic Logs (Birch Wood Design)
- Lava Rock (approximately 6.6 pounds)
- Remote Control
- Receiver Box
- Instruction Manual

Image: Illustration showing the gas burner, ceramic logs, remote control, and lava rock components.
4. Specifications
| Feature | Detail |
|---|---|
| Fuel Type | LP/Propane Gas Only |
| Heat Output | 30,000 BTU |
| Heating Efficiency | 99.9% |
| Heating Area | Up to 1,000 square feet |
| Ventilation | Vent-free (no external venting required) |
| Log Material | High-temperature Ceramic (Birch Wood Design) |
| Safety Features | Pulse Ignition, Oxygen Depletion Sensor (ODS) |
| Remote Control Features | Manual Mode, Thermostat Mode, Customizable Temperature, Child Lock (CP lock), °F/°C Conversion, 2-hour Auto-shutoff (if no signal for 15 min) |
| Minimum Firebox Required | 14"D x 28"W (20"W rear) front x 24"H |
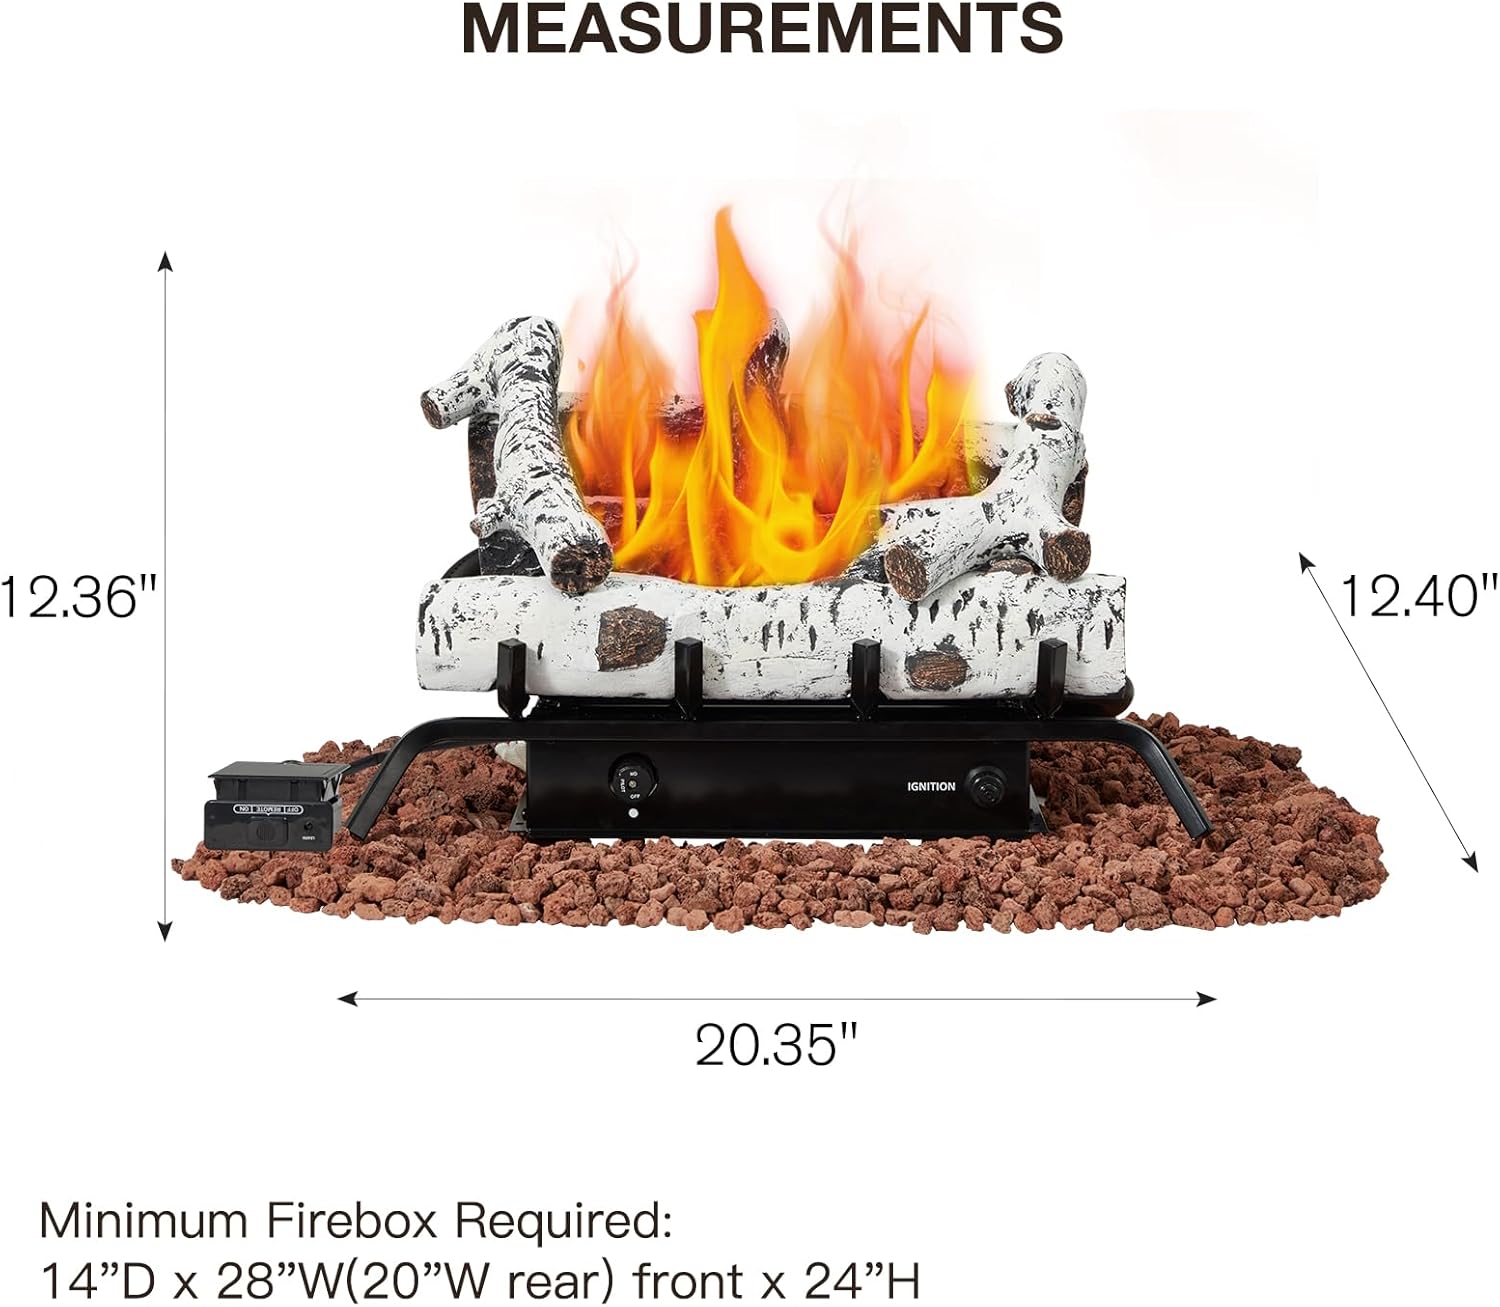
Image: Diagram illustrating the dimensions of the EROMMY 20 Inch Ventless Fireplace Logs Set.
5. Setup and Installation
Follow these steps for proper setup and installation:
- Prepare the Firebox: Ensure your firebox meets the minimum required dimensions (14"D x 28"W front, 20"W rear x 24"H). The firebox must be clean and free of debris.
- Install Ignition Battery: Insert one AAA battery into the IGNITION component. Tighten the cap clockwise.
Video: Demonstrates battery installation for the ignition system. This video also covers other operating instructions.
- Install Receiver Batteries: Insert four AAA batteries into the receiver box. Ensure correct polarity.

Image: Close-up of the remote receiver showing the battery compartment and control switches.
- Connect Receiver: Connect the main unit to the receiver. Ensure the receiver's switch is in the "OFF" position before connecting.
- Install Remote Control Batteries: Insert two AAA batteries into the remote control.
- Place Lava Rocks: Distribute the provided 6.6 pounds of lava rocks evenly around the burner assembly.
- Arrange Ceramic Logs: Carefully place the 7 hand-painted ceramic logs according to the log placement instructions provided in the separate log arrangement guide (if applicable) or as shown in the product images to ensure proper flame distribution and appearance. Each log is marked with a number for correct placement.

Image: Close-up view of the ceramic logs, highlighting their realistic birch wood texture and arrangement.
- Gas Connection: Connect the appliance to your LP/Propane gas supply. This step should be performed by a qualified professional to ensure safety and compliance with local codes.
6. Operating Instructions
Before operating, ensure all safety precautions are followed, especially opening any glass fireplace doors fully.
- Ignite Pilot Flame:
- Lightly press the control knob and turn it counterclockwise to the "PILOT" position.
- While holding the control knob, press and hold the IGNITION button until the pilot flame lights.
- Continue holding the control knob for approximately 30-60 seconds to allow the thermocouple to heat up and stabilize the pilot flame. Release the knob slowly. If the pilot flame extinguishes, repeat the process.
- Turn On Main Burner:
- Once the pilot flame is stable, lightly press the control knob and turn it counterclockwise to the "ON" position.
- Set the receiver switch to the "REMOTE" position.
- Wake up the remote control by pressing any button.
- Press the "ON" button on the remote control to ignite the main flame.

Image: Detailed view of the remote control, showing its display and buttons for ON, OFF, MODE, UP, and DOWN.
- Remote Control Modes:
- Use the "MODE" button to switch between manual mode and automatic constant temperature (thermostat) mode.
- In thermostat mode, use the "UP" and "DOWN" buttons to set your desired temperature. The remote will automatically adjust the flame to maintain this temperature.
- The remote features a child lock (CP lock) and °F/°C conversion. Refer to the remote control's specific instructions for activating these features.
- The system includes an auto-shutoff feature that turns off the main burner after 2 hours if no signal is detected from the remote for 15 minutes.
- Turn Off Main Burner:
- Press the "OFF" button on the remote control to turn off the main flame.
- To completely turn off the pilot flame, rotate the control knob on the burner assembly to the "OFF" position.
7. Maintenance
Regular maintenance ensures safe and efficient operation of your fireplace logs set.
- Cleaning: Ensure the appliance is completely cool before cleaning. Use a soft, damp cloth to wipe down the exterior surfaces. Do not use abrasive cleaners.
- Log Inspection: Periodically inspect the ceramic logs for any cracks or damage. Replace damaged logs immediately to maintain proper flame patterns and safety.
- Burner Inspection: Annually, inspect the burner ports for any blockages or debris. Clean gently with a soft brush if necessary.
- Pilot Light Assembly: Keep the pilot light assembly clean. Dust or lint can obstruct the pilot flame or the ODS sensor.
- Gas Connections: Annually, have a qualified technician inspect all gas connections for leaks and proper function.
- Battery Replacement: Replace batteries in the remote control and receiver box as needed, typically annually or when performance degrades.
8. Troubleshooting
If you encounter issues, refer to the table below for common problems and solutions.
| Problem | Possible Cause | Solution |
|---|---|---|
| Pilot light will not light or stay lit. | No gas supply; air in gas line; thermocouple not heating; ODS sensor issue; pilot orifice clogged. | Check gas supply valve. Bleed air from gas line. Hold pilot knob longer. Clean pilot assembly. Contact a qualified technician. |
| Main burner does not ignite. | Pilot light not lit; receiver in OFF position; remote control batteries low/dead; remote not synced. | Ensure pilot is lit. Set receiver to REMOTE. Replace remote batteries. Sync remote (press LEARN button on receiver, then ON on remote). |
| Flames are low or irregular. | Low gas pressure; burner ports clogged; incorrect log placement. | Verify gas pressure. Clean burner ports. Re-arrange logs according to manual. |
| Unit shuts off unexpectedly. | ODS sensor activated (low oxygen); remote auto-shutoff; loose wiring. | Ensure adequate ventilation. Check for remote signal. Inspect wiring connections. |
If problems persist after attempting these solutions, please contact customer support.
9. Warranty and Support
For warranty information, please refer to the warranty card included with your product or visit the official EROMMY website. For technical support, replacement parts, or further assistance, please contact EROMMY customer service.
EROMMY Customer Service:
- Website: Visit the EROMMY Store on Amazon
- Contact information may also be found on your product packaging or included documentation.