Introduction
The Blackview DCM6 Triple Laptop Screen Extender is designed to enhance your productivity by providing two additional 14.1-inch Full HD IPS displays for your laptop. This ultra-lightweight and ultra-slim device offers a versatile multi-screen workspace, compatible with a wide range of operating systems and devices. It features eye-care technology and multiple connection options for seamless integration into your mobile or stationary setup.
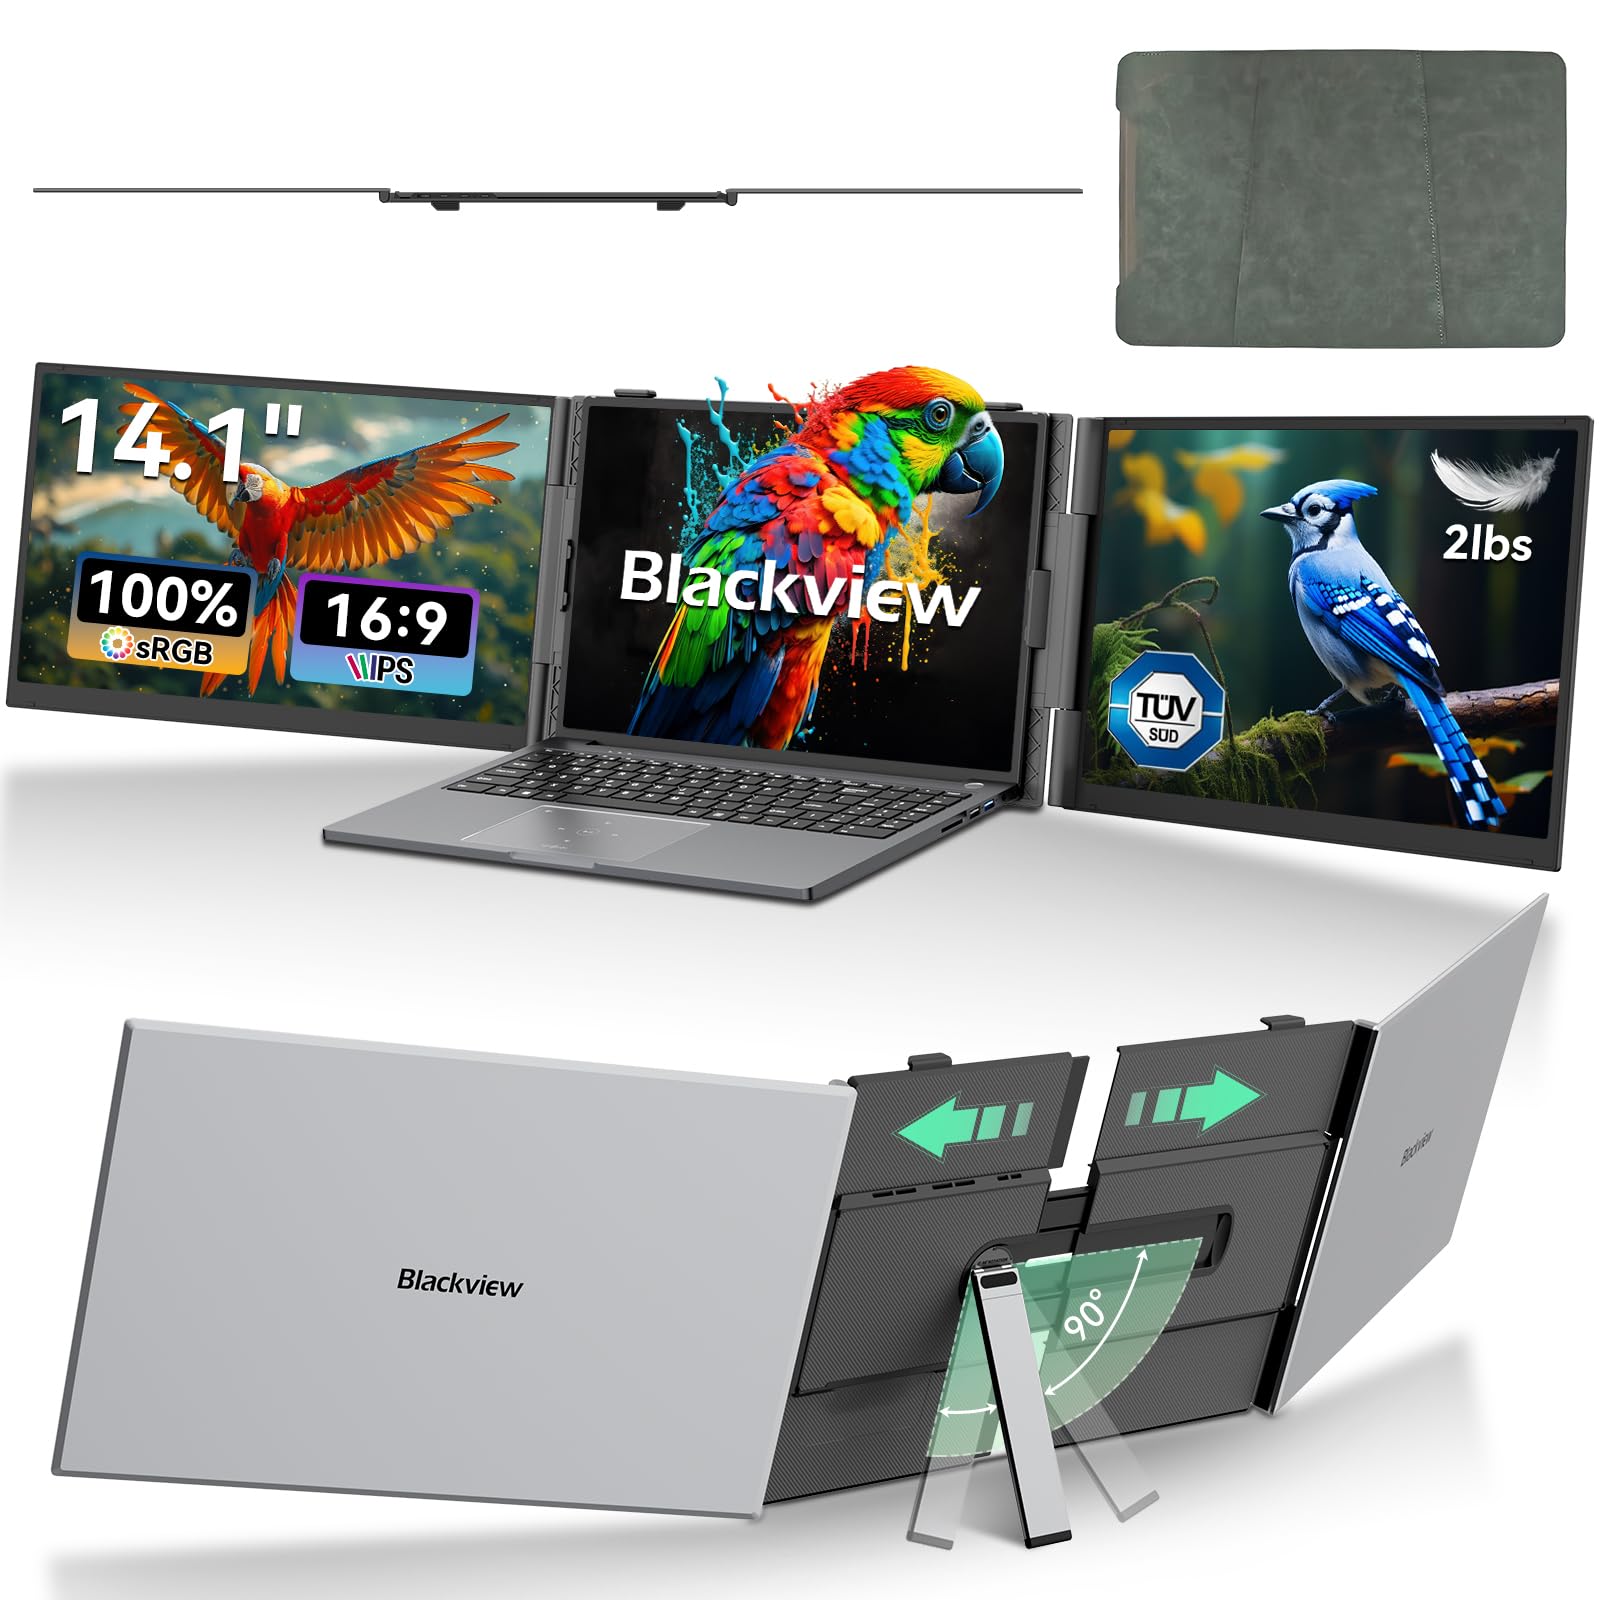
Image: The Blackview DCM6 Triple Laptop Screen Extender in use, providing an expanded workspace.
Setup Instructions
Follow these steps to correctly set up your Blackview DCM6 Triple Laptop Screen Extender.
1. Unpacking and Initial Inspection
- Carefully remove all components from the packaging.
- Verify that all items listed in the packing list are present: 1x Screen Extender, 1x Protective Case, 2x USB-C to USB-C Cable (Full-Featured), 1x USB-A to USB-C Cable, 1x HDMI to USB-C Cable, 1x H5-T Cable, 1x User Manual & Quick Guide.
- Inspect the screens and cables for any visible damage.

Image: Contents of the Blackview DCM6 package, showing the screen extender, cables, and protective case.
2. Attaching to Your Laptop
- Gently pull out the screen extender's mounting clips and secure it behind your laptop screen.
- Unfold the integrated kickstand from the back of the extender to provide additional support, especially for heavier laptops or when adjusting the screen angles. The kickstand can be adjusted to the desired length and rotated up to 90 degrees.
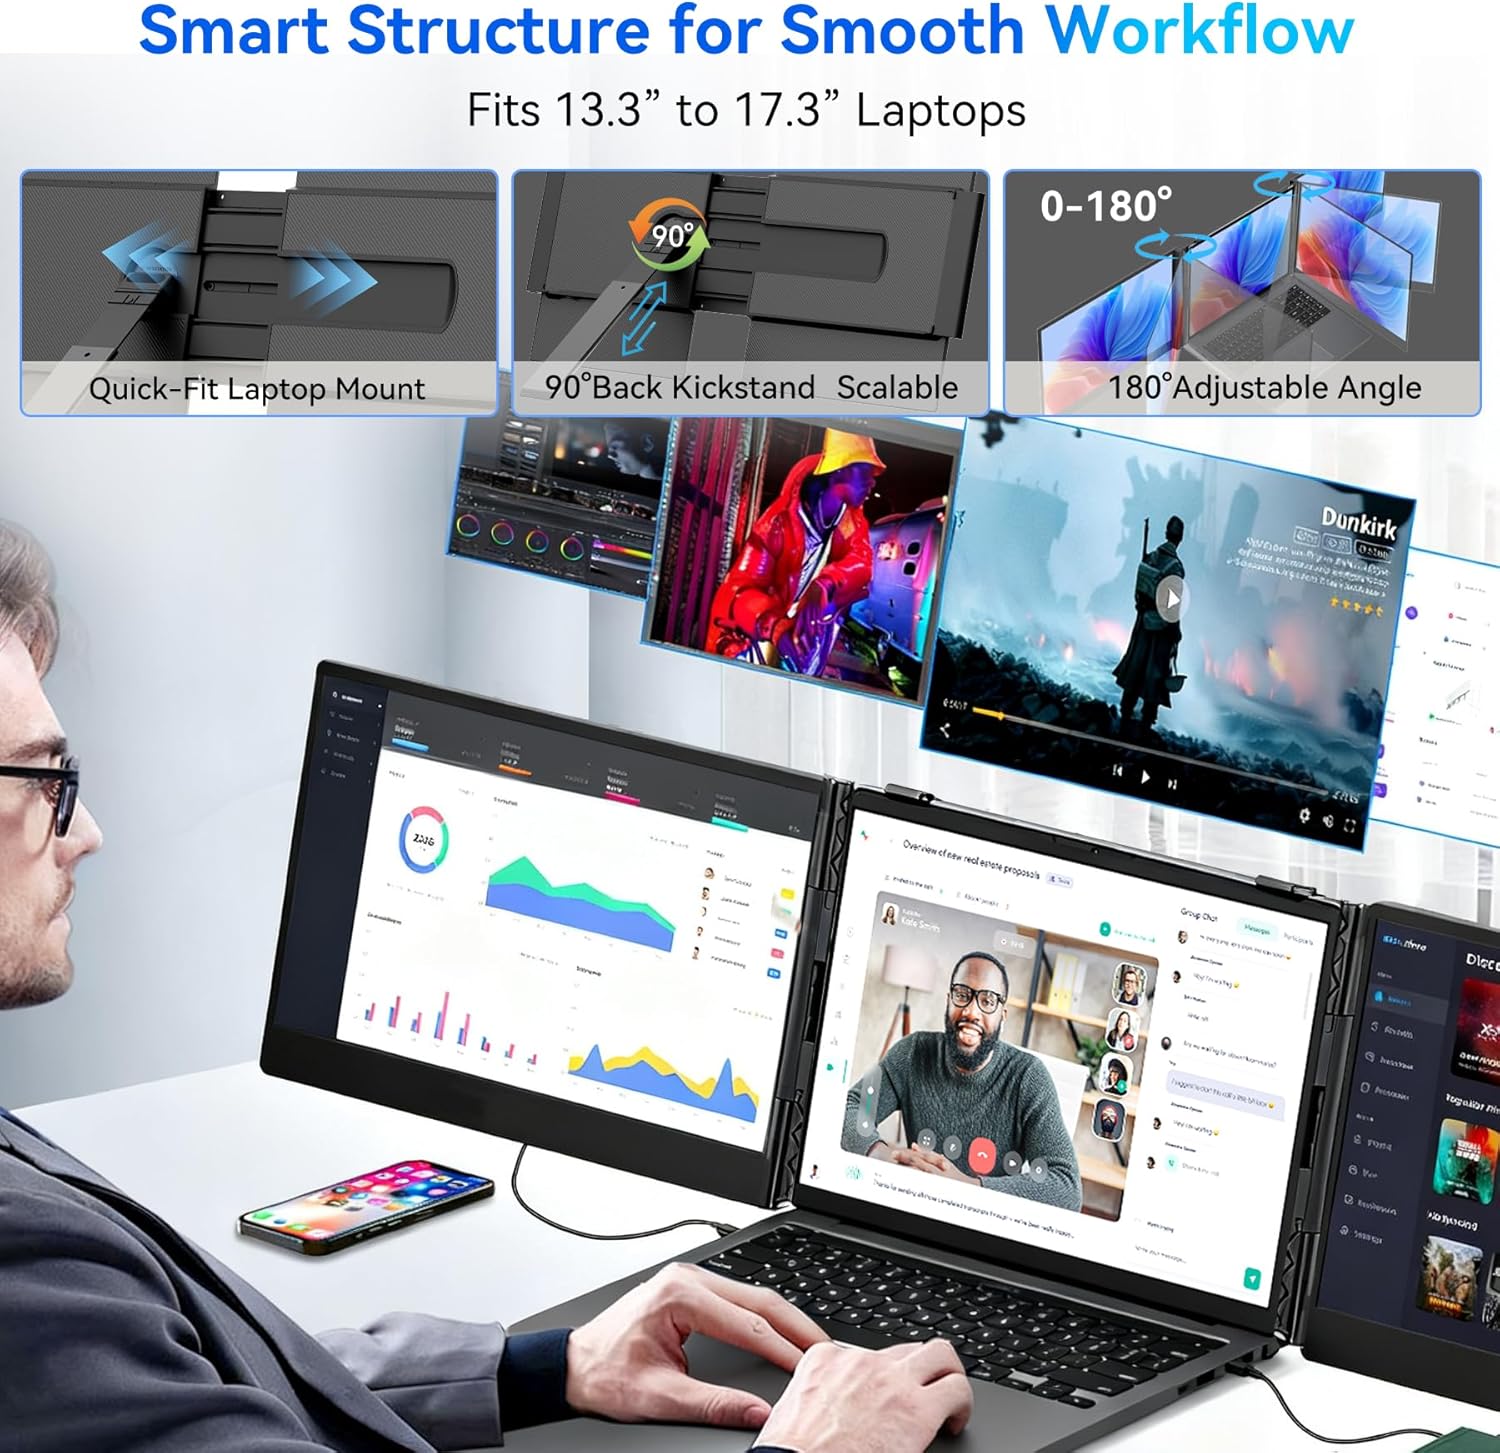
Image: Illustration of the quick-fit laptop mount, adjustable kickstand, and 180° rotation feature.
3. Connection Methods
The DCM6 offers flexible connection options depending on your laptop's available ports. Ensure your laptop's USB-C ports are full-featured (support power, video, and data transmission) for optimal performance.
- Method 1: Two Full-Featured USB-C Ports
Connect both screens directly to your laptop using the two provided USB-C to USB-C cables. This method provides both power and video transmission. - Method 2: One Full-Featured USB-C Port & One HDMI Port
Connect one screen via a USB-C to USB-C cable and the other via an HDMI to USB-C cable. An external power supply (5V/2A or above) may be required for the HDMI-connected screen if the screen flashes or power is insufficient. - Method 3: Laptop without Full-Featured USB-C Port (using H5-T Cable)
If your laptop lacks full-featured USB-C ports, use the H5-T conversion cable along with an HDMI to USB-C cable and an external power supply. The H5-T cable requires driver installation. Refer to the "Driver Installation" section for details.

Image: Visual guide to the three primary connection methods for the screen extender.
4. Driver Installation (for H5-T Cable)
If you are using the H5-T conversion cable, driver installation is required. The driver file is typically found on the product's included USB drive or can be downloaded from the official Blackview support website. Follow the on-screen instructions to complete the installation. For Mac users, ensure "Screen Recording" permissions are granted in System Preferences after installation.
For detailed visual instructions on setup, please refer to the official product video below:
Video: Official Blackview DCM6 Triple Laptop Screen Extender setup guide.
Operating Instructions
The Blackview DCM6 is designed for intuitive operation to maximize your workspace efficiency.
1. Display Modes
The extender supports multiple display modes:
- Mirror Mode: Duplicates your laptop's display on the external screens.
- Extension Mode: Extends your desktop across the three screens, providing a larger workspace.
- Landscape & Portrait Mode: Allows for flexible screen orientation.
You can also rotate the screens up to 180° for optimal viewing angles or collaborative work.

Image: Examples of enhanced productivity with the triple screen setup for various tasks.
2. Adjusting Display Settings
The 14.1" Full HD IPS screens offer 1920x1080 resolution, 16:9 aspect ratio, 60Hz refresh rate, 300 nits brightness, and 100% sRGB color gamut. You can adjust brightness, contrast, and backlight settings through the monitor's on-screen display (OSD) menu, typically accessed via buttons on the screen extender itself.

Image: Key display specifications highlighted on the screen extender.
3. Eye Care Features
The DCM6 is TÜV SÜD certified for low blue light and flicker-free operation. This hardware-level blue light filtering technology reduces harmful short-wave blue light radiation, minimizing eye dryness, discomfort, and visual fatigue during prolonged use.
4. Compatibility
The screen extender is compatible with a wide range of operating systems and devices, including:
- Windows
- Mac (including M1, M2, M3 chips)
- ChromeOS
- Android
- Linux
- Nintendo Switch
- Smartphones and Tablets with full-featured USB-C ports

Image: Visual representation of the broad operating system and device compatibility.
Maintenance
To ensure the longevity and optimal performance of your Blackview DCM6 Triple Laptop Screen Extender, follow these simple maintenance guidelines:
- Cleaning: Use a soft, lint-free cloth slightly dampened with water or a screen-safe cleaning solution to clean the display surfaces. Avoid harsh chemicals or abrasive materials.
- Storage: When not in use, fold the screens securely and store the extender in its protective case to prevent scratches and damage.
- Handling: Always handle the device with care. Avoid dropping it or applying excessive force to the screens or hinges.
Troubleshooting
If you encounter any issues with your Blackview DCM6, please refer to the following common solutions:
- No Display/Screen Flashing:
- Ensure all cables are securely connected to both the extender and your laptop.
- If using an HDMI connection, ensure an external power adapter (5V/2A or above) is connected to the screen extender's power port.
- Verify that your laptop's USB-C ports are full-featured (support power, video, and data).
- M1/M2/M3 Chip Compatibility: The extender is compatible with M1/M2/M3 chips. Ensure you are using the correct connection method and any necessary drivers are installed (if using H5-T cable).
- Driver Installation Issues: If using the H5-T cable and experiencing driver issues, double-check the installation steps and ensure "Screen Recording" permissions are granted for Mac users.
- Screen Stability: Ensure the kickstand is properly extended and adjusted to support the screens. The reinforced springs and non-slip pads are designed for stability.
For further assistance, scan the QR code on the product for video guides and technical support, or contact Blackview customer service.
Specifications
| Brand | Blackview |
| Model Name | DCM6 |
| Screen Size | 14.1 Inches |
| Resolution | FHD 1080p (1920 x 1080 Pixels) |
| Aspect Ratio | 16:9 |
| Refresh Rate | 60 Hz |
| Brightness | 300 Candela |
| Display Technology | IPS LCD |
| Viewing Angle | 180 Degrees |
| Color Gamut | 100% sRGB |
| Connectivity Technology | HDMI, USB Type C |
| Item Weight | 2.27 Kilograms (approx. 2 lbs for the screen extender itself) |
| Additional Features | Built-In Speakers, Eye Care (Low Blue Light, Flicker-Free), Lightweight, Portable, Ultra-Slim |
| Compatible Devices | Desktop, Gaming Console, Laptop, Smartphone, Tablet |
Warranty and Support
Blackview provides an industry-leading 24-month reliable warranty for the DCM6 Triple Laptop Screen Extender. This warranty covers manufacturing defects and ensures you receive a brand new, factory-sealed unit. Our policy is replacement-only.
For professional customer support, technical assistance, or to resolve any concerns promptly, please contact Blackview customer service. You can find contact information on the product packaging or the official Blackview website.