
1. Introduction
Thank you for choosing the Pragovle S480-5 4K HD Security Mini Camera. This DIY module camera offers ultra-high-definition video recording, motion detection, and remote control operation without the need for Wi-Fi or an app. Its compact design allows for versatile placement and discreet surveillance. Please read this manual carefully to ensure proper use and optimal performance of your device.
Note: This camera does not feature night vision and does not include an SD card unless specified in the package contents.
2. What's in the Box
Verify that all items are present in your package:
- Mini Camera
- Remote Control Unit
- Button Fitting
- Instruction Manual
- 64G SD card (Note: Product specifications indicate a 64G SD card is included, but feature bullets state 'Not include SD card'. Please verify your package contents.)
3. Product Overview
The Pragovle S480-5 is a modular camera system designed for discreet recording. It consists of a main control unit, a flexible ribbon cable with a camera lens, and a separate battery pack, all controlled by a wireless remote.

Image: Overview of the Pragovle S480-5 Mini Camera components, including the main module, flexible camera lens, external battery, and remote control unit.

Image: A close-up view of the mini camera module and its accompanying remote control, highlighting their compact size.
4. Features
- 4K/2K Ultra-High-Definition Resolution: Records video in 4K (4096 pixels effective still resolution) at 15fps or 2K (4320 effective video resolution) at 30fps for clear footage.
- Remote Control Operation: Features a dedicated remote control for power on/off, continuous recording, photography, and motion detection functions, eliminating the need for Wi-Fi or an app.
- Motion Detection: Automatically starts recording when motion is detected, saving storage space and capturing relevant events.
- Loop Recording: When the SD card is full, the oldest files are automatically overwritten by new recordings.
- Powerful Battery Capacity: Built-in 2000mAh battery provides over 6 hours of continuous recording in 4K (longer in 2K).
- Expandable Storage: Supports 64GB to 256GB Micro SD cards.
- Compact and DIY Friendly: Mini lens design allows for easy concealment and integration into various objects.

Image: Visual comparison demonstrating the superior clarity of 4K Ultra HD video recording compared to 1080p Full HD.

Image: Examples illustrating how the mini camera can be discreetly integrated into common household items for DIY hidden surveillance.
5. Setup
- Insert Micro SD Card: Locate the Micro SD card slot on the main camera unit. Gently insert a compatible Micro SD card (64GB-256GB, Class 10 or higher recommended) until it clicks into place. Ensure the card is inserted correctly to avoid damage.
- Connect Battery: Connect the provided battery pack to the main camera unit. Ensure a secure connection.
- Power On: Press the power button on the remote control unit to turn on the camera. Refer to the LED indicator for status (specific LED behavior not detailed in provided data, typically a solid light indicates standby).

Image: A laptop screen showing recorded video footage, with the camera module and a Micro SD card visible, illustrating the recording and playback process.
6. Operation
The camera is operated using the included remote control unit. Ensure you are within approximately 30 feet of the camera for the remote to function effectively.
Remote Control Functions:
- Power On/Off: Use the designated buttons on the remote to turn the camera on or off.
- Continuous Recording: Press the continuous recording button to start recording video continuously. Press again to stop.
- Photography: Press the photography button to capture still images.
- Motion Detection: Activate motion detection mode using the remote. The camera will begin recording automatically when movement is detected within its field of view.
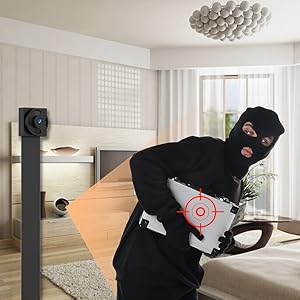
Image: An illustration depicting the motion detection feature, where the camera identifies and records activity within its surveillance area.

Image: A visual representation of the motion detection function, showing how the camera identifies and records suspicious activity, such as a person entering a room.
7. Charging
The camera's built-in 2000mAh battery provides extended recording time. To charge the device:
- Connect the camera unit to a 5V power source using a compatible USB cable.
- Charging can be done via a wall adapter, power bank, or computer USB port.
- The camera supports simultaneous charging and recording.

Image: A diagram illustrating the flexible charging options for the camera, including wall adapter, power bank, and computer USB port.
8. Data Transfer and Playback
To view recorded videos or photos:
- Turn off the camera.
- Remove the Micro SD card from the camera unit.
- Insert the Micro SD card into a computer's card reader or a compatible device.
- Access the files on the SD card. Videos are typically saved in MOV format with H.264 encoding.
Ensure your computer has appropriate media players installed to view 4K/2K video files.
9. Maintenance
- Keep the camera and its components dry. This device is not water-resistant.
- Clean the lens gently with a soft, dry cloth to ensure clear video quality.
- Avoid exposing the camera to extreme temperatures or direct sunlight for prolonged periods.
- Regularly back up important recordings from the Micro SD card to prevent data loss.
- Format the Micro SD card periodically (e.g., monthly) to maintain optimal performance and prevent file corruption.
10. Troubleshooting
| Problem | Possible Cause / Solution |
|---|---|
| Camera does not power on. |
|
| Cannot record video. |
|
| Poor video quality. |
|
| Remote control not working. |
|
11. Specifications
| Feature | Detail |
|---|---|
| Model Name | S480-5 |
| Video Resolution | 4K (4096 pixels effective still resolution), 2K (4320 effective video resolution) |
| Frame Rate | 15fps (4K), 30fps (2K) |
| Viewing Angle | 120 degrees |
| Connectivity Technology | Wireless (Remote Control) |
| Storage | Micro SD Card (64GB-256GB supported) |
| Battery Capacity | 2000mAh |
| Recording Time | Over 6 hours (4K), longer (2K) |
| Video Encoding | H.264 |
| Video Capture Format | MOV |
| Power Source | Battery Powered (5V, 5W) |
| Indoor/Outdoor Usage | Indoor |
| Night Vision | No |
| Item Dimensions | 3 x 5 x 4 inches (approximate, for main unit) |
| Material | Plastic |