
1. Introduction
Thank you for choosing the STAHLWERK 3-in-1 Automatic Welding Helmet Booster Air. This advanced welding helmet provides superior protection and comfort for various welding, plasma cutting, and grinding applications. It features an integrated Powered Air-Purifying Respirator (PAPR) system, True-Colour technology for enhanced visibility, and automatic darkening capabilities. Please read this manual thoroughly before use to ensure safe and optimal operation.
1.1 Product Overview
The STAHLWERK Booster Air welding helmet is designed to protect your eyes, face, and respiratory system from harmful radiation, sparks, and fumes during welding and related processes. The integrated PAPR system supplies fresh, filtered air, significantly improving working conditions and safety.
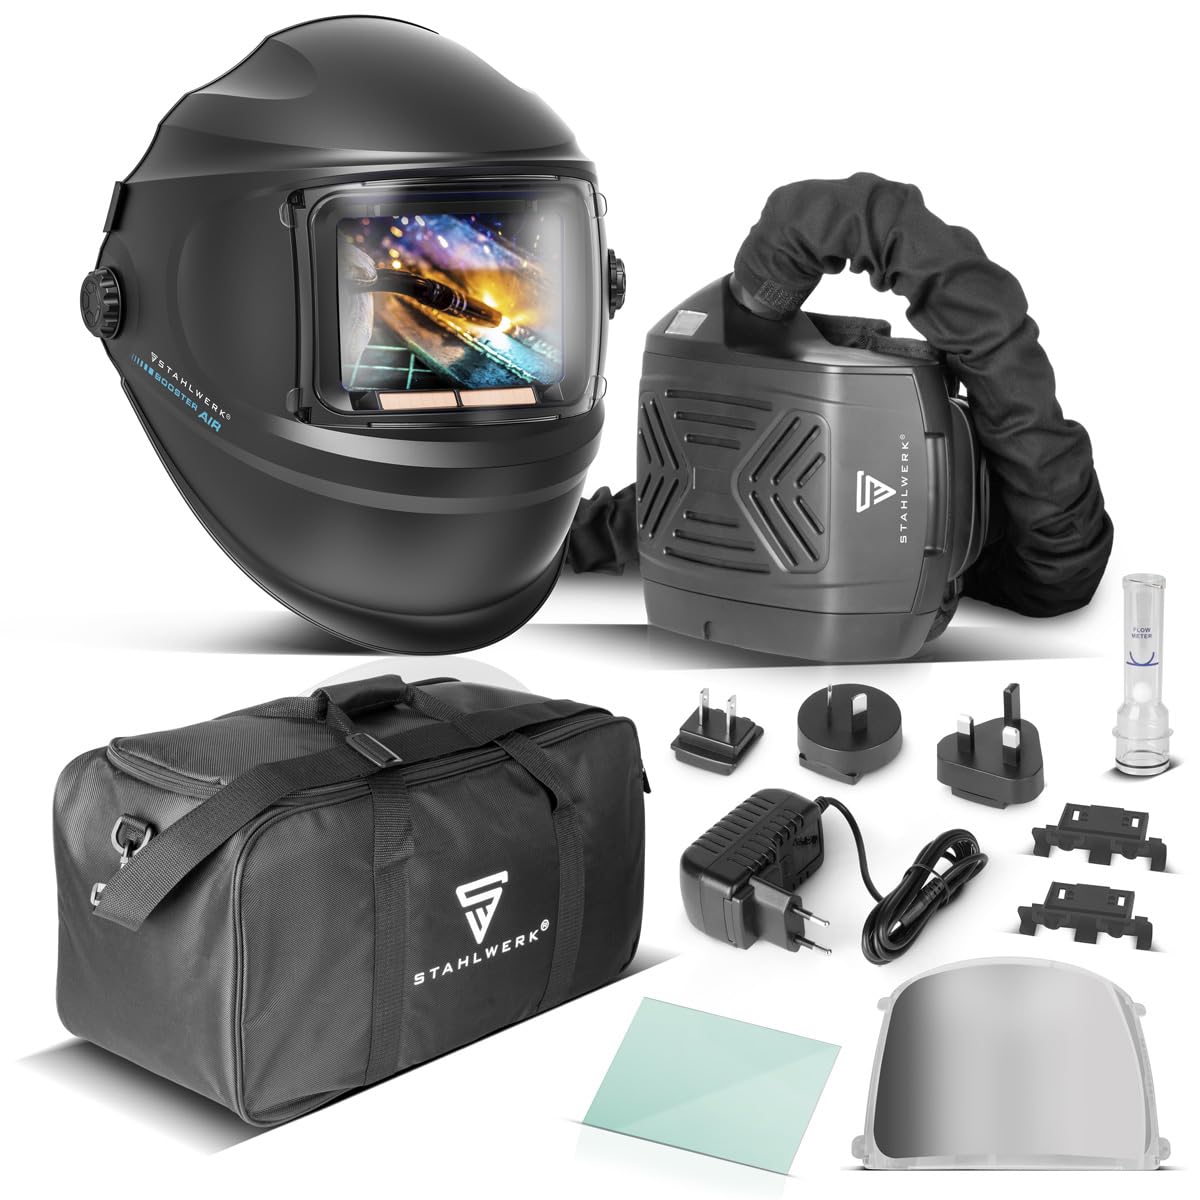
Figure 1: STAHLWERK 3-in-1 Automatic Welding Helmet Booster Air with PAPR unit and carry bag.
1.2 Intended Use
This welding helmet is intended for professional and DIY use in welding (MIG/MAG, TIG, MMA), plasma cutting, and grinding operations. It is not suitable for laser welding or oxy-acetylene welding/cutting applications.
2. Safety Instructions
Always prioritize safety when working with welding equipment. Failure to follow these instructions may result in serious injury or death.
- Eye Protection: The automatic darkening filter protects against harmful UV/IR radiation. Always ensure the filter is functioning correctly before use. Never look directly at the welding arc without proper eye protection.
- Respiratory Protection: The integrated PAPR system provides filtered air. Ensure the P3 particle filter is correctly installed and not clogged. Replace filters regularly as per maintenance guidelines.
- Head and Face Protection: The helmet protects against sparks, spatter, and heat. Ensure the helmet is properly fitted and free from damage.
- Ventilation: Even with the PAPR system, ensure adequate general ventilation in the work area to disperse welding fumes.
- Maintenance: Regularly inspect the helmet, filter cassette, and PAPR unit for damage. Do not use damaged equipment.
- Electrical Safety: Keep the PAPR unit and charging cables away from water and heat sources.
3. Product Features
The STAHLWERK Booster Air welding helmet is equipped with several advanced features for optimal performance and user comfort:
- Highest Safety Level: Premium 3-in-1 automatic welding helmet with integrated PAPR respiratory protection system and P3 particle filter (TH3 P R SL protection class) for maximum safety.
- True Colour View: Optical class 1/1/1/2 and True Colour filter cartridge ensure optimal vision and excellent real-color reproduction.
- Rapid Darkening: Four independent sensors provide automatic darkening as soon as the electric arc ignites. Ideal for welding, plasma cutting, grinding, and cutting.
- Integrated Work Memory: Allows saving preferred settings for quick recall.
- Comfortable Fit: Designed for comfort, suitable for wearing over respiratory masks or glasses.
- LCD Filter Cassette: Monochrome LCD filter cassette with a wide field of view (116 x 81 mm).
- High-Quality Headband: Features numerous adjustment possibilities for an optimal and secure fit.

Figure 2: Key features of the welding helmet.

Figure 3: True Colour technology for excellent real-color rendering.
4. Setup
4.1 Helmet Assembly and Headband Adjustment
- Unpack the helmet and headband components.
- Attach the headband to the helmet using the provided mounting points. Ensure it is securely fastened.
- Adjust the headband for a comfortable and secure fit on your head. Use the top strap and rear knob for circumference and height adjustments.

Figure 4: Headband adjustment points.
4.2 PAPR Unit Setup
- Filter Installation: Open the filter compartment on the PAPR unit. Insert the P3 particle filter, ensuring it is correctly seated and sealed. Close the compartment securely.
- Battery Charging: Before first use, fully charge the PAPR unit's battery using the provided charger. The charging indicator will show the status.
- Hose Connection: Connect one end of the air hose to the PAPR unit and the other end to the air inlet on the welding helmet. Ensure both connections are firm and airtight.

Figure 5: PAPR filter layers.

Figure 6: Connecting the air hose.
4.3 Pre-Use Check
- Verify all connections are secure.
- Check the battery level of the PAPR unit.
- Ensure the helmet's outer and inner protective lenses are clean and free from scratches.
- Perform a darkening test: Briefly expose the helmet's sensors to a bright light source (not the welding arc) to confirm the filter darkens.
5. Operating Instructions
5.1 Powering On/Off
- Helmet: The automatic darkening filter is typically solar-powered with battery backup and activates automatically when exposed to light.
- PAPR Unit: Press the power button on the PAPR unit to turn it on. The unit will start supplying filtered air to the helmet. Press again to turn off.
5.2 Adjusting Shade Levels and Modes
The helmet features a control knob for adjusting various settings:

Figure 7: Control knob for mode and shade adjustment.
- WELD Mode: For general welding applications. Adjust the shade level (DIN) according to the welding process and current.
- CUT Mode: Optimized for plasma cutting. Select appropriate shade.
- GRIND Mode: For grinding operations. The filter remains in a light state (shade DIN 3-4) to provide eye protection from debris without darkening.
- DARK Mode: Allows manual selection of a fixed dark shade.
- TACK Mode: For tack welding or spot welding, providing specific darkening characteristics.
Refer to the shade guide table (usually found on the helmet or in a separate quick guide) to select the appropriate shade level for your specific welding process and amperage.
5.3 Sensitivity and Delay Adjustment
- Sensitivity: Adjusts how sensitive the sensors are to the welding arc. Higher sensitivity is useful for low-amperage TIG welding.
- Delay: Controls the time the filter remains dark after the arc extinguishes. A longer delay prevents eye strain from residual glow or quick re-ignition.
5.4 Wearing the Helmet and PAPR Unit
- Place the helmet on your head and adjust the headband for a snug, comfortable fit.
- Wear the PAPR unit on your back or hip using the provided belt/harness. Ensure the air hose is not kinked and allows free movement.

Figure 8: Proper wearing of the helmet and PAPR unit.
6. Maintenance
6.1 Cleaning
- Helmet Shell: Clean with a soft cloth and mild soap solution. Avoid harsh chemicals or solvents.
- Protective Lenses: Wipe outer and inner protective lenses with a soft, lint-free cloth. Replace if scratched or damaged.
- Filter Cassette: Gently clean the surface of the automatic darkening filter with a soft, dry cloth. Do not immerse in liquids.
- PAPR Unit: Wipe the exterior of the PAPR unit with a damp cloth. Ensure no moisture enters the internal components.
6.2 Filter Replacement
The P3 particle filter in the PAPR unit must be replaced regularly, depending on usage and working environment. A clogged filter will reduce airflow and filtration efficiency.
- Turn off the PAPR unit.
- Open the filter compartment.
- Remove the old filter and dispose of it according to local regulations.
- Insert a new, genuine STAHLWERK P3 particle filter, ensuring it is correctly seated and sealed.
- Close the filter compartment securely.
6.3 Battery Care
- Recharge the PAPR unit battery after each use or when the low battery indicator appears.
- For long-term storage, charge the battery to approximately 50% and store in a cool, dry place. Recharge every 3-6 months to maintain battery health.
7. Troubleshooting
| Problem | Possible Cause | Solution |
|---|---|---|
| Helmet filter does not darken. | Low battery in filter cassette; Sensors obstructed; Incorrect mode selected. | Replace battery (if applicable); Clean sensors; Select WELD or CUT mode. |
| PAPR unit not providing airflow. | Battery discharged; Filter clogged; Power button not pressed. | Recharge battery; Replace filter; Turn on PAPR unit. |
| Poor visibility through the filter. | Protective lenses dirty or scratched; Incorrect shade setting. | Clean or replace protective lenses; Adjust shade level. |
| Air hose detaches easily. | Hose not fully connected; Connection mechanism damaged. | Ensure firm connection; Inspect connection points for damage. |
8. Specifications
| Feature | Detail |
|---|---|
| Manufacturer | STAHLWERK |
| Model Number | 6795 |
| Product Dimensions (L x W x H) | 20 x 18 x 8 cm |
| Weight | 1.7 Kilograms |
| Size | BOOSTER AIR -SET |
| Color | Booster Air |
| Optical Class | 1/1/1/2 (according to DIN EN 379) |
| Respiratory Protection Class | TH3 P R SL (P3 particle filter) |
| Field of View | 116 x 81 mm |
| Sensors | 4 independent sensors |
| Included Components | High-quality headband for welding helmet |

Figure 9: Product dimensions.
9. Warranty and Support
9.1 Warranty Information
This STAHLWERK product comes with a 7-year warranty in accordance with § 6 of the warranty conditions. For more detailed information regarding warranty terms and conditions, please refer to the seller's general terms and conditions or contact the seller directly.
9.2 Customer Support
For technical assistance, spare parts, or any questions regarding your STAHLWERK 3-in-1 Automatic Welding Helmet Booster Air, please contact the seller or STAHLWERK customer service. Always provide your model number (6795) and purchase date when seeking support.