1. Introduction
Thank you for choosing the ecomoment GT801 Dash Cam. This device is designed to provide comprehensive road surveillance with its dual front and rear cameras, offering high-resolution recording, advanced safety features, and smart connectivity. This manual will guide you through the setup, operation, and maintenance of your new dash cam.
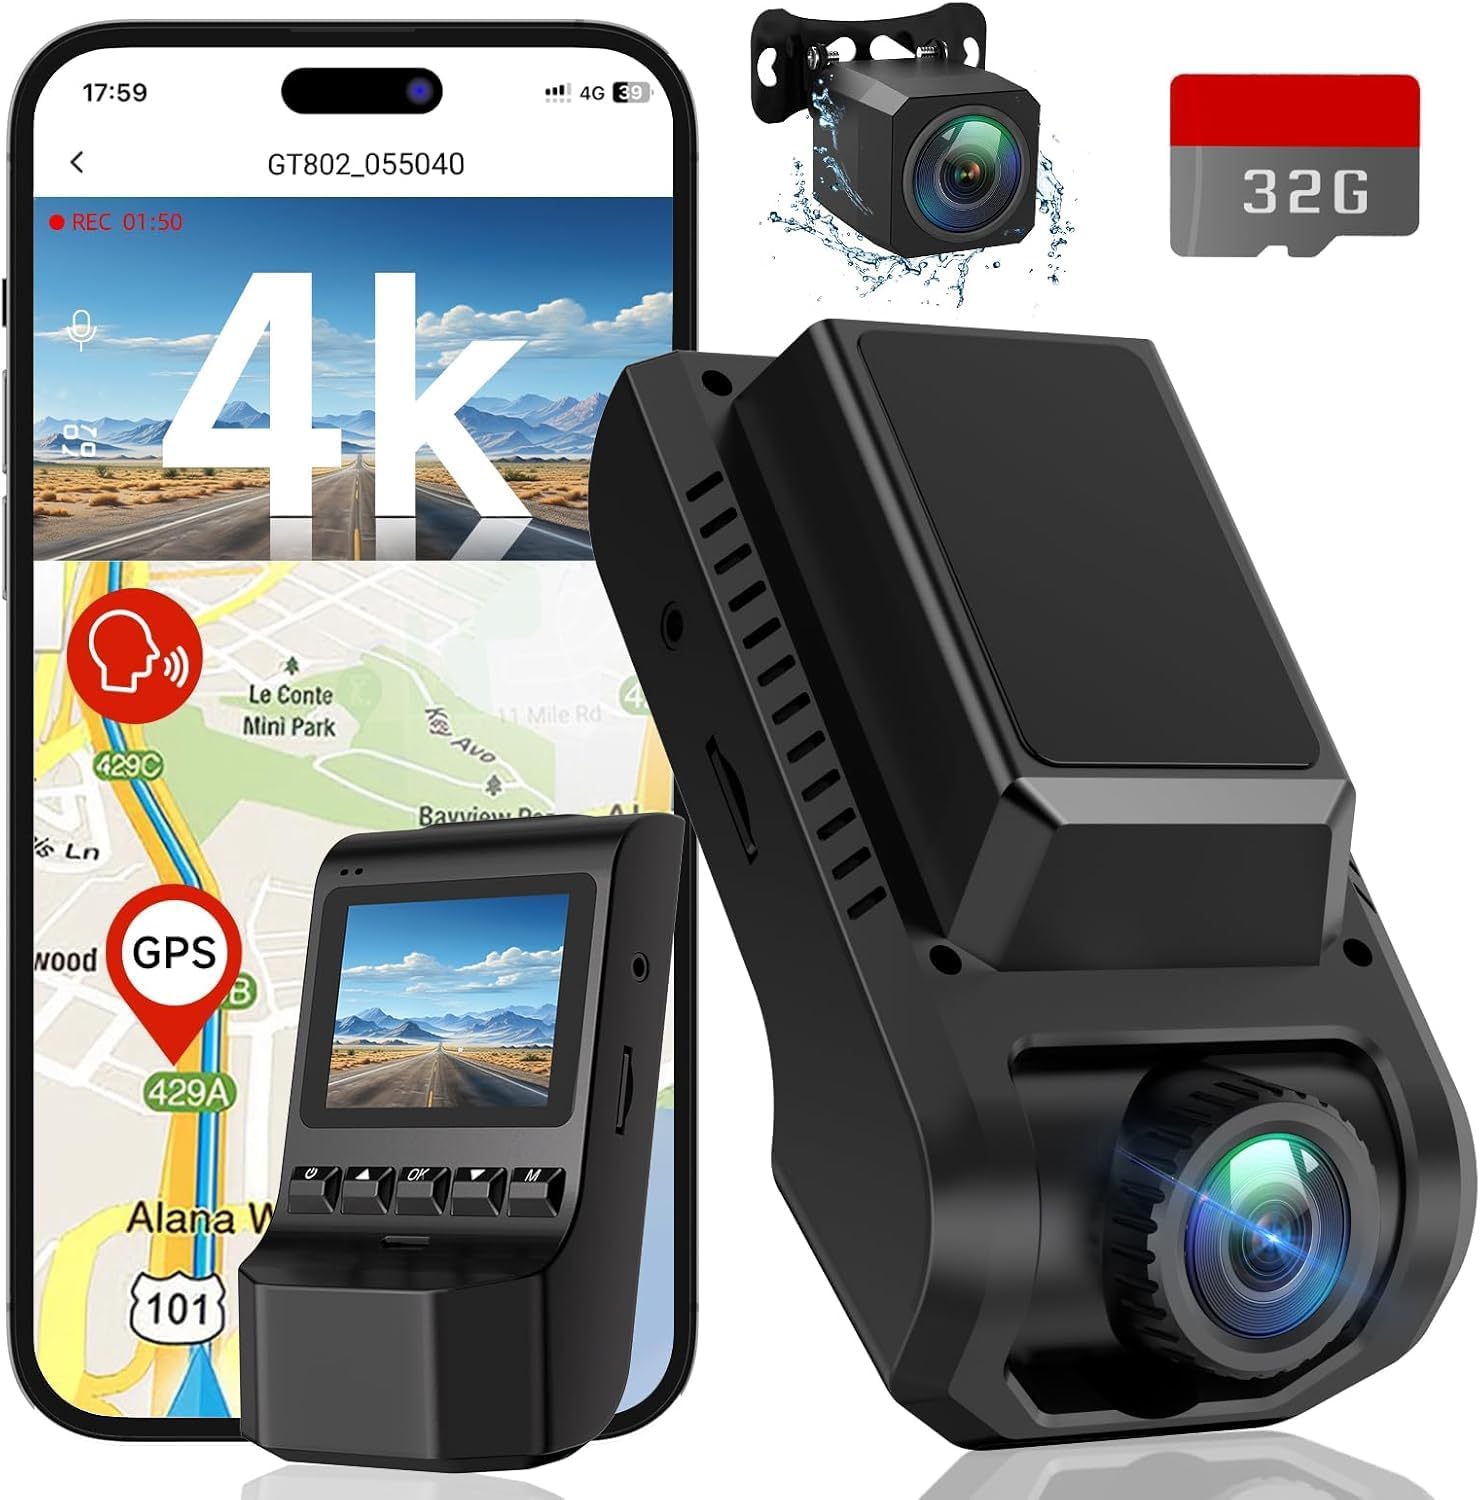
Image 1.1: ecomoment GT801 Dash Cam with its components and app interface.
2. What's in the Box
Please check the package contents to ensure all items are present:
- 1 x GT801 Dash Cam (Front Camera)
- 1 x Rear Camera (22.5ft cable)
- 1 x 32GB SD Card (pre-installed into GT801)
- 1 x Car Charger (11.5ft cable)
- 2 x Adhesive Pads
- 1 x Easy Pry Tool
- 1 x User Manual
- 1 x Installation Guide
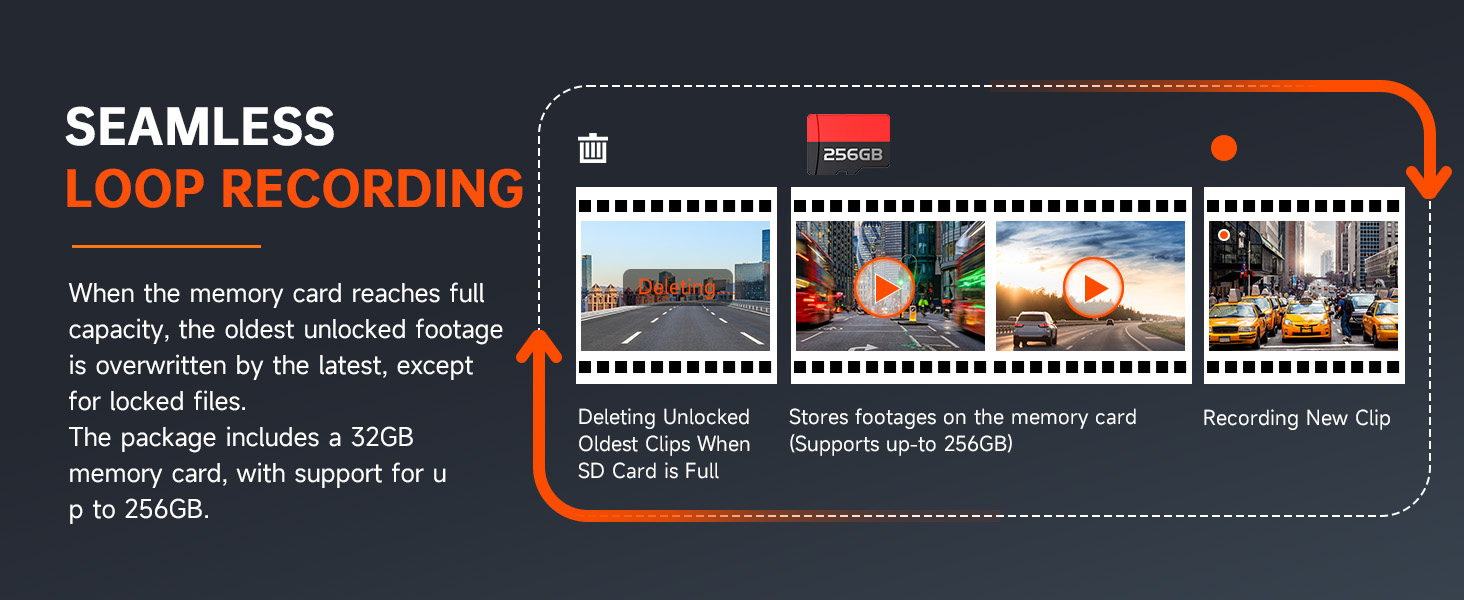
Image 2.1: Visual representation of the ecomoment GT801 Dash Cam package contents.
3. Setup & Installation
Follow these steps for proper installation of your ecomoment GT801 Dash Cam:
- Prepare the Mounting Area: Clean the windshield area where you intend to mount the front dash cam. Use one of the provided adhesive pads.
- Mount the Front Camera: Attach the front dash cam to the prepared area on your windshield, typically behind the rearview mirror to avoid obstructing your view. Ensure the lens has a clear view of the road ahead.
- Install the Rear Camera: Mount the rear camera on your rear windshield. Use the long 22.5ft cable to route it discreetly along the car's interior trim to the front dash cam. The easy pry tool can assist in tucking the cable.
- Connect Power: Plug the car charger into your vehicle's cigarette lighter socket. Connect the other end to the front dash cam's USB Type-C port.
- Insert SD Card: The 32GB SD card is pre-installed. If you need to replace it or ensure it's properly seated, gently insert it into the designated slot on the dash cam.
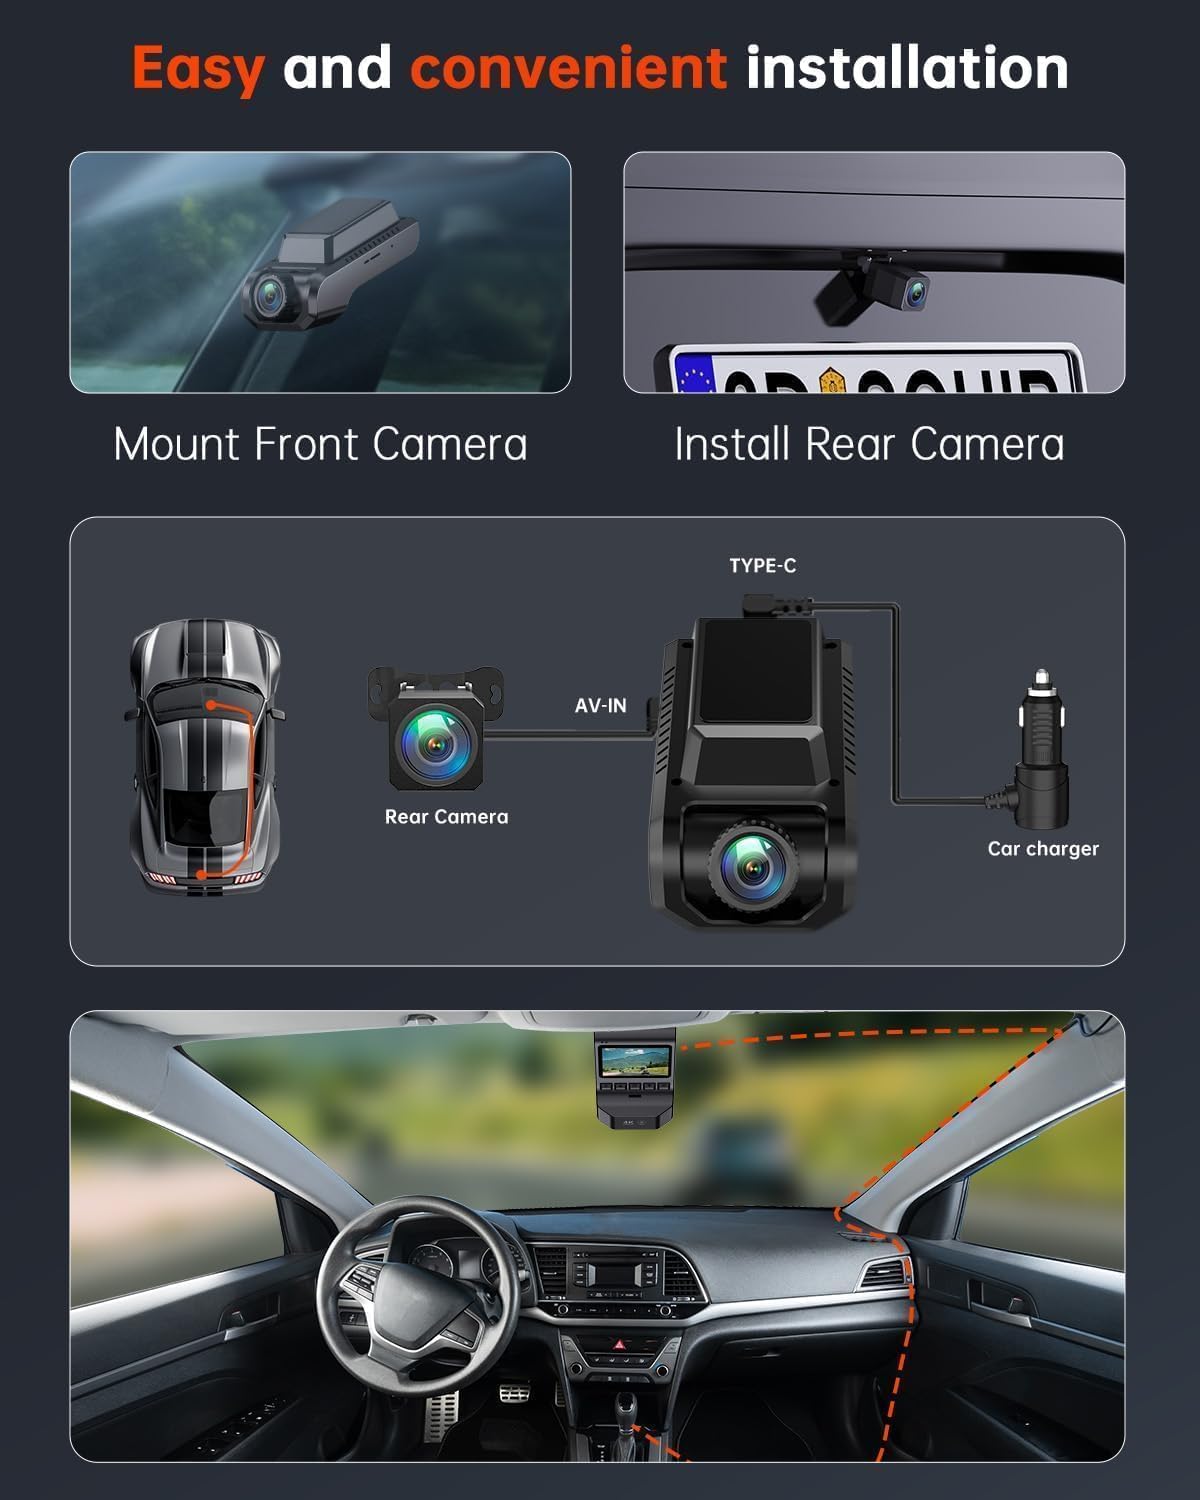
Image 3.1: Visual guide for installing the front and rear dash cameras and routing cables.

Image 3.2: Simplified installation diagram for the ecomoment GT801 Dash Cam.
Installation Video
Video 3.1: An official video from ecomoment Direct demonstrating the installation process of the GT801 Dual Dash Cam.
4. Operating Instructions
Basic Operation
The dash cam features a 2.0-inch IPS screen and physical buttons for direct control. Refer to the included Installation Guide for specific button functions.
Wi-Fi & Smart App Control
The GT801 dash cam includes built-in 2.4G Wi-Fi for seamless connection to your smartphone via the VeeCar app. This allows you to:
- View live footage from both cameras.
- Download recorded videos and photos directly to your phone.
- Adjust device settings conveniently.
- Share footage easily.
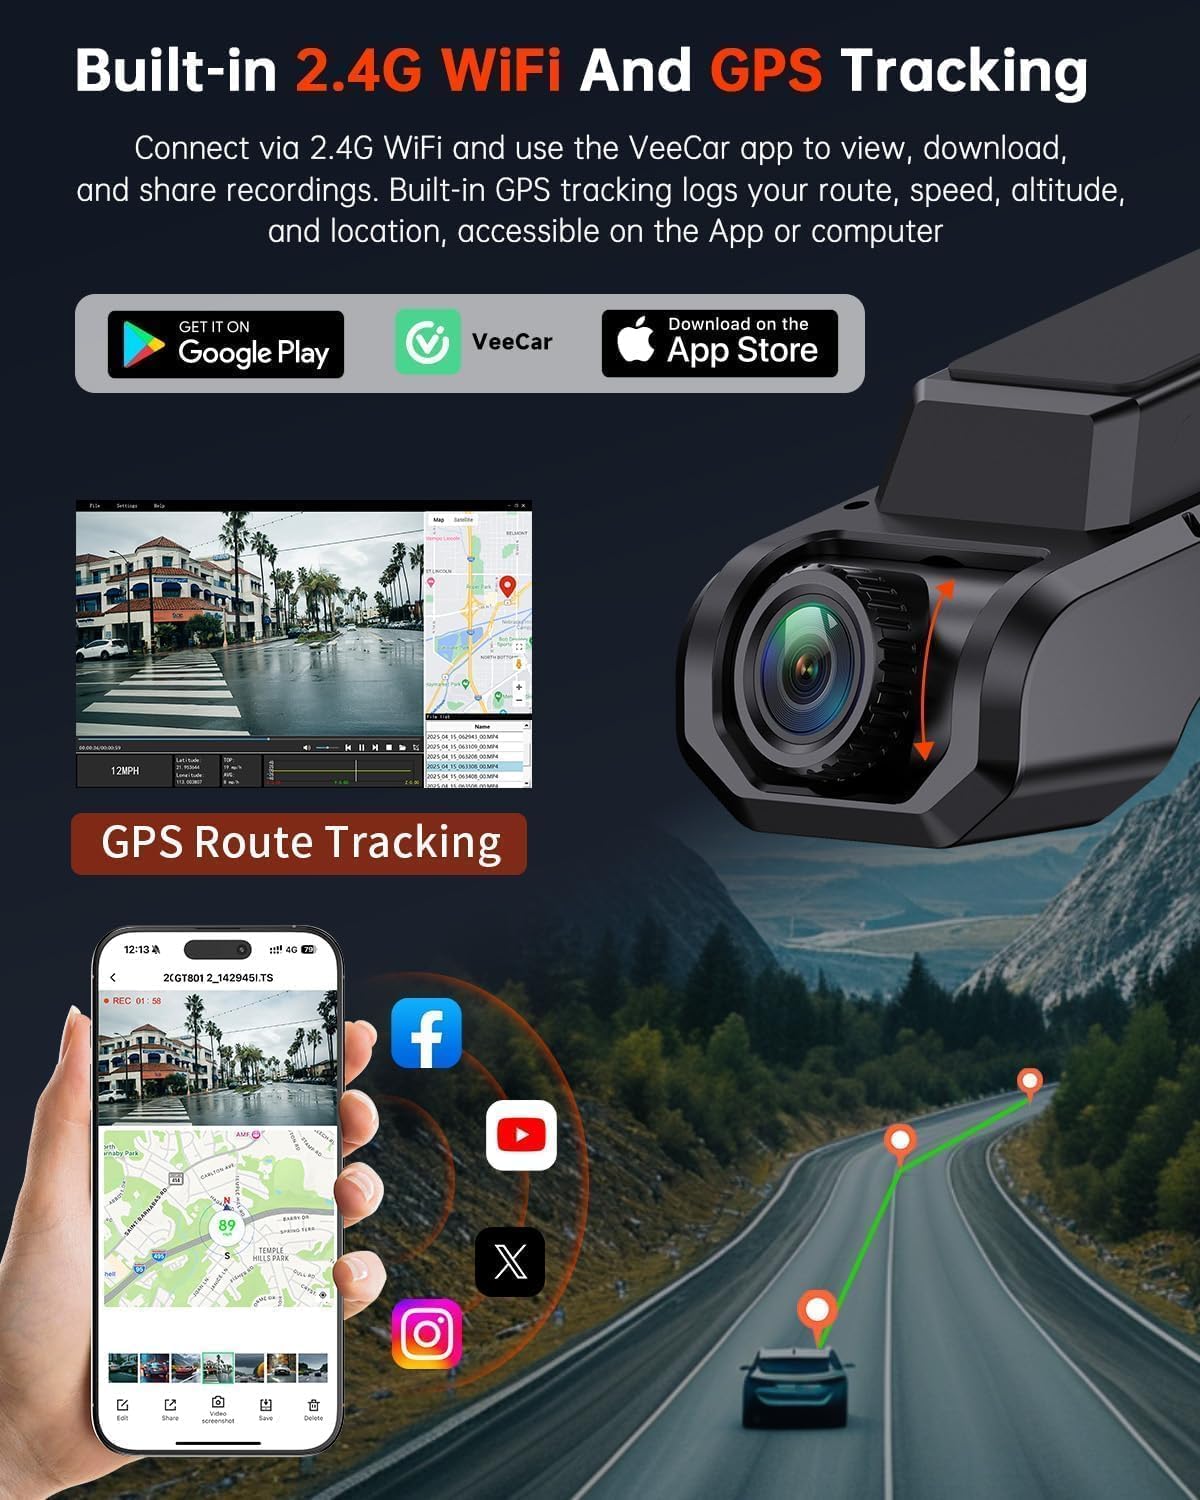
Image 4.1: The VeeCar app displaying live footage and GPS route tracking from the dash cam.

Image 4.2: The VeeCar app's interface for Wi-Fi control and footage management.
GPS Functionality
The integrated GPS module provides precise tracking of your driving routes. You can review your speed, location, and route history on computers and mobile devices, adding an extra layer of security and information.
Loop Recording
When the memory card reaches its full capacity, the loop recording feature automatically overwrites the oldest unlocked footage with new recordings. This ensures continuous recording without manual intervention. Locked files (triggered by the G-sensor) are protected from being overwritten.
G-Sensor (Gravity Sensor)
The built-in G-sensor detects sudden impacts or collisions. Upon detection, it automatically locks and saves the current video footage, preventing it from being overwritten by loop recording. This secures critical evidence in case of an incident.

Image 4.3: Automatic collision detection and video lock feature in action.
24-Hour Parking Mode
For continuous surveillance when your vehicle is parked, the 24-hour parking mode utilizes a time-lapse function. If the G-sensor detects any impact or movement, it will trigger recording. Note: A hardwire kit is required for this feature to function continuously (ASIN: B0D93KLNJR, sold separately).

Image 4.4: Overview of the 24/7 parking monitoring capabilities.
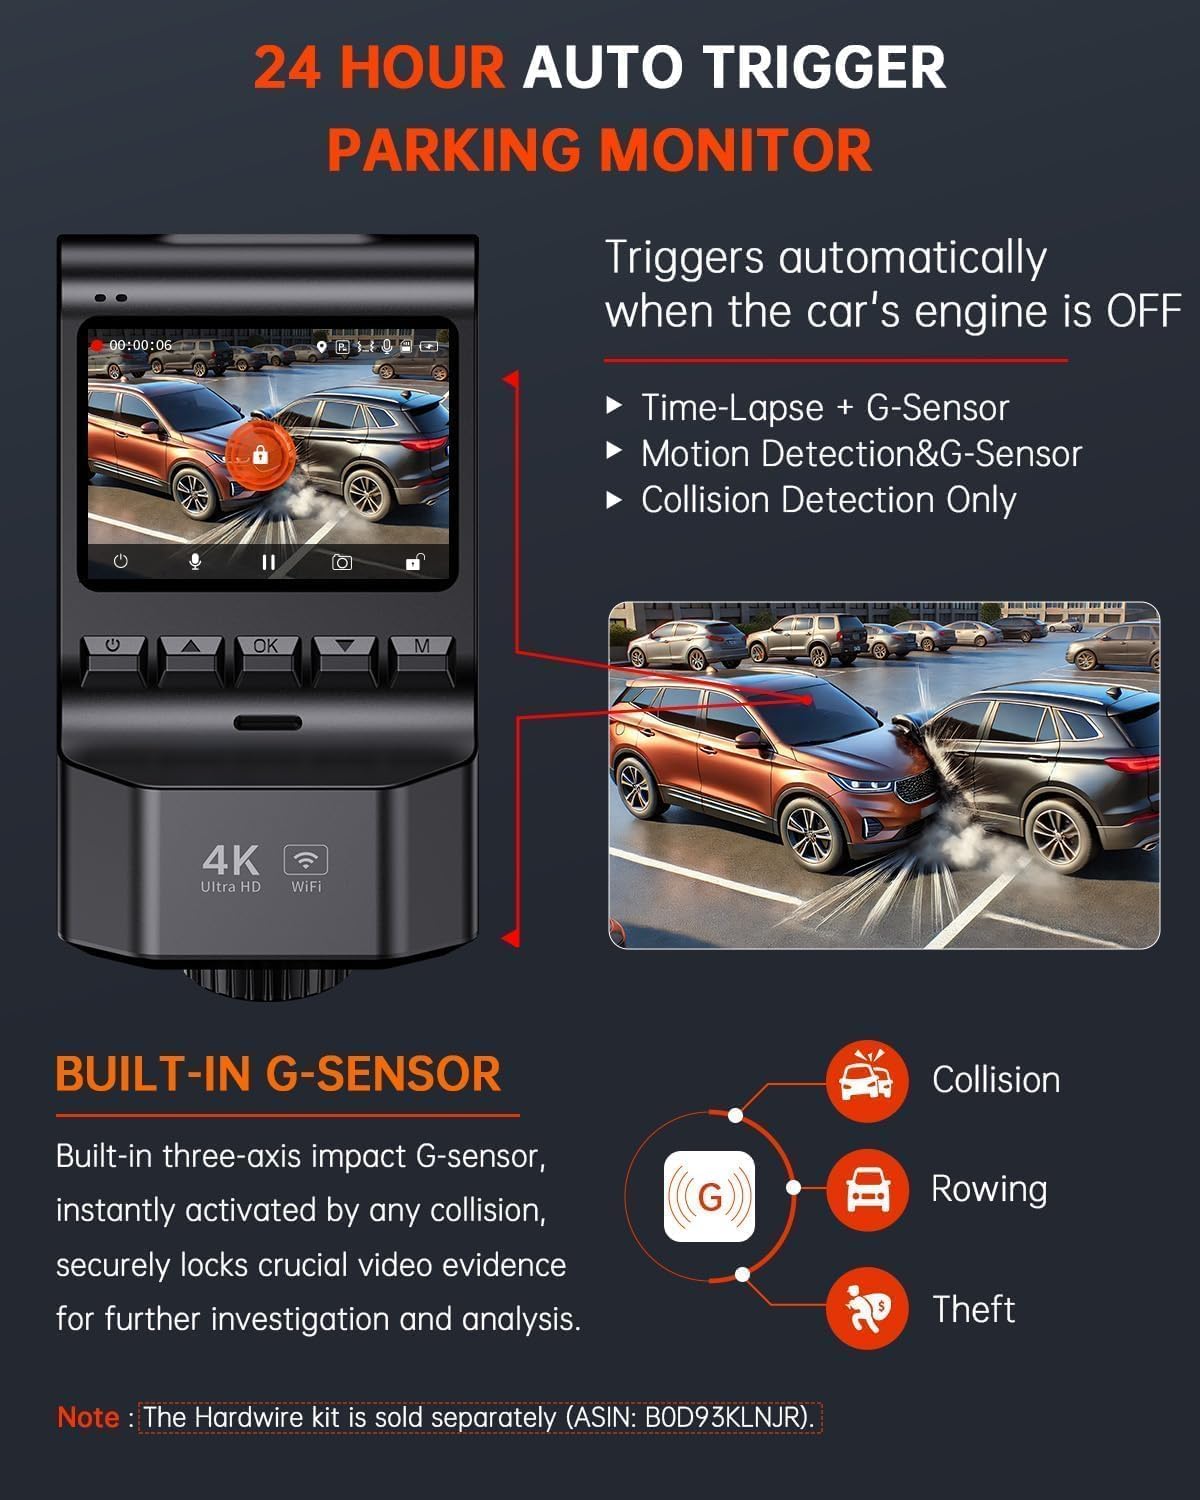
Image 4.5: Details of the 24-hour auto-trigger parking monitor.
5. Key Features
- Dual-Camera Recording: Records Ultra HD 4K (3840*2160P) from the front camera and Full HD 1080P from the rear camera simultaneously.
- Wide-Angle Lenses: Front camera with a 170° wide angle and rear camera with a 160° wide angle to minimize blind spots.
- Superior Night Vision: Equipped with a starlight night vision sensor and a 6-layer glass lens (F1.8 aperture) for clear footage in low-light conditions.
- 2.0-inch IPS Screen: Compact display for easy viewing of recordings and direct setting adjustments.
- USB Type-C Compatibility: Offers higher data transfer rates and enhanced durability.
- Included 32GB SD Card: Ready to use out of the box, supports up to 256GB.

Image 5.1: Key features of the ecomoment GT801 Dash Cam.

Image 5.2: Dual-view protection with front and rear cameras.

Image 5.3: Enhanced night vision for clear recordings in low light.
6. Maintenance
- Clean the Lenses: Regularly clean the front and rear camera lenses with a soft, lint-free cloth to ensure clear video quality.
- Format SD Card: It is recommended to format the SD card monthly to maintain optimal performance and prevent data corruption. This can usually be done through the dash cam's settings menu or the VeeCar app.
- Firmware Updates: Check the ecomoment website or VeeCar app periodically for any available firmware updates to ensure your dash cam has the latest features and bug fixes.
- Temperature Considerations: Avoid exposing the dash cam to extreme temperatures for prolonged periods, as this can affect its lifespan and performance.
7. Troubleshooting
| Problem | Possible Solution |
|---|---|
| Dash cam does not power on. | Check the car charger connection and ensure the vehicle's power outlet is functioning. Try a different USB cable or power source. |
| Video footage is blurry or unclear. | Clean the camera lenses. Ensure the protective film has been removed from the lenses. Check resolution settings in the menu or app. |
| SD card error or recording issues. | Format the SD card. Ensure the SD card is properly inserted. Replace the SD card if the issue persists (supports up to 256GB). |
| Wi-Fi connection issues. | Ensure the VeeCar app is installed and updated. Restart the dash cam and your smartphone. Check Wi-Fi settings on both devices. |
| GPS not tracking. | Ensure the dash cam has a clear view of the sky. Check GPS settings in the menu or app. Allow a few minutes for GPS signal acquisition. |
| Parking mode not working. | Verify that a hardwire kit is installed and correctly connected, as it is required for continuous 24-hour parking mode. Check parking mode settings. |
8. Specifications
- Product Dimensions: 4 x 1.6 x 2.2 inches
- Item Weight: 3.52 ounces
- Item Model Number: GT801
- Connectivity Technology: Wi-Fi
- Special Features: 24H Parking Monitor, App Control, Built-In GPS & UHD 2.0” Display, Built-In WiFi, G-Sensor & Loop Recording, Night Vision
- Video Capture Resolution: 2160p (Front), 1080p (Rear)
- Mounting Type: Windshield Mount
- Field Of View: 170 Degrees (Front), 160 Degrees (Rear)
- Control Method: App, Physical Buttons
- Included Components: GT801 Dash Cam, Rear Camera, 32G SD Card, Car Charger, Adhesive Pads, Easy Pry Tool, User Manual, Installation Guide
9. Warranty & Support
ecomoment offers a 1-year warranty on the GT801 Dash Cam. Additionally, lifetime professional technical support is available. For any assistance, questions, or warranty claims, please feel free to contact ecomoment customer support.
You may also activate an extended warranty (up to 36 months) by visiting the ecomoment website or scanning the QR code provided in the packaging within the initial 15 days of receipt.


