1. Product Overview
The ARLBA 3206256 Refrigerator Freezer Door Gasket is a replacement seal designed to restore the efficiency and proper function of your refrigerator or freezer door. This gasket is engineered to address common issues such as torn or worn seals, dirty gaskets, door sweating, leaking, and condensation or frost buildup inside the appliance. It features upgraded EPDM rubber construction with thickened magnetic strips for enhanced sealing performance and energy efficiency.
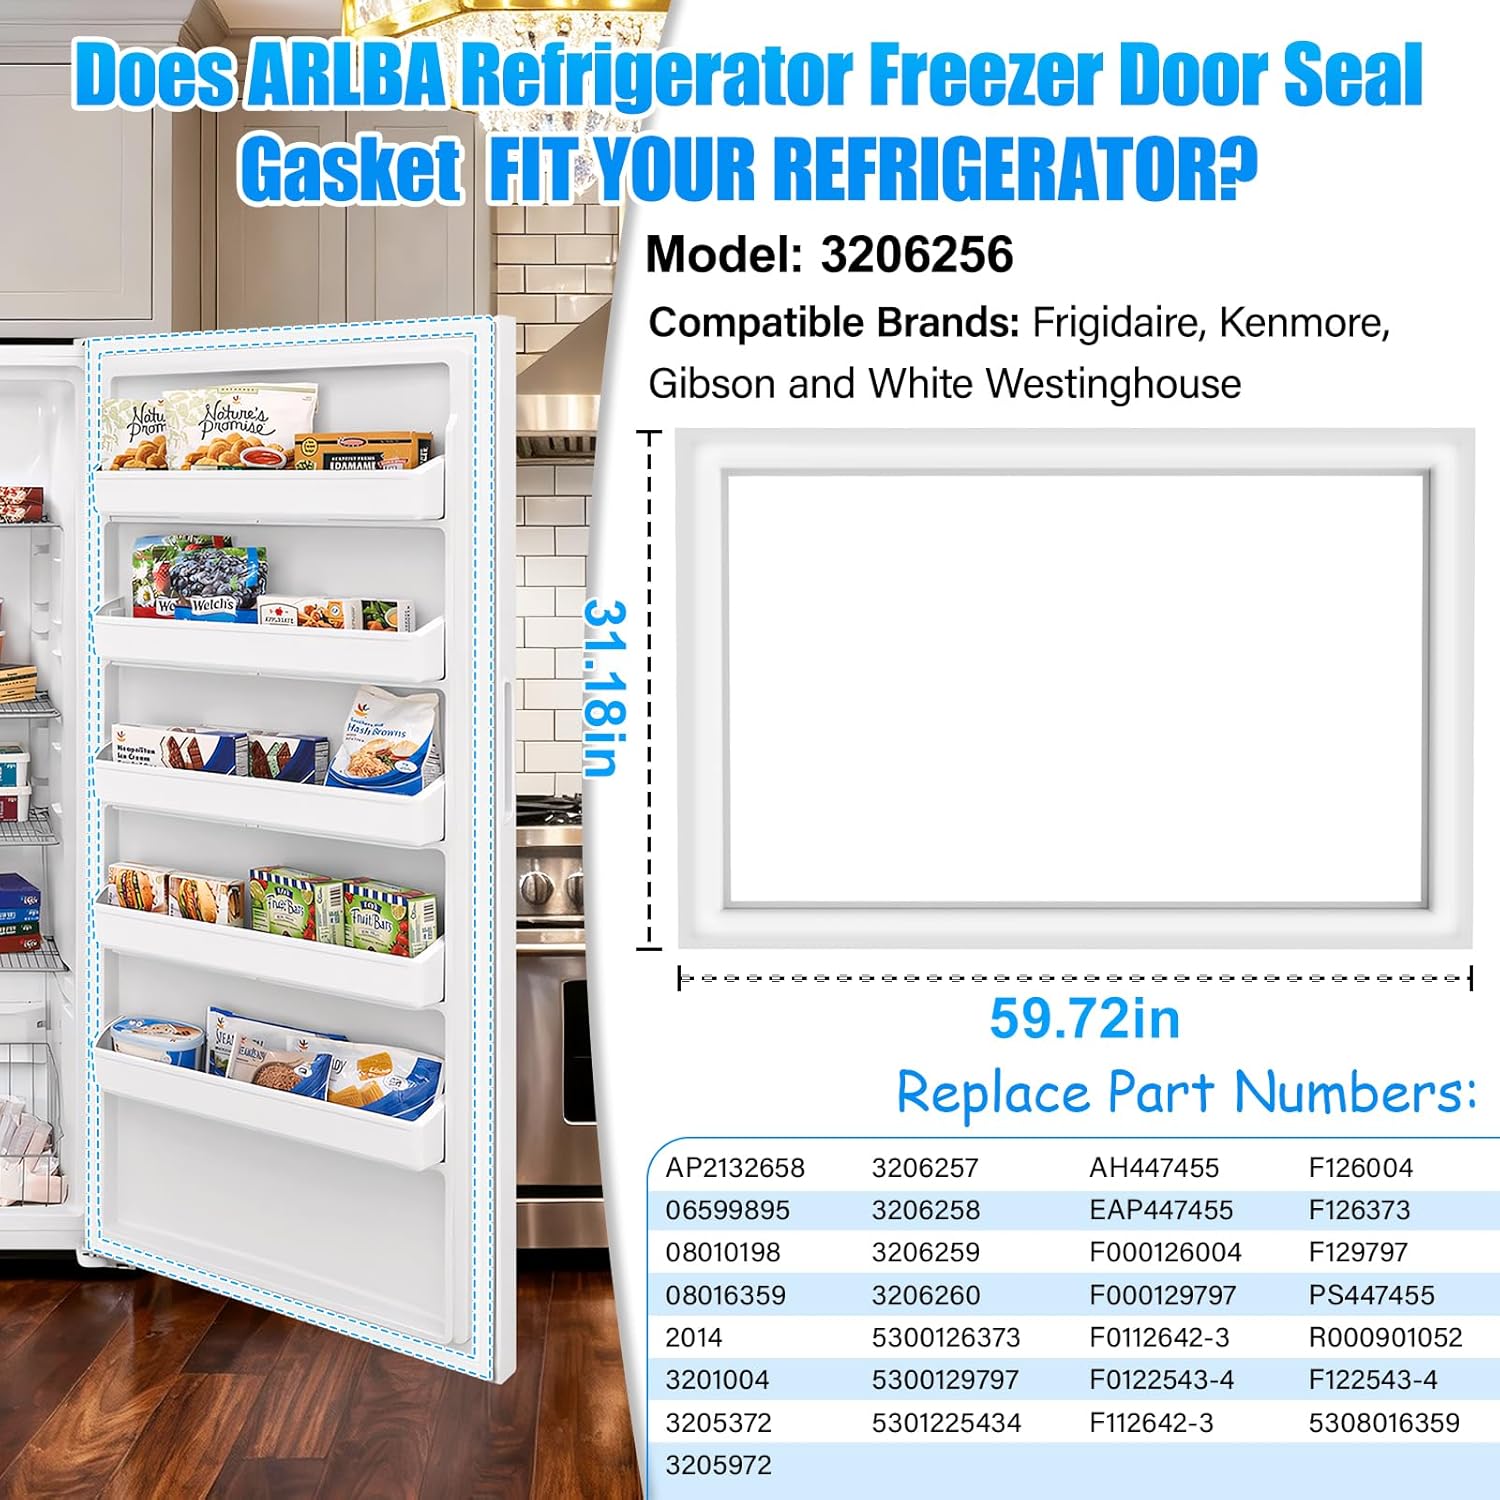
Image 1.1: ARLBA 3206256 Refrigerator Freezer Door Gasket showing its dimensions (59.72" x 31.18") and compatible part numbers. This image helps verify the correct size for your appliance.

Image 1.2: This diagram highlights the key features of the ARLBA 3206256 gasket, such as its high-quality EPDM rubber, 1600-degree Fahrenheit precision welding, cold resistance, high elasticity, and built-in thickened magnetic strips for strong suction and sealing.
2. Compatibility
The ARLBA 3206256 Refrigerator Freezer Door Gasket is compatible with various refrigerator and freezer models from brands including Frigidaire, Kenmore, Gibson, and White Westinghouse.
2.1. Replaces Part Numbers
This gasket replaces the following part numbers:
- 3206256, PD00048201, AP2132658, 06599895, 08010198, 08016359, 2014, 3201004, 3205372, 3205972, 3206257, 3206258, 3206259, 3206260, 5300126373, 5300129797, 5301225434, 5308016359, AH447455, EAP447455, F000126004, F000129797, F0112642-3, F0122543-4, F112642-3, F122543-4, F126004, F126373, F129797, PS447455, R000901052.
2.2. Compatible Appliance Models
Compatible with (but not limited to) the following refrigerator and freezer models:
- MFU17M3BW1, UFP19NL4, FU218JRW3, GFU17M4AW0, GFU17M4AW1, GFU17M4AW2, GFU17M4AW4, F82D179BW0, F82D179CW0, FFU17D9AW1, FFU17D9AW2, FFU17D9AW3, FFU17D9AW4, FFU17D9CW1, FFU17M2AW1, FFU17M2AW2, FFU17M6AW1, FFU17M6AW2, FFU17M6AW3, FFU17M6AW4, FFU17M8CW0, FFU17M8CW1, 2538293910, 2538293911, 2538293980, 2538293981, 2539209380, 2539209381, 2539209382, 2539209383, 2539218710, 2539218711, 2539218712, FU196ERW2, FU196ERW3, FU196JRW3, FU196LRW1, FU196LRW2, FU196LRW3, FU196LRW4, FU196LRW5, FU196LRW6, FU199ERD1, FU199ERD2, FU199ERW1, FU199ERW2, FU199JRD2, FU199JRW2, FU199JRW4, FU199LRW1, FU199LRW2, FU199LRW3, FU199LRW4, FU199LRW5, FV19F5WSFD, FV19F5WSFE, FV19F5WVFA, FV19F5WVFB, FV19F5WXFA, FV19F5WXFB, FV19F5WXFC, FV19F5WXFD, FV19F5WXFE, FV19M2WVFA, FV19M2WVFB, FV19M2WVFC, FV19M2WXFA.
Important Note: Always check the model number and size of your existing gasket carefully before purchasing. Many door gaskets may appear similar but have different specifications. Order based on the model and size, not solely on appearance.

Image 2.1: A detailed list of compatible refrigerator and freezer models, along with replacement part numbers, to ensure proper fitment.
3. Installation Guide
3.1. Preparation Before Installation
- Safety First:
- Unplug the refrigerator from the power outlet.
- Remove any food or shelves from the door to make it lighter and easier to work on.
- Tools You Will Need:
- Hair Dryer: Essential for softening the new gasket.
- Screwdrivers (Flat-head and Phillips): For removing the door liner, if necessary.
- Bucket of Hot Water (Optional, effective alternative to a hair dryer for softening).
- Work Gloves: To protect your hands during installation.
- Clean Cloth: For cleaning the gasket channel.
- Prepare the New Gasket:
New gaskets are often stiff from being packaged. Softening the gasket makes it more flexible and easier to install.
- Method 1 (Recommended): Use a hair dryer on a low setting to gently warm and soften the gasket.
- Method 2 (Alternative): Soak the gasket in hot water (60-70 degrees Celsius or 140-158 degrees Fahrenheit) in a tub for 10 minutes to achieve a perfect fit. Alternatively, lay it in the sun for an hour or so to recover its shape.
3.2. Step-by-Step Installation Guide
- Remove the Old Gasket: Gently pry the edge of the old gasket from the door liner's channel and remove it entirely. Some models may have screws holding the seal in place; remove these first.
- Clean the Gasket Channel: Thoroughly clean and dry the channel where the new gasket will sit. Remove any debris, old adhesive, or dirt with a clean cloth.
- Install the New Gasket: Begin by installing the four corners of the new gasket first. Then, press the middle sections back and forth to ensure it is seated snugly and evenly.
- Work Towards the Sides and Bottom: Continue pressing the gasket into the channel, working from the center towards the hinges on both sides, and then along the bottom section. Use a hair dryer on stubborn sections to make them more flexible.
- Close the Door and Check the Seal: Close the refrigerator door. The gasket should create a tight, even seal all around. You can test the seal by closing the door on a piece of paper; you should feel some resistance when you pull it out.
- Fix the Refrigerator Door with Tape: After installation, use a hair dryer to heat up the sealing strip and blow it for a while to help it conform. Then, fix the refrigerator door with tape for 12 to 24 hours to allow the gasket to fully set and create a strong seal before powering the appliance back on.

Image 3.1: A visual guide detailing the preparation and step-by-step process for installing the ARLBA 3206256 refrigerator freezer door gasket.
4. Operating Instructions
Once the new gasket is installed and has had sufficient time to set (12-24 hours), you can plug your refrigerator or freezer back into the power outlet.
- Door Closure: Ensure the door closes completely and the magnetic strips engage firmly, creating a strong seal.
- Seal Check: Periodically check the seal by attempting to pull a piece of paper or a thin card from between the door and the appliance frame when the door is closed. There should be noticeable resistance, indicating a good seal.
- Temperature Stability: A properly sealed door will help maintain consistent internal temperatures, contributing to food freshness and energy efficiency.
5. Maintenance
Proper maintenance of your refrigerator freezer door gasket will extend its lifespan and ensure optimal performance.
- Regular Cleaning: Clean the gasket regularly with a mild soap and water solution and a soft cloth. Avoid harsh chemicals or abrasive cleaners, as these can damage the rubber. Ensure the gasket is dry after cleaning.
- Inspect for Damage: Periodically inspect the gasket for any signs of wear, tears, cracks, or hardening. Early detection of damage can prevent larger issues.
- Avoid Obstructions: Ensure that food items or containers do not obstruct the gasket when the door is closed, as this can compromise the seal and lead to damage over time.
6. Troubleshooting
If you experience issues after installing the new gasket, consider the following troubleshooting steps:
| Problem | Possible Cause | Solution |
|---|---|---|
| Door not sealing properly / Air leaks | Gasket not fully seated; Gasket still stiff; Obstruction in door path. | Re-check installation, ensuring gasket is fully pressed into the channel. Re-apply heat with a hair dryer to soften and conform the gasket. Ensure no items are blocking the door. |
| Condensation or frost buildup inside | Poor seal allowing warm, moist air to enter. | Verify the gasket is properly installed and sealing tightly. Perform the paper test (Section 4. Operating Instructions). Ensure the door is not left open for extended periods. |
| Gasket appears wavy or not flat | Gasket was not sufficiently softened before installation or did not set properly. | Remove the gasket, re-soften it thoroughly (using hot water or hair dryer), and reinstall, paying close attention to pressing it evenly. Use tape to hold the door shut for 12-24 hours after re-installation. |

Image 6.1: Visual examples of common issues that indicate a need for gasket replacement, including broken/torn seals, dirty seals, door sweating/leaking, and condensation/frost buildup.
7. Specifications
| Attribute | Detail |
|---|---|
| Manufacturer | ARLBA |
| Part Number | PD00048201 |
| Item Model Number | 3206256 |
| Dimensions | 59.72 inches x 31.18 inches |
| Item Weight | 2.9 pounds |
| Product Dimensions (Package) | 14 x 9 x 5 inches |
| Color | White |
| Material | High quality EPDM rubber |
| Item Package Quantity | 1 |
8. Warranty Information
This ARLBA 3206256 Refrigerator Freezer Door Gasket comes with a 2-year warranty. Please retain your proof of purchase for any warranty claims. For specific terms and conditions, refer to the product packaging or contact customer support.
9. Customer Support
If you encounter any issues not covered in this manual, or if you require further assistance with installation or troubleshooting, please contact ARLBA customer support. Refer to the product packaging or the retailer's website for contact details.