
1. Introduction
Thank you for choosing the ANDELI MIG-135PLUS 4-in-1 Multi-Process Welder. This manual provides essential information for the safe and efficient operation, maintenance, and troubleshooting of your welding machine. Please read it thoroughly before use and keep it for future reference.
1.1 Safety Precautions
Welding can be dangerous. Always follow safety guidelines to prevent injury or damage. This machine is designed for use by trained individuals or under supervision.
- Always wear appropriate personal protective equipment (PPE), including a welding helmet with suitable shade, welding gloves, protective clothing, and safety shoes.
- Ensure adequate ventilation in the work area to disperse welding fumes.
- Protect bystanders from arc rays and sparks. Use welding screens if necessary.
- Do not weld near flammable materials or in explosive atmospheres.
- Ensure the welding machine is properly grounded.
- Never touch live electrical parts.
- Disconnect power before performing any maintenance or changing accessories.
1.2 Package Contents
Verify that all items are present upon unpacking:
- ANDELI MIG-135PLUS Welder Unit
- Flux-cored wire spool (gasless)
- MIG Welding Torch
- Electrode Holder (for MMA welding)
- Ground Clamp
- Auto-darkening Welding Helmet (convertible to goggles)
- Professional Leather Welding Gloves

Figure 1: ANDELI MIG-135PLUS Welder and included accessories.
2. Setup
2.1 Power Connection
- The MIG-135PLUS operates on a 220V/230V power supply. Ensure your power source matches this requirement.
- Connect the power cord securely to a grounded electrical outlet.
2.2 Wire Installation (Flux-Cored MIG)
- Open the wire feed compartment.
- Place the flux-cored wire spool onto the spindle, ensuring it rotates freely.
- Thread the wire through the guide tube and into the drive rollers.
- Close the drive roller tension arm and adjust the tension. The wire should feed smoothly without slipping or deforming.
- Feed the wire through the MIG torch liner until it exits the contact tip.
- The welder supports 0.030'' (0.8mm) and 0.035'' (0.9mm) flux-cored wires.
2.3 Accessory Connection
- MIG Torch: Connect the MIG torch cable to the corresponding port on the front panel.
- Ground Clamp: Connect the ground clamp cable to the negative (-) terminal. Attach the clamp securely to the workpiece, ensuring good electrical contact.
- Electrode Holder (for MMA): Connect the electrode holder cable to the positive (+) terminal for MMA welding.
- Lift TIG Torch (Optional): If using a Lift TIG torch (not included), connect it to the appropriate port as per its instructions.

Figure 2: Front panel connections of the MIG-135PLUS welder.
3. Operating Modes
3.1 4-in-1 Welding Functions
The MIG-135PLUS offers four versatile welding processes:
- Gasless Flux-Cored MIG: Ideal for outdoor use and welding mild steel without the need for shielding gas. Includes a pulsed function for smoother, more stable arcs and finer weld beads.
- Standard Gasless MIG: Basic flux-cored MIG welding.
- Lift TIG: For precise welding of various metals (requires a separate Lift TIG torch, not included).
- MMA (Stick Welding): For welding with coated electrodes, suitable for thicker materials. Features adjustable Hot Start and Arc Force.

Figure 3: Overview of the 4-in-1 welding functions.
3.2 Control Panel and Display
The welder features a precise 4.1-inch LED digital display that provides real-time welding data such as voltage, current, and wire feed speed. This display is protected by a transparent cover for durability against impacts and splashes.
3.3 Welding Mode Selection (SYNERGIC vs. Manual)
- SYNERGIC Mode (Automatic): Recommended for beginners. The system automatically adjusts voltage based on the wire feed speed, simplifying parameter setup.
- Manual Mode: Recommended for experienced users. Allows separate and precise control over welding current and voltage for fine-tuning.
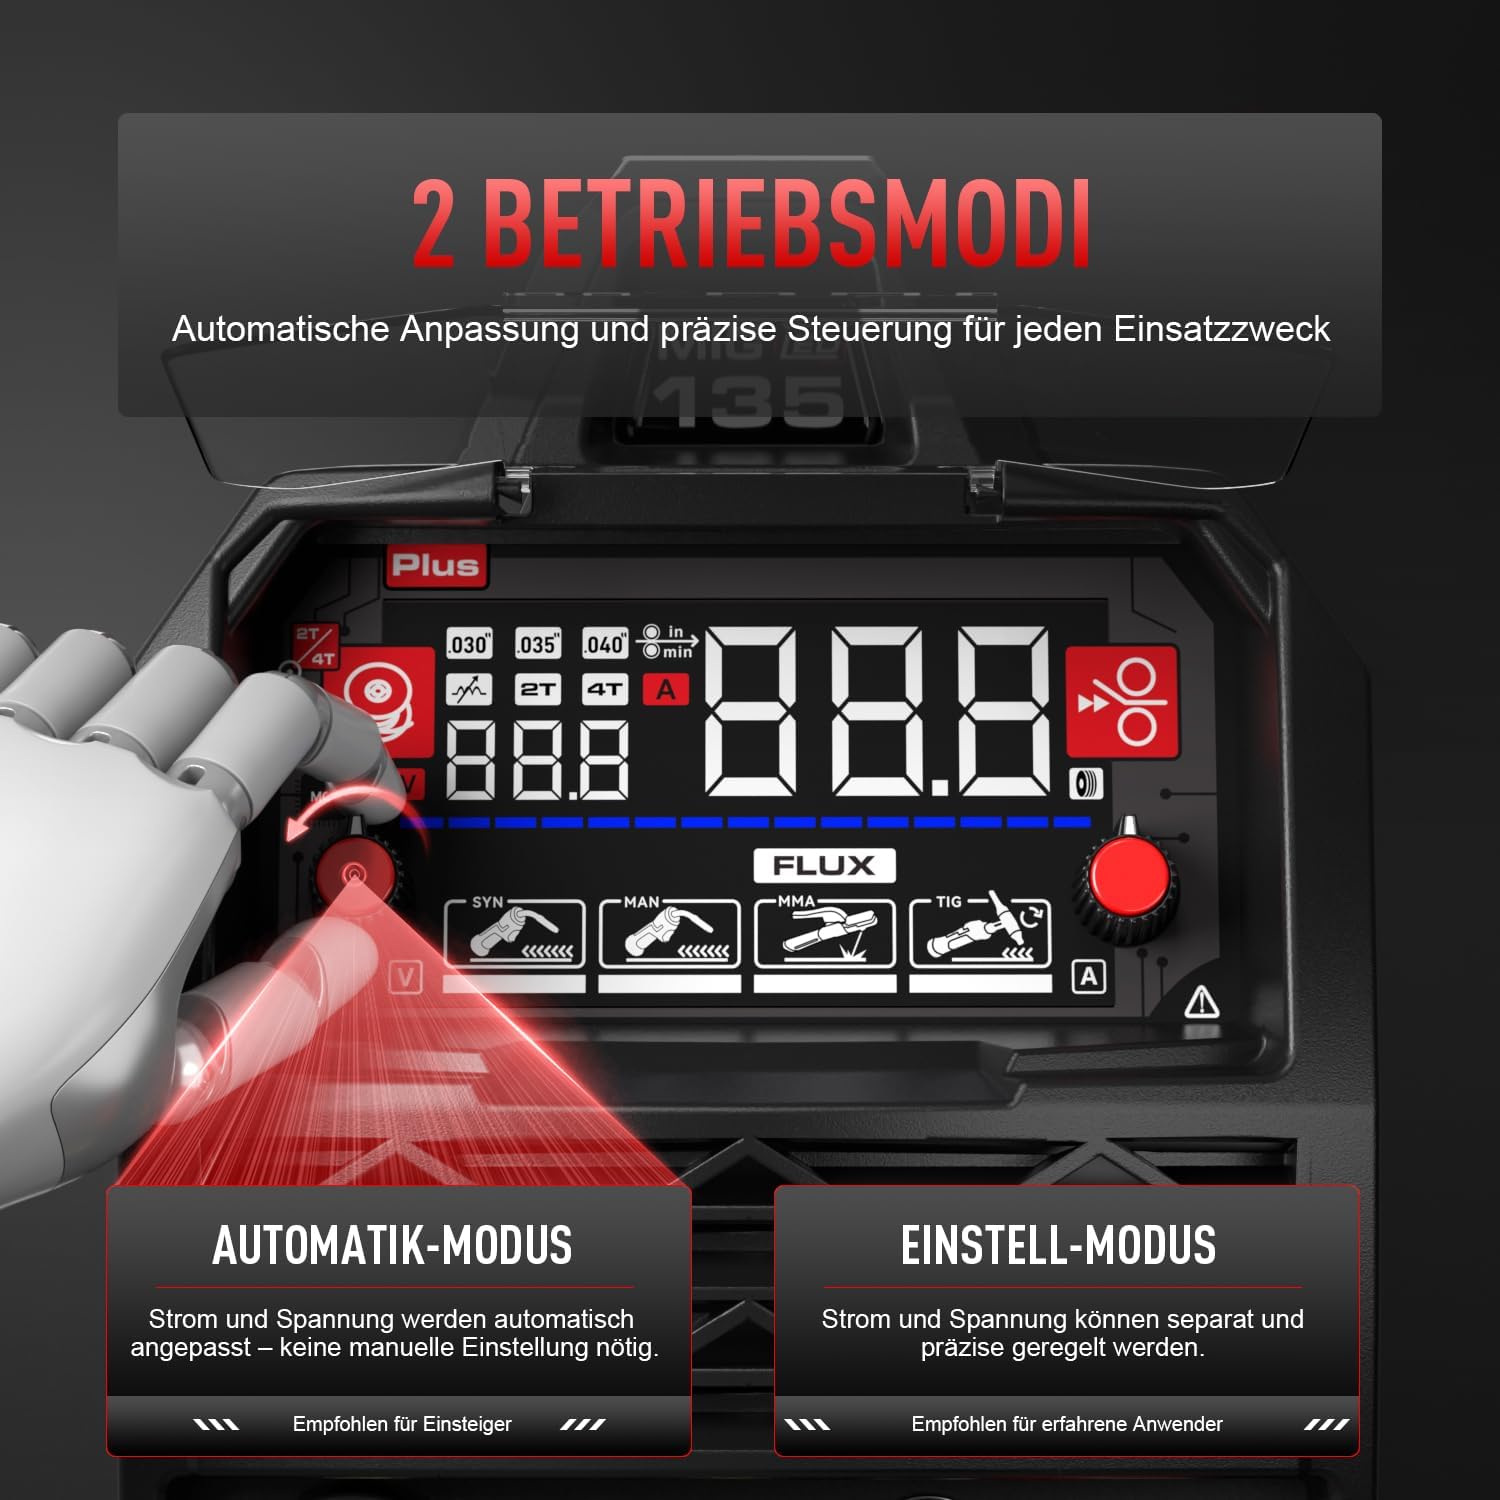
Figure 4: Automatic vs. Manual operating modes.
3.4 2T/4T Trigger Modes
- 2T Mode (Two-Touch): Press and hold the torch trigger to start wire feeding and welding. Release the trigger to stop. Suitable for short welds.
- 4T Mode (Four-Touch): Press the trigger once to start wire feeding and welding. Press it again to stop. Ideal for longer welds, reducing hand fatigue.
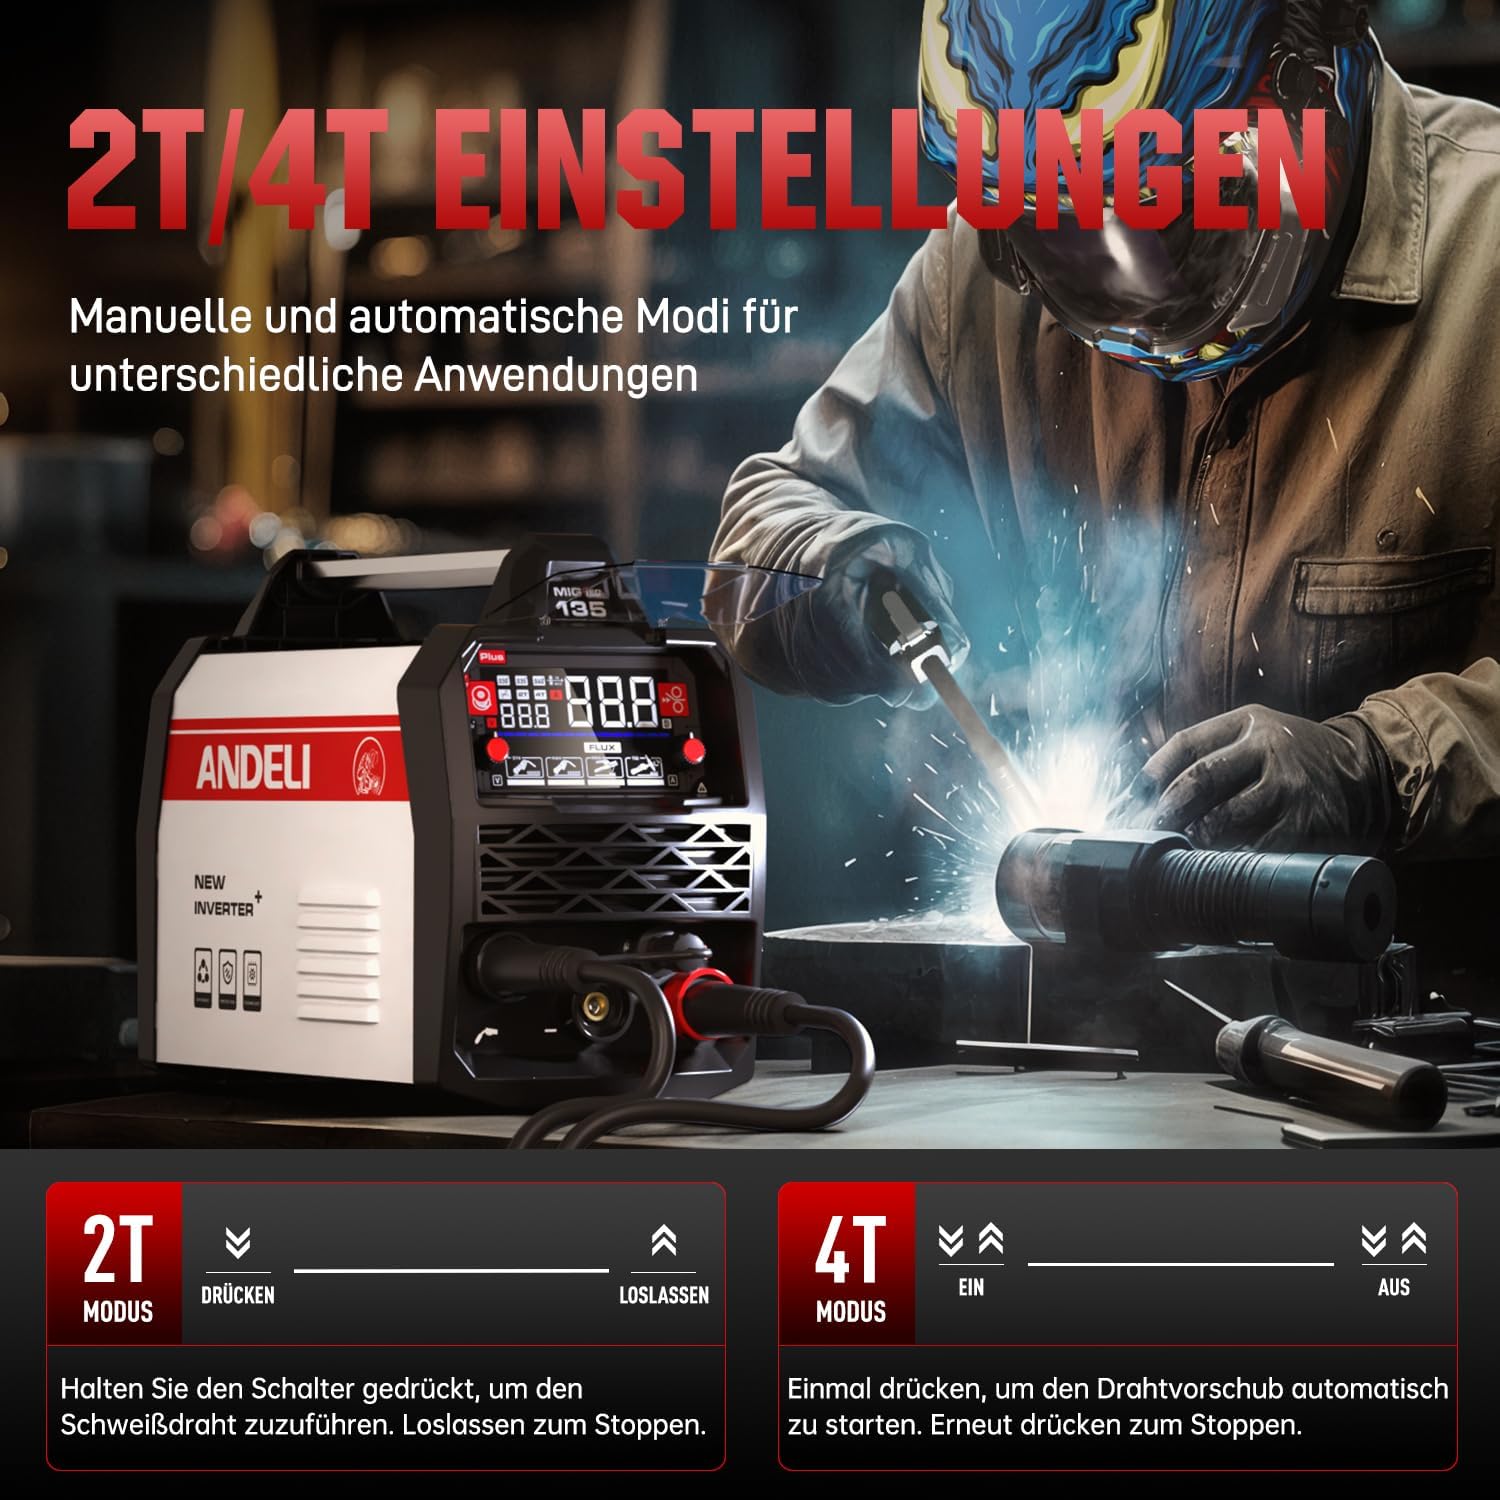
Figure 5: 2T and 4T trigger mode settings.
3.5 Pulsed MIG Welding (Gasless)
The gasless MIG function includes a pulsed mode, which provides a smoother and more stable arc. This results in finer, more uniform weld beads and stronger joints, enhancing the quality and versatility of gasless welding.

Figure 6: Comparison of welding quality with and without pulsed MIG function.
4. Maintenance
Regular maintenance ensures the longevity and optimal performance of your welding machine.
- Cleaning: Periodically clean the machine's exterior with a dry cloth. Use compressed air to clear dust from ventilation openings.
- Torch and Cables: Inspect the MIG torch, electrode holder, and ground clamp cables for any signs of damage, cuts, or loose connections. Replace damaged components immediately.
- Wire Feed Mechanism: Keep the wire feed rollers clean and free of debris. Ensure the wire liner is not clogged.
- Storage: Store the welder in a dry, clean environment, away from excessive dust and moisture.
5. Troubleshooting
The MIG-135PLUS features an advanced protection system against overcurrent, overload, overheating, and overvoltage. If an issue occurs, the machine may automatically shut down or display an error code. Consult the table below for common issues.
| Problem | Possible Cause | Solution |
|---|---|---|
| No arc / Weak arc | Poor ground connection, incorrect settings, damaged torch/cable, power supply issue. | Check ground clamp connection. Verify welding parameters. Inspect cables and torch. Ensure stable power supply. |
| Wire feed issues | Incorrect drive roller tension, clogged liner, wrong wire size, spool tangled. | Adjust drive roller tension. Clean wire liner. Ensure correct wire size for rollers. Untangle spool. |
| Overheating protection activated | Exceeded duty cycle, poor ventilation. | Allow the machine to cool down. Ensure proper ventilation around the unit. Reduce welding time. |
| Poor weld quality | Incorrect settings (voltage, wire speed), improper technique, contaminated workpiece. | Adjust welding parameters. Practice proper welding technique. Clean workpiece thoroughly. |
If problems persist after attempting these solutions, please contact customer support.
6. Technical Specifications
| Feature | Specification |
|---|---|
| Model | MIG-135PLUS |
| Manufacturer | Andeli |
| Input Voltage | 220V / 230V |
| Max Output Current | 135A |
| Welding Processes | Gasless Flux MIG (Pulsed/Standard), Lift TIG, MMA |
| Wire Compatibility | 0.030'' (0.8mm), 0.035'' (0.9mm) Flux-cored wire |
| Max Welding Thickness (Mild Steel) | Up to 5 mm |
| Display | 4.1-inch LED Digital Display |
| Technology | IGBT Inverter, SYNERGIC Control System |
| Protection Features | Overcurrent, Overload, Overheating, Overvoltage |
| Product Dimensions (L x W x H) | 24 x 15 x 33 cm (9.4 x 5.9 x 13 inches) |
| Item Weight | 7.87 kg (17.35 lbs) |
| Power Source Type | Electric |
| Batteries Required | No |
7. Warranty and Support
For warranty information, technical support, or service inquiries, please refer to the documentation provided with your purchase or contact the seller/manufacturer directly. Keep your proof of purchase for warranty claims.


