Introduction
Thank you for choosing the HOOBRO 5-Tier Slanted Shoe Rack. This manual provides detailed instructions for assembly, usage, and maintenance to ensure optimal performance and longevity of your product. Please read all instructions carefully before beginning assembly and retain this manual for future reference.
Product Features
- Slanted Structure: Space-saving design ideal for narrow areas like under stairs, offering practical storage with minimal footprint.
- Multifunctional Capacity: This 5-tier unit (including the top shelf) provides ample space for organizing 12-16 pairs of footwear. The 4 slanted metal shelves are suitable for shoes, while the sturdy top surface can hold keys, decorations, or other items.
- Industrial Style Charm: The combination of a black metal frame with warm wood-effect boards creates a distinct industrial aesthetic, enhancing your home's decor.
- Stable Frame: Constructed from robust materials, this narrow shoe rack includes adjustable feet for stability on uneven floors. A wall-mounting anti-tipping device is provided for enhanced safety.
- Simple and Clear Assembly: Features labeled parts, illustrated step-by-step instructions, and all necessary tools for quick and easy setup.
Package Contents
Please check that all components are present and in good condition before assembly:
- Rustic Brown Wood-Effect Top Board (1 pc)
- Black Metal Side Frames (2 pcs)
- Black Metal Slanted Shelves (4 pcs)
- Adjustable Feet (4 pcs)
- Wall Anti-Tipping Kit (1 set)
- Assembly Hardware (screws, connectors, Allen key)
- Instruction Manual (1 pc)
Assembly Instructions
Follow these steps carefully for proper assembly:
- Step 1: Prepare Components
Unpack all parts and lay them out on a clean, soft surface to prevent scratches. Identify each component using the provided parts list. - Step 2: Attach Adjustable Feet
Secure the adjustable feet to the bottom of the two metal side frames. Ensure they are tightened but allow for minor adjustments later. - Step 3: Assemble Side Frames
Connect the horizontal support bars between the two vertical side frames. Use the provided screws and Allen key. Do not fully tighten all screws until the entire frame is assembled. - Step 4: Install Slanted Metal Shelves
Insert the four slanted metal shelves into the designated slots on the side frames. Ensure they are oriented correctly to create the slanted storage angle. Gently tap into place if needed. - Step 5: Secure Top Wooden Board
Place the rustic brown wood-effect top board onto the uppermost frame. Secure it with the provided screws. Once all parts are in place, fully tighten all screws. - Step 6: Install Anti-Tipping Kit
For safety, especially in households with children or pets, attach the anti-tipping device to the top of the shoe rack and secure it to a wall according to the kit's instructions.
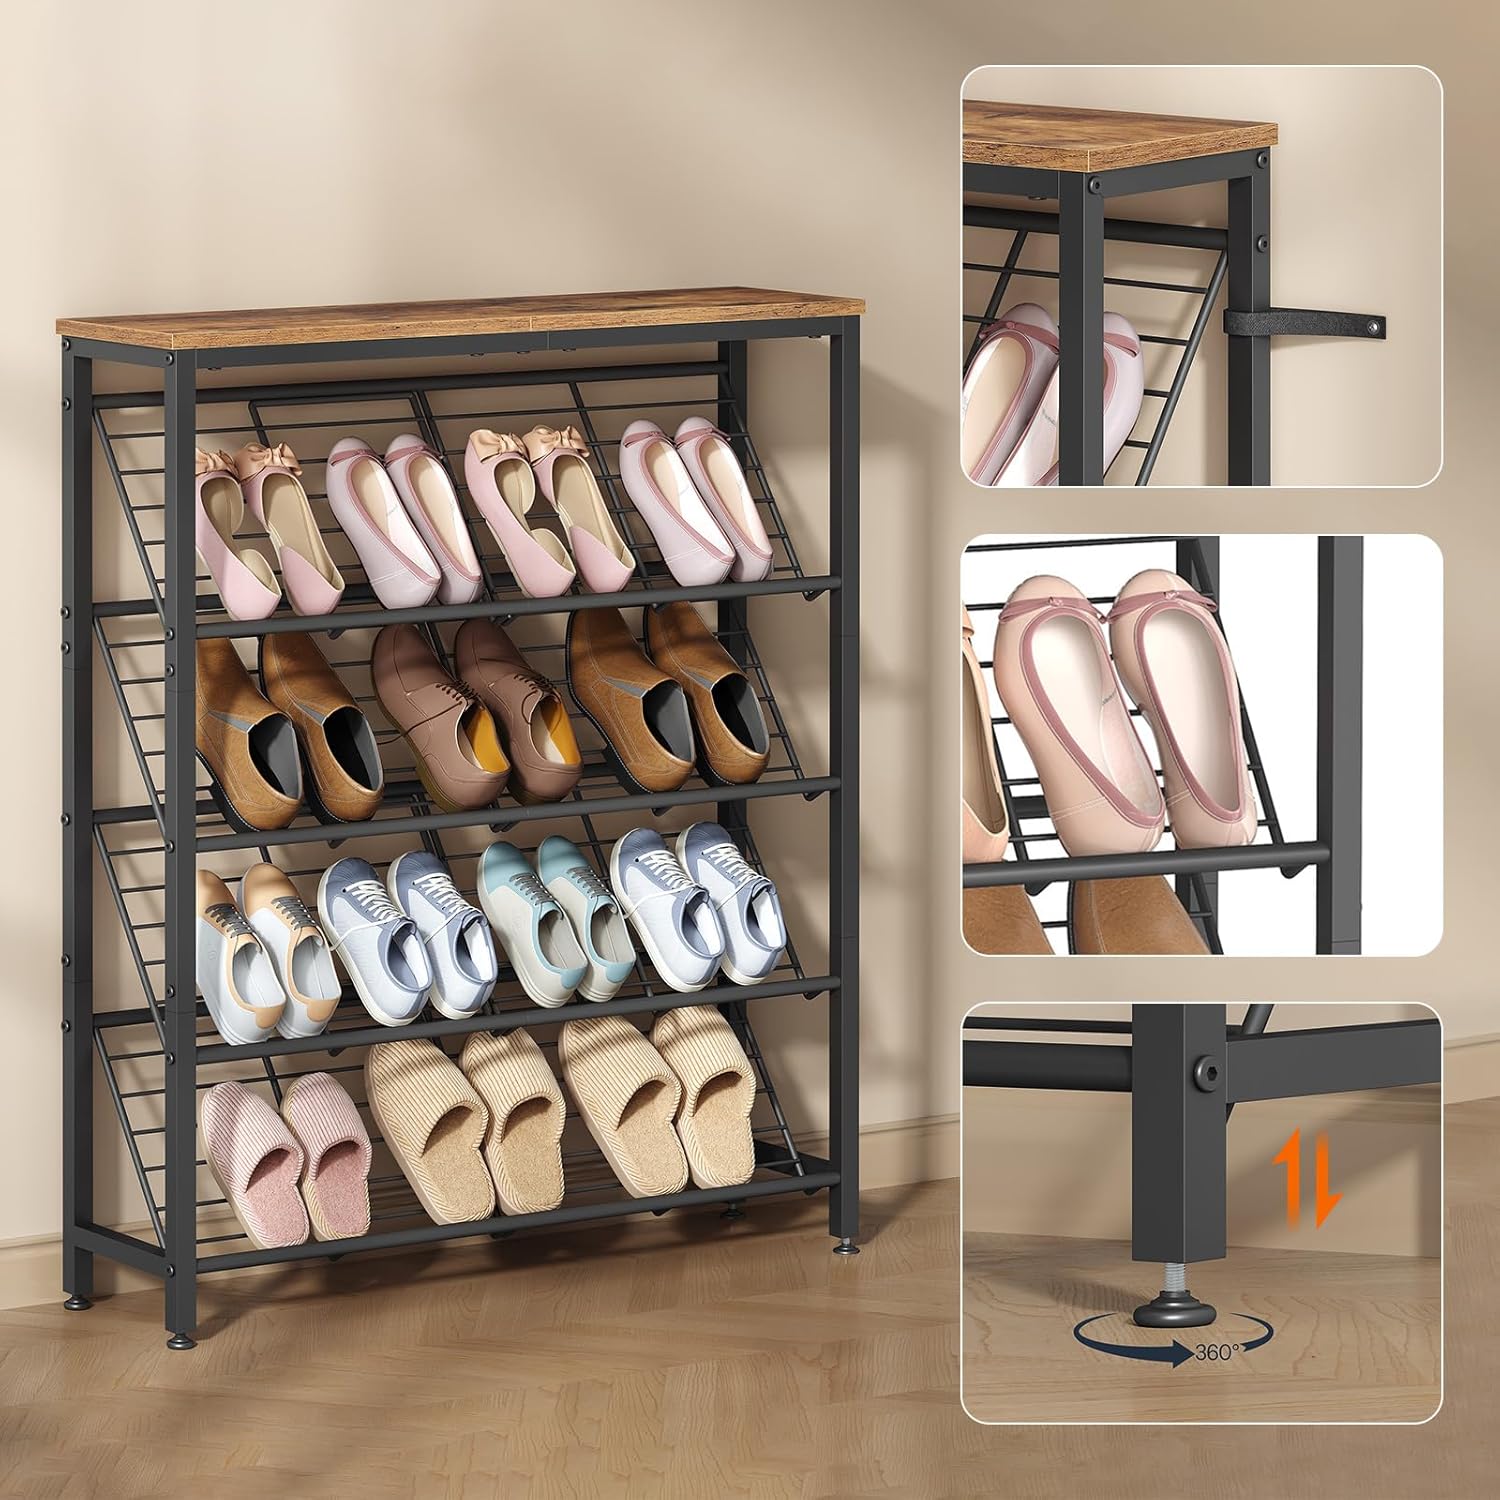
Image: Key features including wall anchor, slanted shelves, and adjustable feet.
Usage
This shoe rack is designed for efficient and stylish shoe storage:
- Slanted Shelves: Place shoes on the four slanted metal shelves for easy visibility and access. The design helps prevent shoes from falling off.
- Top Shelf: Utilize the rustic brown top board for displaying decorative items, storing small bags, keys, or other entryway essentials.
- Capacity: The rack can comfortably hold between 12 to 16 pairs of shoes, depending on their size and style.

Image: The shoe rack in a room, demonstrating its use for shoe storage and as a display surface.

Image: A close-up view of the rustic brown top shelf, featuring a small handbag and an aroma diffuser.
Maintenance
- Cleaning: Wipe the metal frame and wooden top with a soft, damp cloth. Avoid using harsh chemicals or abrasive cleaners.
- Regular Checks: Periodically check all screws and connections to ensure they remain tight. Retighten if necessary to maintain stability.
- Placement: Avoid placing the shoe rack in direct sunlight or in excessively humid environments to prevent damage to the materials.
Troubleshooting
- Instability: If the rack feels wobbly, ensure all screws are fully tightened. Adjust the leveling feet on the bottom to compensate for uneven floors.
- Missing Parts: If any parts are missing or damaged upon arrival, please contact HOOBRO customer support for assistance.
- Assembly Difficulty: Review the step-by-step instructions and diagrams carefully. Ensure all parts are oriented correctly before tightening.
Specifications
| Attribute | Detail |
|---|---|
| Model Number | EBF20XJ01 |
| Dimensions (L x W x H) | 75 x 20 x 96 cm (30 x 8 x 38 inches) |
| Number of Tiers | 5 (including top shelf) |
| Material | Metal frame, Wood-effect board |
| Color | Rustic Brown + Black |
| Style | Industrial |
| Assembly Required | Yes |

Image: Detailed dimensions of the HOOBRO 5-Tier Slanted Shoe Rack.
Safety Information
- Always use the provided anti-tipping kit to secure the shoe rack to a wall, especially if placed in an area with heavy traffic or if there are children or pets present.
- Do not overload the shelves. Each metal shelf is designed to support a specific weight. Refer to the product specifications for weight limits.
- Keep small parts and packaging materials away from children to prevent choking hazards.
- Ensure the product is assembled on a flat, stable surface.
Warranty and Support
HOOBRO products are designed for quality and durability. If you encounter any issues with your product, require replacement parts, or have questions regarding assembly or use, please contact HOOBRO customer support. Keep your purchase receipt as proof of purchase for warranty claims.


