1. Product Overview
The Monstrum Terminator 1-6x First Focal Plane (FFP) LPVO Scope is engineered for precision and versatility. It features Extra Low Dispersion (ED) glass for superior optical clarity and color fidelity, paired with a CM8 reticle. This scope provides a true 1x sight picture, 1-6x variable magnification, and precise windage and elevation adjustments. Its design includes a removable mounting exoskeleton with an integrated Picatinny mount, offering flexible configuration options.
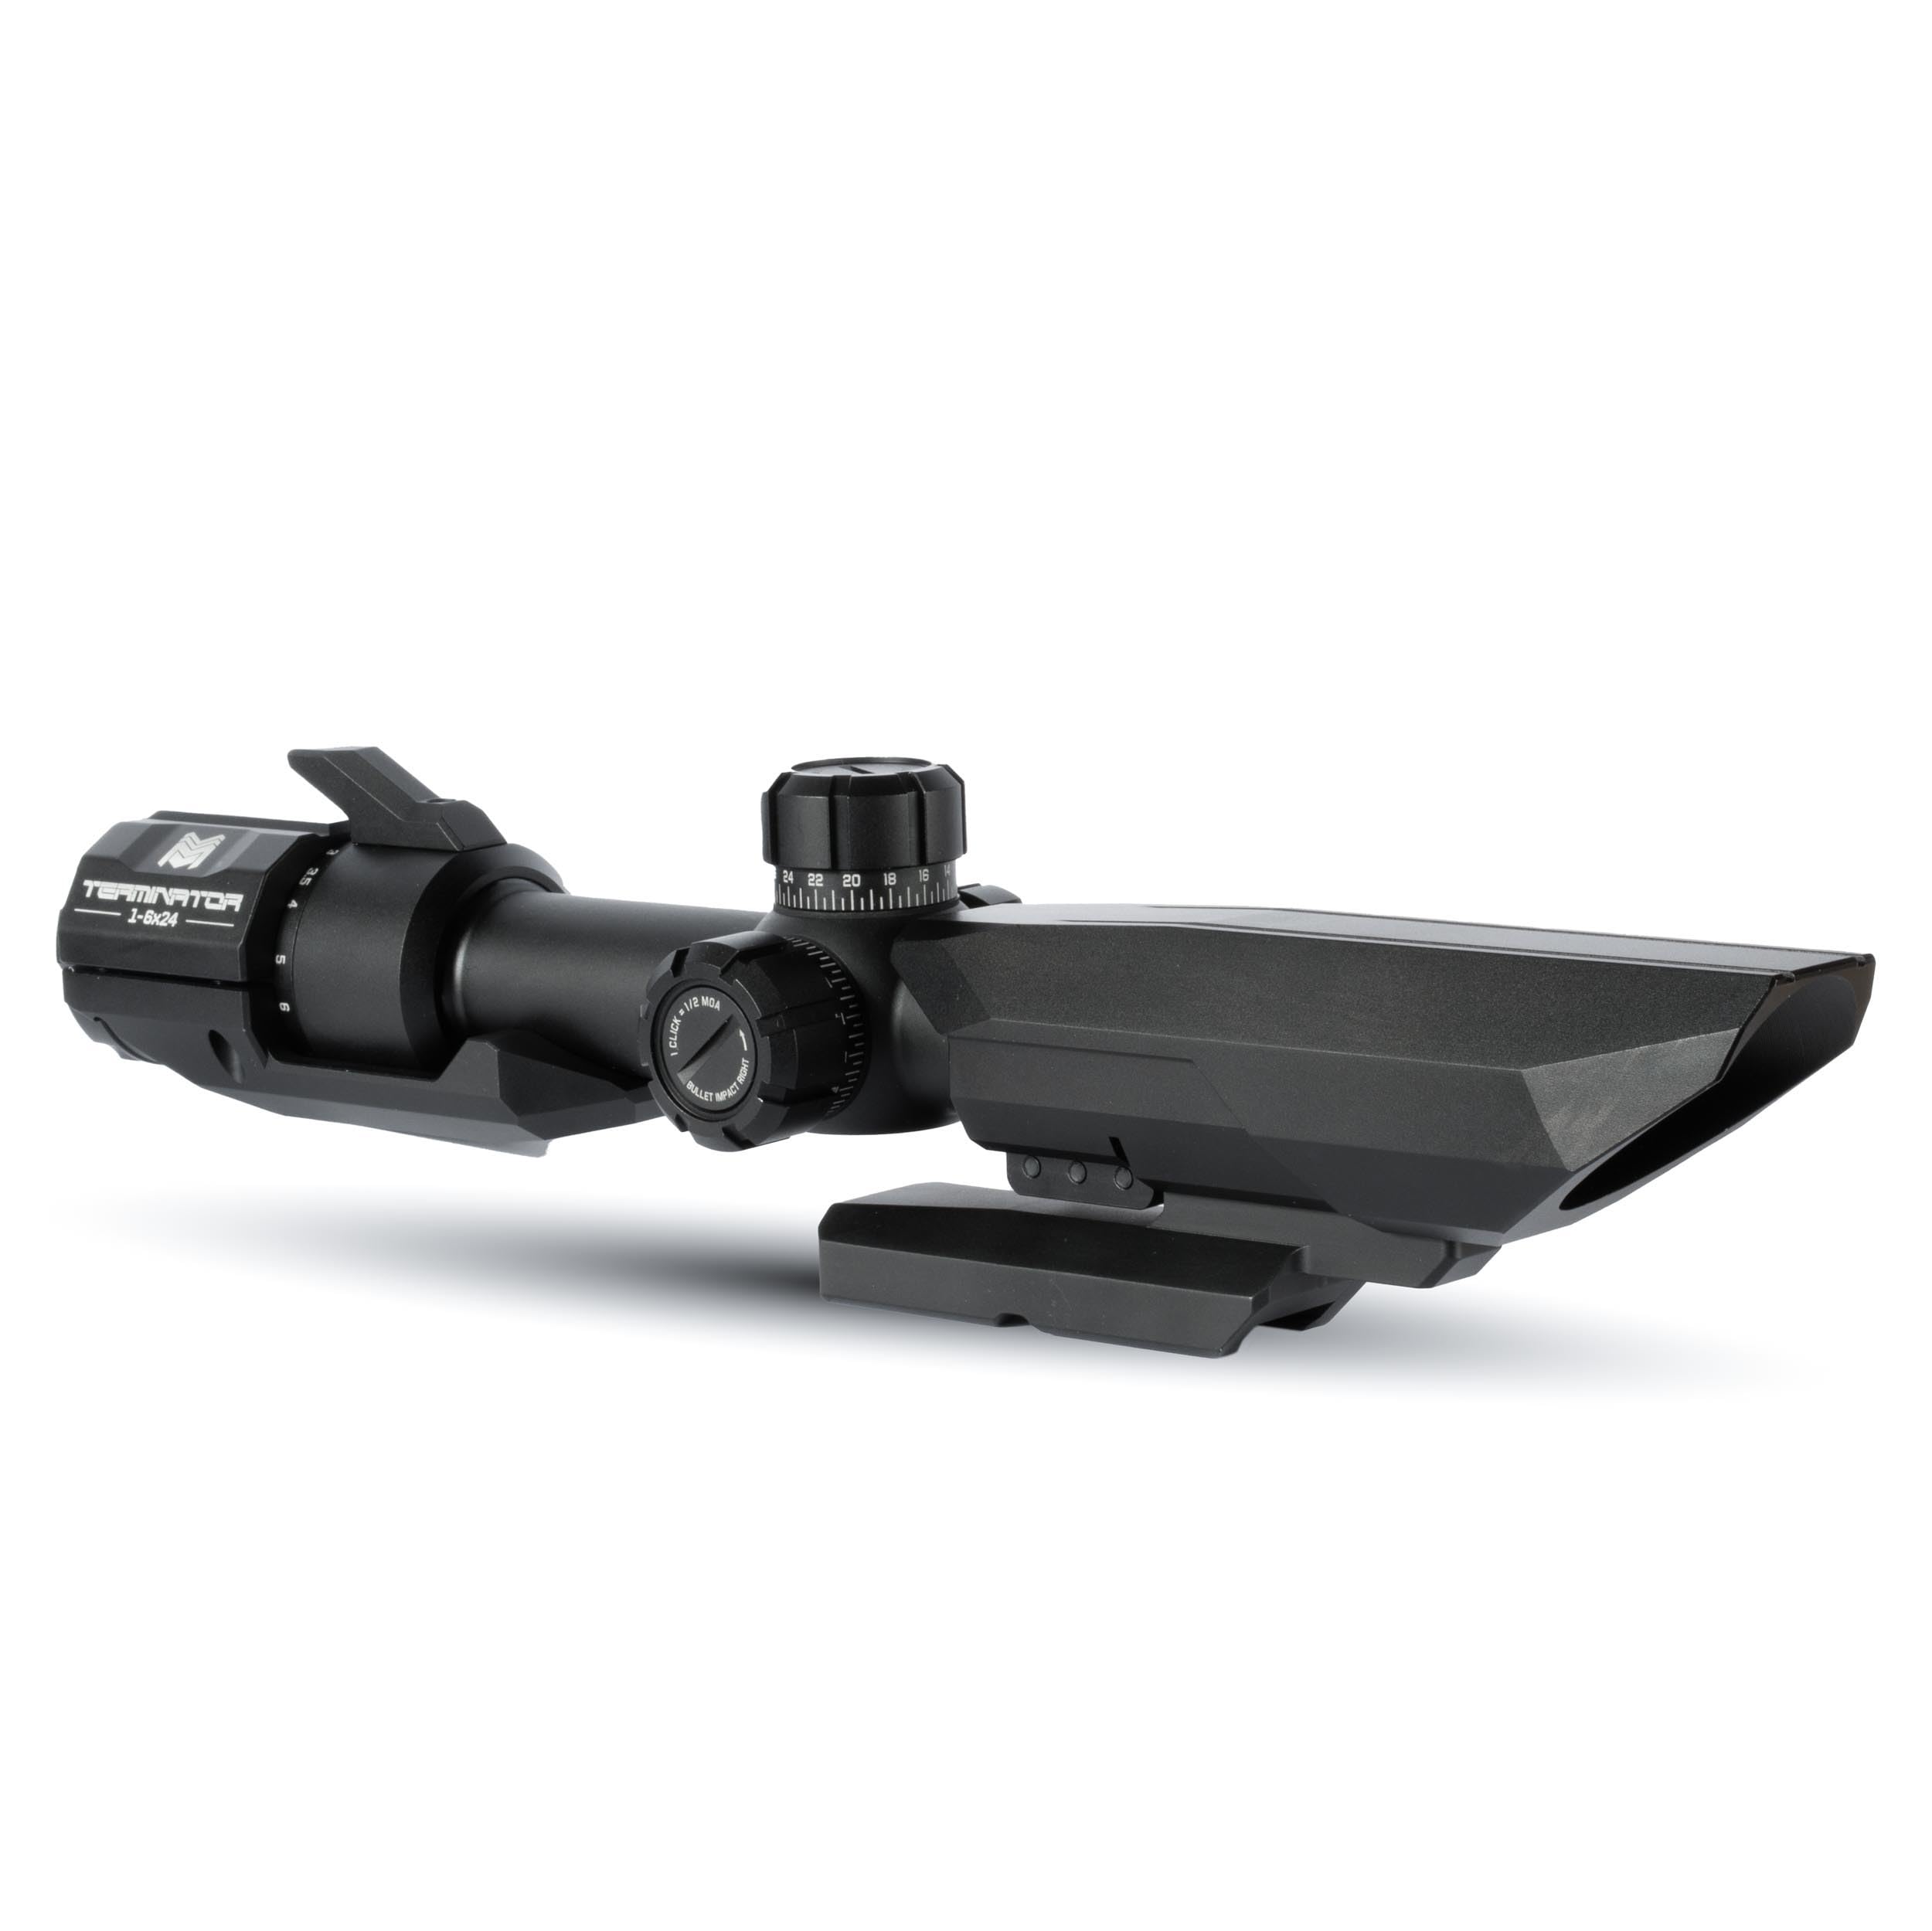
Figure 1: Monstrum Terminator 1-6x FFP LPVO Scope, showing the overall profile with its integrated mounting exoskeleton.
2. Key Features
2.1. First Focal Plane (FFP) Reticle
The Monstrum Terminator utilizes a First Focal Plane (FFP) reticle. In FFP scopes, the reticle is positioned in front of the magnification lens, causing its apparent size to change proportionally with the magnification. As magnification increases, the reticle appears larger, and as it decreases, the reticle appears smaller. This design ensures that all ranging information, holdovers, and bullet drop compensation values remain consistent and accurate across the entire magnification range (1x to 6x), which is crucial for precise shooting at varying distances.
2.2. Extra Low Dispersion (ED) Glass
This scope incorporates Extra Low Dispersion (ED) glass, a premium optical component. ED glass effectively reduces chromatic aberration, a common optical distortion that can cause color fringing around objects. By minimizing this effect, the ED glass delivers superior color contrast, sharper image quality, and a brighter sight picture. An anti-reflective lens coating further optimizes light transmission for enhanced clarity in diverse lighting conditions.
3. Setup and Mounting
The Monstrum Terminator is equipped with a unique mounting exoskeleton that integrates a Picatinny mount for secure attachment to compatible firearms. This exoskeleton is removable, allowing the scope to be used as a traditional 30mm tube LPVO with standard scope rings (not included). The necessary Torx wrenches for removal are provided with the scope.
3.1. Removing the Metal Housings
To detach the metal housings (front hood and rear protective shield) from the scope, follow these instructions:
- Front Hood Removal: Identify the three T25 bolts securing the front hood. Use the provided T25 Torx wrench to loosen these bolts. Once loosened, the front hood can be carefully wiggled and pulled away from the scope body.
- Rear Protective Shield Removal: Turn the scope over to access the underside of the rear protective shield. Locate the four T15 bolts. Use the provided T15 Torx wrench to loosen these bolts. After loosening, the rear shield can be removed.
- Once both housings are removed, the scope will have the appearance of a standard LPVO, ready for mounting with conventional 30mm rings if desired.
Video 1: Monstrum Terminator Shroud Removal Instructions. This video provides a visual guide on how to safely detach the metal housings from the scope using the included Torx wrenches.
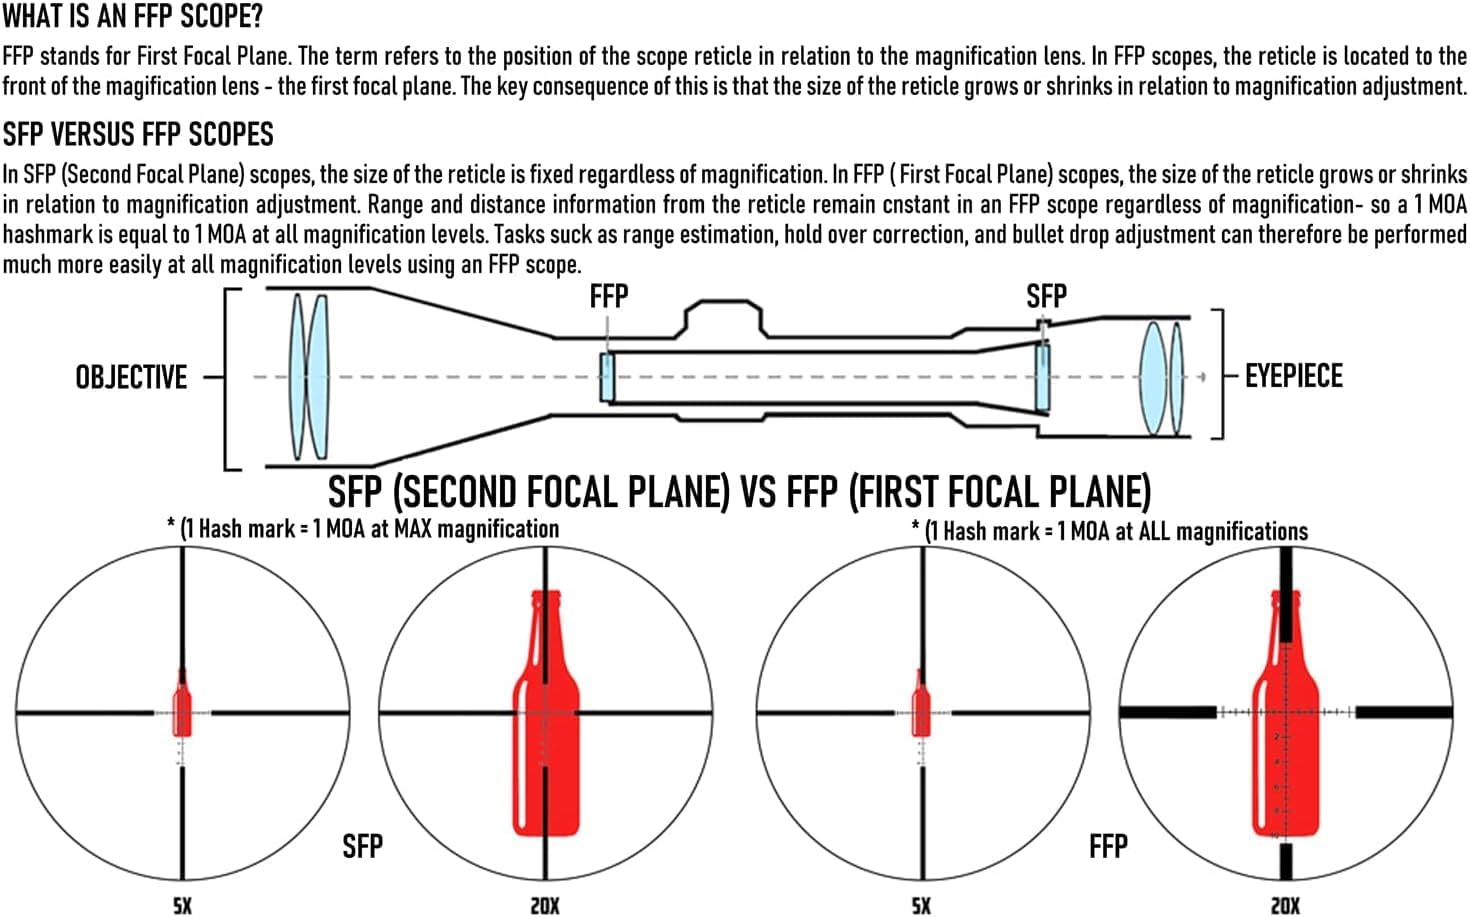
Figure 2: Top-down view of the Monstrum Terminator scope, illustrating the integrated Picatinny mount and the locations of the housing screws.
4. Operating Instructions
4.1. Magnification Adjustment
To adjust the magnification, rotate the magnification ring, which is typically located near the eyepiece. The scope offers a variable magnification range from 1x to 6x. Due to the First Focal Plane (FFP) design, the reticle will appear to change size as you adjust magnification, ensuring that all subtensions and ranging features remain accurate at any power setting.
4.2. Windage and Elevation Adjustments
The windage (horizontal adjustment) and elevation (vertical adjustment) turrets are positioned on the side and top of the scope body, respectively. These turrets allow for precise adjustments to zero your scope. Each audible click corresponds to a specific adjustment value: 1/2 MOA per click for MOA reticle versions or 0.2 MIL per click for MIL reticle versions. Turn the turrets as required to shift your point of impact. After zeroing, ensure the turrets are securely capped or locked to prevent unintended adjustments.

Figure 3: Side view of the scope, highlighting the windage and elevation adjustment turrets for precise aiming.
4.3. Reticle Illumination
If your Monstrum Terminator model includes reticle illumination, a dedicated control knob or button will be present, typically on the left side of the main tube. Rotate this control to cycle through various brightness settings. Adjust the illumination level to ensure optimal reticle visibility against different backgrounds and in varying ambient light conditions.
5. Maintenance
Regular and proper maintenance is essential to preserve the performance and extend the lifespan of your Monstrum Terminator scope.
- Lens Cleaning: Use only a soft, lint-free optical cloth and a specialized lens cleaning solution. Gently wipe the objective and eyepiece lenses to remove dust, smudges, or debris. Avoid using paper towels, clothing, or harsh chemical cleaners, as these can scratch or damage the lens coatings.
- Body Cleaning: The scope body can be cleaned with a soft, damp cloth to remove dirt, dust, or fingerprints. Ensure the scope is completely dry before storing it.
- Storage: Store the scope in a protective case or bag in a dry, cool environment, away from direct sunlight, extreme temperatures, and high humidity. Always use the provided lens caps to protect the optical surfaces when the scope is not in use.
- Fastener Check: Periodically inspect all mounting screws, bolts, and housing fasteners to ensure they remain securely tightened. Loose components can affect zero and overall performance.
6. Troubleshooting
If you encounter any operational issues with your Monstrum Terminator LPVO Scope, please refer to the following common troubleshooting steps:
- Unclear or Blurry Image:
- Ensure both the objective and eyepiece lenses are clean and free from smudges, dust, or moisture.
- Adjust the diopter setting on the eyepiece to match your individual eyesight. This is typically done by focusing on the reticle against a plain background.
- Confirm that the magnification is set appropriately for the target distance and lighting conditions.
- Inaccurate Zero or Point of Impact Shift:
- Verify that the scope is securely mounted to your firearm and all mounting screws are tightened to the manufacturer's recommended torque specifications.
- Check that the windage and elevation turrets have not been accidentally bumped or moved from your zero setting.
- Perform a re-zeroing procedure following standard practices for your firearm and ammunition.
- Reticle Not Illuminating (if applicable):
- Check the battery compartment for proper battery insertion and ensure the battery has sufficient charge. Replace the battery if necessary.
- Confirm that the illumination control knob is turned to an active brightness setting and not in the "off" position.
Should these steps not resolve the issue, please contact Monstrum customer support for further assistance.
7. Specifications
| Brand | Monstrum |
| Model Name | Terminator |
| Style | CM8 Reticle |
| Color | Black |
| Material | Metal |
| Magnification Range | 1x - 6x |
| Compatible Devices | Rifle, Handgun, Shotgun |
| Mounting Type | Picatinny Mount |
| Night Vision | No |
| Reticle Type | CM8 |
| Adjustments | 1/2 MOA/click or 0.2 MIL/click |
| Item Package Dimensions (L x W x H) | 16.38 x 4.65 x 3.9 inches |
| Package Weight | 1.52 Kilograms |
| Part Number | FTR16B-CM8 |
| UPC | 810198400458 |
| Date First Available | October 7, 2025 |
8. Warranty and Support
For detailed warranty information, technical assistance, or any questions regarding your Monstrum Terminator LPVO Scope, please contact Monstrum customer service directly. The most current contact details and comprehensive warranty policy can be found on the official Monstrum website or within the product packaging.
Monstrum Tactical Store: Visit the Monstrum Store on Amazon