1. Introduction
This manual provides detailed instructions for the assembly, setup, operation, and maintenance of your Glacier Weikav MAX102 Mechanical Keyboard Kit. The MAX102 is a full-size, 102-key layout keyboard kit featuring tri-mode connectivity (wired, 2.4 GHz wireless, Bluetooth), hot-swappable switch sockets, and customizable RGB backlighting. Its premium CNC aluminum construction ensures durability and a refined typing experience.
2. Package Contents
Please verify that all items listed below are present in your package.
- Glacier Weikav MAX102 Keyboard Case (CNC Aluminum)
- PCB (Printed Circuit Board) with hot-swappable sockets
- FR4 Plate
- Gasket Mount Components (Poron, IXPE, Silicone dampening layers)
- Detachable USB-C Cable (Aviator or Standard, depending on variant)
- 2.4 GHz Wireless Receiver
- Screws and assembly tools (if applicable)
- User Manual (this document)
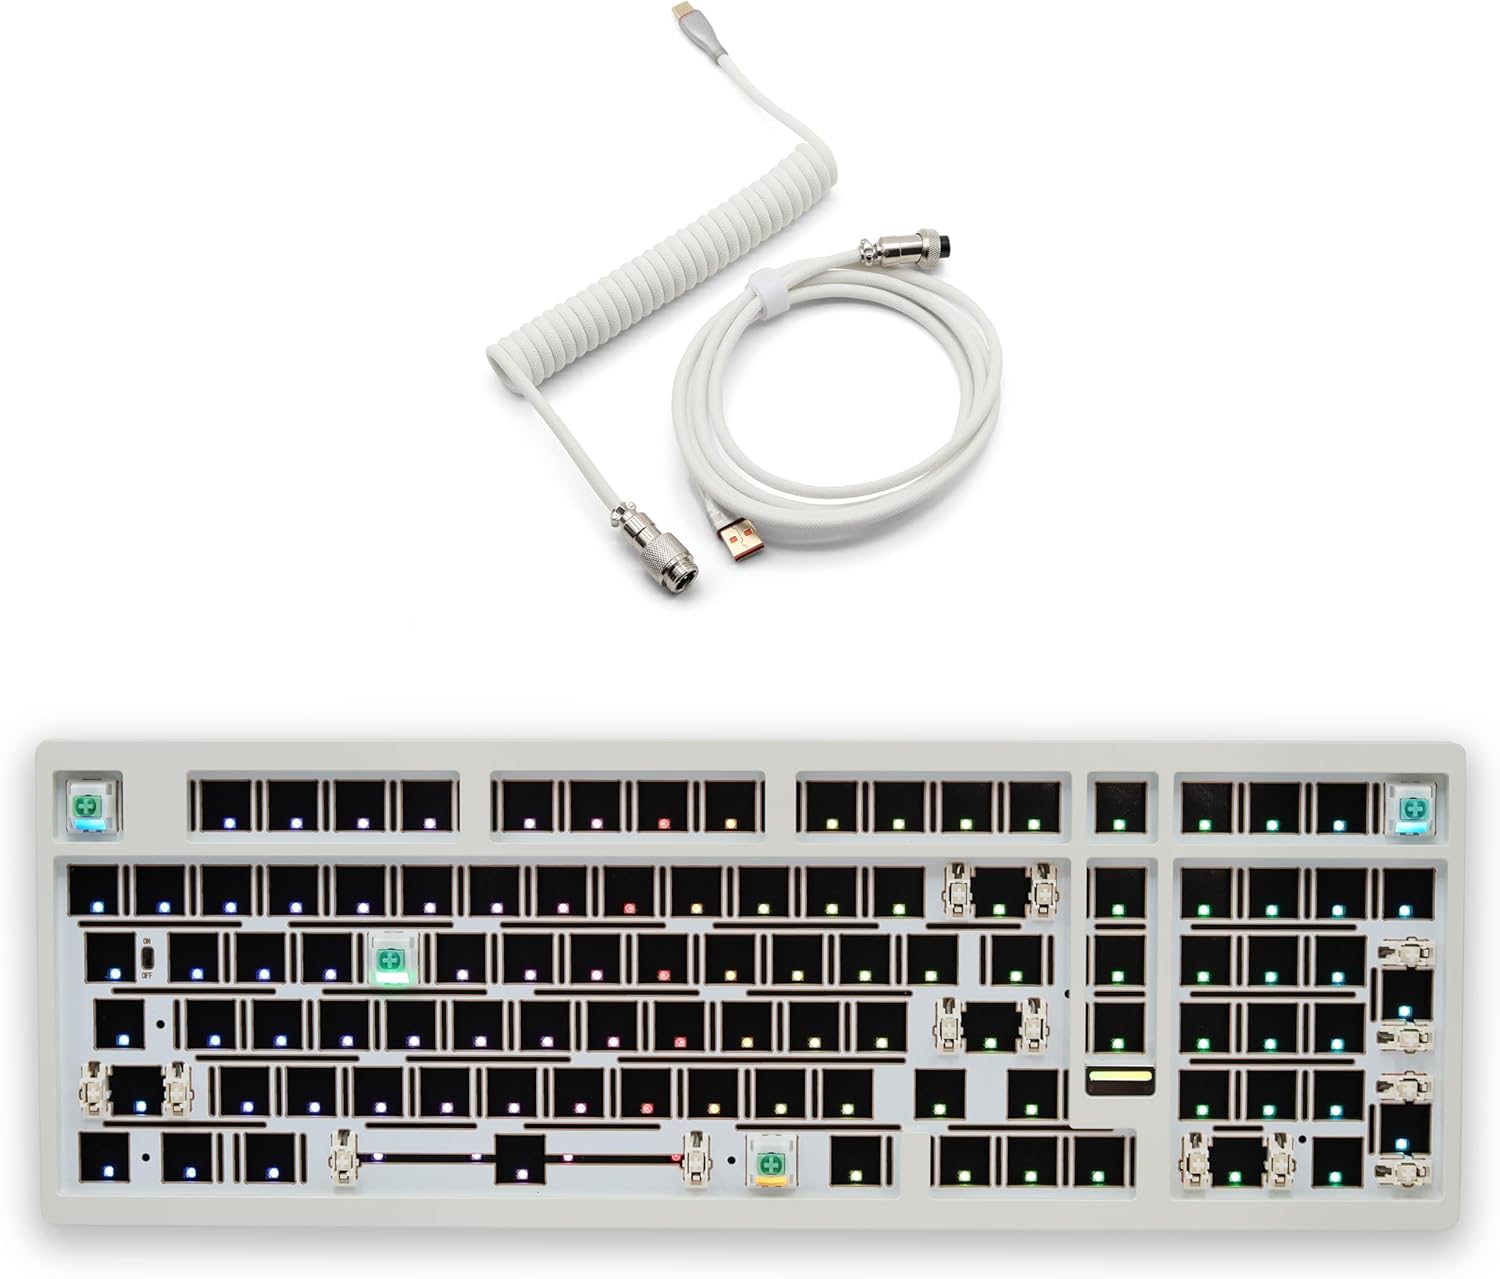
Image 2.1: Overview of the Glacier Weikav MAX102 Mechanical Keyboard Kit components, including the keyboard base, PCB, and a coiled USB-C cable.
3. Setup and Assembly
The MAX102 is a DIY kit, requiring assembly of switches and keycaps. Follow these steps for proper setup.
3.1. Keyboard Assembly
- Prepare Components: Ensure you have the keyboard case, PCB, FR4 plate, gasket materials, switches, and keycaps ready.
- Install Gasket Materials: Carefully place the Poron, IXPE, and silicone dampening layers onto the PCB and plate as indicated by the design. These layers enhance acoustics and typing feel.
- Mount PCB to Plate: Align the PCB with the FR4 plate.
- Install Switches: Insert your desired MX-style mechanical switches into the hot-swappable sockets on the PCB. Ensure the pins are straight and align correctly with the sockets before pressing down firmly. No soldering is required.
- Secure PCB/Plate Assembly: Place the assembled PCB and plate into the keyboard case, ensuring the gasket mounts are properly seated.
- Install Keycaps: Press your chosen keycaps onto the installed switches.
- Connect Bottom Case: Secure the bottom case to the main body using the provided screws.

Image 3.1: Exploded view illustrating the various layers of the Glacier Weikav MAX102 keyboard, including the aluminum case, PCB, FR4 plate, and sound dampening materials.

Image 3.2: Detailed view of the hot-swappable PCB, highlighting the switch sockets and the physical ON/OFF switch for power control.

Image 3.3: Illustration of mechanical switches being installed into the hot-swappable sockets on the keyboard's PCB, demonstrating the solder-free customization process.
3.2. Connectivity Modes
The MAX102 supports three connectivity modes: Wired (USB-C), 2.4 GHz Wireless, and Bluetooth.
- Wired Mode: Connect the provided USB-C cable to the keyboard and your computer. The keyboard will automatically switch to wired mode.
- 2.4 GHz Wireless Mode:
- Locate the 2.4 GHz USB receiver.
- Plug the receiver into an available USB port on your computer.
- Switch the mode selector on the keyboard (usually located on the back or side) to 2.4G mode. The keyboard should connect automatically.
- Bluetooth Mode:
- Switch the mode selector on the keyboard to Bluetooth mode.
- On your computer or device, enable Bluetooth and search for new devices.
- Select "Glacier MAX102" (or similar name) from the list of available devices to pair.
- The keyboard can typically store multiple Bluetooth profiles for quick switching between devices. Refer to the keyboard's specific key combinations for managing Bluetooth profiles (e.g., Fn + 1, Fn + 2, Fn + 3).

Image 3.4: Visual representation of the three connectivity options: Wired (USB-C), 2.4 GHz Wireless, and Bluetooth, available on the Glacier Weikav MAX102 keyboard.
4. Operating Instructions
4.1. Power On/Off
Locate the physical ON/OFF switch on the keyboard's PCB (visible when the bottom case is removed, or through an access port). Toggle this switch to power the keyboard on or off.
4.2. RGB Backlighting Control
The MAX102 features customizable per-key RGB backlighting with seven default lighting modes. Specific key combinations are used to control the lighting effects.
- Change Lighting Mode: Typically, use Fn + [Key] (e.g., Fn + \ or Fn + Ins) to cycle through different lighting effects.
- Adjust Brightness: Use Fn + ↑ / ↓ to increase or decrease backlight brightness.
- Adjust Speed/Direction: Use Fn + ← / → to change the speed or direction of dynamic lighting effects.
- Change Color: For some modes, Fn + [Key] (e.g., Fn + Del) may cycle through static colors.
- Software Customization: For advanced per-key RGB customization and macro programming, download the official Glacier software from the manufacturer's website.
4.3. Hot-Swapping Switches
The hot-swappable design allows you to change mechanical switches without soldering.
- Power Off: Ensure the keyboard is powered off and disconnected from your computer.
- Remove Keycap: Gently pull off the keycap from the switch you wish to replace using a keycap puller.
- Remove Switch: Use a switch puller tool to carefully grip the top and bottom clips of the switch and pull it straight up. Avoid bending the pins.
- Insert New Switch: Align the pins of the new MX-style mechanical switch with the holes in the hot-swappable socket on the PCB. Ensure the pins are straight.
- Press Firmly: Gently but firmly press the new switch into the socket until it clicks into place. Do not force it.
- Test: Reattach the keycap and test the switch functionality after powering the keyboard back on.
Caution: Always ensure switch pins are straight before insertion to prevent damage to the PCB sockets.
5. Maintenance
5.1. Cleaning
- General Cleaning: Use a soft, lint-free cloth to wipe down the keyboard case. For stubborn smudges, a slightly damp cloth with mild soap can be used, followed by immediate drying.
- Keycap Cleaning: Keycaps can be removed and cleaned with warm, soapy water. Ensure they are completely dry before reattaching.
- Dust Removal: Use compressed air to remove dust and debris from between keycaps and around switches.
5.2. Switch and Stabilizer Lubrication (Advanced)
For enthusiasts, lubricating switches and stabilizers can enhance typing feel and sound. This process requires specialized lubricants and tools. Refer to online guides for detailed instructions if you choose to perform this maintenance.
6. Troubleshooting
| Problem | Possible Cause | Solution |
|---|---|---|
| Keyboard not responding in Wired Mode. | Loose cable connection, faulty USB port, incorrect mode. |
|
| Keyboard not connecting via 2.4 GHz Wireless. | Receiver not plugged in, incorrect mode, low battery. |
|
| Keyboard not connecting via Bluetooth. | Bluetooth not enabled on device, incorrect mode, pairing issue, low battery. |
|
| Some keys are not working. | Loose switch, bent switch pins, faulty switch. |
|
| RGB backlighting is not working or stuck. | Software glitch, incorrect settings. |
|
7. Specifications
| Feature | Detail |
|---|---|
| Model | Glacier Weikav MAX102 |
| Layout | Full-Size 102-Key, QWERTY |
| Connectivity | Wired (USB-C), 2.4 GHz Wireless, Bluetooth |
| Switch Compatibility | Hot-swappable, compatible with MX-style mechanical switches |
| Case Material | CNC 6063 Aluminum |
| Plate Material | FR4 |
| Mounting Style | Gasket Mount (Poron, IXPE, Silicone dampening) |
| Backlighting | Customizable Per-Key RGB |
| Power Source | Wired/Wireless (Internal Battery for wireless modes) |
| Compatible Devices | PC |
| Item Weight | Approximately 3 pounds (1.36 kg) |
| Package Dimensions | 16 x 7.25 x 2 inches (40.64 x 18.42 x 5.08 cm) |
8. Warranty and Support
For warranty information and technical support, please refer to the official Glacier website or contact Glacier customer service directly. Keep your purchase receipt as proof of purchase.
Glacier Official Website: Visit the Glacier Store on Amazon (for general brand information)


