Introduction
This manual provides detailed instructions for the installation, operation, maintenance, and troubleshooting of your AINAVI 7-inch Car Stereo Radio. Please read this manual thoroughly before using the product to ensure proper function and safety.
Packing List
Verify that all items listed below are included in your package:
- Head Unit (1280*720) for Volkswagen *1
- User Manual *1
- Power Cable *1
- AHD 1080P Rear View Camera *1
- Microphone *1
- Frame Removal Tool *1
- GPS Antenna *1
- USB Cables (4Pin & 6Pin)
- RCA Cable
- CANbus Decoder (if required by vehicle model)
- 24 Hours Engineer--Pre and after-sale Services.

Text Description: This image displays the various components included in the AINAVI car stereo package. It shows the front and back of the 7-inch head unit, a power cable with CANbus decoder, an RCA cable, a car microphone, a GPS module, 2 USB cables, a reversing control cable, a 1080P rear view camera, and a frame removal tool. The text clarifies that cables may vary by model.
Setup and Installation
Proper installation is crucial for optimal performance. If you are unsure about any steps, please consult a professional or contact our technical support.
1. Removing the Original Car Radio
Carefully remove the trim around your existing car radio using the provided frame removal tool. Unscrew the mounting screws and disconnect all cables from the back of the original radio.

Text Description: This image shows a split view of a car's dashboard. The top half displays three different original car radios in various Volkswagen/SEAT/Skoda models. The bottom half shows the AINAVI 7-inch car stereo seamlessly integrated into a dashboard, demonstrating the modern upgrade.
2. Wiring Connections
Connect the provided power cable, RCA cables, GPS antenna, and USB cables to the corresponding ports on the AINAVI head unit. Ensure all connections are secure.
Text Description: This video provides a step-by-step guide for installing the wiring for a Volkswagen car radio. It shows how to remove the original radio, connect the power cord to the original car's power cord, and test the power connection. It also demonstrates how to connect the emergency button wire to the new frame and install the new radio into the dashboard.
3. Rear View Camera Wiring (Optional)
If installing the optional rear view camera, connect the camera's video cable to the "Rear Camera Input" on the head unit and its power cable to the vehicle's reverse light circuit (12V). Ensure the trigger wire is correctly connected to the power harness.
Text Description: This video demonstrates the wiring process for the backup camera. It shows how to connect the extension cable, power cable, and the rear view camera to the car stereo unit and the vehicle's electrical system. It also illustrates how to route the cables through the car's interior and trunk, and how to install the camera in the license plate area. The video concludes with testing the camera functionality.
4. Final Installation
Carefully slide the head unit into the dashboard opening. Reinstall the mounting screws and reattach the trim panel. Test all functions before fully securing the trim.
Operating Instructions
1. Power On/Off
Press and hold the power button (usually labeled VOL or POWER) on the front panel to turn the unit on or off. A short press typically mutes/unmutes the audio.
2. CarPlay & Android Auto
The unit supports both wired and wireless CarPlay and Android Auto. Connect your smartphone via USB or Bluetooth. Once connected, select the CarPlay or Android Auto icon on the home screen to access your phone's features on the stereo display.
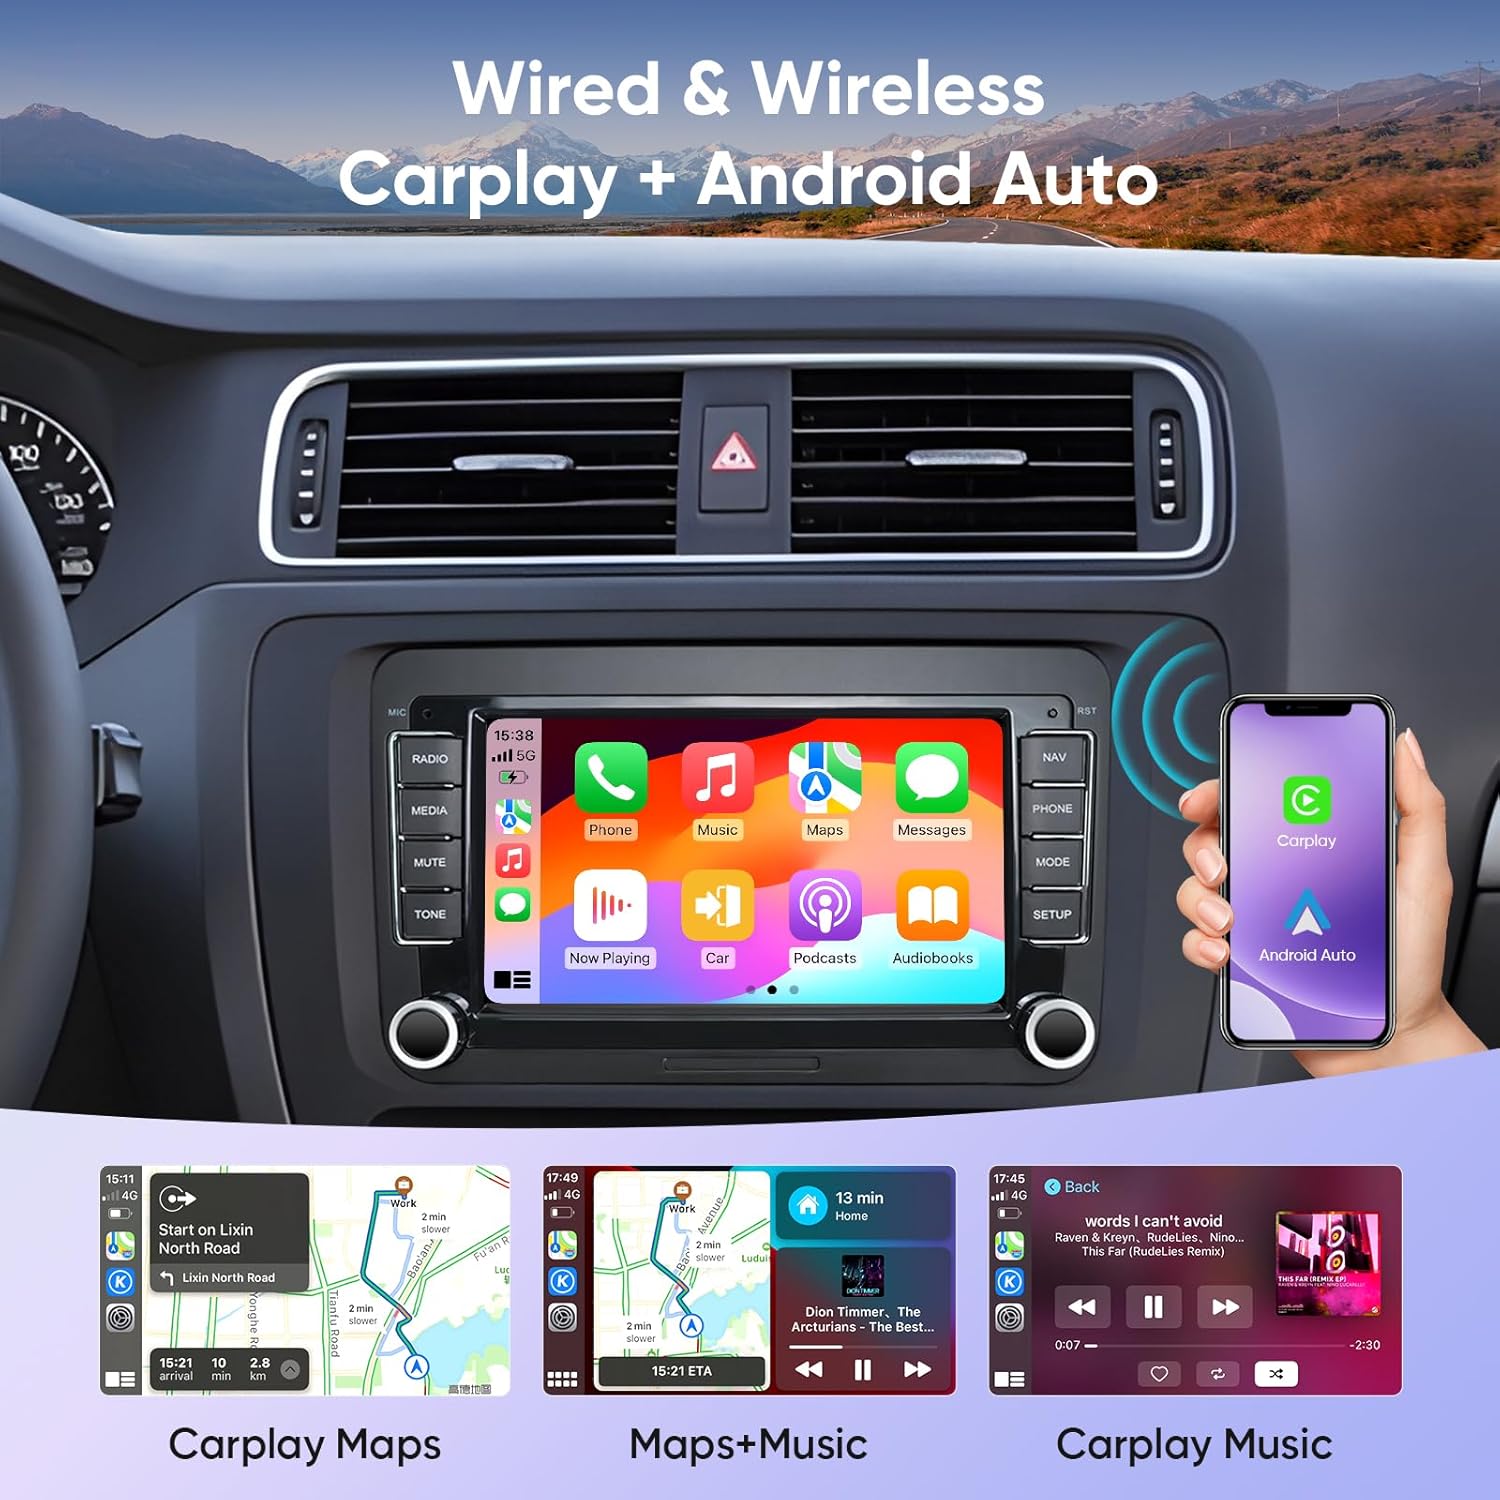
Text Description: This image displays the AINAVI car stereo's 7-inch screen with the Apple CarPlay interface active. The screen is divided into several app icons for Phone, Music, Maps, Messages, Now Playing, Exit, Podcasts, and Audiobooks. Below the main screen, smaller images show examples of CarPlay Maps, Maps+Music, and CarPlay Music in action.
3. GPS Navigation
The unit features built-in GPS navigation with 5G WiFi support for accurate real-time mapping. Access Google Maps or other compatible navigation apps from the home screen.

Text Description: This image shows the AINAVI car stereo's 7-inch screen displaying a detailed GPS navigation map within a car's dashboard. The map shows a route with estimated arrival time and distance. The surrounding dashboard elements are visible, indicating seamless integration.
4. Bluetooth Connectivity
Pair your smartphone via Bluetooth for hands-free calling and audio streaming. Access the Bluetooth menu to manage devices and settings.

Text Description: This image illustrates the AINAVI car stereo's screen with options for WiFi and Bluetooth connectivity. Below the main screen, two smaller insets show "WiFi Connection" and "Bluetooth music" interfaces, with a hand holding a smartphone demonstrating the Bluetooth connection process.
5. Split Screen Function
Utilize the split screen feature to run two applications simultaneously, such as navigation and music playback, without switching between apps.

Text Description: This image shows the AINAVI car stereo's screen in a split-screen mode, displaying two different applications simultaneously. One side shows a video playing, and the other side shows a navigation map. A smartphone is also shown mirroring its screen content to the car stereo.
6. Steering Wheel Control
The unit supports learning steering wheel controls. Access the settings menu to configure your vehicle's steering wheel buttons for convenient control of the stereo.
7. Rear View Camera Display
When the vehicle is shifted into reverse gear, the 1080P HD rear view camera display will automatically activate, providing a clear view of the area behind your car with guiding lines.

Text Description: This image displays the AINAVI car stereo's 7-inch screen showing a clear 1080P AHD rear view camera feed. The view is from the back of the car, showing a parking lot with other vehicles, and includes colored parking guidelines (red, yellow, green) overlaid on the image for assistance.
Maintenance
To ensure the longevity and optimal performance of your AINAVI car stereo, follow these maintenance guidelines:
- Cleaning the Screen: Use a soft, lint-free cloth to gently wipe the touchscreen. For stubborn smudges, slightly dampen the cloth with water or a screen-safe cleaner. Avoid harsh chemicals or abrasive materials.
- General Care: Keep the unit free from dust and debris. Avoid exposing the unit to extreme temperatures or direct sunlight for prolonged periods.
- Software Updates: Periodically check for software updates to ensure you have the latest features and bug fixes. Updates can usually be performed via Wi-Fi.
Troubleshooting
If you encounter any issues with your AINAVI car stereo, please refer to the common problems and solutions below. If the problem persists, contact our technical support team.
- Device not turning on:
- Check all power cable connections to ensure they are secure.
- Verify that the vehicle's power supply is active.
- If your vehicle requires a CANbus decoder, ensure it is correctly connected.
- "Ultra High Definition Eats" video playing unexpectedly:
- This may indicate a software glitch or an unintended pre-installed video. Try performing a factory reset or contacting support for a firmware update.
- Backup camera issues (snow/9-grid display):
- This often indicates an incorrect image format setting. Long-press the screen for 5 seconds to access image format settings and select AHD720P25. Alternatively, navigate to Settings > Factory Settings (Password) > Camera-RVC Channel Config > AHD.
- Ensure all camera wiring, including the trigger cable, is correctly installed and secured.
- Device not fitting flush in dashboard:
- Verify compatibility with your specific vehicle model (Volkswagen, SEAT, Skoda). Some models, like the 2014 Volkswagen Beetle, may have specific fitment challenges due to bottom corner dimensions.
- Steering wheel controls not working:
- Access the steering wheel learning function in the settings menu to program the buttons.
Specifications
| Feature | Detail |
|---|---|
| Item Weight | 3.32 pounds |
| Package Dimensions | 13.78 x 9.92 x 5.2 inches |
| Item Model Number | 2G+64G |
| Display Size | 7 Inches |
| Operating System | Android 12.0 |
| Memory (RAM) | 2GB |
| Storage (ROM) | 64GB |
| Connectivity Technology | Bluetooth, USB, Wi-Fi (2.4GHz & 5GHz), Wireless/Wired CarPlay & Android Auto |
| Special Features | 48EQ (Sound Point Control) + Premium DSP, Highest Level QLED Screen, Split Screen Function, Touchscreen |
| Map Type | Europe, North America, South America, Worldwide (Google Maps) |
| Audio Output Mode | Surround Sound Stereo |
| Rear View Camera Input | 1080P HD AHD (included) |
Warranty
Your AINAVI 7-inch Car Stereo Radio comes with a 12 Months Manufacturer Guarantee. Please retain your proof of purchase for any warranty claims.
Customer Support
For professional technical support regarding installation, operation, or any other inquiries, please contact our dedicated support team:
- Phone: +1 (833) 858-5016
- Working Hours: 01:00 PM to 00:00 AM PST
- Email: info@ainavi.com
You can also seek help via your order center on Amazon.

Text Description: This image displays AINAVI's customer support information. It features a smiling customer service representative wearing a headset. Below the image, contact details are provided: a phone number (+1 (833) 858-5016), working hours (01:00 PM to 00:00 AM PST), and an email address (info@ainavi.com).


