1. Introduction
Thank you for choosing the SIRMAN TC 8 VEGAS Medium-Duty Meat Grinder. This manual provides essential information for the safe and efficient operation, maintenance, and troubleshooting of your new appliance. Please read this manual thoroughly before using the grinder and retain it for future reference.
The SIRMAN TC 8 VEGAS is designed for medium-duty applications in commercial kitchens, butcher shops, and delis, offering reliable performance for grinding various types of meat.
2. Important Safety Instructions
WARNING: Failure to follow these safety instructions may result in serious injury or damage to the appliance.
- Always disconnect the power supply before assembling, disassembling, cleaning, or performing any maintenance.
- Keep hands and utensils away from the feed opening and grinding plates during operation. Use the provided food pusher only.
- Ensure all parts are correctly assembled and secured before operating the grinder.
- Do not operate the grinder with wet hands or in wet conditions.
- Never feed bones, nuts, or other hard objects into the grinder, as this can damage the motor and grinding components.
- This appliance is not intended for use by persons with reduced physical, sensory, or mental capabilities, or lack of experience and knowledge, unless they have been given supervision or instruction concerning use of the appliance by a person responsible for their safety.
- Keep children away from the appliance during operation and storage.
- Do not immerse the motor housing in water or any other liquid.
- Regularly inspect the power cord and plug for damage. If damaged, do not use the appliance and contact qualified service personnel.
3. Package Contents
Carefully unpack all components and check against the list below. If any items are missing or damaged, contact your supplier immediately.
- SIRMAN TC 8 VEGAS Meat Grinder Motor Unit
- Grinding Head Assembly (includes auger, knife, grinding plate)
- Hopper Tray
- Food Pusher
- Set of 5 Grinding Plates (3/16”, 7/32”, 5/26”, 3/8”, 9/16”)
- Instruction Manual
4. Product Overview
The SIRMAN TC 8 VEGAS Meat Grinder features a robust design for efficient and consistent meat processing. Familiarize yourself with the main components before operation.
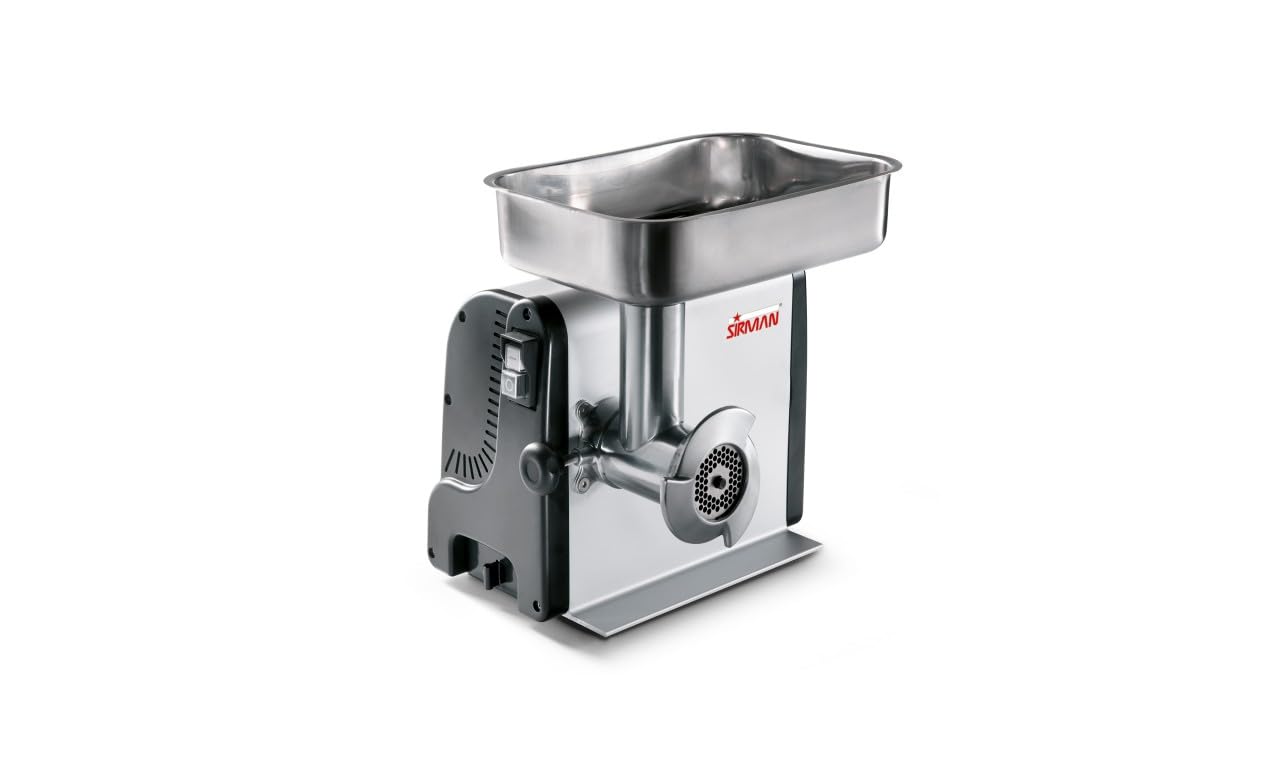
Figure 4.1: Fully assembled SIRMAN TC 8 VEGAS Meat Grinder. This image shows the main motor unit, grinding head, hopper, and food pusher.
Key Components:
- Motor Unit: Houses the 1/3 Hp fan-cooled motor and sealed gear box.
- Grinding Head: Attaches to the motor unit and contains the auger, knife, and grinding plate.
- Hopper Tray: Sits atop the grinding head, used to feed meat into the auger.
- Food Pusher: Used to safely guide meat into the grinding head.
- Grinding Plates: Interchangeable plates for different grinding textures.
- Storage Compartment: Integrated into the unit for convenient storage of grinding plates and knives.
5. Setup and Assembly
Before first use, clean all parts that will come into contact with food. Refer to the "Cleaning and Maintenance" section for detailed instructions.
Assembly Steps:
- Place the motor unit on a stable, level, and dry surface. Ensure adequate ventilation around the unit.
- Insert the auger into the grinding head, ensuring it is fully seated.
- Place the grinding knife onto the auger shaft, with the sharp edge facing outwards towards the grinding plate.
- Select the desired grinding plate and place it over the knife and auger shaft.
- Screw the locking ring onto the grinding head until it is hand-tight, securing the plate and knife. Do not overtighten.
- Attach the assembled grinding head to the motor unit by aligning the tabs and rotating until it locks securely into place.
- Place the hopper tray onto the top of the grinding head.
- Ensure the power switch is in the "OFF" position before plugging the unit into a grounded electrical outlet.
Figure 5.1: Example of disassembled components for cleaning or assembly. This image shows the main motor unit, grinding head, auger, knife, and various grinding plates.
6. Operating Instructions
Always ensure the grinder is properly assembled and connected to a suitable power supply before operation.
Preparing Meat for Grinding:
- Trim excess fat, gristle, and bones from the meat.
- Cut meat into pieces that fit easily into the hopper opening (approximately 1-inch cubes).
- For best results, chill the meat and grinding components (auger, knife, plate) in a refrigerator for 30 minutes before grinding. This helps prevent smearing and ensures a cleaner grind.
Grinding Process:
- Place a suitable container under the grinding head to collect the ground meat.
- Turn the power switch to the "ON" position. The motor will start.
- Carefully feed the prepared meat into the hopper tray.
- Use the food pusher to gently guide the meat down into the auger. NEVER use your fingers or any other utensil.
- Do not force meat into the grinder. Allow the auger to pull the meat through at its own pace.
- If the grinder becomes jammed, immediately turn off the power switch, unplug the unit, and refer to the "Troubleshooting" section.
- After grinding, turn the power switch to the "OFF" position and unplug the unit.
7. Cleaning and Maintenance
WARNING: Always unplug the grinder from the power outlet before cleaning or maintenance.
Disassembly for Cleaning:
- Ensure the unit is unplugged and cool.
- Remove the hopper tray.
- Unlock and remove the grinding head from the motor unit.
- Unscrew the locking ring, then carefully remove the grinding plate, knife, and auger.
Cleaning Instructions:
- Wash all removable parts (grinding head, auger, knife, plates, hopper tray, food pusher) immediately after use in warm, soapy water.
- Use a brush to remove any meat residue from the grinding plate holes and other crevices.
- Rinse thoroughly with clean water.
- Dry all parts completely to prevent rust, especially the knife and grinding plates. A thin coat of food-grade mineral oil can be applied to metal parts for added protection during storage.
- Wipe the motor unit with a damp cloth. NEVER immerse the motor unit in water.
- Store grinding plates and knives in the integrated storage compartment for convenience and protection.
Maintenance:
- Regularly check the power cord for any signs of damage.
- Ensure the grinding knife remains sharp for optimal performance. Replace if dull or damaged.
- The sealed gear box is designed for long-lasting performance and typically requires no user maintenance.
8. Troubleshooting
If you encounter issues with your meat grinder, refer to the following table for common problems and solutions.
| Problem | Possible Cause | Solution |
|---|---|---|
| Grinder does not start. |
|
|
| Meat is not grinding or comes out mushy. |
|
|
| Loud noise or vibration during operation. |
|
|
If the problem persists after attempting these solutions, please contact customer support.
9. Specifications
| Feature | Detail |
|---|---|
| Model Number | 210814D8NA |
| Brand | Sirman |
| Motor | 1/3 Hp (250W) Fan-Cooled |
| Output Capacity | Up to 5 lbs/min |
| Drive System | Sealed Gear Box with Hardened Gears in Oil Bath |
| Material | Stainless Steel (grinding components), Aluminum Body, Shockproof ABS Side Panels |
| Grinding Plates Included | 5 (3/16”, 7/32”, 5/26”, 3/8”, 9/16”) |
| Product Dimensions (L x W x H) | 13"L x 22"W x 15"H |
| Recommended Use | Meat Grinding (Medium-Duty Commercial) |
10. Warranty and Customer Support
SIRMAN products are manufactured to high-quality standards and are backed by a manufacturer's warranty against defects in materials and workmanship. Specific warranty terms and duration may vary by region and retailer. Please retain your proof of purchase for warranty claims.
For technical assistance, spare parts, or warranty inquiries, please contact your authorized SIRMAN dealer or visit the official SIRMAN website for contact information.
Online Support: www.sirman.com


