Introduction
Welcome and thank you for choosing the AOOCOO 8K HDMI DP 4 In 2 Out KVM Switch. This device allows you to control up to four computers using a single set of keyboard and mouse, and share two monitors. Please read this manual carefully before use to ensure proper installation and operation.
Package Contents
The following items are included in your package:
- 1x AOOCOO Dual Monitor USB3.0 HDMI + DP KVM Switch
- 4x USB 3.0 Cables (1.5m)
- 1x Wired Controller
- 1x User Manual
- 1x DC12V Power Adapter

Product Overview
The AOOCOO KVM Switch is designed to streamline your workspace by enabling control of multiple computers from one workstation.

Front Panel Features
- ON/OFF Switch: Power control for the device.
- USB 3.0 Ports (4x): For connecting keyboard, mouse, printer, USB drives, and other USB peripherals.
- PC Selection Buttons (PC1, PC2, PC3, PC4): Manual switching between connected computers.
- Wired Remote Port: For connecting the external wired controller.
Rear Panel Features
- HDMI Input Ports (4x): For connecting HDMI video output from each computer.
- DP Input Ports (4x): For connecting DisplayPort video output from each computer.
- USB 3.0 Input Ports (4x): For connecting the USB 3.0 data cables from each computer.
- HDMI Output Ports (2x): For connecting your two monitors.
- DP Output Ports (2x): For connecting your two monitors.
- DC/12V Power Input: For connecting the included power adapter.
Setup Instructions
Follow these steps to correctly set up your AOOCOO KVM Switch.
Connection Diagram

Step-by-Step Connection
- Ensure all computers and monitors are powered off.
- Connect the included DC12V Power Adapter to the KVM switch and then to a power outlet.
- For each computer (PC1, PC2, PC3, PC4):
- Connect one HDMI cable from the computer's HDMI output to an available HDMI Input port on the KVM switch (e.g., INPUT A1 for PC1).
- Connect one DisplayPort cable from the computer's DP output to an available DP Input port on the KVM switch (e.g., INPUT B1 for PC1).
- Connect one USB 3.0 cable from the computer's USB port to an available USB 3.0 Input port on the KVM switch (e.g., USB3.0 IN 1 for PC1).
Important: Each computer requires both an HDMI and a DisplayPort connection, along with a USB 3.0 connection, to function correctly with dual monitors and shared peripherals. For computers with discrete and integrated graphics cards, ensure the HDMI and DP ports belong to the discrete graphics card. Verify your computer supports multi-screen output.
- Connect your first monitor to the KVM switch using one HDMI cable (to OUT A) and one DisplayPort cable (to OUT B).
- Connect your second monitor to the KVM switch using one HDMI cable (to OUT A) and one DisplayPort cable (to OUT B).
- Connect your keyboard, mouse, and other USB peripherals (e.g., printer, USB drive) to the USB 3.0 ports on the front panel of the KVM switch.
- (Optional) Connect the wired controller to the "Wired Remote" port on the KVM switch.
- Power on the KVM switch using the ON/OFF switch.
- Power on your monitors and computers.
Operating Instructions
Switching Between Computers
The AOOCOO KVM Switch offers two methods for switching between connected computers:
1. Front Panel Button Switch
Press the corresponding PC selection button (PC1, PC2, PC3, or PC4) on the front panel of the KVM switch to switch to the desired computer. The indicator light will illuminate to show the active computer.
2. Wired Controller
If connected, press the button on the wired controller to cycle through the connected computers. The indicator light on the KVM switch will show the active computer.
Display Modes (Extend Mode & Mirror Mode)
The KVM switch supports both extended display mode and mirrored display mode for your two monitors.
To set the output mode on your computer: On the keyboard, press "Windows + P". A small window will appear, allowing you to choose between "Extend" mode or "Mirror" mode.

Resolution and Cable Requirements
The KVM switch supports high resolutions to ensure optimal visual experience.
- DisplayPort (DP) Part: Supports resolutions up to 8K@30Hz / 4K@144Hz.
- HDMI Part: Supports resolutions up to 8K@60Hz / 4K@120Hz.
Important: To achieve these resolutions, please use high-quality 8K HDMI and DP cables. Shorter cable lengths are recommended for a more stable signal. The KVM switch is not recommended for devices connected via VGA or DVI ports.

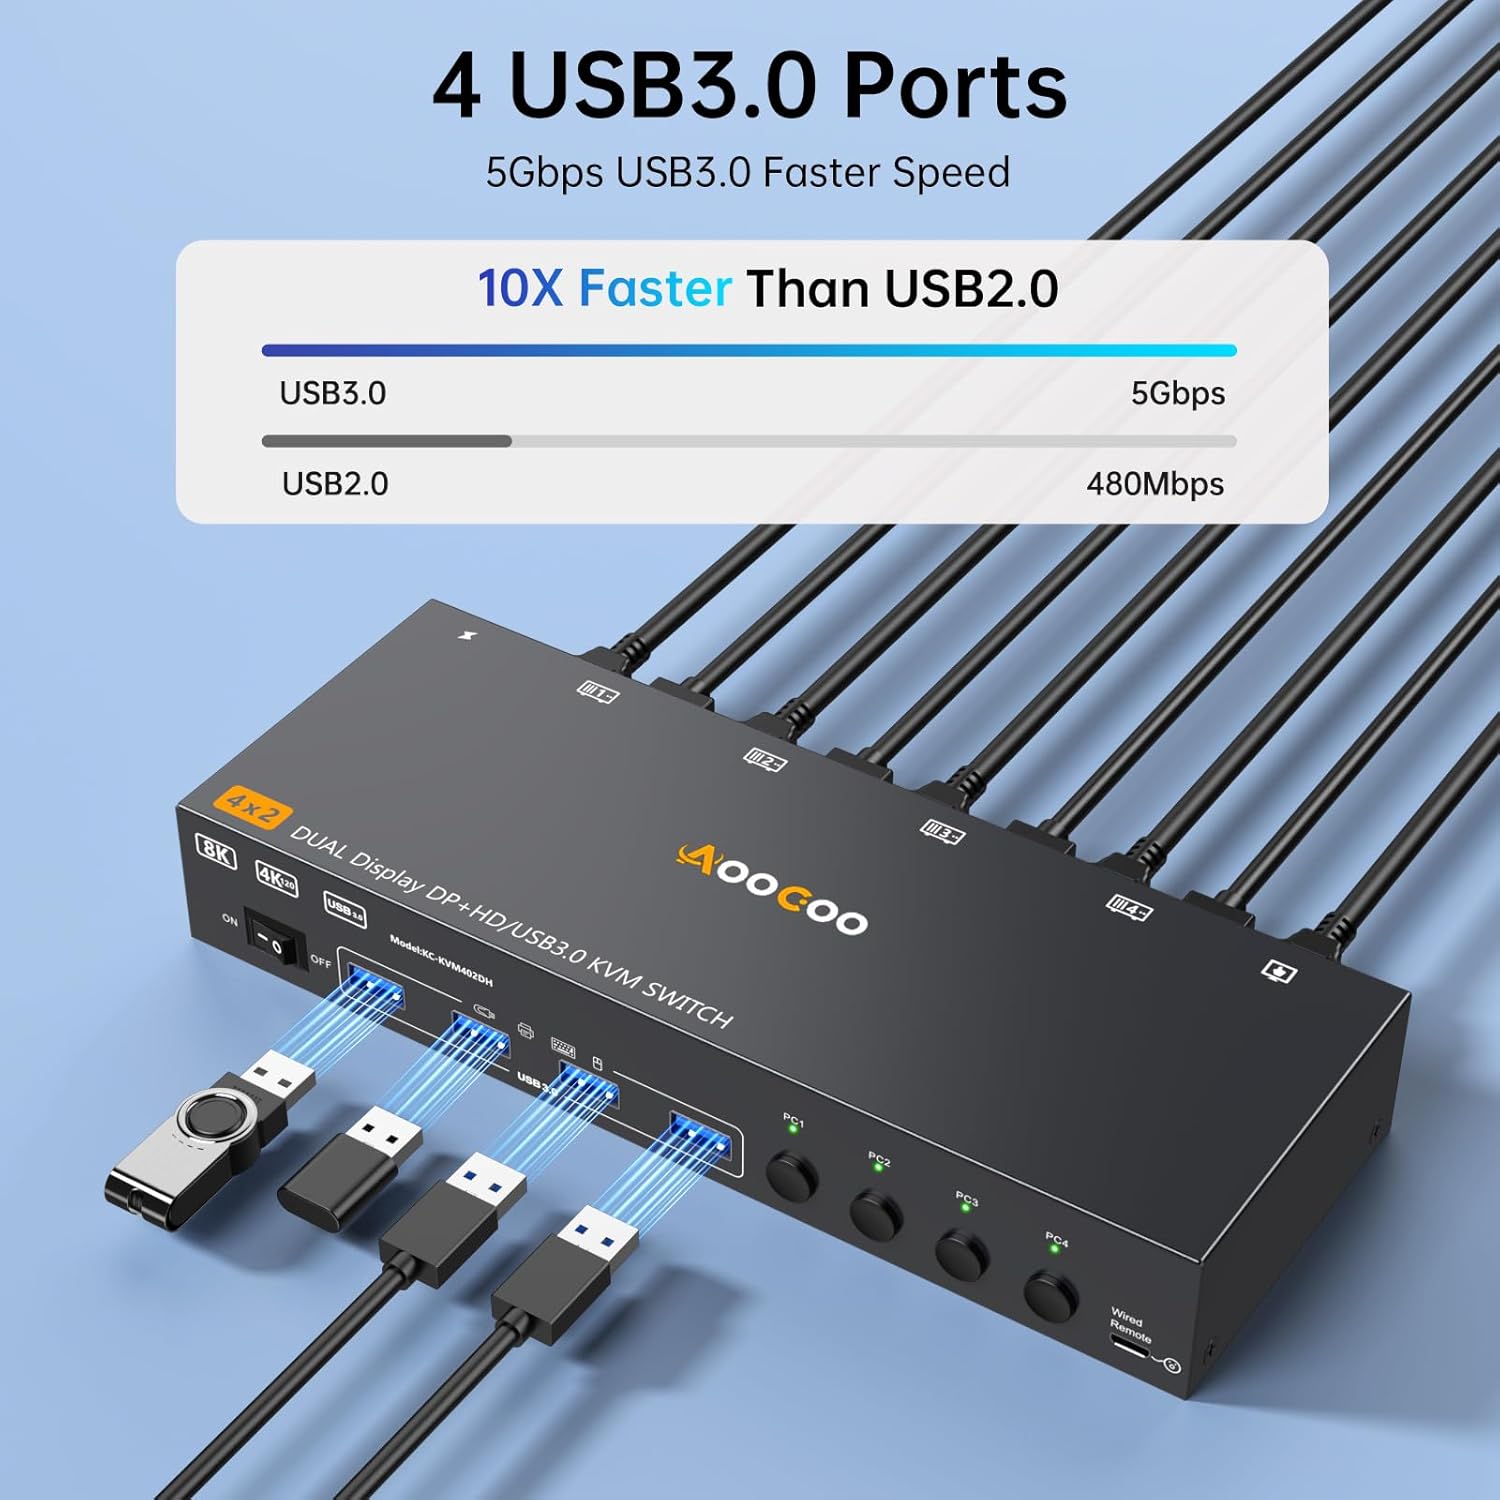
USB 3.0 Ports
The KVM switch features four USB 3.0 ports, providing high-speed data transfer for your peripherals.
- Data Transfer Speed: USB 3.0 offers data transfer speeds of up to 5Gbps, which is significantly faster than USB 2.0 (480Mbps).
- Compatibility: These ports can recognize and connect various USB devices such as keyboards, mice, printers, scanners, and USB storage devices.
Note: If the input USB 3.0 cables from your computers are not connected to the KVM or are connected incorrectly, the output USB devices connected to the KVM switch will not be recognized by the active computer.

Troubleshooting
If you encounter issues, please refer to the following common problems and solutions.
No Display or Incorrect Resolution
- Check Cables: Ensure all HDMI and DisplayPort cables are securely connected between the computers, KVM switch, and monitors.
- Cable Quality: Verify that you are using high-quality 8K/4K compatible HDMI and DP cables, especially for high resolutions.
- Power: Confirm the KVM switch is powered on and the power adapter is correctly connected.
- Computer Output: Ensure your computer's graphics card is configured for multi-screen output and that the HDMI and DP ports used belong to the discrete graphics card if applicable.
- Restart: Try restarting the KVM switch and then your computers and monitors.
Keyboard/Mouse or USB Devices Not Working
- USB Connections: Ensure the USB 3.0 cables from each computer are correctly connected to the corresponding USB 3.0 Input ports on the KVM switch.
- Peripheral Connection: Verify that your keyboard, mouse, and other USB devices are securely plugged into the USB 3.0 ports on the front of the KVM switch.
- Power Cycle: Disconnect and reconnect the USB devices, or power cycle the KVM switch.
- Direct Connection Test: Temporarily connect the USB device directly to the computer to confirm it functions independently of the KVM switch.
Switching Delays
- A brief delay (a few seconds) during switching is normal as the system re-establishes connections. If delays are excessive, check cable quality and connections.
No Audio
- Audio is transmitted via HDMI/DP. Ensure your monitors or connected audio devices are correctly configured as the default playback device on your computer.
Specifications
| Feature | Detail |
|---|---|
| Model | B0FT2JFSMS |
| Brand | AOOCOO |
| Inputs | 4x HDMI, 4x DisplayPort, 4x USB 3.0 (Type-B) |
| Outputs | 2x HDMI, 2x DisplayPort, 4x USB 3.0 (Type-A) |
| Max Resolution (DP) | 8K@30Hz / 4K@144Hz |
| Max Resolution (HDMI) | 8K@60Hz / 4K@120Hz |
| USB Data Transfer | Up to 5Gbps (USB 3.0) |
| Power Supply | DC 12V |
| Switching Methods | Front Panel Buttons, Wired Controller |
| Package Dimensions | 10.31 x 6.02 x 2.64 inches |
| Contact Material | Copper, Brass, Silver |
| Operation Mode | ON-ON |
| First Available | September 29, 2025 |
Safety Information
- Do not expose the device to water or excessive moisture.
- Do not attempt to disassemble or repair the device yourself.
- Use only the provided power adapter.
- Keep the device away from heat sources and direct sunlight.
- Ensure proper ventilation around the device.
Warranty and Support
For warranty information or technical support, please contact AOOCOO customer service. Refer to the product packaging or the official AOOCOO website for contact details.
This product is covered by a standard manufacturer's warranty. Please retain your proof of purchase for warranty claims.