
1. Introduction
This manual provides detailed instructions for setting up, operating, and maintaining your rockspace AC2100 Dual Band WiFi Extender. This device is designed to expand your existing Wi-Fi network coverage, eliminate dead zones, and provide a stable, high-speed internet connection throughout your home or office.
The rockspace AC2100 operates on both 2.4 GHz and 5 GHz bands, offering a combined speed of up to 2100 Mbps. It features strong wall penetration capabilities and a Gigabit Ethernet port for wired device connectivity.

Image: The rockspace AC2100 WiFi Extender illustrating its dual-band capabilities, with 300 Mbps for 2.4 GHz and 1734 Mbps for 5 GHz, suitable for various online activities.
2. Package Contents
Please check the package carefully for the following items:
- rockspace AC2100 WiFi Extender (Repeater)
- Quick Installation Guide (not included in this digital manual)
- Power Adapter (integrated into the device)
If any item is missing or damaged, please contact rockspace customer support.
3. Product Features
- Dual-Band Connectivity: Supports 2.4 GHz (up to 300 Mbps) and 5 GHz (up to 1734 Mbps) for a combined speed of 2100 Mbps, ensuring optimal performance for various devices and activities.
- Extended Coverage: Boosts Wi-Fi signal to cover areas up to 1292 sq.ft, effectively eliminating Wi-Fi dead zones.
- Smart Signal Switching: Utilizes 4T4R MU-MIMO technology to automatically select the best channel for a stable and reliable internet connection.
- Strong Wall Penetration: Designed to provide high-speed signal through walls, especially on the 5 GHz band, making it suitable for multi-story homes.
- Universal Compatibility: Works with any standard wireless Wi-Fi router, gateway, or access point.
- Gigabit Ethernet Port: Allows for a stable wired connection to devices such as smart TVs, gaming consoles, or PCs.
- Easy Setup: Simple configuration via WPS button or web browser.
- Smart LED Indicator: Provides visual feedback on signal strength for optimal placement.

Image: The rockspace AC2100 WiFi Extender emitting strong signals, illustrating its capability to penetrate walls and provide coverage in challenging environments.

Image: A close-up of the rockspace AC2100 WiFi Extender's Gigabit Ethernet port, highlighting its use for connecting wired devices directly to the extended network.
4. Setup Guide
There are two methods to set up your rockspace AC2100 WiFi Extender: using the WPS button or via a web browser.
4.1. WPS (Wi-Fi Protected Setup) Method
- Power On: Plug the rockspace AC2100 WiFi Extender into an electrical outlet near your main router. Wait for the Power LED to turn solid.
- Press WPS on Router: Within two minutes, press the WPS button on your main Wi-Fi router. Refer to your router's manual for the exact location of the WPS button.
- Press WPS on Extender: Immediately after pressing the WPS button on your router, press the WPS button on the rockspace AC2100 WiFi Extender.
- Wait for Connection: The Signal LED on the extender will blink during the connection process. Once connected successfully, the Signal LED will turn solid blue.
- Relocate Extender: Unplug the extender and move it to a location halfway between your router and the Wi-Fi dead zone. Ensure the Signal LED remains blue for optimal performance.
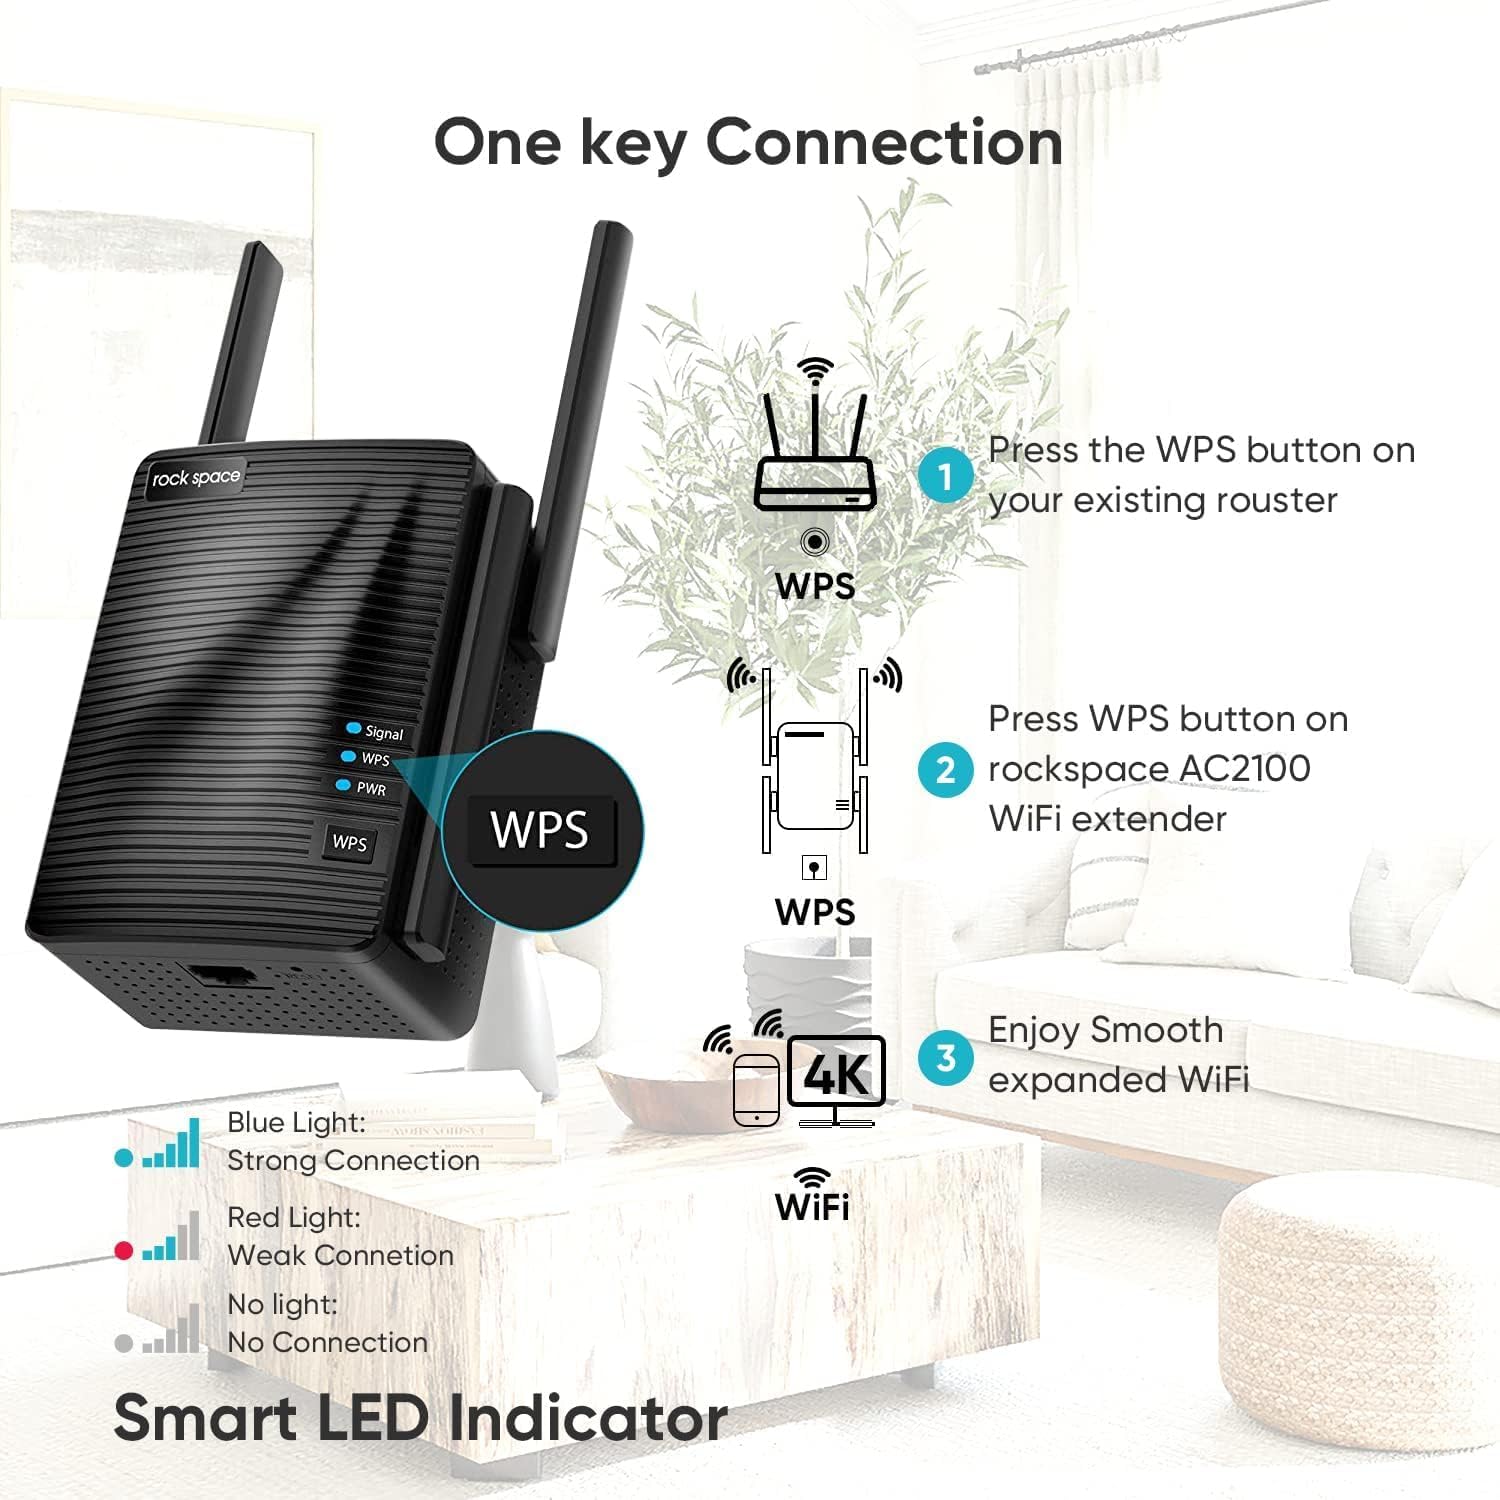
Image: Visual guide for WPS setup, showing the steps to press the WPS button on the router and then on the extender, along with the meaning of the LED indicators.
4.2. Web Browser Method
- Power On: Plug the rockspace AC2100 WiFi Extender into an electrical outlet near your main router. Wait for the Power LED to turn solid.
- Connect to Extender's Wi-Fi: On your computer or mobile device, connect to the Wi-Fi network broadcast by the extender (e.g., "rockspace_EXT"). Do not connect to your main router's Wi-Fi at this step.
- Access Setup Page: Open a web browser (e.g., Chrome, Firefox, Safari) and enter
re.rockspace.localor192.168.0.254in the address bar. - Log In: Create a new login password when prompted.
- Select Network: Follow the on-screen instructions to scan for available Wi-Fi networks. Select your main router's 2.4 GHz and 5 GHz networks.
- Enter Password: Enter the Wi-Fi password for your main router's networks.
- Configure Extended Network: You can choose to keep the same network name (SSID) for the extended network or create new ones.
- Complete Setup: Confirm your settings. The extender will restart. Once the Signal LED turns solid blue, the setup is complete.
- Relocate Extender: Unplug the extender and move it to a location halfway between your router and the Wi-Fi dead zone. Ensure the Signal LED remains blue for optimal performance.
5. Operating Instructions
5.1. Connecting Devices
After successful setup, your rockspace AC2100 WiFi Extender will broadcast an extended Wi-Fi network. You can connect your wireless devices (smartphones, tablets, laptops, etc.) to this extended network using the Wi-Fi name and password you configured during setup.
5.2. Using the Ethernet Port
The Gigabit Ethernet port on the bottom of the extender allows you to connect a wired device, such as a desktop computer, gaming console, or smart TV, to your extended network. This provides a stable and high-speed connection for devices that benefit from a direct link.
To use the Ethernet port:
- Ensure the extender is powered on and successfully connected to your main router (Signal LED is blue).
- Connect one end of an Ethernet cable to the Gigabit Ethernet port on the extender.
- Connect the other end of the Ethernet cable to the Ethernet port on your wired device.
- The device should automatically detect the wired connection and access the internet.
6. LED Indicators
The rockspace AC2100 WiFi Extender features several LED indicators to provide status information:
- Signal LED:
- Solid Blue: Good connection to the main router. Optimal placement.
- Solid Red: Weak connection to the main router. Relocate the extender closer to the router.
- No Light: No connection to the main router. Check power and setup.
- Blinking: Connecting via WPS or during initial setup.
- WPS LED:
- Blinking: WPS pairing in progress.
- Solid: WPS connection successful (may turn off after a short period).
- PWR (Power) LED:
- Solid: Device is powered on.
- Off: Device is powered off.
7. Troubleshooting
If you encounter issues with your rockspace AC2100 WiFi Extender, refer to the following common solutions:
| Problem | Solution |
|---|---|
| Extender cannot connect to the router (Signal LED is red or off). |
|
| Slow internet speed when connected to the extender. |
|
| Cannot access the web management page (re.rockspace.local). |
|
| Forgot login password for the web management page. |
|
8. Specifications
| Feature | Detail |
|---|---|
| Model | AC2100 |
| Brand | rockspace |
| Wireless Standards | IEEE 802.11ac/n/g/b/a |
| Frequency Bands | 2.4 GHz and 5 GHz |
| Data Transfer Rate | Up to 300 Mbps (2.4 GHz), Up to 1734 Mbps (5 GHz) |
| Ethernet Port | 1 x Gigabit Ethernet Port |
| Special Features | MU-MIMO, WPS Button, Smart LED Indicator |
| Coverage Area | Up to 1292 sq.ft |
| Dimensions | 5.91 x 4.65 x 4.29 inches (Package) |
| Weight | 13.1 ounces |
9. Maintenance
- Optimal Placement: Ensure the extender is placed in a location where the Signal LED is solid blue for best performance. Avoid placing it near large metal objects, concrete walls, or appliances that emit electromagnetic interference (e.g., microwaves, cordless phones).
- Firmware Updates: Periodically check the rockspace official website for firmware updates. Keeping your device's firmware up-to-date can improve performance, stability, and security.
- Cleaning: Use a soft, dry cloth to clean the exterior of the extender. Do not use liquid cleaners or aerosols. Ensure the device is unplugged before cleaning.
- Resetting: If the extender becomes unresponsive or you wish to reconfigure it from scratch, perform a factory reset by pressing and holding the reset button for 8-10 seconds. Note that this will erase all custom settings.
10. Warranty and Support
rockspace products come with a standard manufacturer's warranty. For specific warranty terms and conditions, please refer to the warranty card included with your product or visit the official rockspace website.
For technical support, troubleshooting assistance, or to inquire about warranty services, please contact rockspace customer support through their official channels. Contact information can typically be found on the rockspace website or in the product packaging.
Please retain your purchase receipt for warranty purposes.