Introduction
This manual provides detailed instructions for the setup, operation, and maintenance of your YZDTECH Digital Wireless Rain Gauge Weather Station. This device offers comprehensive weather monitoring, including precise rain measurements, indoor and outdoor temperature and humidity readings, air pressure history, moon phase display, and weather forecasts. It also features an integrated calendar, dual snooze alarms, and automatic time calibration via WWVB for accurate timekeeping.
Package Contents
- Main Display Unit
- Wireless Rain Gauge Sensor
- Wireless Outdoor Temperature/Humidity Sensor (1 included, supports up to 3)
- Power Adapter
- User Manual
Note: The package contains one outdoor temperature/humidity sensor. Additional sensors are sold separately.
Setup
1. Powering the Main Display Unit
The main display unit can be powered by the included DC adapter or by 3 x LR03 AAA batteries (not included). For continuous operation and adjustable backlight brightness, using the DC adapter is recommended.
- Connect the DC adapter to the main display unit and plug it into a power outlet.
- Alternatively, open the battery compartment on the back of the unit and insert 3 AAA batteries, observing polarity.

Image: The main display unit illustrating its two power options: a DC adapter for continuous power and a battery compartment for 3 AAA batteries.
2. Installing Batteries in Sensors
Insert batteries into the wireless rain gauge sensor and the outdoor temperature/humidity sensor. Ensure correct polarity. Close the battery compartments securely to protect against weather elements.
3. Sensor Placement
- Rain Gauge: Place the rain gauge in an open area, away from obstructions like trees or buildings, to ensure accurate rainfall collection. The self-draining design allows for maintenance-free operation.
- Outdoor Sensor: Position the outdoor temperature/humidity sensor in a shaded area, protected from direct sunlight and rain, to obtain accurate readings. Ensure it is within the 100m (328ft) transmission range of the main unit.

Image: The main display unit and the wireless outdoor sensor, demonstrating their typical placement for optimal performance.
4. Initial Synchronization
Once both the main unit and sensors are powered, the main unit will automatically search for and connect to the sensors. This process may take a few minutes. Ensure the sensors are within range.
5. Atomic Clock Synchronization
The weather station automatically synchronizes its time with the WWVB signal, ensuring accurate time display and automatic Daylight Saving Time (DST) adjustments. Set your time zone on the main unit for correct local time. If the WWVB signal is weak, manual time setting is possible.
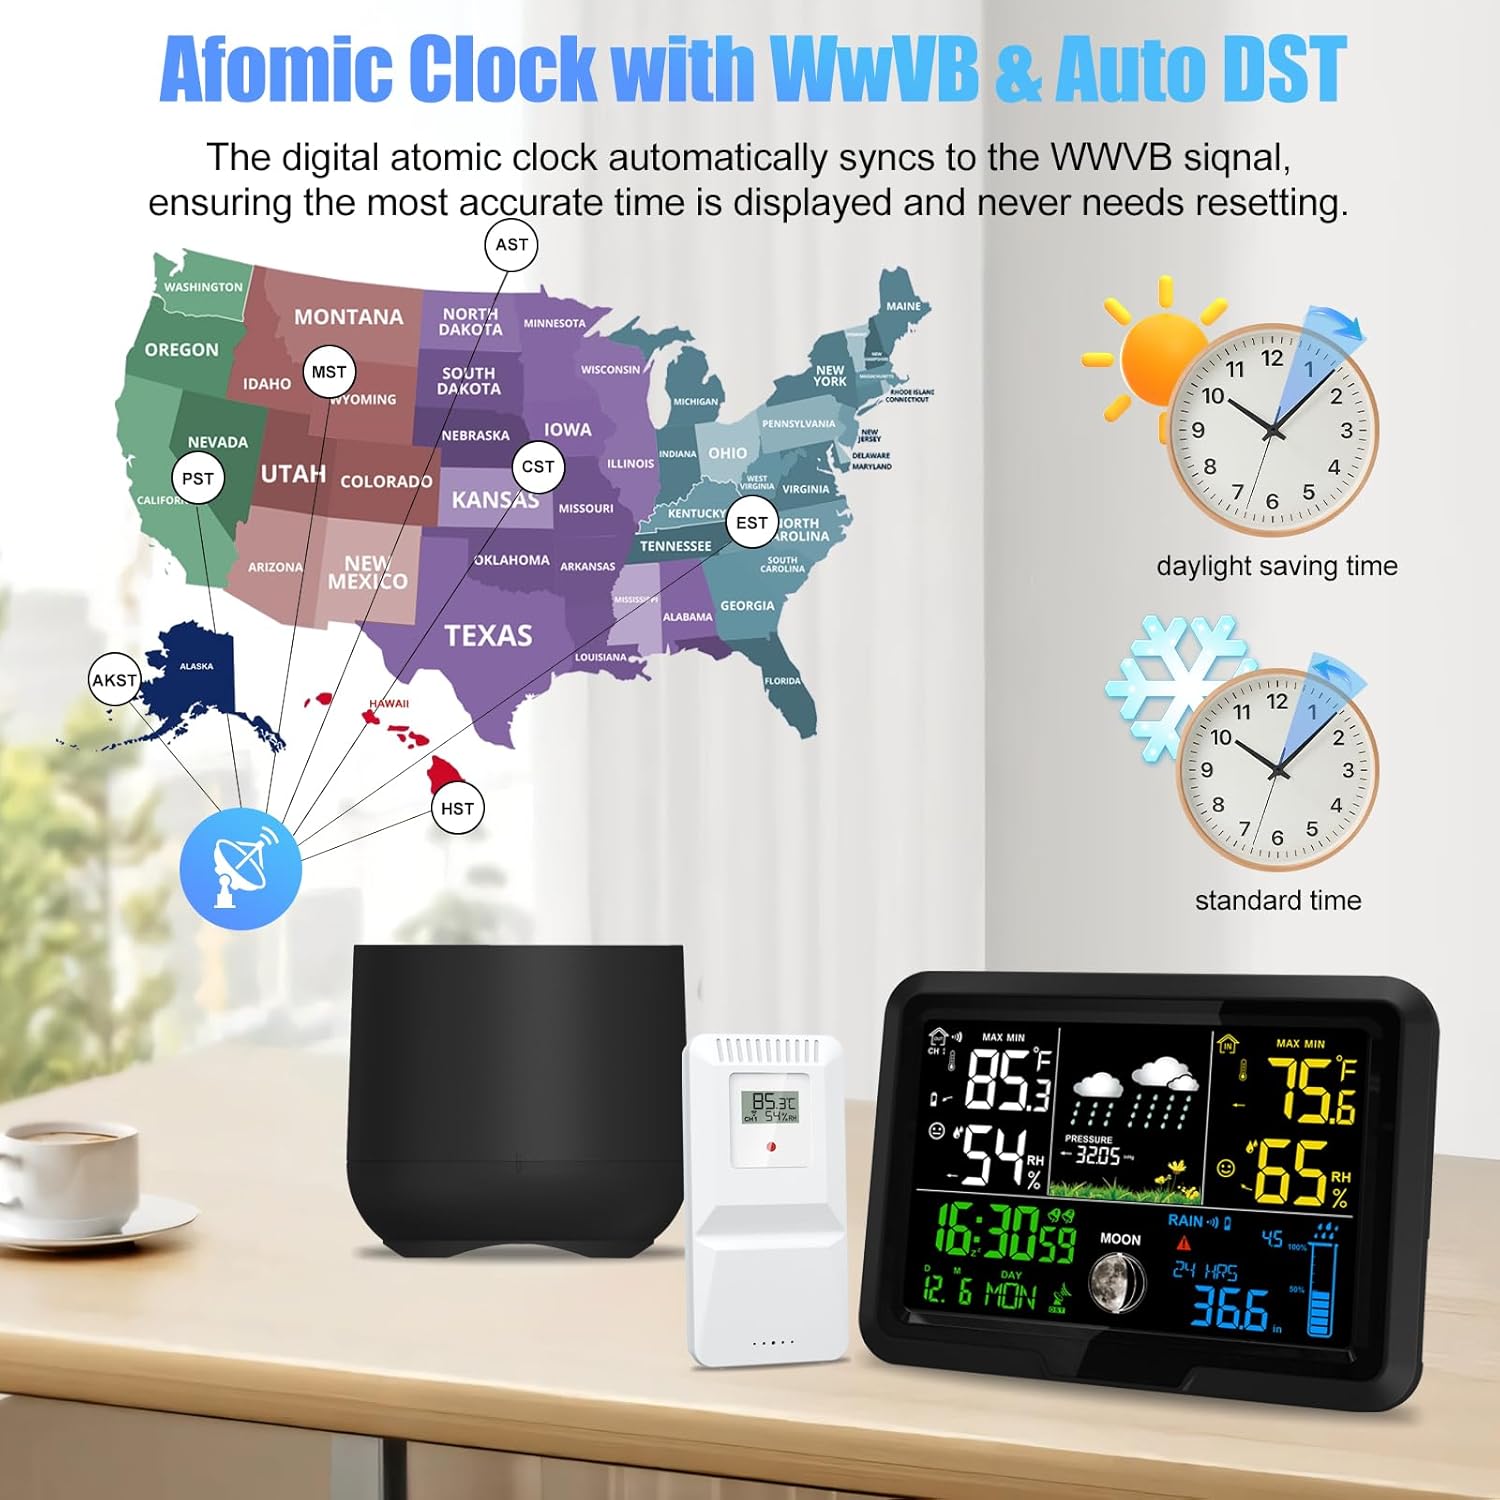
Image: A visual representation of the WWVB atomic clock signal coverage across the United States, illustrating how the weather station automatically adjusts for time zones and Daylight Saving Time.
Operating Instructions
1. Main Display Unit Overview
The full-color LCD display provides a wide range of information at a glance. Key display areas include:
- Indoor/Outdoor Temperature and Humidity
- Weather Forecast Icons
- Air Pressure History
- Time, Date, and Day of the Week
- Moon Phase
- Rainfall Data
- Alarm Indicators

Image: A labeled diagram of the weather station's display, highlighting sections for outdoor temperature and humidity, weather forecast and air pressure, time, date, alarm clock, rain gauge, and moon phase.
2. Rainfall Measurement
The wireless rain gauge provides precise rainfall data. The main unit displays rainfall in various dimensions:
- Current rainfall
- Daily rainfall
- Weekly rainfall
- Monthly rainfall
- Yearly rainfall
A rainfall alarm function can be configured to alert you to specific precipitation levels.
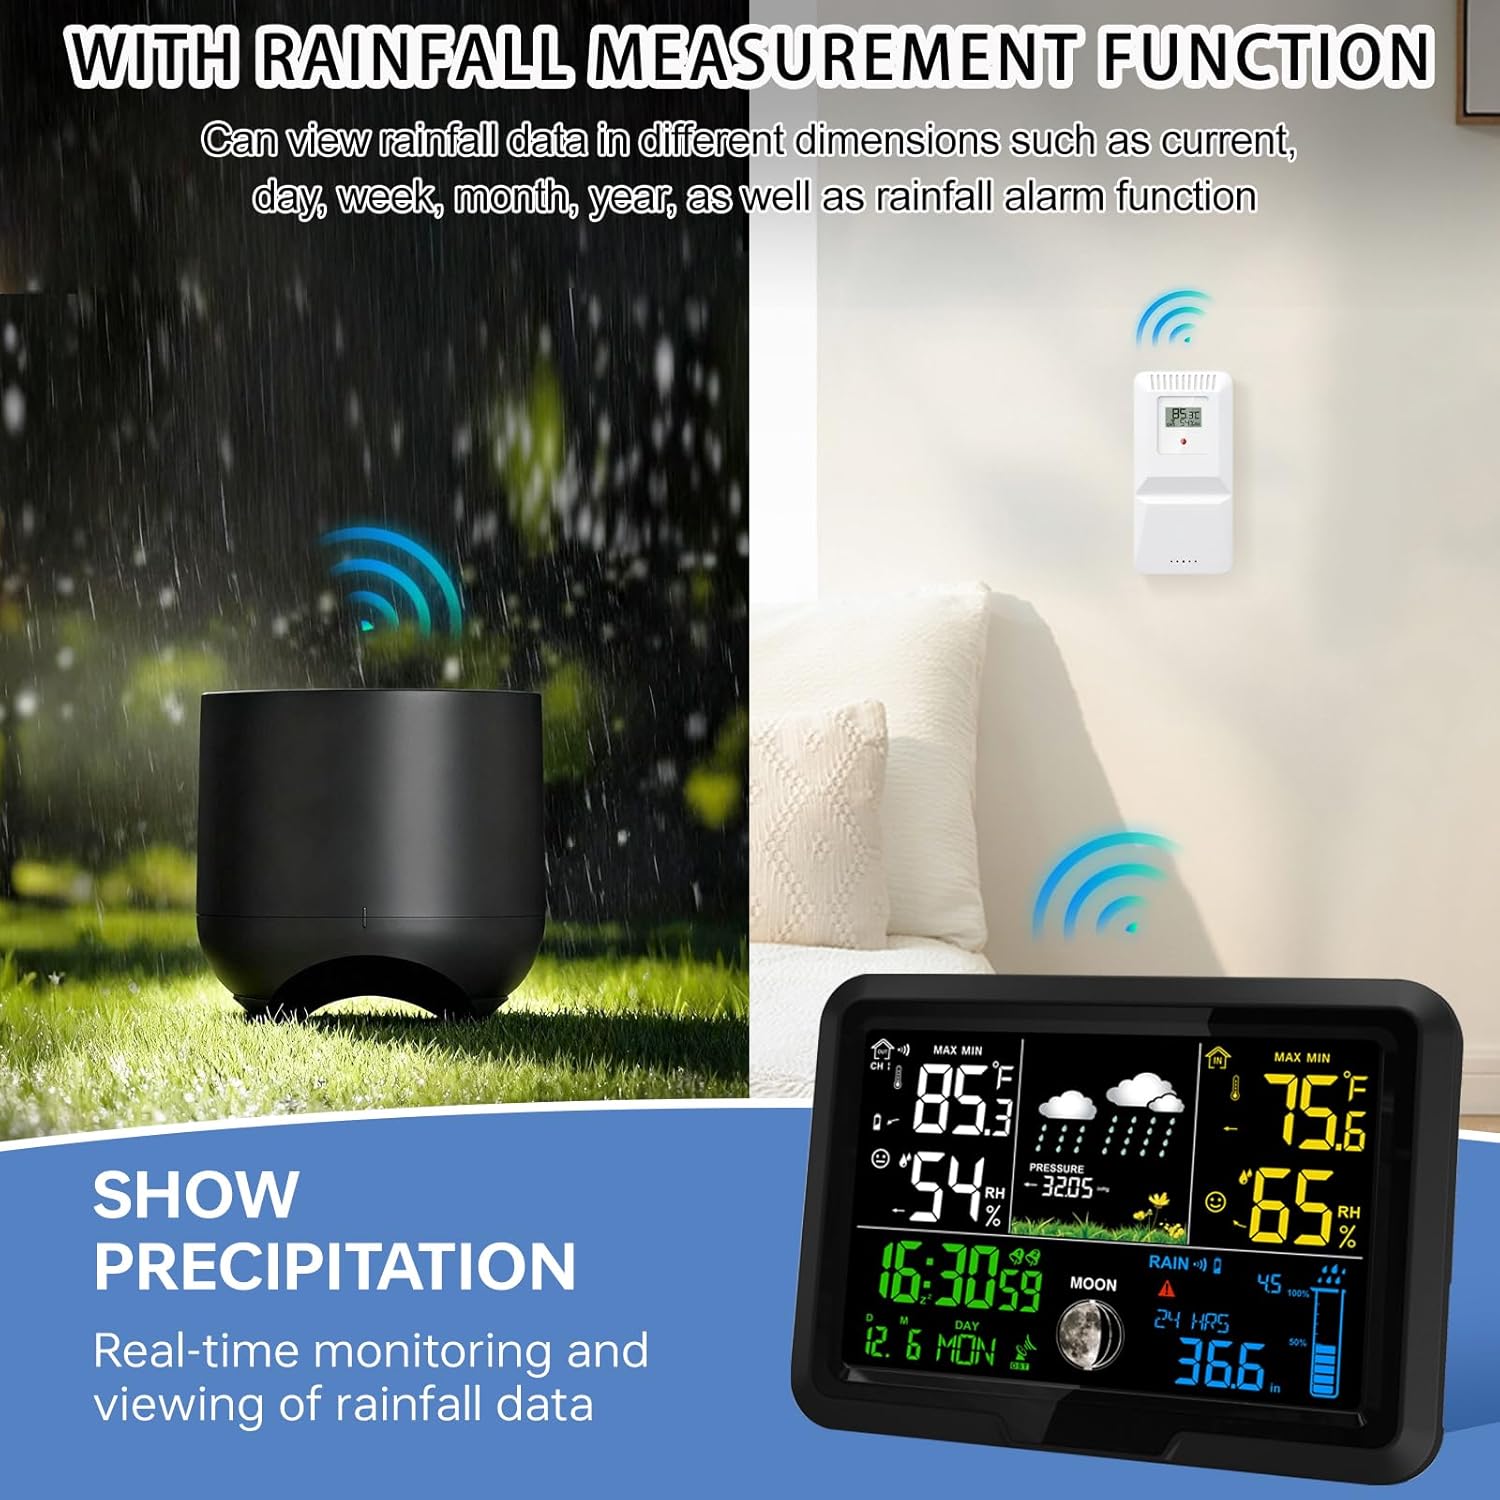
Image: The wireless rain gauge positioned outdoors, alongside the main display unit showing real-time rainfall data and other environmental readings.
3. Temperature and Humidity Monitoring
The station displays both indoor and outdoor temperature and humidity. It also tracks trends and provides a comfort indicator.

Image: The main display unit showing temperature, humidity, and comfort levels, with illustrations suggesting its capability to connect to multiple sensors for monitoring different indoor and outdoor locations.
4. Weather Forecast and Atmospheric Pressure
The station provides a weather forecast based on atmospheric pressure changes, displayed with intuitive icons (e.g., sunny, cloudy, rainy, snowy). It also shows air pressure history and trends.

Image: A visual guide to the six types of weather forecast icons displayed on the weather station: Sunny, Cloudy, Overcast, Rain, Sunshower, and Snow, providing comprehensive weather notifications.
5. Time Management and Alarms
The atomic clock ensures precise time and date. The station includes two daily alarms with a snooze function for daily planning.
6. Display Brightness Adjustment
When powered by the DC adapter, the LCD backlight has four adjustable brightness levels (100%, 75%, 50%, 25%) and an OFF option. This allows for optimal visibility in various lighting conditions and power saving.
Image: The main display unit demonstrating its five brightness levels (LI/4 to OFF) when powered by the DC adapter, alongside an illustration of battery power option.
Maintenance
- Cleaning: Wipe the main display unit and sensors with a soft, damp cloth. Avoid abrasive cleaners or solvents.
- Rain Gauge: The rain gauge is self-draining. Periodically check for debris (leaves, insects) that might obstruct the funnel or tipping bucket mechanism. Clear any blockages carefully.
- Battery Replacement: Replace batteries in the sensors and main unit (if battery-powered) when the low battery indicator appears on the display.
- Sensor Placement: Ensure outdoor sensors remain securely mounted and free from obstructions.
Troubleshooting
No Display on Main Unit
- Check if the DC adapter is securely plugged in and the power outlet is functional.
- If using batteries, ensure they are inserted correctly and are not depleted. Replace if necessary.
No Sensor Data (Outdoor Temp/Humidity, Rain)
- Ensure batteries in the sensors are fresh and correctly installed.
- Verify that sensors are within the 100m (328ft) transmission range of the main unit and there are no major obstructions (thick walls, metal objects) between them.
- Try bringing the sensors closer to the main unit to re-establish connection.
- Reboot the main unit and sensors by removing and reinserting batteries/power.
- If the rain gauge connection frequently drops, ensure it is placed optimally and free from interference.
Inaccurate Weather Forecast
- The weather forecast is based on atmospheric pressure changes over time and is an estimation for a local area. It may not always perfectly match official weather reports.
- Allow the station sufficient time (24-48 hours) to calibrate and learn local pressure patterns after initial setup.
Atomic Clock Not Synchronizing
- Ensure the main unit is placed away from electronic devices that might cause interference.
- Try repositioning the main unit to a location with better reception for the WWVB signal.
- If automatic synchronization fails, you can set the time and date manually.
Specifications
| Brand | YZDTECH |
| Model Number | Weather Station with Rain Gauge (250928WEA01) |
| Connectivity Technology | Wireless |
| Power Source (Main Unit) | AC/DC Adapter (included), 3 x LR03 AAA Batteries (not included) |
| Special Features | Digital Rain Gauge, Wireless Sensors, Atomic Clock (WWVB), DST, Weather Forecast, Temperature, Humidity, Barometer, Moon Phase, Dual Alarms, Adjustable Backlight |
| Material | Plastic |
| Product Dimensions | 15.24 x 15.24 x 1.85 cm (Main Unit) |
| Item Weight | 540 g |
| Outdoor Sensor Range | Up to 100m (328ft) in open area |
| Display Type | Full Color LCD |


