1. Important Safety Information
Please read this entire manual carefully before operating the treadmill. Keep this manual for future reference. Failure to follow these instructions may result in injury or damage to the product.
- Always place the treadmill on a flat, stable surface.
- Ensure adequate clear space around the treadmill (at least 0.6 meters on all sides).
- Keep children and pets away from the treadmill during operation.
- Do not operate the treadmill if it is damaged or malfunctioning.
- Wear appropriate athletic footwear and clothing.
- Consult a physician before starting any exercise program.
- Do not use the treadmill in wet or damp conditions.
- Unplug the treadmill from the power outlet when not in use or before cleaning/maintenance.
2. Product Overview
The vannect X309AS Electric Treadmill is designed for home and office use, offering a versatile workout experience with adjustable speed and incline.
Package Contents
- vannect X309AS Electric Treadmill
- Remote Control
- User Manual (this document)
- Tool Kit
- Lubricant
Specifications
| Feature | Specification |
|---|---|
| Brand | vannect |
| Model Number | X309AS |
| Motor | 2.75 HP Brushless Motor |
| Speed Range | 1-10 km/h |
| Incline | Manual 9% Adjustable |
| Running Surface (L x W) | 116 cm x 50.5 cm |
| Weight Capacity | 150 kg |
| Noise Level | <30 dB |
| Dimensions (L x W x H) | 116 x 50.5 x 12.5 cm |
| Item Weight | 18 kg |
| Running Belt | 5-layer anti-slip |
| Shock Absorption | 10 silicone shock absorbers |
| Display | LED (Time, Speed, Distance, Calories) |
| Control | Magnetic Remote Control |
| Power Source | Corded Electric |
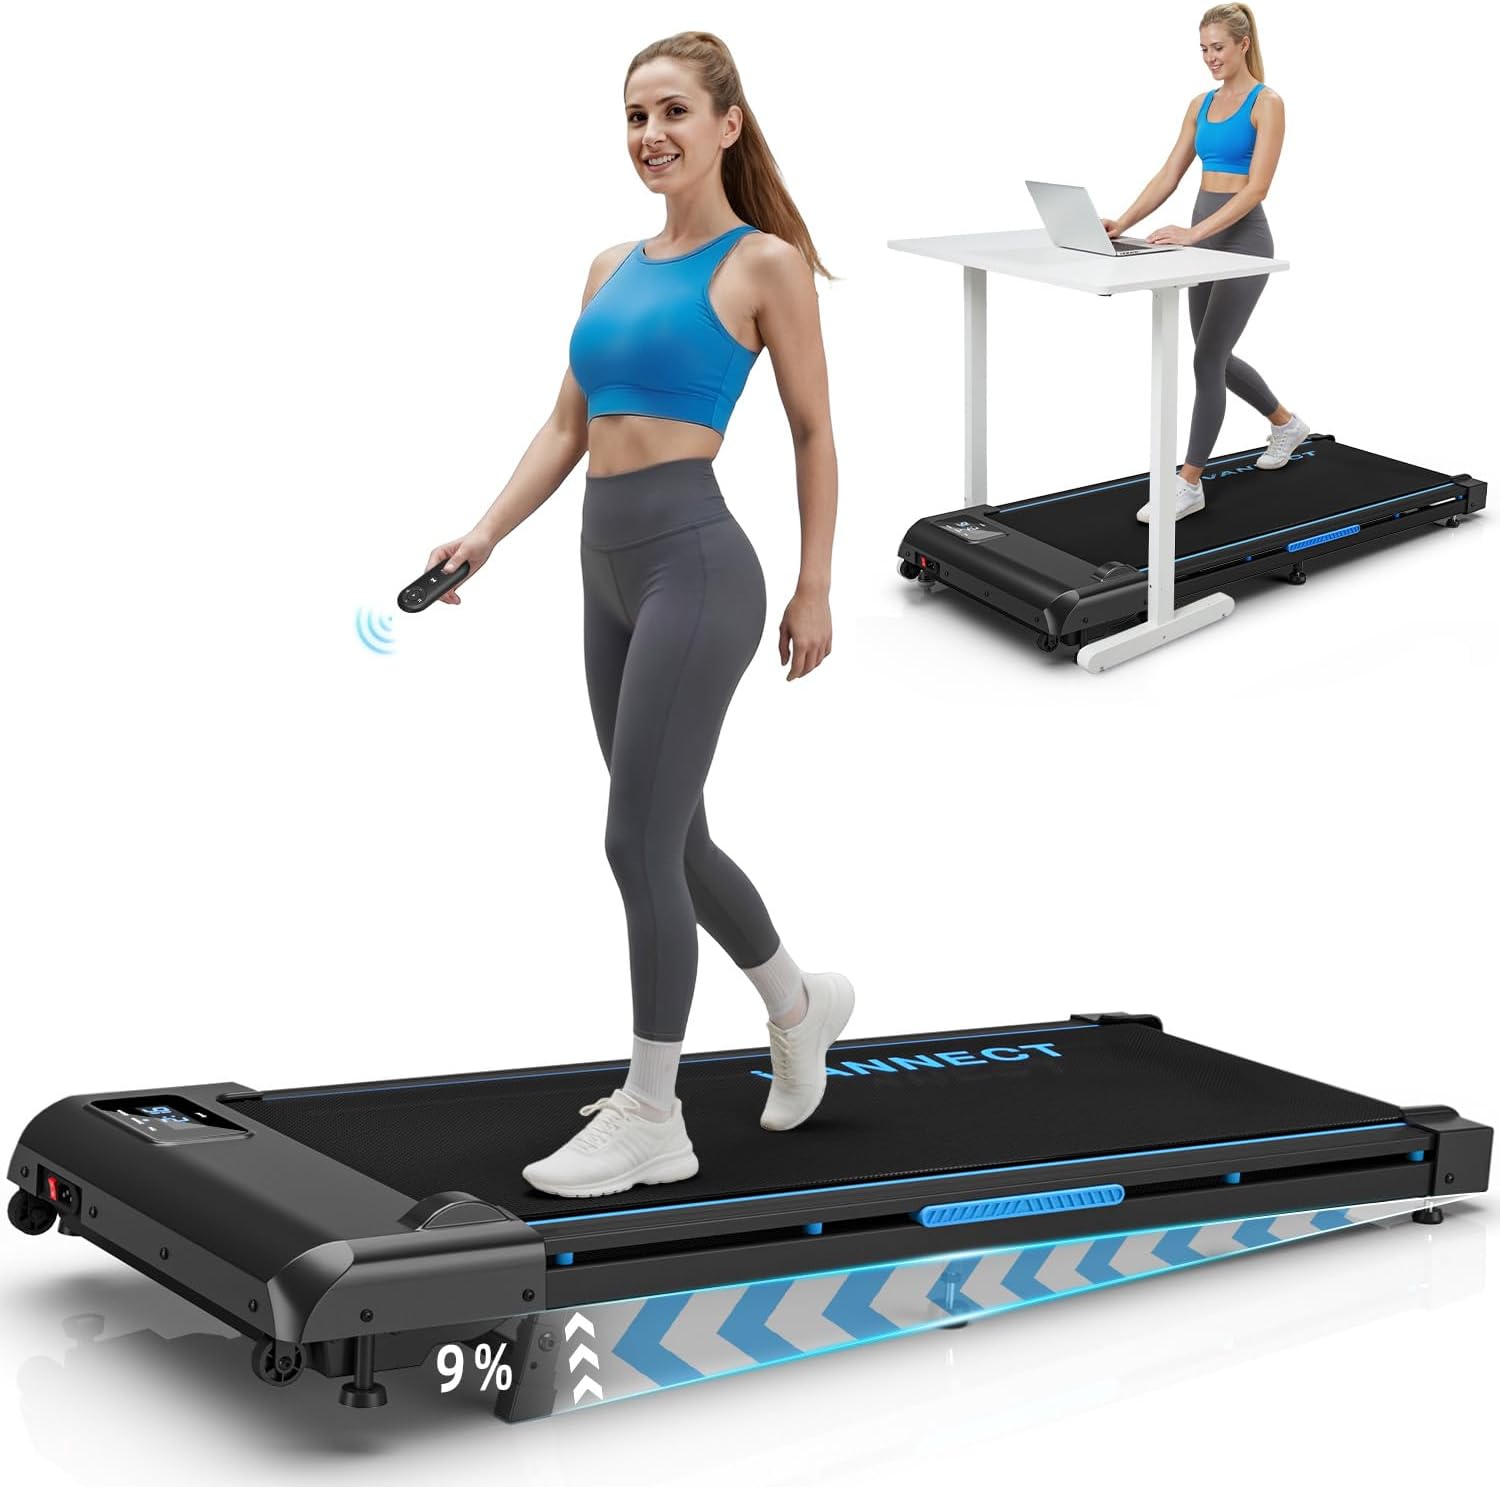
Image: The vannect X309AS Electric Treadmill, showcasing its compact design and under-desk usage.
3. Setup
The vannect X309AS treadmill is designed for zero assembly, allowing you to start your workout quickly.
Initial Setup
- Unpack the Box: Carefully remove the treadmill and all accessories from the packaging.
- Position the Treadmill: Place the treadmill on a firm, level surface. Ensure there is sufficient space around the unit for safe operation and movement.
- Connect Power: Plug the power cord into a grounded electrical outlet.

Image: Visual guide demonstrating the simple 3-step zero assembly process: unpack, get ready, and hop on.
Storage and Portability
The treadmill features integrated transport wheels and a compact design for easy storage.
- To move: Tilt the treadmill and roll it using the built-in wheels.
- To store: The low-profile design allows it to be stored under a bed or sofa, saving space.

Image: A person easily moving the treadmill using its wheels and examples of storing it under a sofa and bed.
4. Operating Instructions
Familiarize yourself with the controls and display before beginning your workout.
Power On/Off
- To power on: Ensure the treadmill is plugged in and the main power switch (usually located near the power cord) is in the 'ON' position. The LED display will illuminate.
- To power off: Switch the main power switch to 'OFF' and unplug the unit.
Using the Remote Control
The magnetic remote control allows for convenient adjustment of settings during your workout.
- Start/Stop Button: Press to start or stop the treadmill belt.
- Speed Adjustment: Use the '+' and '-' buttons to increase or decrease the speed in increments.
- Pause Function: The remote control includes a pause button to temporarily stop your workout while retaining your current data. Press again to resume.
- Magnetic Attachment: The remote control can be magnetically attached to the treadmill for easy access and to prevent loss.

Image: Close-up of the treadmill's LED display showing workout data and the wireless remote control.
LED Display
The integrated LED display provides real-time feedback on your workout metrics:
- Time: Duration of your workout.
- Speed: Current speed in km/h.
- Distance: Total distance covered.
- Calories: Estimated calories burned.
Adjusting Incline
The treadmill features a manual 9% incline adjustment to intensify your workout and simulate climbing.
- To adjust the incline, ensure the treadmill is off and unplugged.
- Locate the manual incline adjustment mechanism (refer to the product diagram if available).
- Adjust the support feet to achieve the desired 9% incline. Ensure both sides are evenly set.

Image: Illustration showing the manual incline adjustment and its effect on calorie burn compared to a flat surface.
Speed Modes and Workout Suggestions
The treadmill supports various speeds for different workout intensities:
- Walking Mode (1-3 km/h): Ideal for a relaxed walk or warm-up.
- Brisk Walking Mode (4-6 km/h): Suitable for a steady, brisk walk.
- Running Mode (7-10 km/h): For more intense running sessions.

Image: Visual representation of climbing, exercise at work, walking, and running modes with corresponding speed ranges.
Energy Saving Feature
If the treadmill is not used for more than 10 minutes, it will automatically enter sleep mode, turning off the display to conserve energy.
5. Maintenance
Regular maintenance ensures the longevity and optimal performance of your treadmill.
Lubrication Schedule
Proper lubrication of the running belt is crucial. Use the provided lubricant according to the following schedule:
| Usage Frequency | Maintenance Frequency |
|---|---|
| <3 Hours/Week | Every 2 Months |
| 4-7 Hours/Week | Every 1 Month |
| ≥8 Hours/Week | Every 2 Weeks |

Image: A hand applying lubricant to the treadmill belt, illustrating the lubrication process and schedule.
Belt Adjustment
If the running belt feels loose, slips, or is off-center, it may need adjustment. Use the included tool to adjust the belt tension or alignment screws located at the rear of the treadmill.
- For tension: Turn both screws clockwise a quarter turn at a time until the belt feels appropriately taut.
- For alignment: If the belt drifts to the left, turn the left screw clockwise a quarter turn. If it drifts to the right, turn the right screw clockwise a quarter turn. Run the treadmill for a minute and re-check.

Image: A hand using a tool to adjust the treadmill belt, demonstrating the adjustment process.
Cleaning
Regularly wipe down the treadmill with a damp cloth to remove dust and sweat. Do not use abrasive cleaners or solvents.
6. Troubleshooting
If you encounter any issues with your treadmill, refer to the following common problems and solutions:
- Treadmill not starting:
- Ensure the power cord is securely plugged into a working outlet.
- Check that the main power switch is in the 'ON' position.
- Verify the remote control battery is not depleted.
- Running belt slipping or hesitating:
- The belt may require lubrication (refer to Section 5: Maintenance).
- The belt tension may need adjustment (refer to Section 5: Maintenance).
- Unusual noise during operation:
- Check for any loose components and tighten them.
- Ensure the treadmill is on a level surface.
- Lubricate the running belt if it has not been done recently.
- LED display not working:
- Check the power connection and main power switch.
- Ensure the remote control battery is functional, as it controls the display.
If the problem persists after attempting these solutions, please contact customer support.
7. Warranty and Support
Your vannect X309AS Electric Treadmill comes with a 24-month free warranty from the date of purchase.
This warranty covers manufacturing defects and ensures the quality of your product. It does not cover damage caused by misuse, accident, unauthorized modification, or normal wear and tear.
Customer Support
Should you encounter any issues or have questions regarding your treadmill, please contact our customer service team. For the quickest resolution, we recommend reaching out via your Amazon order page.
Our professional technicians aim to respond to your inquiries within 16 hours.


