1. Introduction
This manual provides detailed instructions for the setup, operation, and maintenance of your Vrriis WL087 Wireless HDMI Transmitter and Receiver system. Please read this manual thoroughly before use to ensure optimal performance and longevity of your device. This system is designed for reliable wireless video transmission with ultra-low latency and multiple channel options.
2. What's in the Box?
- 1x Transmitter (TX)
- 1x Receiver (RX)
- 4x Antennas
- 2x 5V2A Power Adapters
- 2x USB-C Cables
- 1x User Manual
- 1x USB 3.0 Cable for UVC Out
- 1x Standard HDMI Cable
- 1x Mini HDMI Cable
- 1x Micro HDMI Cable

Figure 2.1: All components included in the Vrriis WL087 package.
3. Product Overview
The Vrriis WL087 Wireless HDMI Transmitter and Receiver system offers advanced features for professional video transmission:
- 1500FT LOS Range, 0.05s Latency: Dual antenna design with 2.4/5GHz high-speed transmission for stable line-of-sight signal transmission up to 1500ft in open fields with ultra-low 0.05s latency. Note: Walls, metal, bricks, or glass can shorten signal coverage or cause severe signal loss.
- 20 Channels Adjustable: Features 20 adjustable channels with an LCD display showing signal strength and interference levels. Manual channel selection ensures stable and high-quality signal transmission by automatically synchronizing the receiver to the transmitter's selected channel.
- UVC Out & Loop Out: The receiver's UVC output allows direct streaming to third-party platforms (e.g., OBS) on a computer via USB-C, eliminating the need for additional capture devices. The transmitter's HDMI loop out supports local monitoring.
- Plug and Play, 1080P Resolution: Quick and easy setup without software installation. Supports Full HD 1080p @60Hz input/output resolutions via HDMI, suitable for various applications including meetings, gaming, and projection.
- Multiple Power Options: Can be powered by NP-F Series batteries (F970, F750, F550) or 5V2A Type-C adapters. Batteries are not included.
- Up to 1TX to 5RX: Supports connection of one transmitter to up to five receivers. Note that wireless transmission distance may decrease as the number of receivers increases.

Figure 3.1: Key features of the Vrriis WL087 system.
4. Setup Guide
4.1. Initial Setup
- Attach the four antennas to the designated ports on both the Transmitter (TX) and Receiver (RX) units.
- Ensure both TX and RX units are powered. Use the provided 5V2A adapters or compatible NP-F batteries (not included).
- Connect your video source (e.g., camera, TV box) to the HDMI IN port of the Transmitter using an appropriate HDMI cable (Standard, Mini, or Micro HDMI).
- Connect your display device (e.g., monitor, TV, projector) to the HDMI OUT port of the Receiver using a Standard HDMI cable.
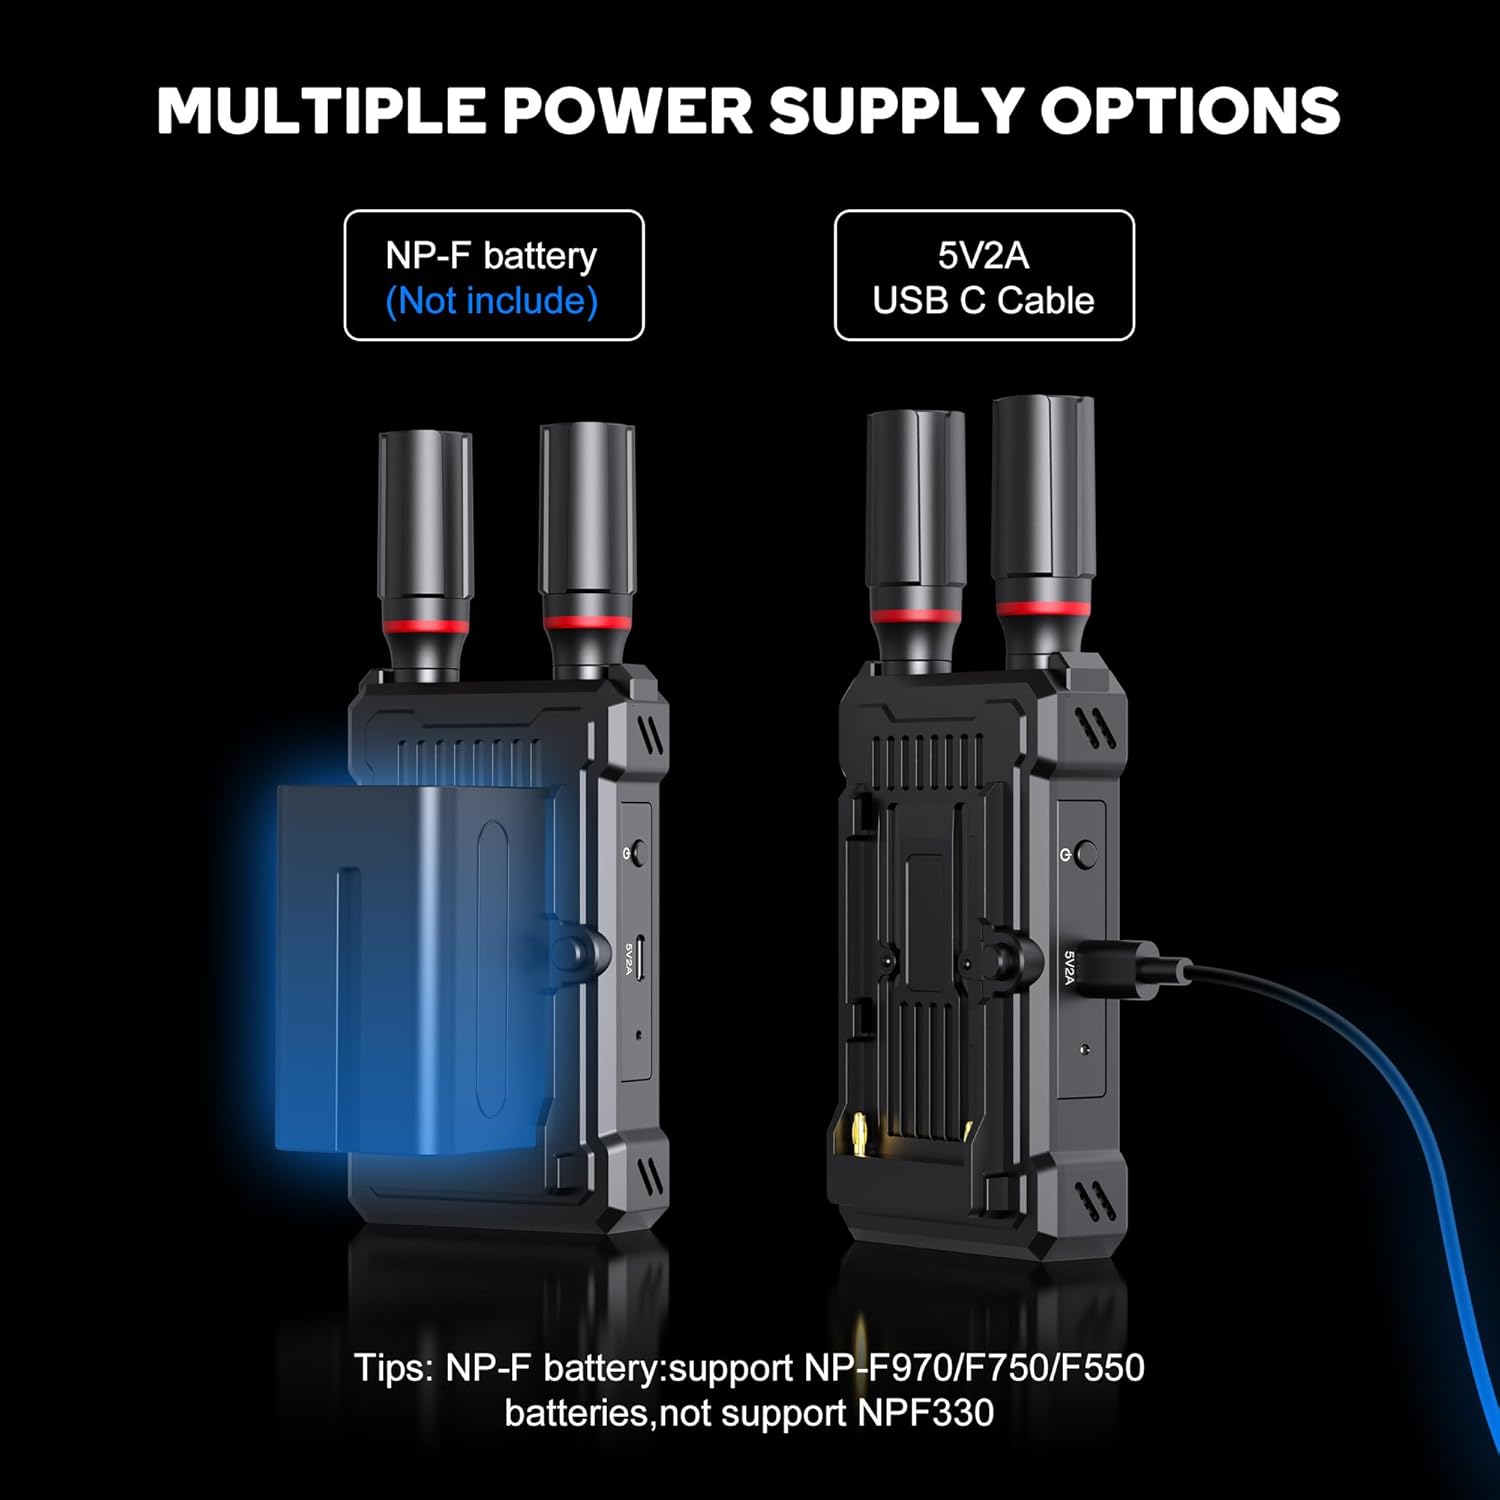
Figure 4.1: Basic Plug and Play connection steps.
4.2. Powering the Units
The Vrriis WL087 offers flexible power options:
- USB-C Power: Connect the provided 5V2A adapters to the USB-C ports on both TX and RX units.
- NP-F Battery: Attach a compatible NP-F series battery (F970, F750, F550) to the battery plate on the rear of each unit.

Figure 4.2: Powering options for the transmitter and receiver.
5. Operating Instructions
5.1. Channel Switching
The system supports 20 adjustable channels (CH01-CH20) to avoid interference and ensure stable transmission. The LCD display on both TX and RX units shows the current channel, signal strength, and channel congestion levels (Green: Low interference, Yellow: Middle interference, Red: High interference).
- Press the left or right arrow buttons on the unit to select a desired channel (1-20).
- Press the center button to lock the selection. The system will automatically confirm after 6 seconds if no further input is received.
- The TX and RX units will auto-synchronize to the selected channel.

Figure 5.1: Manual channel selection to avoid transmission lag.
Video 5.1: Demonstration of how to adjust the channel on the Vrriis WL087 system.
5.2. UVC Function for Live Streaming
The UVC (USB Video Class) output on the receiver allows you to directly connect to a computer for live streaming without additional video capture devices.
- Connect the Receiver (RX) to your computer using the included USB 3.0 Cable for UVC OUT.
- Open your preferred streaming software (e.g., OBS Studio, YouTube Live).
- In the software, select the 'WLTech Device' as your video input source.
- The video feed from your camera (connected to the TX) will now appear in your streaming software for real-time transmission.

Figure 5.2: Using the UVC output for live streaming.
Video 5.2: Step-by-step guide on how to use the UVC function for live streaming.
5.3. Multi-Device Connection (1 TX to 5 RX)
The Vrriis WL087 system supports connecting one transmitter to up to five receivers simultaneously for multi-screen monitoring or distribution.
- Ensure all additional receivers are powered on and within range of the transmitter.
- Each new receiver must be paired with the original transmitter the first time it is used. Follow the channel synchronization steps outlined in Section 5.1.
- Connect each receiver to its respective display device.
Note: Increasing the number of connected receivers may slightly reduce the overall wireless transmission distance.

Figure 5.3: Multi-device connection setup (1 TX to 5 RX).
6. Maintenance
- Keep the devices clean and free from dust. Use a soft, dry cloth for cleaning.
- Avoid exposing the units to extreme temperatures, humidity, or direct sunlight.
- Ensure proper ventilation during continuous use to prevent overheating.
- Store the units in their protective carrying case when not in use.
7. Troubleshooting
| Problem | Possible Cause | Solution |
|---|---|---|
| No video signal on receiver | Incorrect HDMI connection; Power issue; Channel interference; Out of range | Check all HDMI cables; Ensure both TX and RX are powered; Switch to a different channel (refer to Section 5.1); Reduce distance between TX and RX. |
| Video stuttering or lagging | Channel interference; Obstructions; Too many receivers | Switch to a less congested channel; Minimize physical obstructions; Reduce the number of active receivers. |
| UVC function not working | Incorrect USB-C cable; Software not recognizing device | Ensure the correct USB 3.0 cable is used; Verify 'WLTech Device' is selected in streaming software; Restart computer and devices. |
| Units overheating | Poor ventilation; Prolonged use | Ensure units are in a well-ventilated area; Allow units to cool down if used for more than 4 hours continuously. |
8. Specifications
| Feature | Detail |
|---|---|
| Model Number | WL087 |
| Wireless Distance | 1500FT (Line of Sight) |
| Latency | 0.05s |
| Max Resolution | 1080p @60Hz |
| Wireless Frequency | 2.4GHz / 5GHz Dual-Band |
| HDMI Standard | HDMI 1.3, HDCP 1.4 |
| Power Input | 5V2A Type-C, NP-F Series Batteries |
| UVC Output | Supported |
| Channels | 20 Adjustable Channels |
| Multi-Receiver Support | Up to 1 Transmitter to 5 Receivers |
| Product Dimensions | 7.87 x 6.9 x 3.6 inches |
| Item Weight | 2.09 pounds |
9. Warranty and Support
For warranty information and technical support, please refer to the contact details provided with your product packaging or visit the official Vrriis website. Keep your purchase receipt for warranty claims.