
Introduction
This manual provides essential information for the safe and effective installation, operation, and maintenance of your GEYA G2R 2P 63A AC110V Automatic Transfer Switch. Please read this manual thoroughly before installation and use, and retain it for future reference.
Safety Information
WARNING: Electrical shock hazard. Installation and servicing must be performed by qualified personnel only. Disconnect all power sources before working on the switch.
- Ensure the rated voltage and current of the switch match your application.
- Always follow local electrical codes and regulations.
- Do not operate the switch if it appears damaged.
- The input power supply must be connected in the correct phase sequence.
Product Overview
The GEYA G2R Automatic Transfer Switch (ATS) is designed to ensure an uninterruptible power supply by automatically switching between a main power source and a backup power source. It features both automatic and manual operation modes and is suitable for DIN rail mounting.
Key Features:
- Rated Current: 63A
- Rated Voltage: AC 110V
- Dual Mode Operation: Automatic and Manual
- Fast Switching: Millisecond-level transfer time (within 50ms)
- Mounting: DIN Rail and Screw Mounting System
- Material: High-quality PA6 material with 94V-2 flame retardant grade
Product Dimensions:

Image: Front and side views of the GEYA G2R Automatic Transfer Switch with detailed dimensions in millimeters. The unit measures 108mm in height, 50.5mm in width (2P version), and 70mm in depth.
Setup and Installation
The GEYA G2R ATS supports both DIN rail mounting and screw mounting for flexible installation. Ensure the mounting location is dry, well-ventilated, and free from excessive vibration.
Wiring Instructions:
Refer to the wiring diagram below for correct connection. It is crucial that the input power supply is connected in the correct phase sequence.
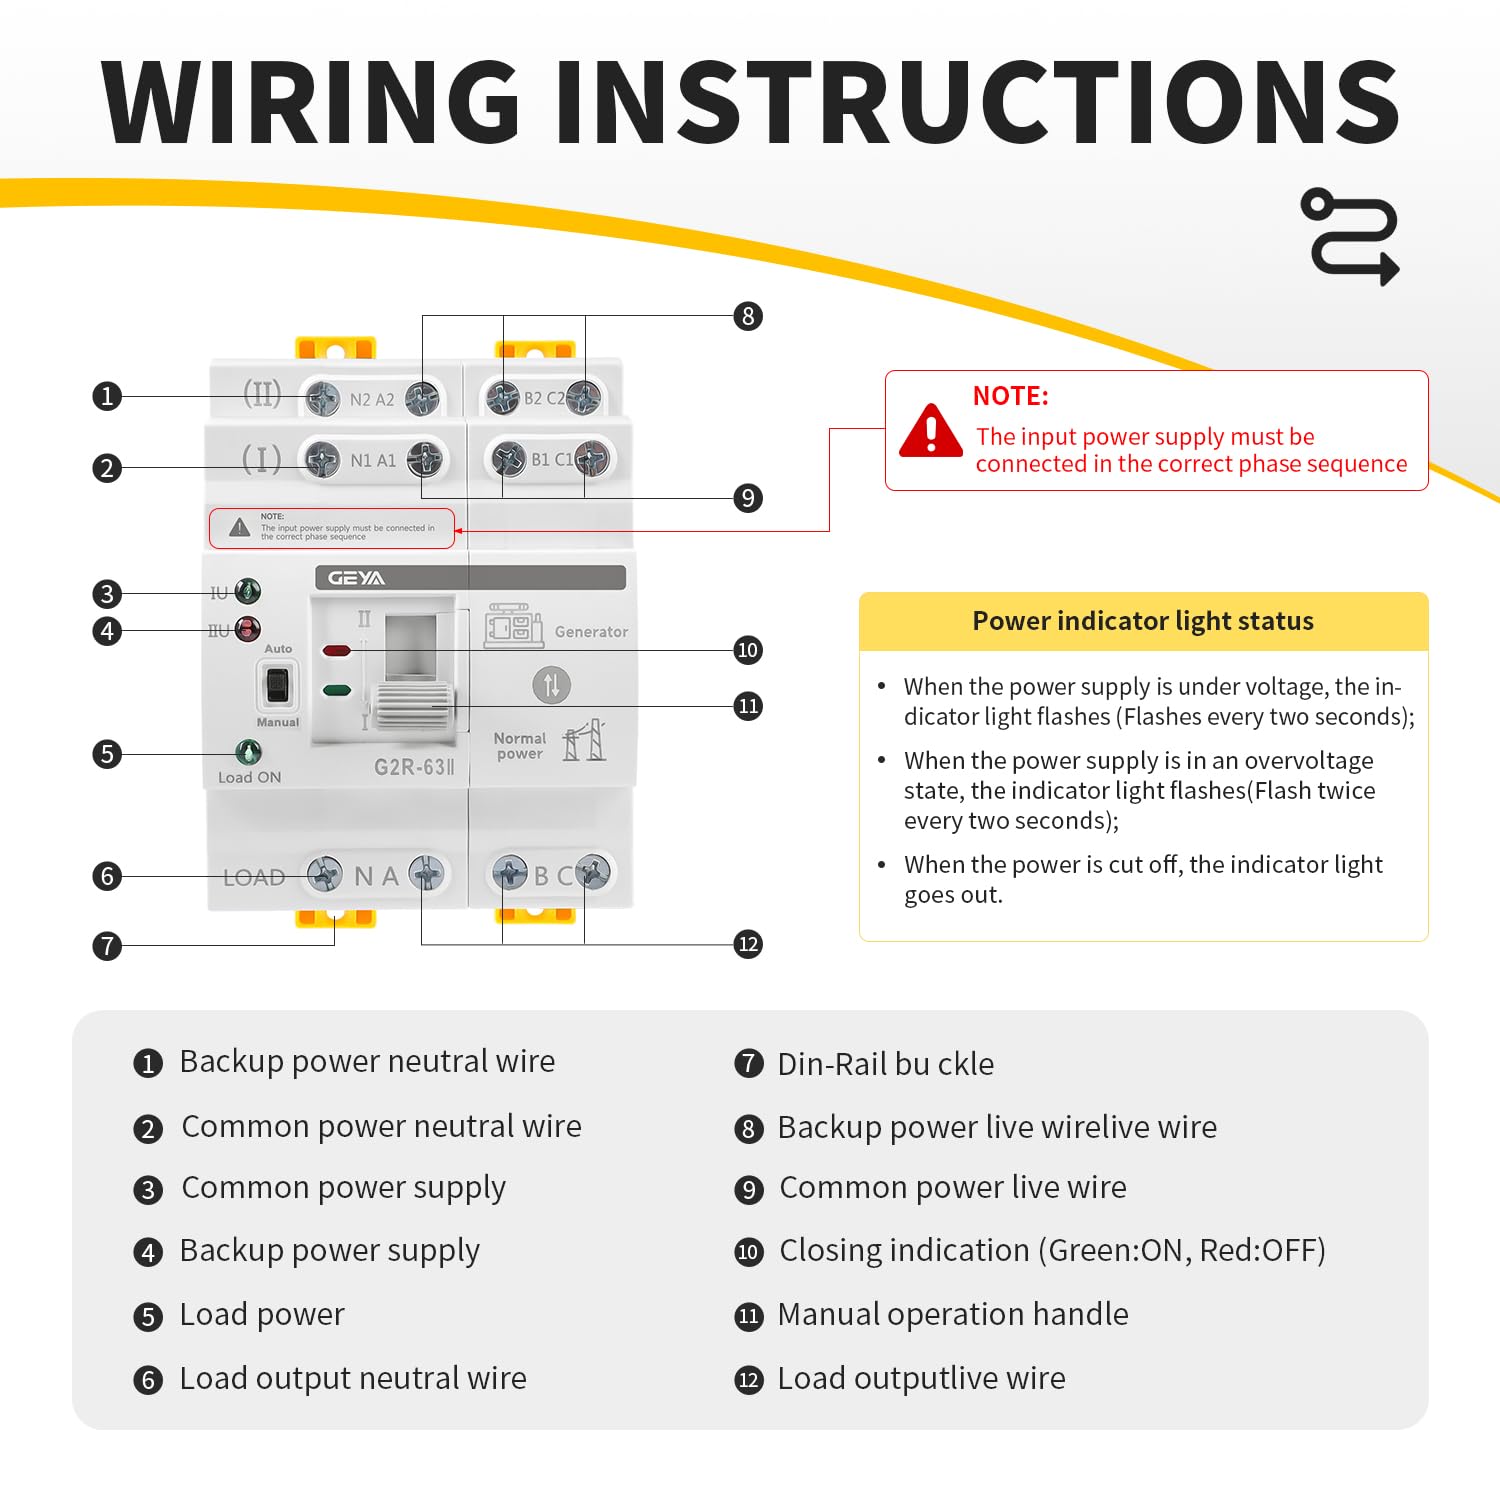
Image: Detailed wiring diagram for the GEYA G2R ATS. It illustrates connections for backup power neutral wire (1), common power neutral wire (2), common power supply (3), backup power supply (4), load power (5), load output neutral wire (6), DIN-Rail buckle (7), backup power live wire (8), common power live wire (9), closing indication (10), manual operation handle (11), and load output live wire (12). A note emphasizes correct phase sequence for input power.
Voltage Selection:
Select the appropriate voltage model for your system. This model is designed for AC 110V systems. Using an incorrect voltage can damage the control circuit.

Image: Voltage selection guide for GEYA G2R ATS. It shows two configurations: G2R-2P-63A-220V for 220/400V systems or one L line 220V, and G2R-2P-63A-110V for 110/220V systems or one L line 110V. A warning advises choosing the correct voltage to prevent coil damage.
Operating Instructions
Modes of Operation:
- Automatic Mode: The switch automatically detects power failures in the main source (I) and transfers the load to the backup source (II) within 50 milliseconds. When the main power is restored, it automatically switches back.
- Manual Mode: Use the manual operation handle to select and switch between power sources I and II.
Indicator Light Status:
- When the power supply is under voltage or overvoltage, the indicator light flashes (flashes every two seconds).
- When the power is cut off, the indicator light goes out.
- Green indicator light constantly on: Main power supply is active.
- Red indicator light constantly on: Backup power supply is active.
Operation Demonstration Video:
Video: This video demonstrates the operation of the GEYA ATS, showing how to switch between manual and automatic modes, and how the device automatically transfers power when the main supply is interrupted or restored. It illustrates the indicator light behavior during different power states.
Maintenance
The GEYA G2R ATS is designed for durability with a mechanical life of ≥8000 times and an electrical life of ≥1500 times. Regular maintenance is minimal but important for optimal performance.
- Periodically inspect all wiring connections to ensure they are secure and free from corrosion.
- Keep the unit clean and free from dust and debris.
- Test the automatic transfer function periodically by simulating a main power failure (if safe to do so and with appropriate precautions).
Troubleshooting
| Problem | Possible Cause | Solution |
|---|---|---|
| Switch does not transfer automatically. | Incorrect mode selection (manual instead of auto). Faulty power source. Control circuit issue. | Ensure the switch is set to "Auto" mode. Check both main and backup power sources. Consult qualified electrician. |
| Indicator lights not functioning. | No power to the unit. LED malfunction. | Verify power supply connections. Contact support if power is present but lights are off. |
| Overvoltage/Undervoltage indication (flashing light). | Input voltage outside normal operating range. | Check the stability of your power sources. The unit will automatically recover after 30 seconds if voltage returns to normal. |
Specifications
| Parameter | Value |
|---|---|
| Rated Current | 63A |
| Rated Insulation Voltage | 690V |
| Rated Voltage | AC 110V |
| Rated Frequency | 50/60Hz |
| Rated Short-Circuit Current | 5KA |
| Mechanical Life | ≥8000 times |
| Electrical Life | ≥1500 times |
| Flame Retardant Grade | 94V-2 |
| Mounting Type | DIN Rail Mount |
| Number of Poles | 2 |
| Item Model Number | IG-G2R-2P-63A-AC110V |
| Package Dimensions | 4.84 x 3.43 x 2.2 inches; 13.44 ounces |
Warranty and Support
For warranty information or technical support, please refer to the manufacturer's official website or contact your point of purchase. Keep your purchase receipt for warranty claims.
Manufacturer: GEYA
For further assistance, visit the GEYA Store on Amazon.