1. Introduction
Thank you for choosing the Retevis MateTalk P3 DMR Two-Way Radio. This professional-grade digital radio is designed for reliable and clear communication in various commercial and professional environments. Featuring advanced Digital Mobile Radio (DMR) technology, AES256 encryption, and fast charging capabilities, the MateTalk P3 ensures efficient and secure team coordination. This manual provides essential information for the proper setup, operation, and maintenance of your device.

Image: Overview of the Retevis MateTalk P3 Professional Radio highlighting its key features.
2. What's in the Box
Your Retevis MateTalk P3 package includes the following items:
- MateTalk P3 Walkie Talkie (x4)
- Base Charger (x4)
- Earpiece (x4)
- Belt Clip (x4)
- Type-C Charging Cable (x4)
- Use Manual (x1)

Image: Back view of the Retevis MateTalk P3 radio, showing the model number and regulatory details.

Image: Visual representation of the complete package contents, including radios, chargers, earpieces, and cables.
3. Product Overview and Features
3.1. Digital Communication Clarity
The MateTalk P3 utilizes Digital Mobile Radio (DMR) technology to filter out background noise, providing crystal-clear audio quality comparable to face-to-face conversations. This is crucial in noisy environments like kitchens or construction sites, preventing miscommunication.

Image: Diagram illustrating DMR Digital Communication with features like Noise Suppression, High Fidelity, Echo Cancellation, and Error Correction.
Video: Demonstrates the clear digital communication capabilities of the Retevis MateTalk P3 radio.
3.2. Secure Communication with AES256
For sensitive communications, the MateTalk P3 supports AES256 encryption, ensuring your conversations remain private and secure. This feature is compatible with Motorola DM4600/XPR5000 and Retevis NR30D/RT29D/RT81 radios.

Image: Visual representation of AES256 Secure Communication, showing a padlock icon over the radio.
3.3. Extended Range and Power
Experience extended communication range with high power output, providing strong signals across large areas like warehouses and hotel campuses. The radio supports repeater connectivity for even greater coverage.
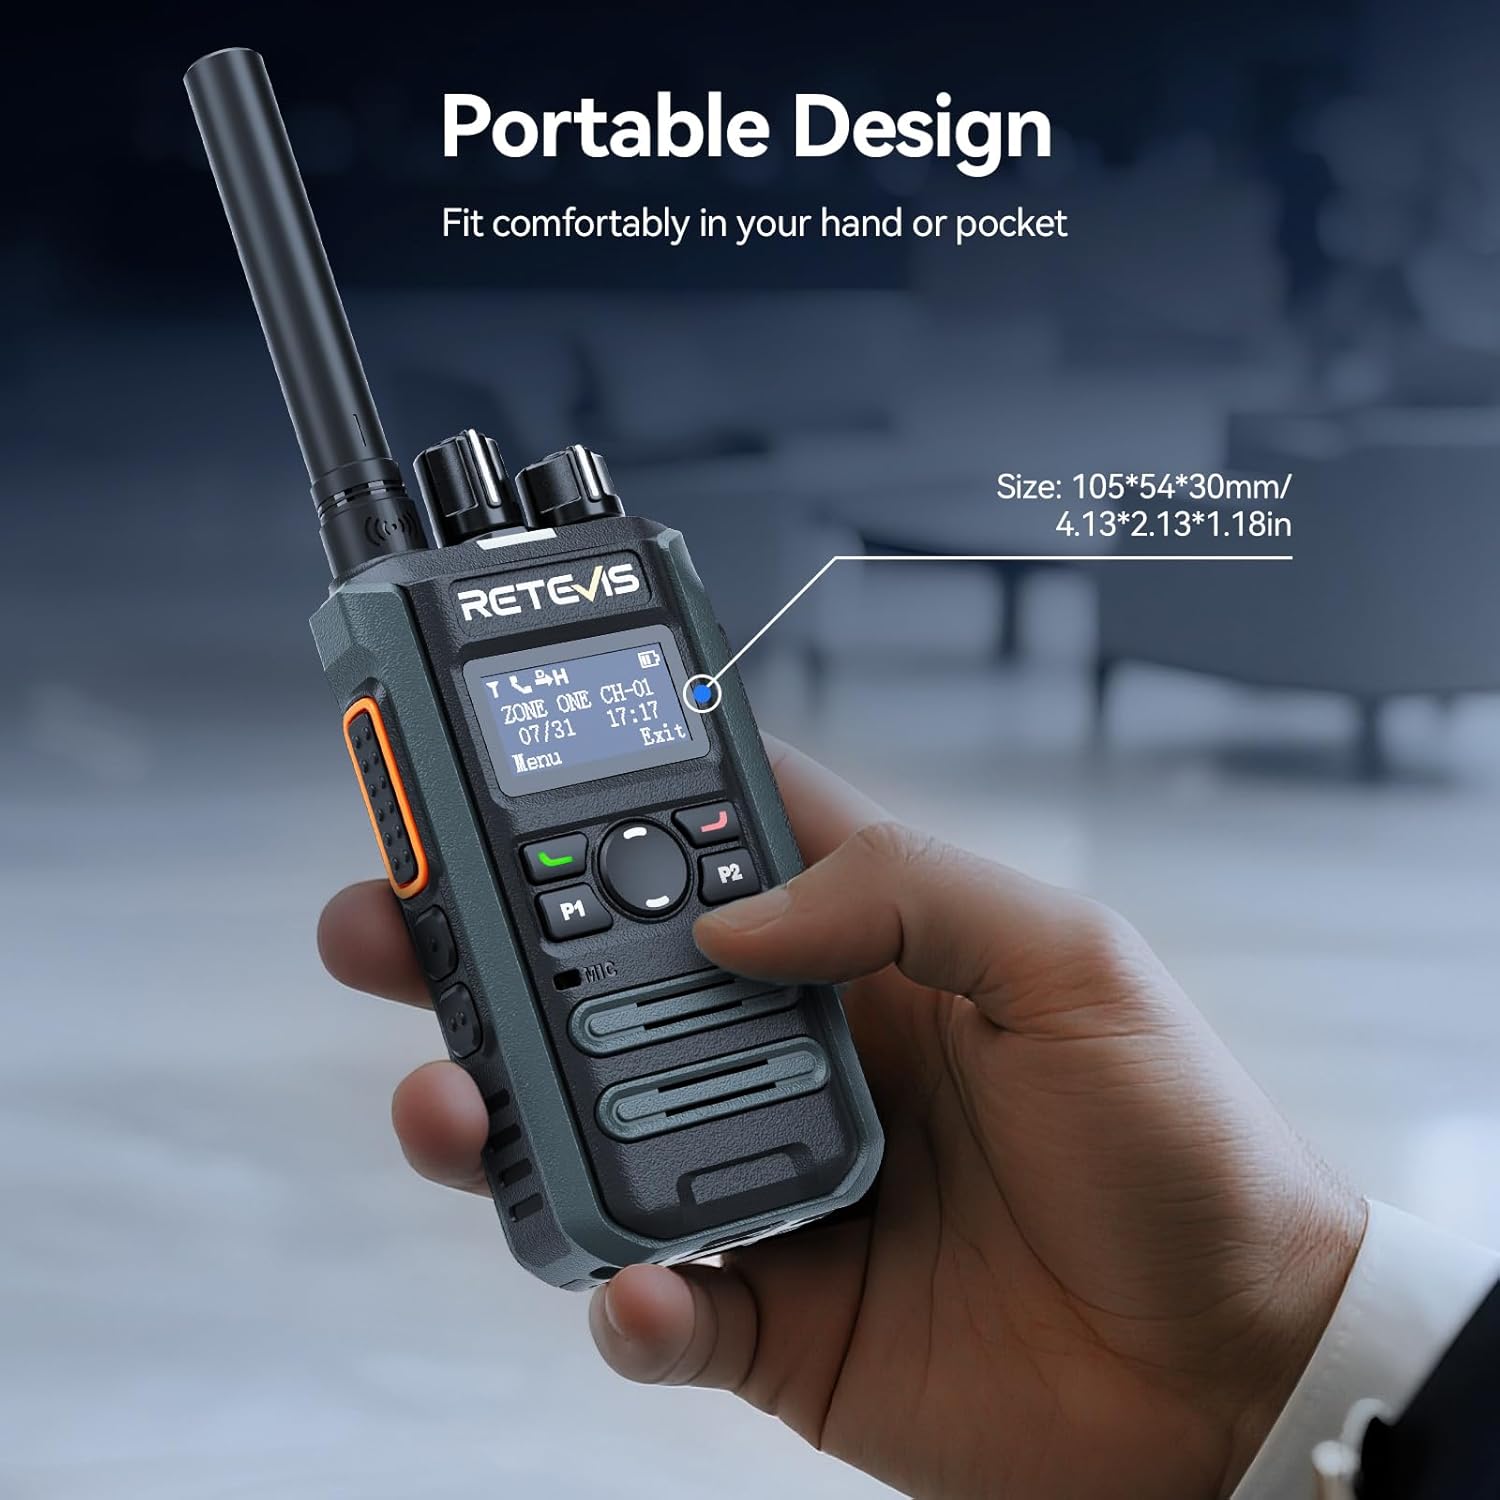
Image: Illustrates the long-range communication capabilities, showing coverage over a large area (350,000 sq.ft or 30 floors).
3.4. Efficient Team Management
With 2 zones and 32 channels, the MateTalk P3 allows for dedicated channel assignments to different teams (e.g., security, housekeeping, maintenance) for organized and efficient collaboration. It supports Single, Group, and All Call modes.
Image: Depicts the Single, Group, and All Call functionalities, showing how different communication types can be tailored.
3.5. Long-Lasting Battery and Fast Charging
Equipped with a 2000 mAh battery, the radio provides up to 15 hours of use (5% transmit, 5% receive, 90% standby) and 70 hours of standby time. The 2.5-hour fast-charge capability ensures quick power-ups during breaks for all-day operation.
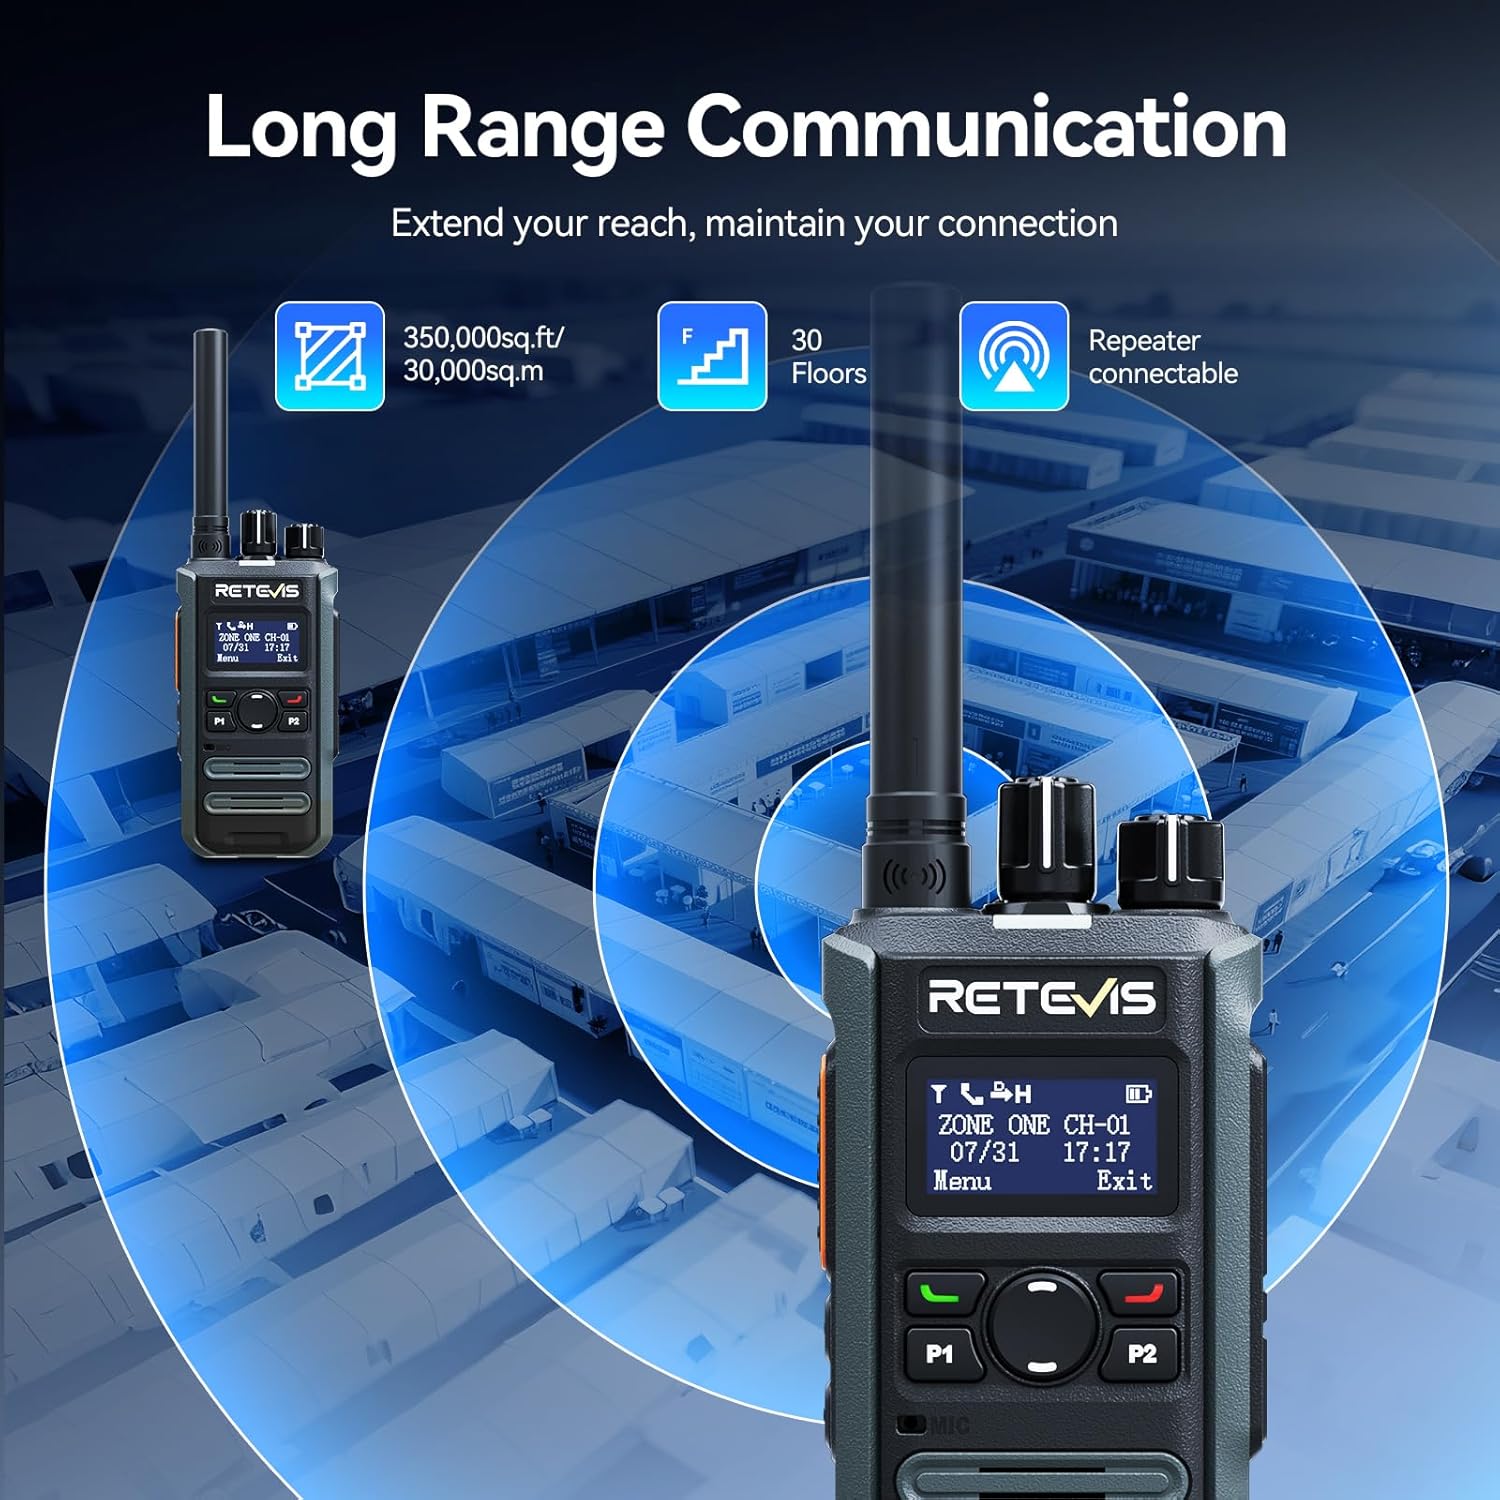
Image: Highlights the fast charging feature, indicating a full charge in 150 minutes.
3.6. Compact and Portable Design
Designed for mobile professionals, the lightweight body of the MateTalk P3 clips easily to a belt or fits into a shirt pocket, allowing for effortless carry in crowded workplaces.
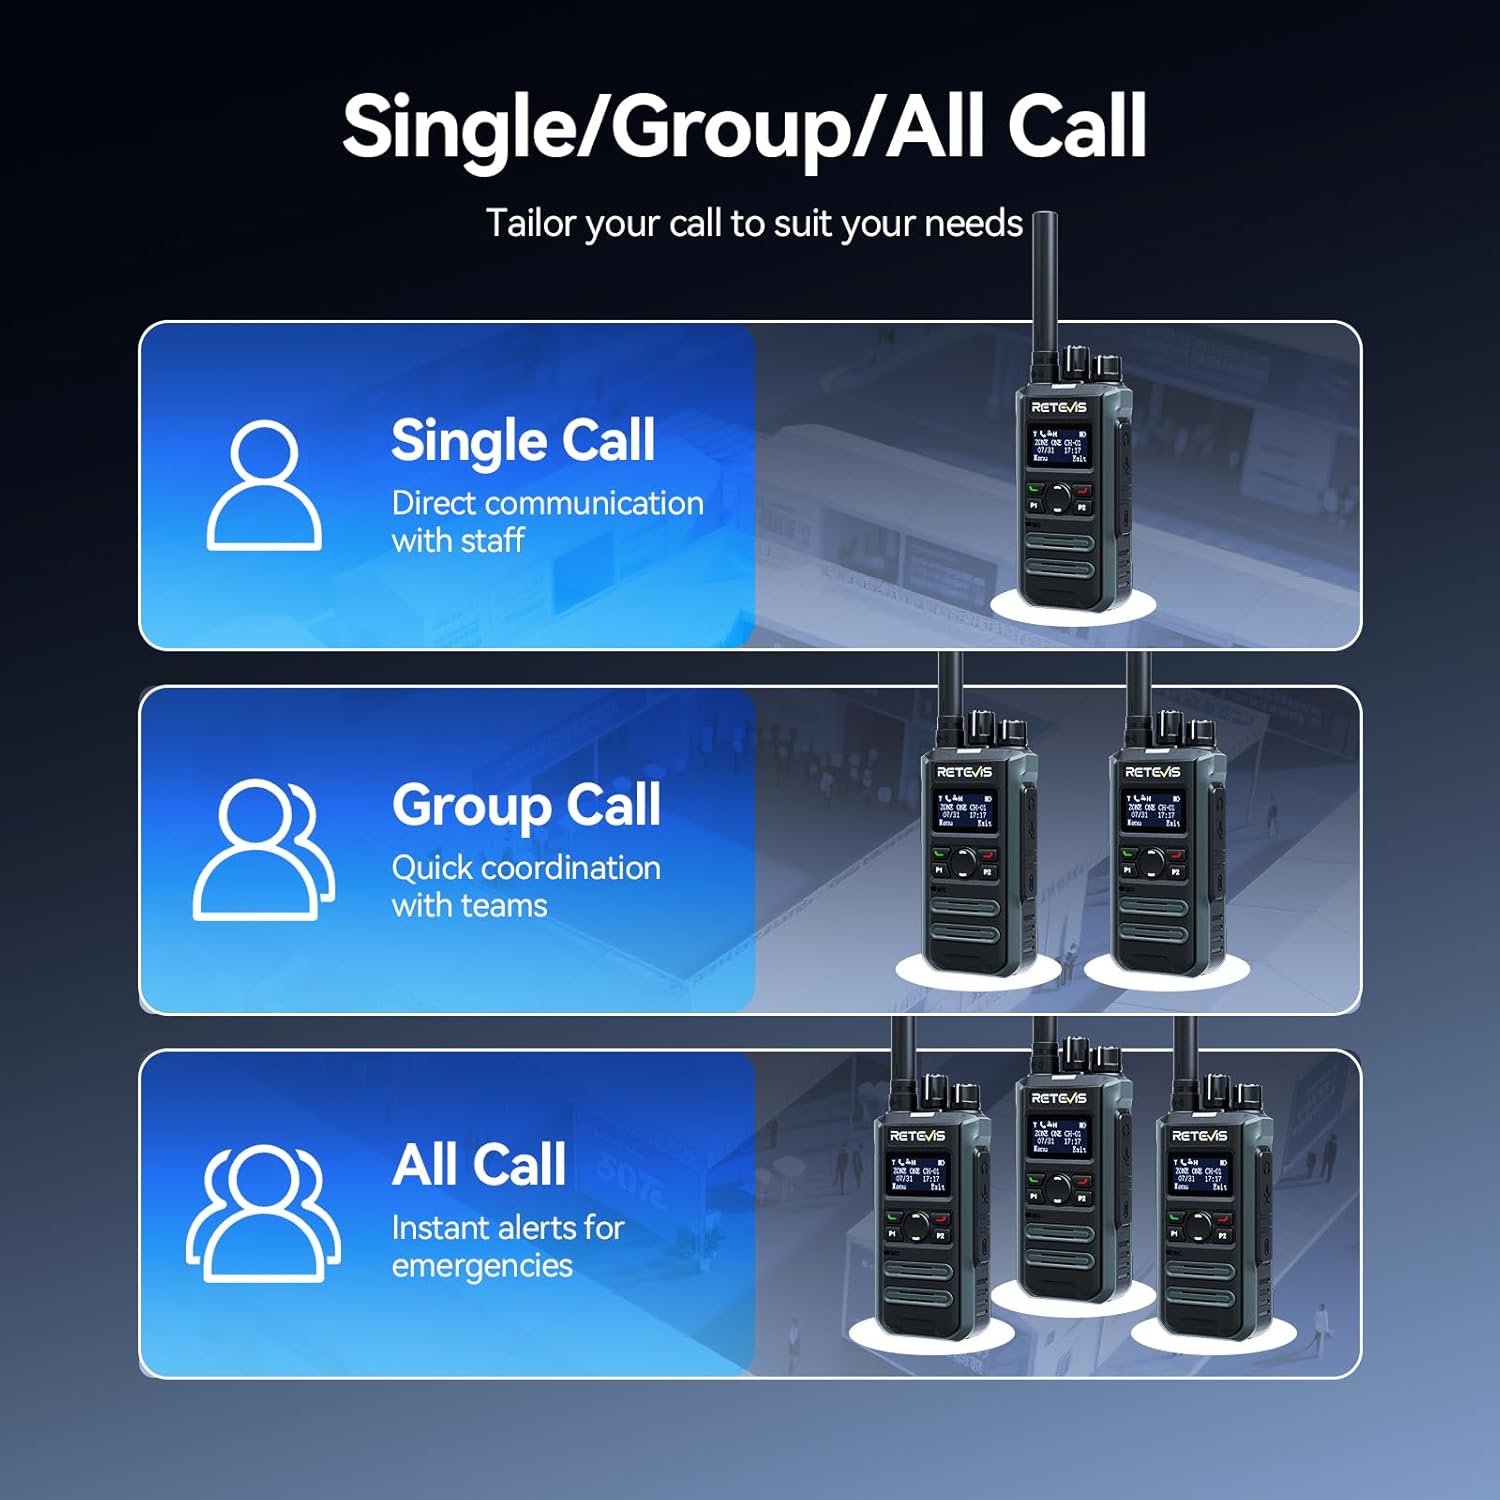
Image: Demonstrates the portable design, showing the radio comfortably held in a hand with its dimensions.
3.7. Intuitive LCD Screen
The clear LCD screen provides easy access to essential information, including time, date, channel information, battery status, and quick menu access for settings and call logs.

Image: Close-up of the LCD screen, detailing its intuitive display of information like time, date, and channel.
3.8. Safety Features
The radio includes safety features such as Lone Worker mode and a One-key Emergency Alarm, providing added peace of mind for users in potentially hazardous situations.

Image: Illustrates the safety features, including Lone Worker and Emergency Alarm functions.
4. Setup
4.1. Charging the Battery
- Connect the Type-C charging cable to the base charger and a suitable USB power adapter (not included).
- Place the MateTalk P3 radio into the charging cradle. Ensure the charging contacts on the radio align with those on the cradle.
- The charging indicator on the radio will show the charging status. A full charge typically takes 2.5 hours.
4.2. Attaching the Antenna
Screw the provided rubber duck antenna clockwise onto the antenna connector at the top of the radio until it is finger-tight. Do not overtighten.
4.3. Attaching the Belt Clip
Align the belt clip with the screw holes on the back of the radio and secure it with the provided screws.
5. Operating Instructions
5.1. Power On/Off and Volume Control
To power on the radio, rotate the Power/Volume knob clockwise. Continue rotating to adjust the volume. To power off, rotate the knob counter-clockwise until it clicks.
5.2. Channel Selection
Rotate the Channel knob at the top of the radio to select your desired channel. The LCD screen will display the current channel information.
5.3. Transmitting and Receiving
- To transmit, press and hold the Push-To-Talk (PTT) button on the side of the radio. Speak clearly into the microphone.
- Release the PTT button to receive.
- Ensure you are on the correct channel and within range for effective communication.
5.4. Call Modes (Single, Group, All Call)
The MateTalk P3 supports various call modes for flexible communication:
- Single Call: Direct communication with an individual radio.
- Group Call: Communicate with a predefined group of radios.
- All Call: Broadcast a message to all radios within the current zone.
5.5. Menu Navigation
Use the Menu key and Up/Down keys to navigate through the radio's settings and features displayed on the LCD screen. The Exit key allows you to return to the previous screen or the main display.
6. Maintenance
- Keep the radio clean by wiping it with a soft, damp cloth. Avoid harsh chemicals.
- Ensure the charging contacts are clean and free of debris for optimal charging.
- Store the radio in a cool, dry place when not in use.
- Do not attempt to disassemble the radio; this will void the warranty.
7. Troubleshooting
7.1. No Power
- Check if the battery is properly installed and charged.
- Ensure the Power/Volume knob is rotated clockwise to turn on the radio.
7.2. Cannot Transmit or Receive
- Verify that the radio is on the correct channel.
- Check if the antenna is securely attached.
- Ensure you are within the effective communication range.
- Confirm that the battery has sufficient charge.
7.3. Poor Audio Quality
- Adjust the volume level.
- Move to an area with fewer obstructions or interference.
- Ensure the microphone and speaker are not blocked.
8. Specifications
| Feature | Specification |
|---|---|
| Item Weight | 410 Grams (14.5 ounces) |
| Package Dimensions | 13.6 x 9.4 x 4.4 inches |
| Item Model Number | MateTalk P3 |
| Batteries | 4 Nonstandard Battery batteries required. |
| Number of Channels | 64 |
| Special Feature | AES256, Fast charge, Long Range |
| Frequency Range | 440-461.9Mhz, 468-470Mhz |
| Water Resistance Level | Not Water Resistant |
| Manufacturer | Retevis |
9. Warranty and Support
Retevis provides a 2-year warranty for the radio body and a 1-year warranty for accessories. Additionally, there is a 30-day no-reason return policy. Even beyond the warranty period, we offer maintenance services, with buyers responsible for corresponding costs. For any support or service inquiries, please contact us on Amazon, and we will respond within 12 hours.