1. Introduction
This manual provides detailed instructions for the installation, operation, and maintenance of your RAVEMEN FR500 Front Bike Light and CL01 Rear Bike Taillight Set. Please read this manual thoroughly before using the product to ensure proper function and safety.

Image 1.1: The RAVEMEN FR500 front light (bottom) and CL01 rear light (top) included in the set.
2. Package Contents
Verify that all items are present in your package:
- 1 x FR500 Bike Headlight
- 1 x CL01 Bike Taillight
- Mounting accessories for FR500 (typically handlebar mount)
- Mounting accessories for CL01 (saddle rail mount, seatpost strap, 2 zip ties)
- USB charging cables
3. Safety Information
- Always ensure lights are securely mounted before riding.
- Do not look directly into the light beam to avoid temporary vision impairment.
- Keep lights away from children.
- Charge lights using the provided USB cables and a standard USB power adapter.
- Do not disassemble or modify the lights.
- Ensure lights are fully charged before long rides.
4. Setup and Installation
4.1. CL01 Rear Light Mounting
The CL01 taillight offers two primary mounting options:
- Saddle Rail Mount:
- Attach the saddle rail mount bracket to the rails under your bicycle saddle.
- Secure the CL01 light onto the bracket.
- Important: Confirm your saddle rail spacing (42.3mm to 49.15mm) before purchasing or installing to ensure compatibility.
- Seatpost Mount:
- Use the provided strap to secure the CL01 light directly to your bicycle's seatpost.
- Ensure the strap is tight and the light is stable.

Image 4.1: The CL01 rear light can be mounted under the saddle rails or on the seatpost. Ensure saddle rail spacing is checked for the saddle mount option.

Image 4.2: Visual guide for measuring saddle rail spacing to ensure compatibility with the CL01 saddle rail mount.
4.2. FR500 Front Light Mounting
The FR500 front light typically mounts to your bicycle's handlebar using a quick-release bracket. Refer to the specific instructions included with the FR500 for detailed handlebar mounting steps.
5. Operation
5.1. CL01 Rear Light Modes
The CL01 taillight features 5 distinct light modes for various riding conditions:
- High: 5 lumens, approximately 5 hours runtime.
- Low: 2 lumens, approximately 10 hours runtime.
- Warning Flashing: 30 lumens, approximately 9.5 hours runtime.
- Rapid Flashing: 5 lumens, approximately 11 hours runtime.
- Slow Flashing: 0.5 lumens, approximately 45 hours runtime.
Press the power button to cycle through the modes. Press and hold to turn off.
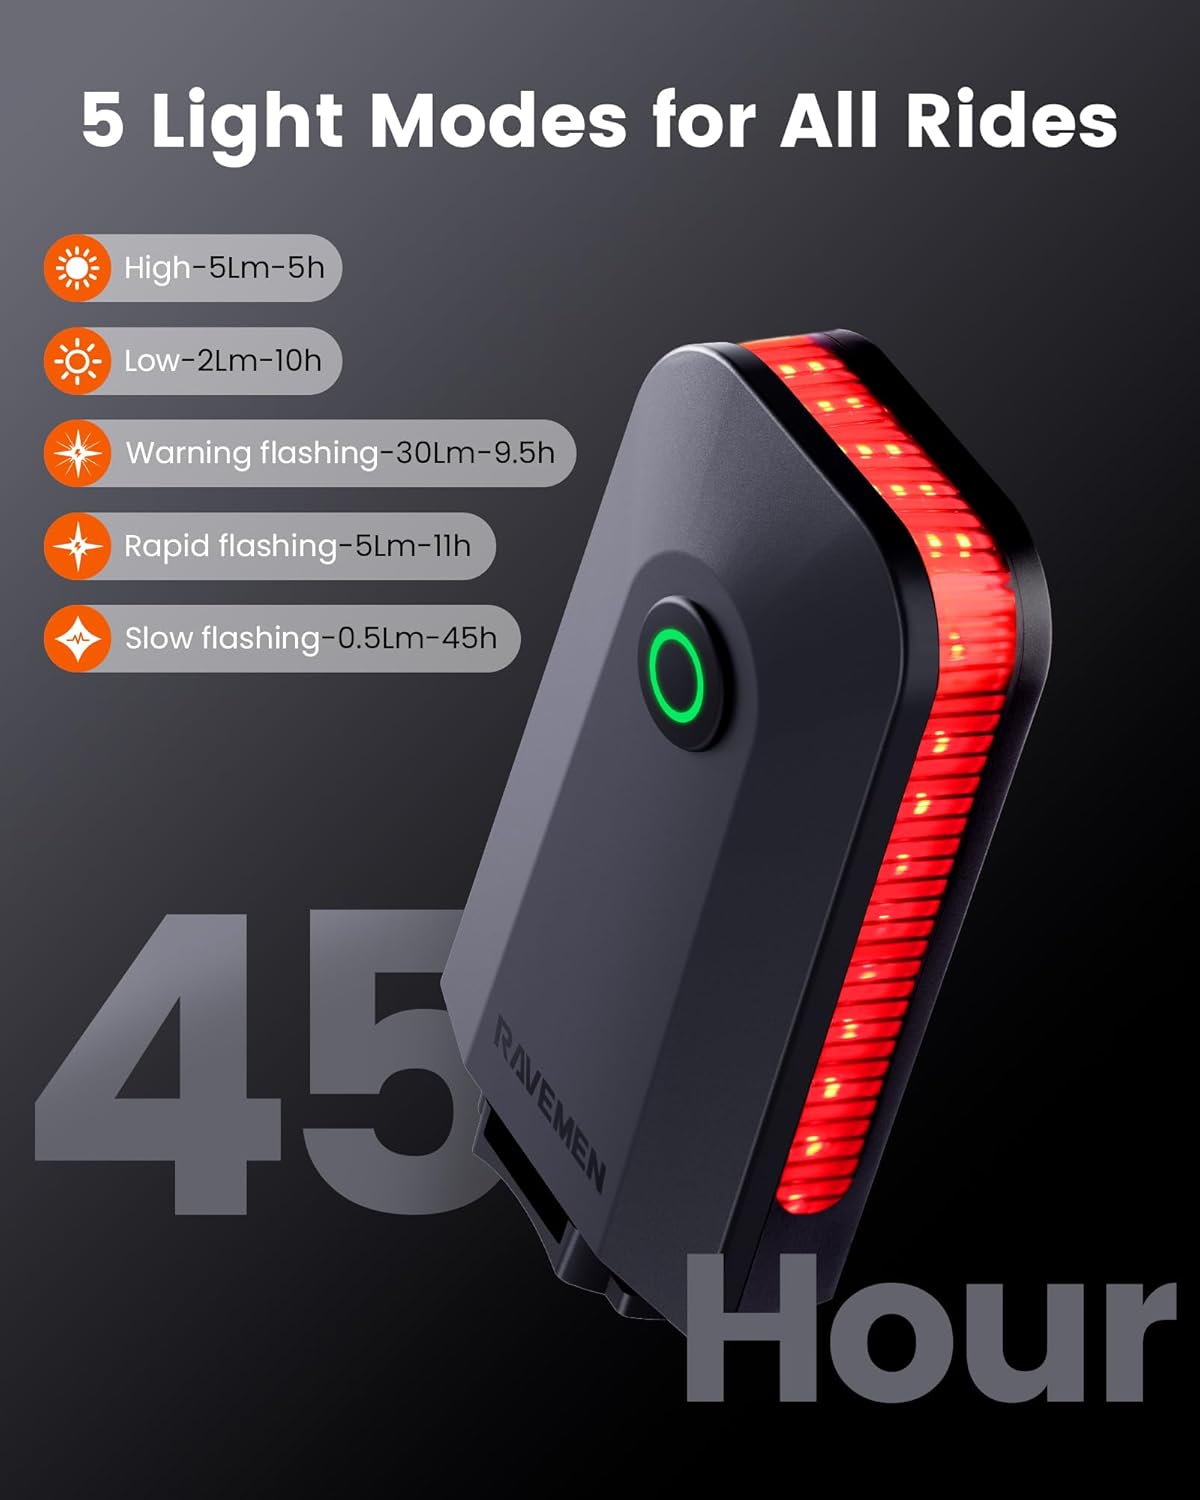
Image 5.1: The CL01 rear light displaying its five operational modes and corresponding battery life.
5.2. CL01 Brake Detection
The CL01 incorporates an intelligent brake sensing system. When you decelerate, the light automatically increases its brightness for 2 seconds to alert other road users behind you, enhancing safety. This feature does not function in slow flashing mode.

Image 5.2: The CL01 rear light automatically brightens for 2 seconds upon detecting braking, signaling to traffic behind the cyclist.
5.3. CL01 Smart Auto On/Off
This mode helps conserve battery power. If the light detects no movement for two minutes, it will automatically enter a sleep state. It will reactivate automatically when movement (vibration) is detected again, making it convenient for stop-and-go city traffic.
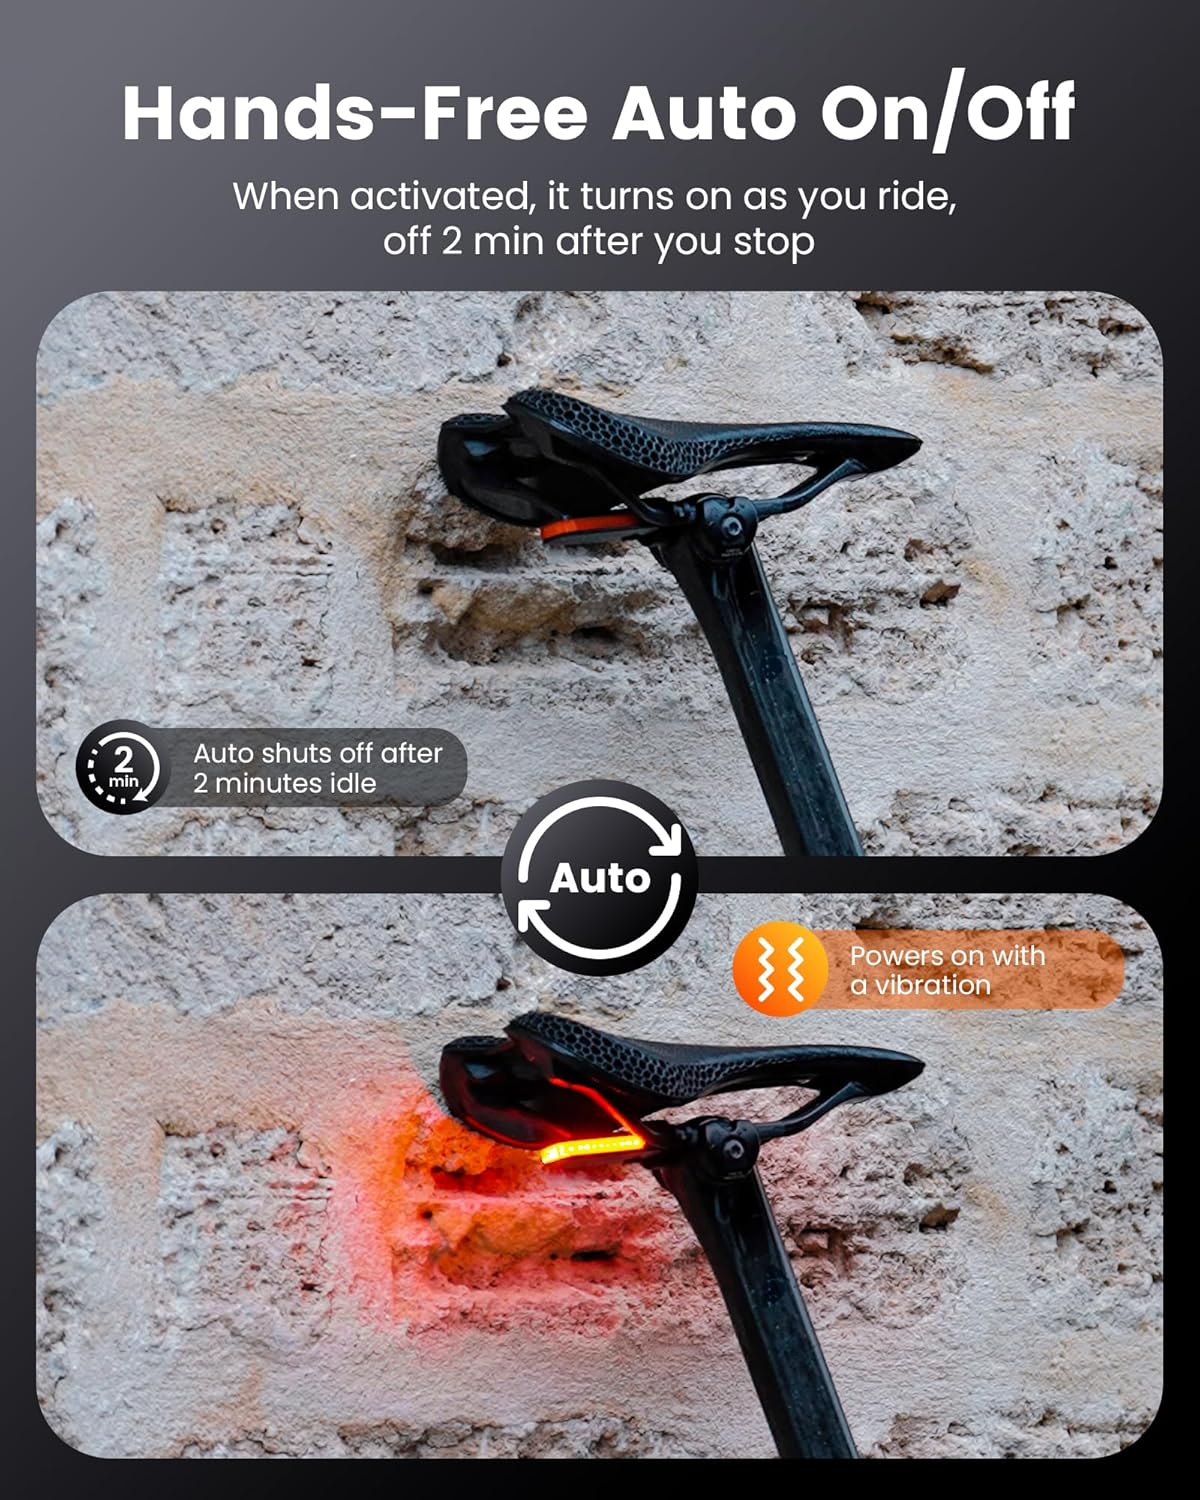
Image 5.3: The CL01 rear light's automatic on/off function, showing it powers off after 2 minutes of inactivity and powers on with vibration.
5.4. CL01 Wide Angle Visibility
The CL01 features a horizontal long light strip design, emitting 30 lumens with a 300-degree wide-angle beam. This design ensures you remain visible from multiple directions, not just directly from behind, enhancing safety in various riding environments.

Image 5.4: The CL01 rear light demonstrating its 300-degree wide-angle visibility, ensuring the cyclist is seen from the sides as well as the rear.
5.5. Power Level Check (CL01)
When the CL01 light is off, a single click of the power button will display the current power level:
- Green light: Battery level > 40%
- Red light: Battery level 5% - 40% (Charge soon)
- Flashing Red light: Battery level < 5% (Charge immediately)

Image 5.5: The CL01 rear light showing its power level indicator via the color of the button light.
5.6. Charging
Both the FR500 and CL01 lights are rechargeable via USB. Connect the provided USB cable to the charging port on each light and plug the other end into a standard USB power source (e.g., computer, wall adapter). An indicator light will show charging status (typically red for charging, green for fully charged).
6. Maintenance
- Cleaning: Wipe the lights with a soft, damp cloth. Do not use abrasive cleaners or solvents.
- Storage: Store the lights in a cool, dry place when not in use. For long-term storage, charge the battery to approximately 50% every 3-6 months to prolong battery life.
- Water Resistance: The lights are designed to be water-resistant for typical cycling conditions. Avoid submerging them in water.
7. Troubleshooting
- Light not turning on: Ensure the battery is charged. If fully charged, try resetting by holding the power button for an extended period (e.g., 10 seconds).
- Light not charging: Check the USB cable and power source. Ensure the charging port is clean and free of debris.
- CL01 Auto On/Off not working: Ensure the light is in a mode that supports auto on/off. The sensor requires sufficient vibration to activate.
- CL01 Brake Detection not working: This feature does not operate in slow flashing mode. Ensure the light is in a compatible mode.
- Light flickering or dim: Charge the battery. If the issue persists, contact customer support.
8. Specifications
| Feature | Description |
|---|---|
| Brand | Ravemen |
| Model | FR500 & CL01 |
| CL01 Max Output | 30 Lumens (Warning Flashing) |
| CL01 Visibility Angle | 300 degrees |
| CL01 Weight | 22g (0.78 oz) |
| CL01 Max Runtime | 45 hours (Slow Flashing) |
| Special Features | Brake Detection, Smart Auto On/Off, Power Level Indicator |
9. Warranty and Support
RAVEMEN products are designed for durability and performance. For warranty information, technical support, or service inquiries, please refer to the official RAVEMEN website or contact your authorized dealer. Keep your purchase receipt as proof of purchase.


