1. Introduction
This manual provides detailed instructions for the installation, operation, and maintenance of your VIKIO HOME 42 Inch Under Cabinet Range Hood, model VK-RC13-42. Please read this manual thoroughly before installation and use to ensure proper function and safety. Keep this manual for future reference.

Image 1.1: Front view of the VIKIO HOME 42 Inch Under Cabinet Range Hood with control panel and LED lights.
2. Safety Information
Always follow basic safety precautions when using electrical appliances to reduce the risk of fire, electric shock, or injury.
- Ensure the range hood is properly grounded.
- Do not operate any fan with a damaged cord or plug. Discard fan or return to an authorized service facility for examination and/or repair.
- Do not use this unit with any solid-state speed control device.
- Clean grease filters frequently. Grease should not be allowed to accumulate on fan or filter.
- Never leave surface units unattended at high settings. Boilovers cause smoking and greasy spillovers that may ignite.
- Always turn hood ON when cooking at high heat or when flaming foods.
- Use appropriate size cookware on each surface unit.
3. Package Contents
Verify that all components are present and undamaged upon unpacking.
- VIKIO HOME 42 Inch Under Cabinet Range Hood (Model VK-RC13-42)
- 5-Layer Aluminum Grease Filters (Pre-installed)
- Installation Hardware (Screws, anchors, etc.)
- Power Cord
- Instruction Manual
4. Specifications
| Feature | Specification |
|---|---|
| Model Number | VK-RC13-42 |
| Brand | VIKIO HOME |
| Size | 42 Inch |
| Mounting Type | Under Cabinet Mount |
| Air Flow Capacity | 900 Cubic Feet Per Minute (CFM) |
| Noise Level | 35 dBA (Low Speed) to 65 dBA (High Speed) |
| Material | Stainless Steel |
| Voltage | 110 Volts |
| Item Weight | 27.7 Pounds |
| Product Dimensions (D x W x H) | 19.68" x 41.3" x 6" |
| Filters | 5-Layer Aluminum Mesh, Dishwasher Safe |
| Controls | Touch/Gesture Control, 3-Speed Fan |
| Lighting | LED Lights (4000K, 3W, GU10) |
| Special Features | Dual-Motor, Noise Reduction |
5. Setup and Installation
This range hood is designed for under-cabinet mounting. Due to its size and weight, proper installation typically requires two people.
5.1 Pre-Installation Checklist
- Verify that the installation area meets the required dimensions (minimum 24 inches, recommended 24-30 inches above the stovetop).
- Ensure adequate electrical supply (110V).
- Confirm all necessary hardware is present.
- Review local building codes and regulations for range hood installation.
5.2 Installation Steps
- Prepare the Cabinet: Measure and mark the mounting points on the underside of the cabinet according to the provided template (if included) or product dimensions.
- Drill Holes: Drill pilot holes for mounting screws and for the electrical wiring access. If ducting through the cabinet, cut the appropriate opening for the exhaust connector.
- Mount the Hood: Carefully lift the range hood into position and secure it to the cabinet using the provided mounting screws. Ensure it is level and firmly attached.
- Connect Ductwork: Attach the exhaust ducting to the range hood's exhaust connector. Ensure all connections are sealed to prevent air leaks. (Ducting and adapter not included).
- Electrical Connection: Connect the power cord to a grounded 110V outlet. If hardwiring, ensure connections are made by a qualified electrician.
- Install Filters: Ensure the 5-layer aluminum filters are securely in place.
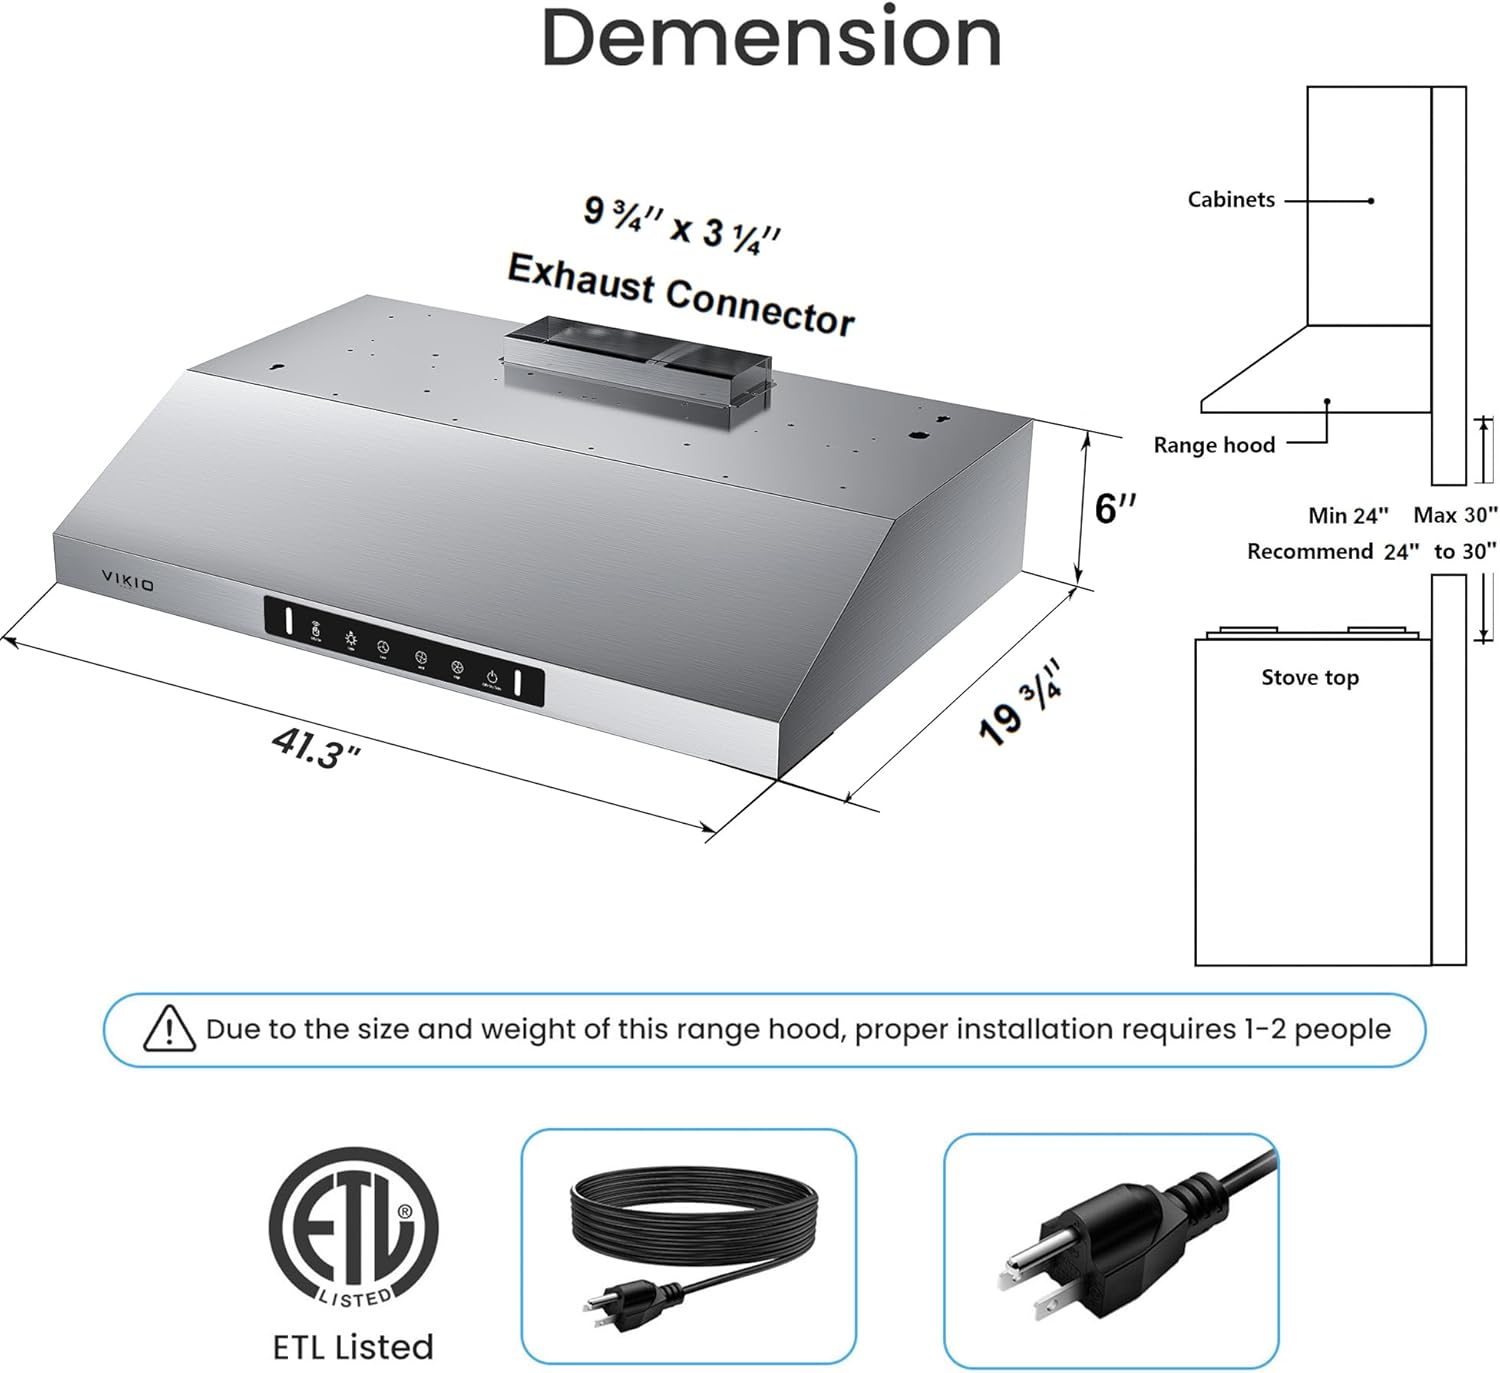
Image 5.1: Diagram showing product dimensions and recommended installation height above the stovetop. Note: Proper installation requires 1-2 people.

Image 5.2: Internal view illustrating the dual motor system and filter placement, highlighting the powerful airflow mechanism.
6. Operating Instructions
Your VIKIO HOME range hood features intuitive touch and gesture controls for ease of use.
6.1 Control Panel Functions

Image 6.1: Detailed view of the touch control panel, indicating functions for lights, fan speeds, and power.
- Light On/Off: Touch the light icon to turn the LED lights on or off. The 4000K LED lights provide clear illumination for your cooking area.
- Fan Speed Control: Select from three fan speeds (Low, Medium, High) by touching the corresponding icons to adjust suction power.
- On/Off / 3S Delay Off: Touch the power icon to turn the unit on or off. Press and hold for 3 seconds to activate the delay-off function, which will continue ventilation for a short period before shutting down.
6.2 Gesture Control
The range hood features responsive gesture-sensing technology for hands-free operation. Gesture control is activated when both sensing points are crossed.

Image 6.2: Illustration of gesture control, showing how to activate the fan by waving a hand across the sensing points.
- Gesture On/Off: Wave your hand across the designated sensing points to turn the fan on or off. This feature offers convenience, especially when your hands are occupied or soiled during cooking.
7. Maintenance
Regular maintenance ensures optimal performance and extends the lifespan of your range hood.
7.1 Cleaning the Grease Filters
The 5-layer aluminum mesh filters efficiently trap grease and particles. Clean them regularly to maintain suction efficiency.
- Removal: Gently push the latch on each filter and pull downwards to remove.
- Cleaning: The filters are dishwasher-safe. Alternatively, wash them by hand with warm, soapy water. Ensure they are completely dry before reinstallation.
- Reinstallation: Insert the dry filters back into their slots, ensuring they click securely into place.

Image 7.1: Visual guide demonstrating how to clean the aluminum grease filters, either by hand washing or using a dishwasher.
7.2 Cleaning the Exterior
Wipe the stainless steel exterior with a soft cloth and a mild, non-abrasive cleaner. Avoid harsh chemicals or abrasive pads that could scratch the surface.
7.3 Replacing LED Lights
The range hood uses GU10 LED bulbs. If a bulb needs replacement, ensure the power is off before carefully twisting out the old bulb and inserting a new one.

Image 7.2: The range hood's LED lights providing ample illumination for the cooking surface.
8. Troubleshooting
Refer to this section for common issues and their solutions.
| Problem | Possible Cause | Solution |
|---|---|---|
| Fan does not turn on | No power supply Control panel issue | Check power cord connection and circuit breaker. Contact customer support if control panel is unresponsive. |
| Low suction power | Clogged grease filters Improper ducting Motor issue | Clean or replace grease filters. Check ductwork for obstructions or leaks. Contact customer support. |
| Lights not working | Loose or faulty bulb Electrical connection issue | Ensure bulbs are securely seated or replace them. Check electrical connections. |
| Excessive noise | Loose parts Motor imbalance Improper installation | Check for and tighten any loose components. Ensure proper installation and contact customer support if noise persists. |
| Gesture control unresponsive | Obstruction of sensors Incorrect gesture | Ensure sensors are clean and unobstructed. Review gesture control instructions (Image 6.2). |
9. Warranty Information
VIKIO HOME products are manufactured to high-quality standards. This product comes with a standard manufacturer's warranty covering defects in materials and workmanship from the date of purchase. Please retain your proof of purchase for warranty claims. Specific warranty terms and duration may vary; refer to the warranty card included with your product or contact customer support for details.
10. Customer Support
For any questions, assistance, or to report issues with your VIKIO HOME range hood, please contact our customer support team. We are dedicated to providing reliable support and complimentary replacements for filters and lights as needed.
Contact Information: Please refer to the contact details provided on the VIKIO HOME official website or your product packaging for the most current support options.


