1. Introduction
Thank you for choosing the VEVOR Hybrid Heat Press. This 8-in-1 multifunction machine is designed for various heat transfer projects, including T-shirts, hoodies, bags, pillows, caps, mugs, tumblers, and plates. Its patented design ensures even heat distribution and stable pressure for superior, long-lasting results. This manual provides essential information for safe operation, setup, maintenance, and troubleshooting.

Image: The VEVOR Hybrid Heat Press showcasing its 8-in-1 capabilities for diverse items.
2. Safety Instructions
- Always read all instructions before using the heat press.
- Keep hands clear of the heating platen during operation to prevent burns.
- Ensure the machine is placed on a stable, heat-resistant surface.
- Do not leave the machine unattended while powered on or in use.
- Unplug the heat press from the power outlet when not in use or before cleaning.
- Keep children and pets away from the heat press during operation.
- Use heat-resistant gloves when handling hot materials or attachments.
3. Product Components
The VEVOR Hybrid Heat Press includes the main unit and various attachments for different applications:
- Main Heat Press Unit (15 x 15 inch platen)
- Control Panel (Time/Temperature)
- Mug Heat Press Attachments (1x 6/12/17/30 oz)
- Mug Press Frame (1x)
- Hat Heat Press Attachment (1x)
- Plate Heat Press Sponge (1x 8 in/10 in)
- Screwdriver (1x)
- Starter Pack (1x)

Image: Detailed view of the VEVOR Hybrid Heat Press dimensions and all included accessories.
4. Setup and Assembly
The VEVOR Hybrid Heat Press features a user-friendly design for quick setup. Follow these steps for initial assembly and attaching accessories:
- Main Unit Setup: Place the main heat press unit on a sturdy, flat surface. Ensure adequate space around the machine for safe operation and heat dissipation.
- Handle Installation: Attach the main handle to the heat press unit using the provided screws and screwdriver. Ensure it is securely fastened for safe operation.
- Control Panel Connection: Connect the independent time/temperature control panel to the main unit.
- Power Connection: Plug the heat press into a compatible power outlet.
Attaching Accessories:
The 8-in-1 design allows for easy interchangeability of attachments. Each accessory connects to the main unit via a dedicated port.
- Mug Press: Secure the mug press frame to the main unit. Then, insert the desired mug heat press attachment (6oz, 12oz, 17oz, or 30oz) into the frame.
- Hat Press: Attach the hat heat press accessory to the designated mounting points on the main unit.
- Plate Press: Place the appropriate plate heat press sponge (8-inch or 10-inch) onto the lower platen when using the plate attachment.
Video: A detailed assembly guide for the VEVOR Heat Press and its mug press attachment.
5. Operating Instructions
The VEVOR Hybrid Heat Press features an upgraded time/temperature independent control panel for simple operation.
- Power On: Turn on the main power switch, usually located on the side or back of the unit.
- Set Temperature: Use the 'TEMP' buttons (up/down arrows) on the control panel to set your desired temperature. The range is 212°F - 410°F (100°C - 210°C).
- Set Time: Use the 'TIME' buttons (up/down arrows) to set your desired pressing time. The timer range is 0-999 seconds.
- Adjust Pressure: Use the pressure adjustment knob, typically located on the top or side of the press, to set the appropriate pressure for your material. Turn clockwise for more pressure, counter-clockwise for less. The machine offers up to 375 lbs of heavy pressure.
- Pre-heat: Allow the machine to reach the set temperature. The display will indicate when it's ready.
- Place Material: Slide out the lower platen (if applicable) and carefully place your item (e.g., T-shirt, mug) and transfer design onto it. Ensure the design is correctly positioned.
- Press Down: Slide the platen back into position. Firmly press down the handle to engage the heat press. The timer will automatically start.
- Release: Once the timer finishes, the machine will beep. Lift the handle to release the pressure and carefully remove your item.
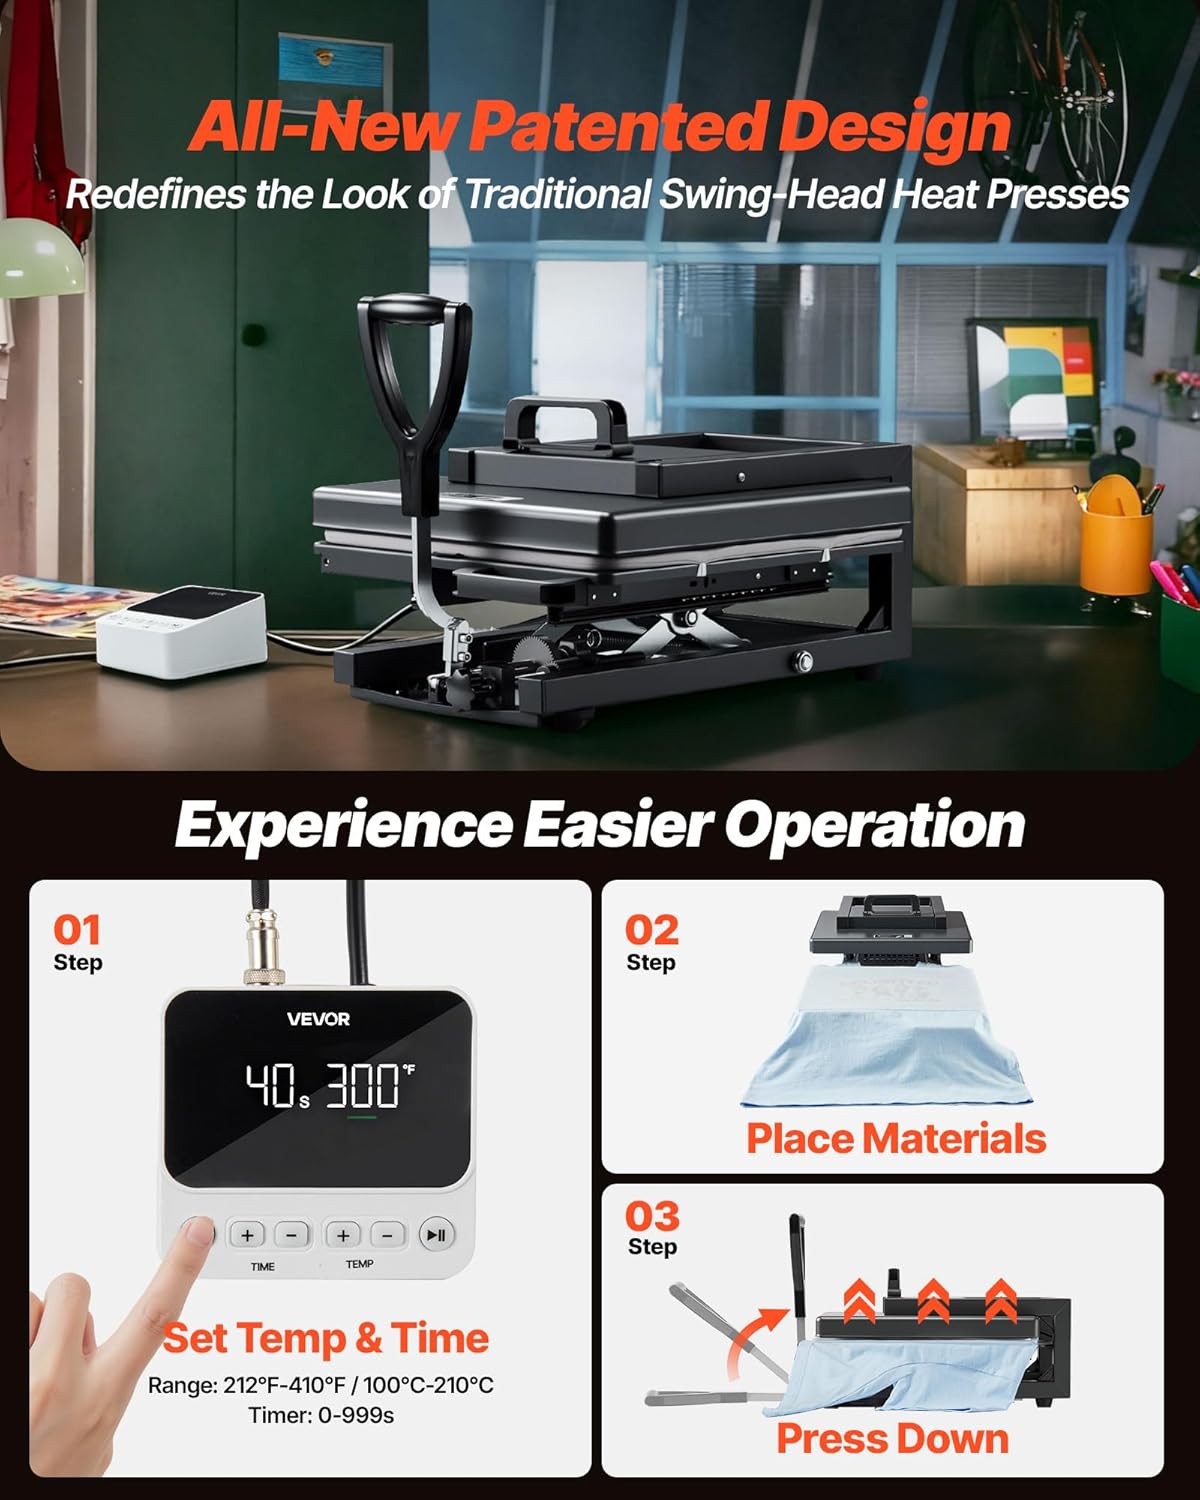
Image: Visual guide to the three-step easy operation process of the heat press.
Video: A short demonstration of the VEVOR 8-in-1 Heat Press in action.
6. Usage Examples and Applications
This versatile 8-in-1 heat press is compatible with various heat transfer materials and projects:
- T-shirts, Hoodies, Clothes: Ideal for applying PU HTV, Glitter HTV, and Heat Transfer Paper.
- Mugs & Tumblers: Use the specialized mug attachments for sublimation designs on ceramic or stainless steel drinkware.
- Caps & Hats: The curved hat press attachment ensures even heat and pressure for custom headwear.
- Plates: Utilize the plate attachments for personalized ceramic plates.
- Bags & Pillows: Customize canvas bags, pillowcases, and other fabric items.

Image: A user demonstrating the customization possibilities with the VEVOR Hybrid Heat Press.
7. Maintenance
Proper maintenance ensures the longevity and optimal performance of your heat press.
- Cleaning: Regularly wipe down the heating platen with a soft, dry cloth when the machine is cool. For stubborn residue, use a specialized platen cleaner.
- Storage: Store the heat press in a dry, dust-free environment.
- Inspection: Periodically check all connections and moving parts for wear and tear. Tighten any loose screws.
- Protective Sheets: Always use a Teflon sheet or parchment paper between your heating platen and your transfer/garment to prevent ink transfer and protect the platen.
8. Troubleshooting
If you encounter issues, refer to the following common troubleshooting tips:
- Uneven Heat/Pressure: Ensure the item is laid flat without wrinkles. Adjust the pressure knob to achieve even contact across the entire platen. Check that the heating element is functioning correctly.
- Transfer Not Sticking: Verify that the correct temperature and time settings are used for your specific transfer material and garment type. Increase pressure if necessary.
- Machine Not Powering On: Check the power cord connection and the power outlet. Ensure the main power switch is in the 'ON' position.
- Error Codes: Consult the detailed troubleshooting section in the full user manual for specific error code interpretations and solutions.
9. Specifications
| Feature | Specification |
|---|---|
| Model Number | SJY-HGG1M |
| Heating Plate Size | 15 x 15 inches (380 x 380 mm) |
| Temperature Range | 212°F - 410°F (100°C - 210°C) |
| Timer Range | 0 - 999 seconds |
| Power | 1400W (US), 1350W (EU) |
| Main Material | Alloy Steel |
| Item Weight | 46.5 pounds (21.1 kg) |
| Product Dimensions (Handle Raised) | 19.29"L x 15.35"W x 14.96"H |
| Product Dimensions (Handle Flat) | 31.50"L x 15.35"W x 11.81"H |
| Recommended Uses | Cap, Mug, Plate, T-Shirt |
10. Warranty and Support
VEVOR products are designed for durability and performance. For warranty information, technical support, or any inquiries, please visit the official VEVOR website or contact customer service. Keep your purchase receipt for warranty claims.
For further assistance, please refer to the contact information provided in your product packaging or on the VEVOR official website.


