
1. Introduction
This manual provides essential instructions for the safe and effective operation, setup, and maintenance of your YESWELDER MIG-165DS PRO Multi-Process Welding Machine and the accompanying 8-inch MIG Welding Pliers. Please read this manual thoroughly before operating the equipment to ensure proper use and to prevent injury or damage.
2. Safety Information
Welding operations involve significant risks. Always adhere to safety guidelines to prevent electric shock, burns, fire, and exposure to fumes and gases. Ensure proper ventilation, wear appropriate personal protective equipment (PPE) including welding helmet, gloves, and protective clothing. Keep a fire extinguisher nearby. Consult local safety regulations and standards before operation.
3. Product Overview
3.1 YESWELDER MIG-165DS PRO Welding Machine
The MIG-165DS PRO is a versatile 4-in-1 multi-process welding machine capable of Gasless Flux Core MIG, Gas MIG, Stick, and Lift TIG welding. It features a digital display and supports dual voltage input (110V/220V).

Figure 1: YESWELDER MIG-165DS PRO Welding Machine and Pliers. This image displays the main welding unit, a MIG torch connected, and the included welding pliers.
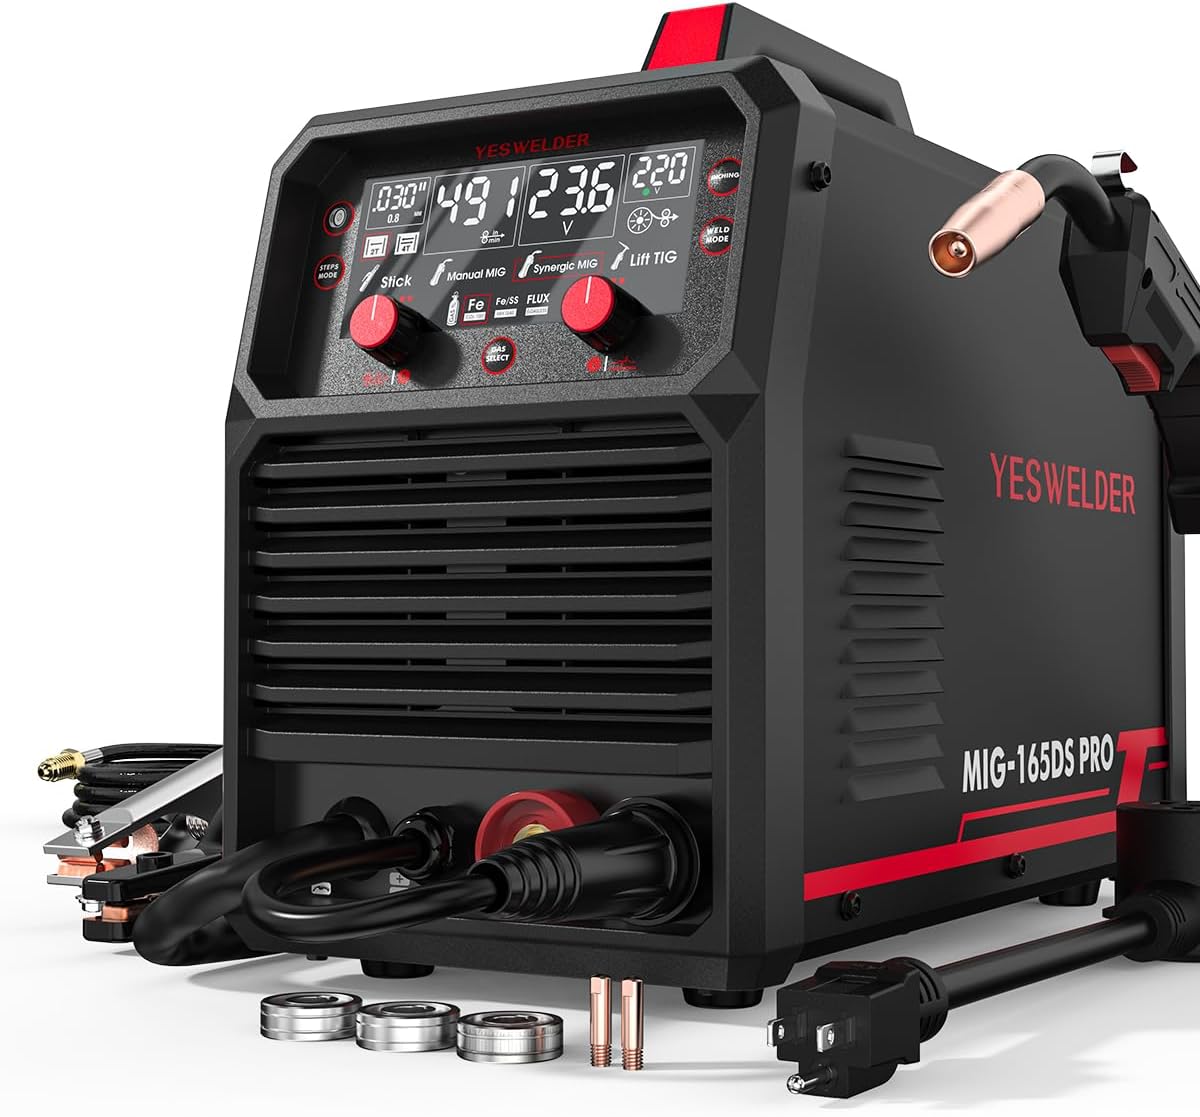
Figure 2: Front and Side View of the Welder. This image shows the front panel controls, various cable connections, and included consumables like contact tips.
3.2 8-inch MIG Welding Pliers
The included 8-inch MIG Welding Pliers are constructed from high-carbon steel (HRC60 rated hardness) and feature a needle nose with grip, spring-loaded handle, and comfortable grip handles for various welding tasks.

Figure 3: YESWELDER 8-inch MIG Welding Pliers. This image shows the full view of the welding pliers with blue handles.
4. Setup
4.1 Power Connection
The MIG-165DS PRO supports dual voltage input (110V/220V). Connect the power cord to an appropriate power outlet. Ensure the power source matches the machine's requirements and is properly grounded.
4.2 Wire Installation
This welder is compatible with 2LB/10LB spools of .023''/.030''/.035'' welding wire. Open the wire feed compartment, place the wire spool onto the spindle, and feed the wire through the drive rollers and liner to the MIG torch. Adjust the drive roller tension appropriately.
4.3 Gas Connection (for Gas MIG)
For Gas MIG welding, connect your shielding gas cylinder (e.g., Argon/CO2 mix) to the gas inlet on the rear of the machine using a gas hose and regulator. Ensure all connections are secure and leak-free.
4.4 Torch and Ground Clamp Connection
Connect the MIG torch to the appropriate connector on the front panel. For Stick and Lift TIG welding, connect the electrode holder and ground clamp to their respective terminals. Ensure all connections are tight.
5. Operating Instructions
5.1 Digital Display and Controls
The advanced digital display provides clear visual feedback for settings such as amperage, voltage, and wire feed speed. Use the control knobs to select welding modes and adjust parameters.

Figure 4: Digital Control Panel. This image highlights the intelligent digital screen display and control knobs for mode selection and parameter adjustment.
5.2 Welding Modes

Figure 5: 4-in-1 Multi-function Welding Machine. This image illustrates the four primary welding processes supported by the MIG-165DS PRO: Gas MIG, Flux Core, Stick, and Lift TIG.
5.2.1 MIG Welding (Flux Core / Gas MIG)
- Synergic MIG: Select the Synergic MIG mode. When adjusting the wire feeding speed, the recommended voltage will automatically be matched by the machine. This simplifies setup for various materials and thicknesses.
- Manual MIG: Select the Manual MIG mode. This allows independent adjustment of wire feeding speed and voltage, providing greater control for experienced welders.
5.2.2 Stick Welding
Select the Stick welding mode. The machine offers adjustable features such as Hot Start, Arc Force, VRD (Voltage Reduction Device), and Anti-Stick to enhance arc stability and ease of use.

Figure 6: Stick and MIG Welding. This image depicts a welder performing Stick welding, highlighting features like Hot Start and Arc Force, and also shows Manual and Synergic MIG welding.
5.2.3 Lift TIG Welding
Select the Lift TIG mode. Note: An additional Lift TIG torch is required and sold separately for this function. Ensure proper gas shielding and tungsten electrode preparation for TIG welding.
5.3 Using the MIG Welding Pliers
The 8-inch MIG Welding Pliers are designed for multiple tasks including nozzle removal and installation, wire cutting, contact tip removal and installation, and hammering. The spring-loaded handle and comfortable grip facilitate ease of use.

Figure 7: Multifunctional MIG Pliers Features. This image details the key features of the pliers: needle nose with grip, spring-loaded handle, and comfortable grip handle.

Figure 8: High-Carbon Steel Construction. This image emphasizes the high-carbon steel material and HRC60 rated hardness of the pliers, indicating durability.

Figure 9: Versatile Applications. This image demonstrates various uses for the pliers, including general welding tasks, car repair, home repair, and bicycle repair.
6. Maintenance
- Regular Cleaning: Keep the welding machine and pliers clean from dust, metal particles, and debris. Use compressed air to clear internal components periodically.
- Consumables: Regularly inspect and replace MIG contact tips, nozzles, and drive rollers as they wear out. For Stick welding, ensure electrodes are stored properly.
- Cable Inspection: Check all cables and connections for damage, fraying, or loose contacts before each use.
- Pliers Care: Keep the pliers clean and lightly oiled to prevent rust and ensure smooth operation.
7. Troubleshooting
- No Arc:
- Check power supply and connections.
- Ensure ground clamp is securely attached to the workpiece.
- Verify correct welding mode and parameters are selected.
- Inspect torch consumables (contact tip, nozzle) for blockages or wear.
- Poor Weld Quality:
- Adjust wire feed speed and voltage settings.
- Check for proper gas flow (for Gas MIG) or correct flux core wire.
- Ensure workpiece is clean and free of contaminants.
- Verify correct stick electrode type and polarity.
- Wire Feeding Issues:
- Check drive roller tension and ensure it matches wire size.
- Inspect wire spool for tangles or binding.
- Clean or replace the MIG torch liner if clogged.
8. Specifications
| Feature | Specification |
|---|---|
| Model | MIG-165DS PRO |
| Welding Processes | Flux Core MIG, Gas MIG, Stick, Lift TIG |
| Output Current | 165 Amps (Max) |
| Input Voltage | 110V/220V Dual Voltage |
| Compatible Wire Sizes | .023''/.030''/.035'' (2LB/10LB spools) |
| Weight | Approximately 18 lbs |
| Pliers Material | High-Carbon Steel (HRC60) |
9. Warranty and Support
For warranty information, technical support, or service inquiries, please refer to the official YESWELDER website or contact their customer service department. Keep your purchase receipt for warranty claims.