
1. Product Overview
The USX MOUNT XTL908 is a heavy-duty tilting TV wall mount designed for large televisions ranging from 60 to 120 inches. It supports TVs weighing up to 220 lbs and features a low-profile design, positioning the TV just 2.6 inches from the wall. The mount is compatible with VESA patterns up to 900x600mm and can be installed on wood studs (16-32 inches apart), concrete, or brick walls.

Image 1.1: The USX MOUNT XTL908 TV Wall Mount installed in a modern living room setting.

Image 1.2: The ultra-slim profile of the mount, showing the TV positioned close to the wall.
2. Safety Information
Read all instructions carefully before installation. If you have any questions, consult a qualified installer. Improper installation can result in serious injury or damage.
- Weight Capacity: Do not exceed the maximum weight capacity of 220 lbs (100 kg). This mount is intended for use only with the maximum weights indicated.
- TV Size: This mount is designed for TVs between 60 and 120 inches.
- Wall Type: Install only on wood studs, solid concrete, or brick walls. DO NOT install on drywall alone.
- Stud Spacing: Ensure wood studs are spaced between 16 and 32 inches apart.
- Mounting Hardware: Use only the provided mounting hardware. If you require concrete anchors, please contact customer support.
- Integrity Test: After installation, perform an integrity test by gently pulling on the mount to ensure it is securely fastened to the wall.

Image 2.1: The robust construction of the mount, designed to securely hold TVs up to 220 lbs.
3. Package Contents
Please verify that all components are present and undamaged before installation. If any parts are missing or defective, contact customer support.
- Wall Plate Assembly
- TV Brackets (2)
- Mounting Hardware Kit (screws, washers, spacers, anchors for concrete/brick)
- Mounting Template
- Instruction Manual
4. Specifications
| Feature | Specification |
|---|---|
| Mounting Type | Wall Mount |
| Movement Type | Tilt |
| Brand | USX MOUNT |
| Material | Metal |
| Color | Black |
| Compatible Devices | Television |
| Maximum Tilt Angle | 12 Degrees Down, 5 Degrees Up |
| Minimum Supported Screen Size | 60 Inches |
| Maximum Supported Screen Size | 120 Inches |
| Max Load Capacity | 220 lbs (100 kg) |
| VESA Compatibility | Up to 900x600mm |
| Wall Distance (Low Profile) | 2.6 inches |
| Stud Spacing Compatibility | 16-32 inches |

Image 4.1: Visual representation of VESA patterns supported and the maximum load capacity of 220 lbs.

Image 4.2: Technical drawing showing the dimensions of the TV interface and wall plate.

Image 4.3: Another view of the product dimensions, highlighting key measurements.
5. Setup and Installation
Before you begin, ensure you have all necessary tools and that your wall type is suitable for this mount. The installation video below provides a visual guide.
Video 5.1: Official USX MOUNT XTL908 installation video, demonstrating the step-by-step mounting process.
5.1 Pre-Installation Checks
- Verify TV Compatibility: Check your TV's weight and VESA mounting pattern to ensure it falls within the mount's specifications (60-120 inches, up to 220 lbs, VESA up to 900x600mm).
- Identify Wall Type: Determine if your wall is wood stud, solid concrete, or brick.
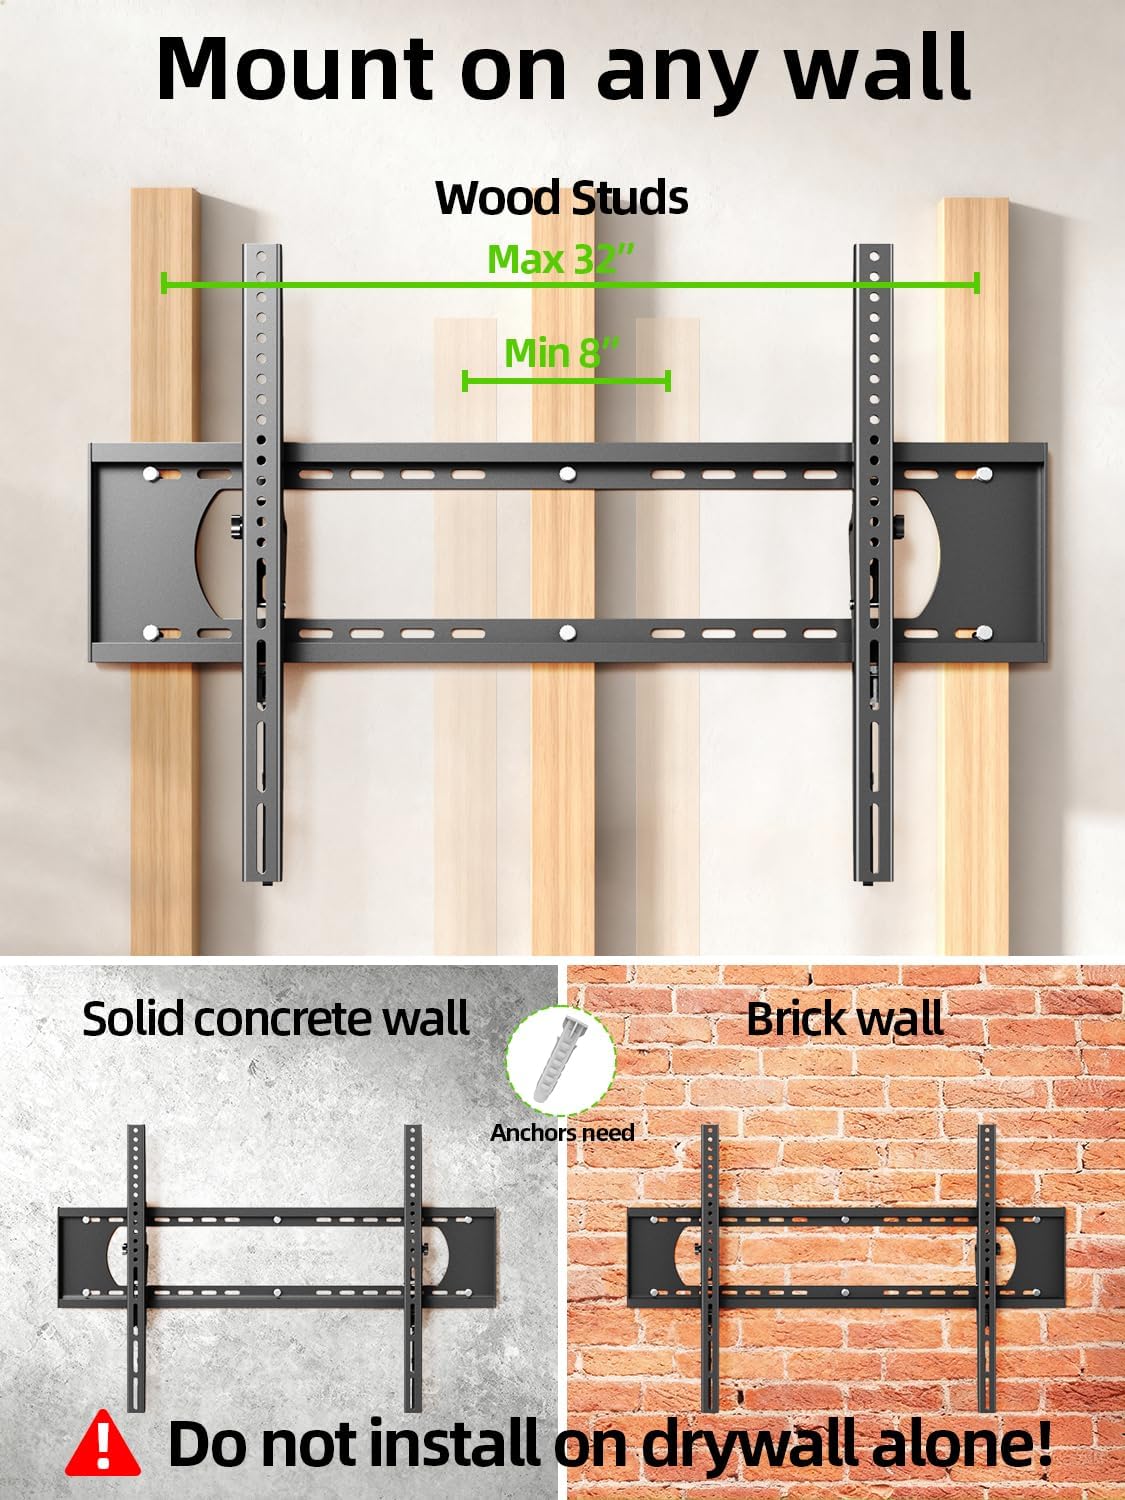
Image 5.2: The mount is suitable for wood studs (16-32" spacing), solid concrete, and brick walls. Not for drywall alone.
5.2 Attaching TV Brackets
Depending on your TV's back, choose the appropriate option:
- For Flat TV Back: Align the TV brackets with the VESA holes on the back of your TV. Secure them using the appropriate screws and washers from the hardware kit. Do not overtighten.
- For Irregular TV Back: If your TV has an irregular or curved back, use the provided spacers to create a flat mounting surface before attaching the brackets.
5.3 Mounting the Wall Plate
Use the provided mounting template to mark the drill holes on your wall. Ensure the template is level before marking.
- For Wood Studs: Locate the center of your wood studs. Drill pilot holes (7/32 in. / 5.5mm diameter, 2.5 in. / 64mm depth). Secure the wall plate using lag bolts and washers. Do not use plastic anchors for wood studs.
- For Concrete/Brick Walls: Drill pilot holes (3/8 in. / 10mm diameter, 2.5 in. / 64mm depth). Insert concrete anchors into the drilled holes. Secure the wall plate using lag bolts and washers.
After securing the wall plate, perform an integrity test by pulling on the mount to ensure it is firmly attached to the wall.

Image 5.3: Simplified 3-step installation process: 1. Attach TV brackets, 2. Mount wall plate, 3. Hang up TV.
5.4 Hanging and Securing the TV
- Carefully lift the TV with the attached brackets and hook them onto the top edge of the wall plate.
- Gently lower the TV until the brackets fully engage with the wall plate.
- Use the quick lock and release pull tabs to secure the TV to the wall plate, preventing accidental dislodgement.
6. Operating Instructions
6.1 Adjusting Tilt Angle
The USX MOUNT XTL908 allows for easy tilt adjustment to optimize your viewing angle and reduce glare. The mount can tilt 5 degrees upwards and 12 degrees downwards.
- To adjust the tilt, loosen the tilting adjustment knobs located on the TV brackets.
- Tilt the TV to your desired angle.
- Tighten the tilting adjustment knobs to secure the TV in place.
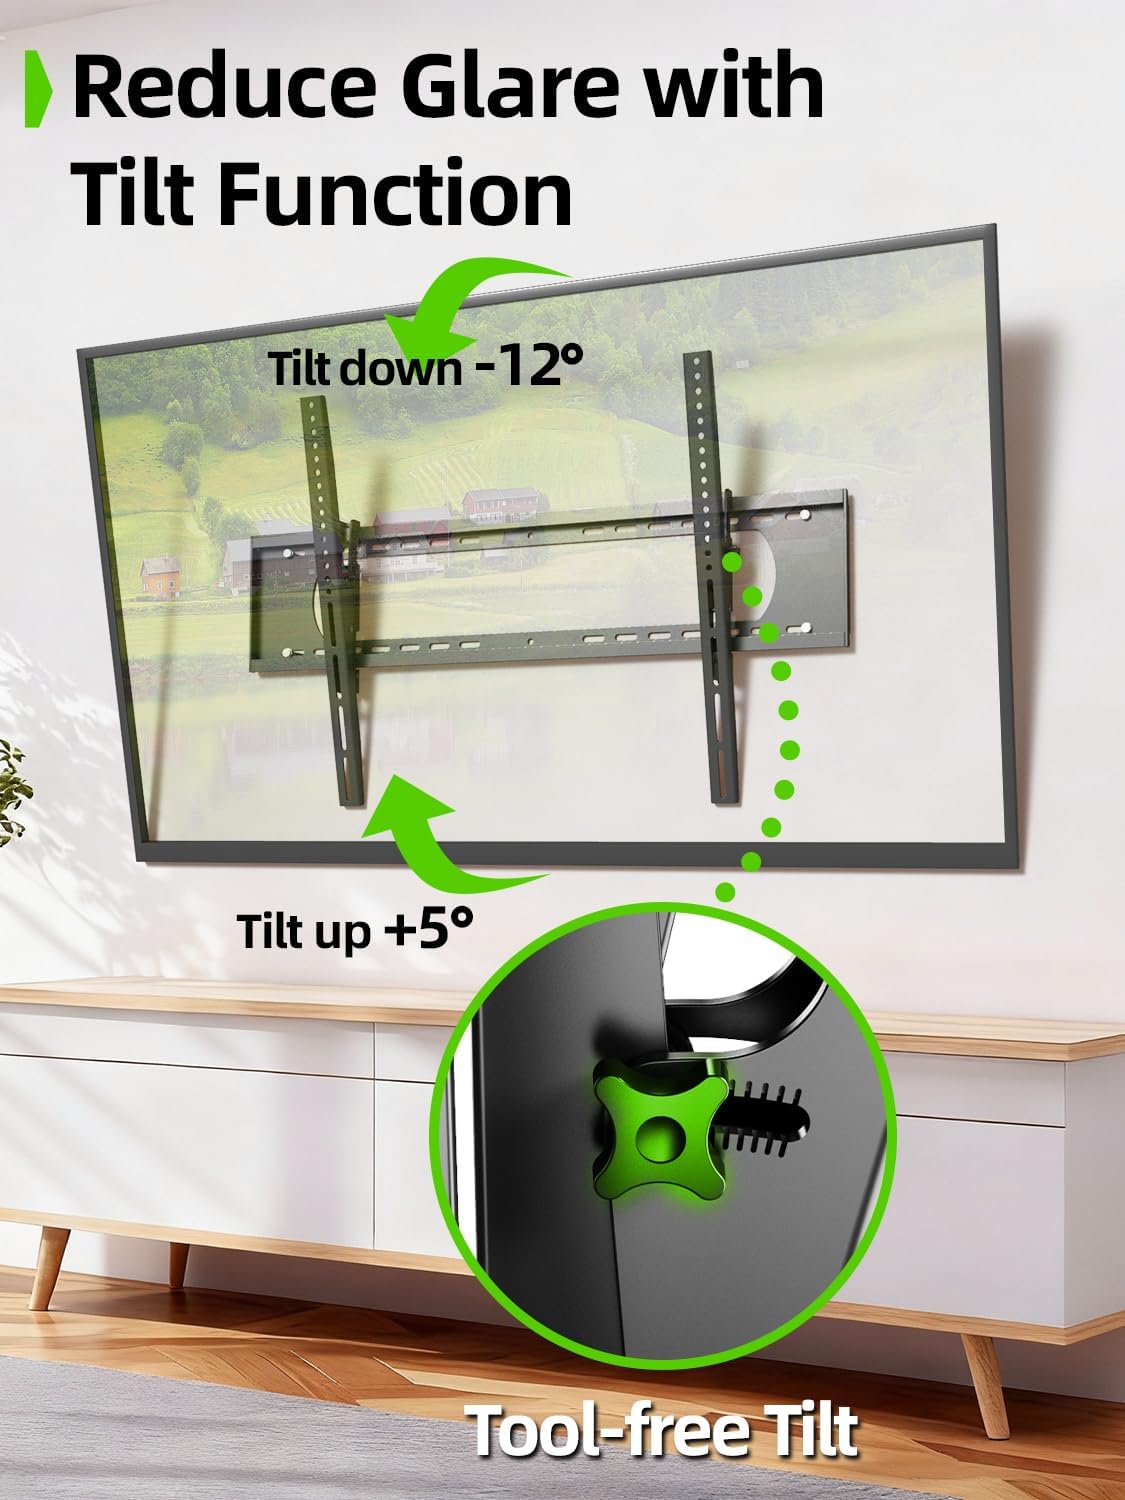
Image 6.1: The tilt function allows for easy adjustment up to +5° and down to -12° to reduce glare.

Image 6.2: The mount's tilt range for optimal viewing from various positions.
6.2 Quick Lock and Release
The mount features pull tabs for easy locking and releasing of the TV from the wall plate.
- To lock the TV, ensure the pull tabs are pushed upwards into the locked position after hanging the TV.
- To release the TV, gently pull down on the cords attached to the tabs. This will unlock the TV from the wall plate, allowing you to lift it off.

Image 6.3: The adjustable pull tabs for easy locking and releasing of the TV.

Image 6.4: Illustration of pulling the cords to release the TV from the mount.
7. Maintenance
Regular maintenance ensures the longevity and safe operation of your TV wall mount.
- Cleaning: Wipe the mount with a soft, dry cloth to remove dust. Avoid abrasive cleaners or solvents.
- Periodic Checks: Periodically check all screws and bolts to ensure they are tight and secure. Re-tighten if necessary.
- Inspect for Damage: Inspect the mount for any signs of wear, corrosion, or damage. If any issues are found, contact customer support and do not use the mount until it is repaired or replaced.
8. Troubleshooting
If you encounter any issues during or after installation, refer to the following common problems and solutions.
| Problem | Possible Cause | Solution |
|---|---|---|
| TV is not level | Wall plate not level during installation. | Remove TV, loosen wall plate screws, adjust level, re-tighten. Ensure to use a level during installation. |
| Mount feels loose on the wall | Screws not fully tightened; incorrect wall anchors used; wall material not suitable. | Ensure all lag bolts are fully tightened. Verify correct anchors for concrete/brick. Do not install on drywall alone. If issues persist, consult a professional. |
| TV cannot be tilted | Tilting adjustment knobs are too tight. | Loosen the tilting adjustment knobs on the TV brackets to allow movement. Re-tighten once desired angle is achieved. |
| TV cannot be removed from mount | Quick release pull tabs are in the locked position. | Pull down on the cords attached to the quick release tabs to unlock the TV. |
9. Warranty and Support
For warranty information or technical support, please refer to the contact details provided with your purchase or visit the official USX MOUNT website. Keep your purchase receipt as proof of purchase for any warranty claims.
If you have any questions or require additional assistance, please do not hesitate to contact USX MOUNT customer service.