1. Introduction
Thank you for purchasing the Docooler HD-229 Home DVD Player. This manual provides essential information for the safe and efficient operation of your device. Please read it thoroughly before use and retain it for future reference.
2. Safety Information
To ensure safe operation and prevent damage, please observe the following precautions:
- Power Supply: Use only the specified power supply (110-240V, 50/60Hz).
- Ventilation: Ensure adequate ventilation around the player. Do not block ventilation openings. Avoid placing the player on soft surfaces that may obstruct airflow.
- Moisture: Do not expose the player to rain, moisture, or liquids.
- Heat: Keep the player away from heat sources such as radiators, heat registers, stoves, or other apparatus that produce heat.
- Discs: Handle discs carefully. Do not use cracked, warped, or scratched discs, as they may damage the player.
- Servicing: Do not attempt to service this product yourself. Refer all servicing to qualified service personnel.
3. Package Contents
Verify that all items are present in the package:
- Docooler HD-229 DVD Player
- Remote Control
- AV Cable (RCA)
- User Manual (English)

Image: Contents of the Docooler HD-229 DVD Player package, including the player, remote control, AV cable, and user manual.
4. Product Overview
4.1 Front Panel
- Disc Tray: Insert DVDs or CDs.
- USB Port: Connect USB flash drives for media playback.
- Open/Close Button: Opens and closes the disc tray.
- Play/Pause Button: Starts or pauses playback.
- Stop Button: Stops playback.
- Power Button: Turns the player on or off.
- Status Display: Shows playback information and time.
- MIC Input: Microphone input (if applicable to model variant).
4.2 Rear Panel
- HD Output (HDMI): Connects to a TV or display with an HDMI cable for high-definition video and audio.
- YPbPr Output (Component Video): Connects to a TV or display using component video cables (red, green, blue) for progressive scan video.
- Video Output (Composite Video): Connects to a TV or display using a single yellow RCA cable for standard definition video.
- Left/Right Channel Output (Audio L/R): Connects to a TV or audio receiver using red and white RCA cables for stereo audio.
- Power Input: Connects the power cord.
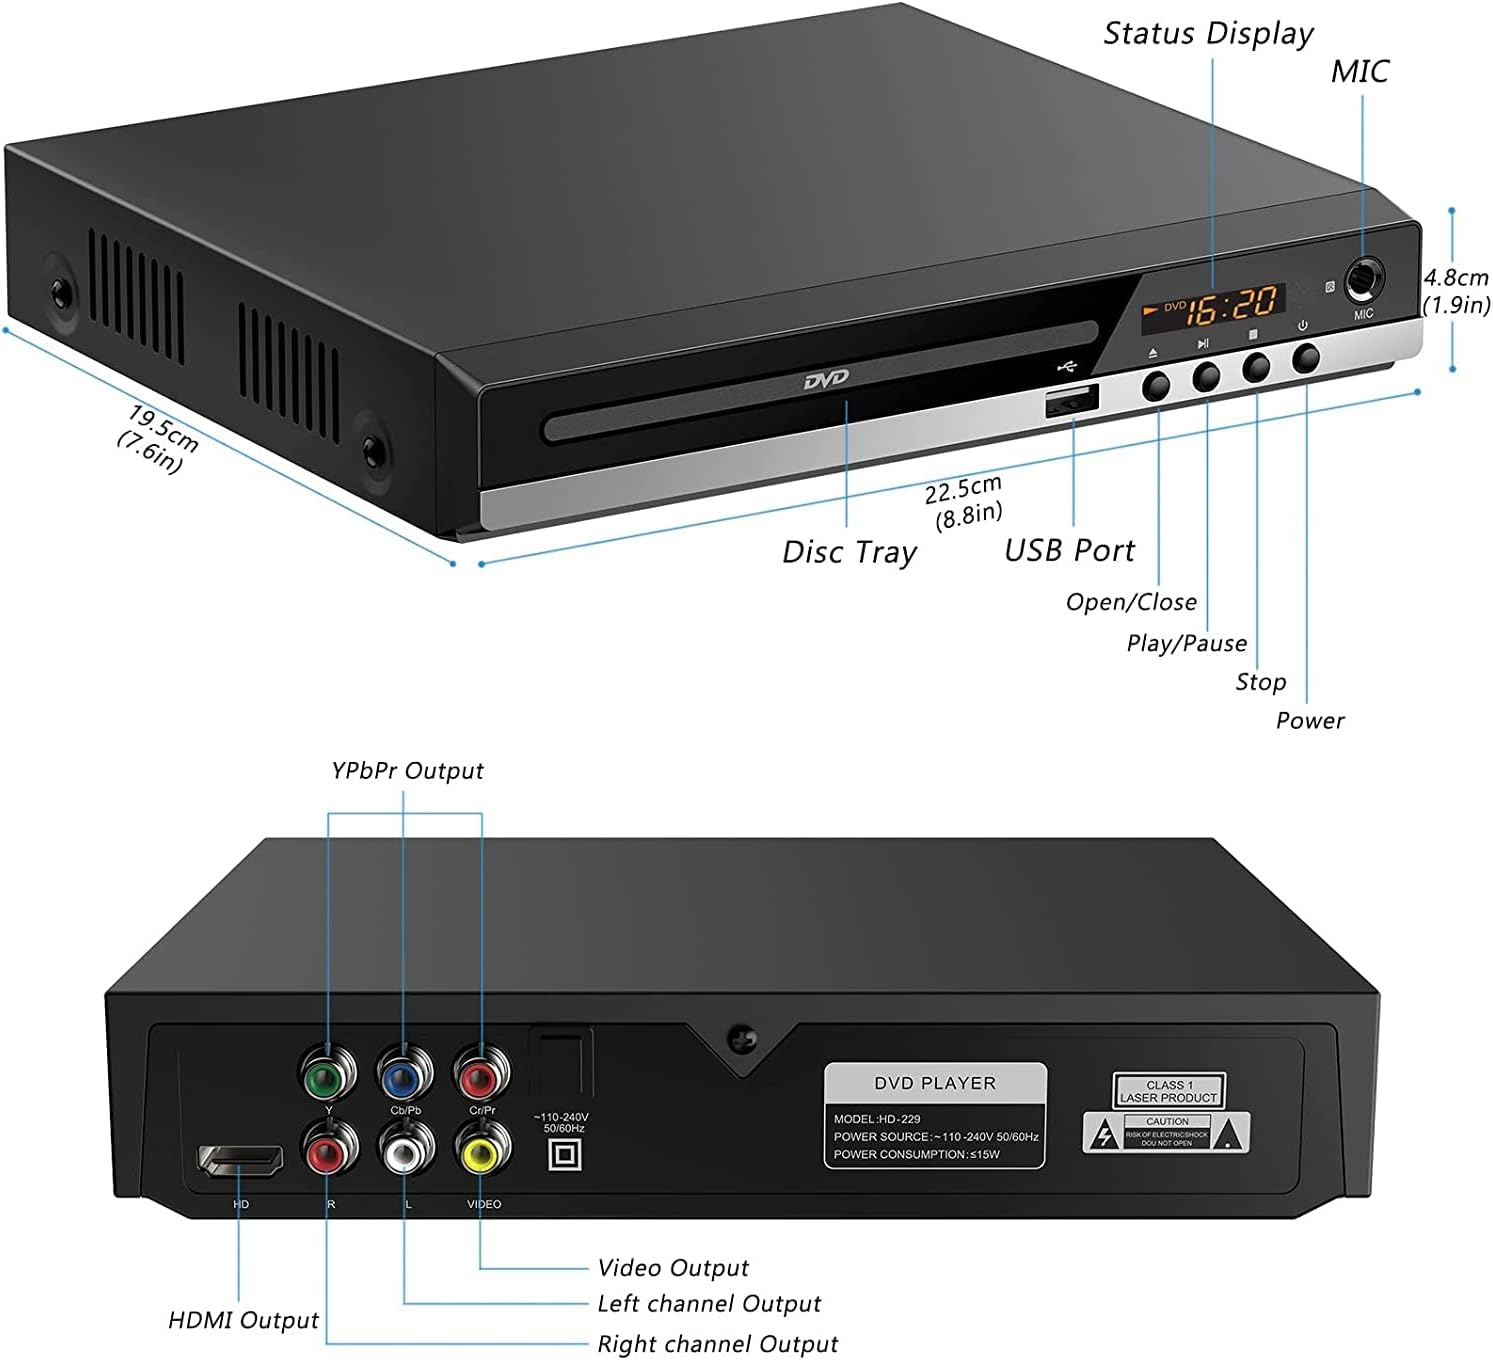
Image: Detailed view of the Docooler HD-229 DVD Player's front and rear panels, highlighting all ports and controls with labels.

Image: Close-up of the rear panel of the Docooler HD-229 DVD Player, showing the various video and audio output ports and power input.
5. Setup
5.1 Connecting to a TV or Display
The Docooler HD-229 offers multiple connection options:
- HDMI Connection (Recommended for HD): Connect an HDMI cable from the player's HD Output port to an HDMI input on your TV. Select the corresponding HDMI input on your TV.
- AV Connection (Composite Video): Connect the yellow RCA plug of the AV cable to the player's Video Output. Connect the red and white RCA plugs to the player's Right Channel Output and Left Channel Output, respectively. Connect the other end of the AV cable to the corresponding input ports on your TV. Select the AV input on your TV.
- Component Video Connection (YPbPr): Connect component video cables (red, green, blue) to the player's YPbPr Output ports and the corresponding inputs on your TV. Connect red and white RCA cables for audio to the player's Right Channel Output and Left Channel Output, and to the audio inputs on your TV. Select the Component input on your TV.

Image: Visual guide demonstrating how to connect the DVD player to a TV using either AV (composite) or HD (HDMI) output cables.
5.2 Power Connection
Connect the power cord to the player's Power Input and then plug it into a standard electrical outlet.
6. Operating Instructions
6.1 Disc Playback
- Turn on the DVD player and your TV. Select the correct input source on your TV.
- Press the Open/Close button on the player or remote control to open the disc tray.
- Place a compatible disc (DVD, SVCD, VCD, CD-R, CD-R/W, MP3 CD/VCD) gently into the disc tray with the label side facing up.
- Press the Open/Close button again to close the disc tray.
- The player will automatically begin playback or display a disc menu. Use the remote control to navigate menus.
6.2 USB Media Playback
The player supports media playback from a USB 2.0 flash drive.
- Insert a USB flash drive into the USB Port on the front panel.
- The player should automatically detect the USB device and display its contents. If not, use the remote control's 'Source' or 'USB' button to switch to USB mode.
- Navigate through your files (WMA, MP3, JPG, VOB) using the remote control and press Play/Pause to start playback.

Image: The Docooler HD-229 DVD Player connected to a TV, demonstrating media playback from a USB flash drive.
6.3 Using the Remote Control
The included remote control allows for convenient operation from a distance.
- Ensure the remote control has working batteries.
- Point the remote control towards the front of the DVD player.
- Common functions include Power, Open/Close, Play/Pause, Stop, Fast Forward/Rewind, Chapter Skip, Volume, and Menu navigation.

Image: A hand holding the remote control, pointing it towards the Docooler HD-229 DVD Player, which is connected to a television.
7. Maintenance
7.1 Cleaning the Player
Wipe the exterior of the player with a soft, dry cloth. Do not use liquid cleaners or abrasive materials.
7.2 Cleaning Discs
Wipe discs from the center outwards with a soft, lint-free cloth. Do not use solvents or abrasive cleaners.
7.3 Ventilation
Ensure the player's ventilation slots remain clear of dust and obstructions to prevent overheating. The player features an upgraded cooling chip for long-term smooth operation.

Image: An exploded view diagram of the Docooler HD-229 DVD Player, showing arrows indicating airflow for its internal cooling system.
8. Troubleshooting
If you encounter issues with your DVD player, refer to the following common problems and solutions:
- No Power:
- Check if the power cord is securely connected to the player and the electrical outlet.
- Ensure the power outlet is functional.
- No Picture:
- Verify that the video cables (HDMI, AV, or Component) are correctly connected between the player and the TV.
- Ensure your TV is set to the correct input source (e.g., HDMI 1, AV, Component).
- No Sound:
- Check that the audio cables (HDMI or RCA L/R) are properly connected.
- Ensure the TV or audio receiver volume is not muted or set too low.
- Disc Not Playing:
- Ensure the disc is clean and free from scratches or damage.
- Verify that the disc format is compatible with the player (DVD, SVCD, VCD, CD-R, CD-R/W, MP3 CD/VCD).
- Try another disc to rule out a faulty disc.
- USB Drive Not Recognized:
- Ensure the USB drive is formatted to a compatible file system (e.g., FAT32).
- Check that the media files are in supported formats (WMA, MP3, JPG, VOB).
- Try a different USB drive.
9. Specifications
| Feature | Specification |
|---|---|
| Model | HD-229 |
| Power Consumption | ≤15W |
| Compatible Disc Formats | DVD, SVCD, VCD, CD-R, CD-R/W, MP3 CD/VCD |
| USB Port Supported Formats | WMA, MP3, JPG, VOB |
| Color | Black |
| Item Dimensions (L x W x H) | 22.5 x 19.7 x 4.1 cm (8.85 x 7.75 x 1.61 inches) |
| Item Weight | 717g (25.29 oz / 2.19 lbs) |
| Connectivity Technology | USB, HDMI, AV (Composite), YPbPr (Component) |
10. Warranty and Support
For warranty information or technical support, please refer to the documentation provided at the time of purchase or contact your retailer. Keep your purchase receipt as proof of purchase.


