1. Introduction
This manual provides essential information for the safe and effective use of your GEOID VE200 Smart Trainer. Please read it thoroughly before initial setup and operation. Keep this manual for future reference.
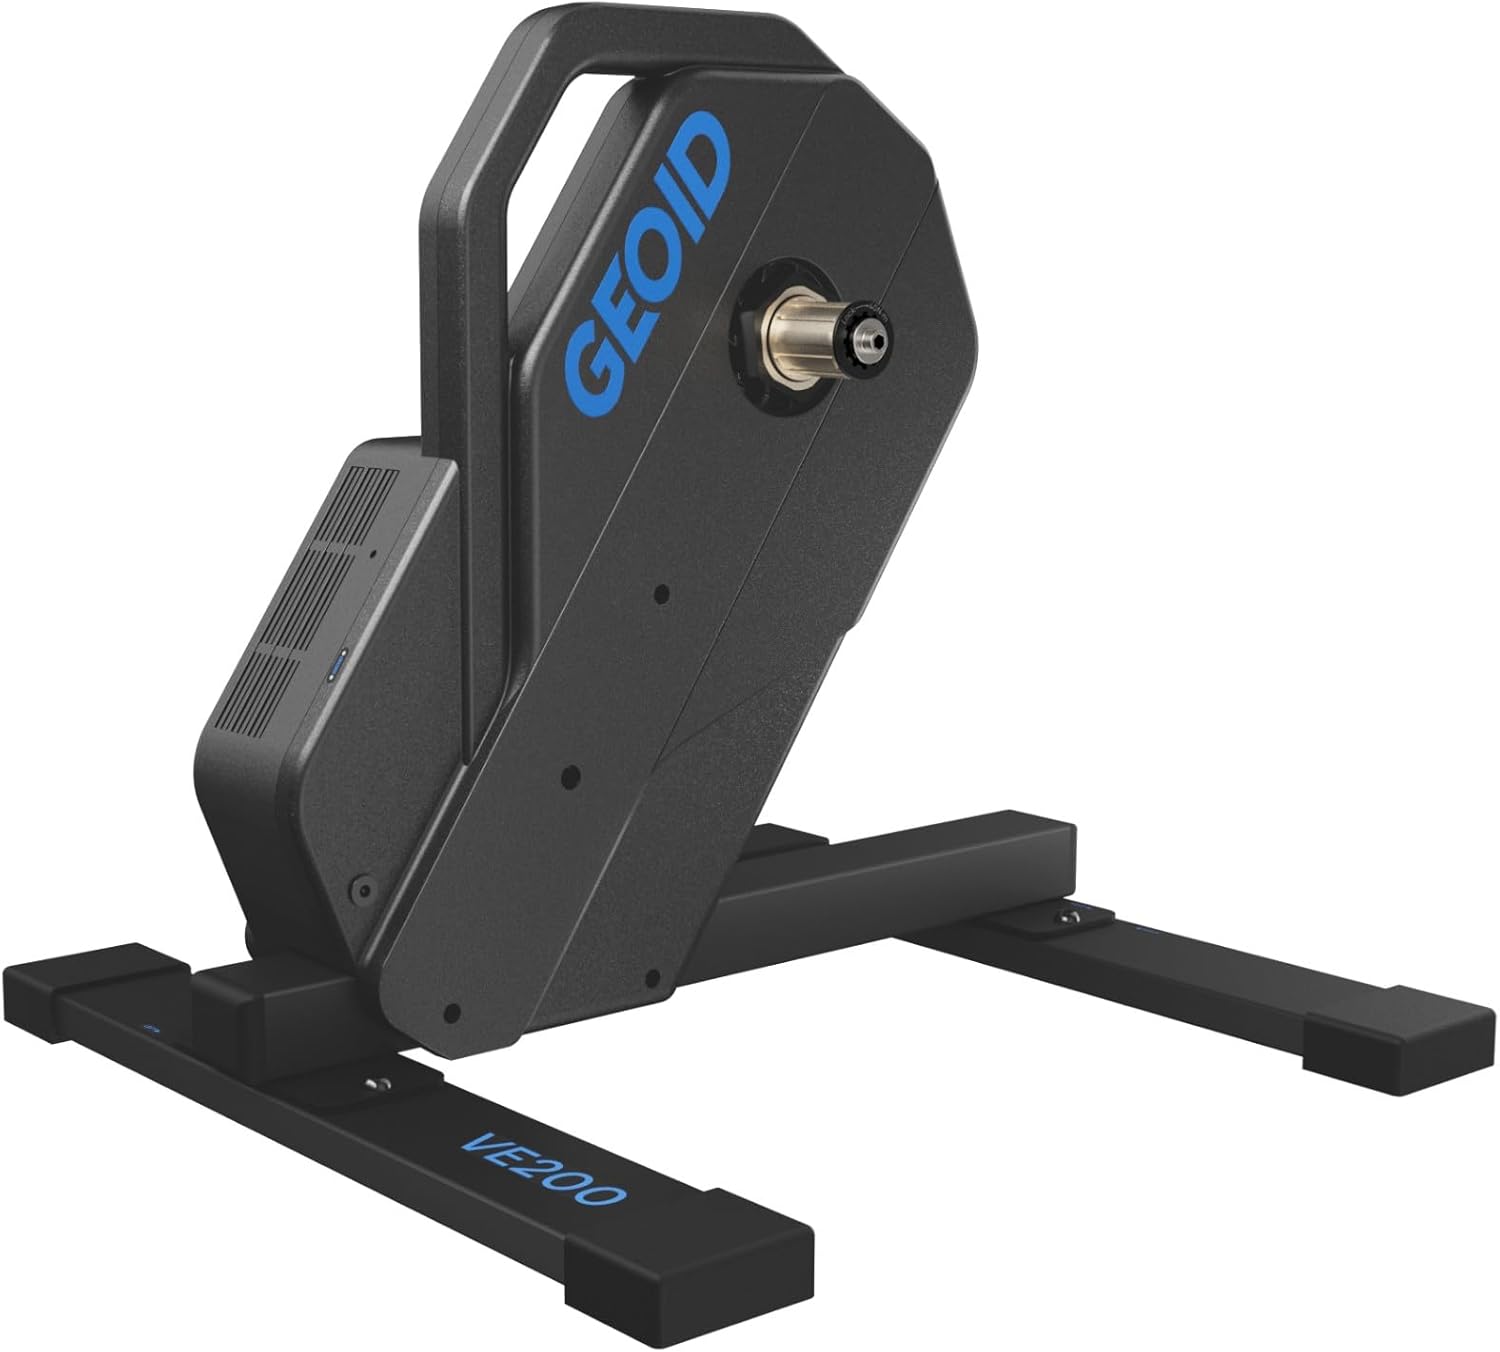
Image 1.1: The GEOID VE200 Smart Trainer, a direct-drive indoor cycling trainer.
2. Key Features
- High Performance: Offers a maximum power output of 2000W, power accuracy of ±2%, and simulates inclines up to 15%. Features a robust steel frame and pure copper electromagnetic resistance for a stable and realistic ride experience.
- Quiet Operation: Designed for low noise, allowing for indoor training without significant disturbance. Noise level is below 56dB at 80rpm cadence (measured in GEOID lab).
- ERG Mode & Customization: ERG resistance response can be customized in 3 stages. The Onelap Fit app allows for pre-customization of training experiences.
- Dual Connectivity: Equipped with BLE (Bluetooth Low Energy) and Wi-Fi dual protocols for stable and uninterrupted connections across various network environments.
- Wide Compatibility: Supports 26-29 inch MTB and 700C road bike wheels. Compatible with thru-axle (12x142mm / 12x148mm) and quick-release (130mm / 135mm) frames. Supports Shimano and SRAM 8-11 speed cassettes, Shimano Road 12-speed, and SRAM XDR 12-speed (XDR freehub sold separately).
- Safety & Portability: Features a full-cover design to prevent accidental finger pinching. Lightweight (11.9kg) and includes a handle for easy transport.
- Important Activation Note: For first-time use, product activation (initial setup) is mandatory. Failure to activate correctly may result in improper operation. Refer to the included instruction manual for detailed activation steps.
3. Package Contents

Image 3.1: Overview of the GEOID VE200 Smart Trainer package contents.
- VE200 Main Unit
- 12V 4A Power Adapter
- Quick-Release Lever
- Freehub Washer
- HG Standard Quick-Release End Cap (pre-installed)
- 130/135 Quick-Release Converter
- HG Standard Thru-Axle End Cap
- 12x142/148 Thru-Axle Converter
- Disc Brake Protector
- Quick Start Guide
- 5mm Hex Wrench
- 17mm Open-End Wrench
Note: Flywheel (cassette) is not included and must be purchased separately.
4. Setup
4.1 Unboxing and Initial Assembly
The following video demonstrates the unboxing and initial assembly steps, including attaching the support legs, installing the cassette, and setting up the adapter seats.
Video 4.1: Detailed unboxing and installation guide for the X2Max (similar to VE200) smart trainer, covering support leg attachment, cassette installation, and adapter setup.
- Attach Support Legs: Securely attach the two support legs to the main unit using the provided screws and hex key. Ensure the longer side of the support leg is on the drive side (freehub side).
- Install Cassette: If your trainer does not have a pre-installed cassette, carefully align the widest notch on the freehub with the widest step on your cassette. Install all cassette pieces, ensuring the raised part of loose pieces faces the cassette. Tighten the cassette with a cassette wrench and cassette sleeve to a torque of 40Nm.
- Install Adapter Seats: The trainer comes with a thru-axle drive-side adapter seat pre-installed. For thru-axle frames, ensure the correct 142mm or 148mm adapter is installed on the non-drive side. For quick-release bikes, remove the pre-installed thru-axle adapter using the open-end wrench and install the quick-release adapter seat.
4.2 Mounting Your Bicycle
Once the trainer is assembled and the correct adapter seats are in place, you can mount your bicycle. For ease of installation, it is recommended to shift your bike's cassette to the smallest cog before mounting.
- Remove Rear Wheel: Remove your bicycle's rear wheel.
- Position Chain: Gently place the bike chain onto the smallest cog of the trainer's cassette.
- Mount Frame: Carefully lower your bicycle frame onto the trainer, aligning the dropouts with the trainer's axle.
- Secure Axle: For thru-axle frames, insert and tighten your bike's thru-axle. For quick-release frames, insert the quick-release lever and tighten it securely.
5. Operating Instructions
5.1 Power Connection
Connect the provided 12V 4A power adapter to the trainer and plug it into a suitable power outlet. The trainer will power on automatically.
5.2 App Connectivity
The GEOID VE200 supports both Bluetooth Low Energy (BLE) and Wi-Fi for connecting to various cycling applications. This dual protocol ensures a stable connection for your training sessions.

Image 5.1: Bluetooth and Wi-Fi dual protocol for reliable connection.
To connect:
- Ensure your smart trainer is powered on.
- Open your preferred cycling application (e.g., Onelap Fit, Zwift, MyWhoosh, Rouvy, BKOOL, TrainerRoad, Kinomap, FulGaz).
- Follow the app's instructions to search for and connect to the smart trainer via Bluetooth or Wi-Fi.
- The trainer will transmit speed, cadence, and power data to the application.
5.3 ERG Mode
The ERG mode allows the trainer to automatically adjust resistance to maintain a target power output, regardless of your speed or cadence. The GEOID VE200 offers 3 stages of ERG resistance customization through the Onelap Fit app, enabling a comfortable ride even for beginners.

Image 5.2: ERG mode customization for personalized training.
6. Compatibility
6.1 Bicycle Compatibility
- Wheel Sizes: 26-29 inch Mountain Bikes (MTB) and 700C Road Bikes (RD).
- Frame Types: Thru-axle (12x142mm / 12x148mm) and Quick Release (130mm / 135mm).
- Cassette Compatibility: Shimano and SRAM 8-11 speed cassettes, Shimano Road 12-speed, and SRAM XDR 12-speed (XDR freehub sold separately).
6.2 Software Compatibility
The GEOID VE200 Smart Trainer is widely compatible with mainstream cycling applications, including:
- Onelap Fit
- Zwift
- MyWhoosh
- Rouvy
- BKOOL
- TrainerRoad
- Kinomap
- FulGaz
Video 6.1: Demonstration of the smart trainer's compatibility with various cycling software, showcasing data transmission and virtual riding.
7. Maintenance
Regular maintenance ensures the longevity and optimal performance of your smart trainer.
- Cleaning: Wipe down the trainer with a soft, dry cloth after each use to remove sweat and dust. Avoid using abrasive cleaners or solvents.
- Cable Inspection: Periodically check the power cable and any other connections for signs of wear or damage. Replace if necessary.
- Storage: When not in use, store the trainer in a dry, cool place away from direct sunlight and extreme temperatures. The compact design and handle facilitate easy storage.
8. Troubleshooting
If you encounter issues with your GEOID VE200 Smart Trainer, refer to the following common problems and solutions:
- Trainer Not Powering On: Ensure the power adapter is securely connected to both the trainer and a working power outlet.
- Connection Issues with App:
- Verify that Bluetooth or Wi-Fi is enabled on your device.
- Ensure the trainer is powered on and within range of your device.
- Close and restart the cycling application.
- If using multiple devices, ensure only one device is attempting to connect to the trainer at a time.
- Perform the mandatory initial activation as described in the Quick Start Guide if this is your first use.
- Incorrect Power/Speed Readings:
- Ensure the trainer is properly calibrated if your application supports it.
- Check that your bicycle is securely mounted and the chain is correctly engaged with the cassette.
- Unusual Noise During Operation:
- Verify that the cassette is properly installed and tightened.
- Ensure the bicycle frame is securely mounted and not rubbing against any part of the trainer.
- Check for any loose components on the trainer or your bicycle.
If problems persist, please contact online customer service for assistance.
9. Specifications

Image 9.1: Detailed product specifications for the GEOID VE200 Smart Trainer.
| Feature | Specification |
|---|---|
| Product Model | VE200 |
| Color | Black |
| Material | Plastic, Metal |
| Package Size | 60 x 60 x 25 cm |
| Weight | 11.9 kg (Product), 15 kg (Package) |
| Resistance Mechanism | Electromagnetic |
| Maximum Power Output | 2000W |
| Power Accuracy | ±2% |
| Maximum Incline Simulation | 15% |
| Noise Level | <56dB |
| Connectivity | Bluetooth, Wi-Fi |
| ERG Mode | Supported |
| Compatible Wheel Sizes | 26-29" MTB / 700C RD |
| Compatible Axles | Thru-axle (12x142/12x148), Quick Release (130/135mm) |
| Compatible Cassettes | Shimano, SRAM 8-11 speed, Shimano Road 12-speed, SRAM XDR 12-speed (XDR freehub sold separately) |
10. Warranty and Support
The GEOID VE200 Smart Trainer comes with a 1-year manufacturer's warranty. If you encounter any issues during use, please contact our online customer service. We are committed to providing thorough support for your trainer-related questions and needs.
11. Optional Accessories
While the GEOID VE200 is a direct-drive trainer and does not require a front wheel block for stability, some users may prefer one for a more level riding position or to protect flooring. The following video demonstrates a compatible front wheel bracket.
Video 11.1: Demonstration of a front wheel bracket, an optional accessory for enhanced stability and comfort during indoor training.


