1. Introduction
This manual provides essential instructions for the safe and effective operation, assembly, and maintenance of your GardenJoy 21V Cordless Electric Snow Shovel. Please read this manual thoroughly before using the product and retain it for future reference.
General Safety Information
- Always wear appropriate personal protective equipment, including eye protection and sturdy footwear, when operating the snow shovel.
- Keep hands, feet, and clothing away from moving parts.
- Ensure the work area is clear of debris, rocks, or other objects that could be thrown by the snow shovel.
- Do not operate the snow shovel in areas where children or pets are present.
- Never leave the snow shovel unattended while it is running.
- Disconnect the battery before performing any maintenance or cleaning.
2. Package Contents
Verify that all items are present in the package before assembly. If any parts are missing or damaged, contact customer support.
- Cordless Electric Snow Shovel Unit
- 21V 4.0Ah Li-ion Battery (quantity may vary, typically one or two)
- Battery Charger
- Adjustable Auxiliary Handle
- Instruction Manual

Figure 2.1: Included components of the snow shovel. This image displays the main snow shovel unit, the handle assembly, a battery, and a charger, along with the instruction manual.
3. Assembly Instructions
The GardenJoy Cordless Electric Snow Shovel is designed for quick and intuitive assembly. Follow these steps to prepare your unit for use.
3.1 Attaching the Handle Assembly
- Align the lower shaft of the handle assembly with the connection point on the main snow shovel unit.
- Push the shaft firmly into the unit until it clicks into place, ensuring a secure connection.
- Tighten any locking mechanisms on the shaft to prevent rotation or detachment during use.
Video 3.1: This video segment demonstrates the process of assembling the main handle to the snow shovel unit. It shows how to connect the two parts and secure them.
3.2 Installing the Auxiliary Handle
- Slide the auxiliary handle onto the upper shaft of the main handle assembly.
- Position the auxiliary handle to a comfortable operating height.
- Secure the auxiliary handle by tightening the provided knob or fastener.
Video 3.2: This video segment shows the installation and adjustment of the auxiliary handle on the snow shovel's shaft.
3.3 Inserting the Battery
- Ensure the snow shovel is turned off and the safety switch is disengaged.
- Align the battery with the battery compartment on the main handle.
- Slide the battery into the compartment until it locks securely into place.

Figure 3.3: The battery slides into the handle for power. This image shows the battery compartment and the dual safety switch mechanism.
4. Battery Charging
Before first use, fully charge the battery. Always use the provided charger for optimal performance and safety.
- Connect the charger to a standard electrical outlet. The indicator light on the charger will illuminate.
- Plug the charger's output connector into the charging port on the battery.
- Allow the battery to charge until the charger's indicator light signals a full charge (e.g., changes from red to green).
- Once fully charged, disconnect the charger from the battery and then from the power outlet.
Video 4.1: This video segment illustrates the correct procedure for connecting the battery to its charger and power source. It shows the charging process from connection to completion.
Battery Features
- The 21V 4.0Ah Li-ion battery provides approximately 15-25 minutes of runtime per charge.
- Features multi-protection against overcurrent, over-discharge, and overcharge.
- Designed to operate effectively in temperatures ranging from -15°C to 10°C.
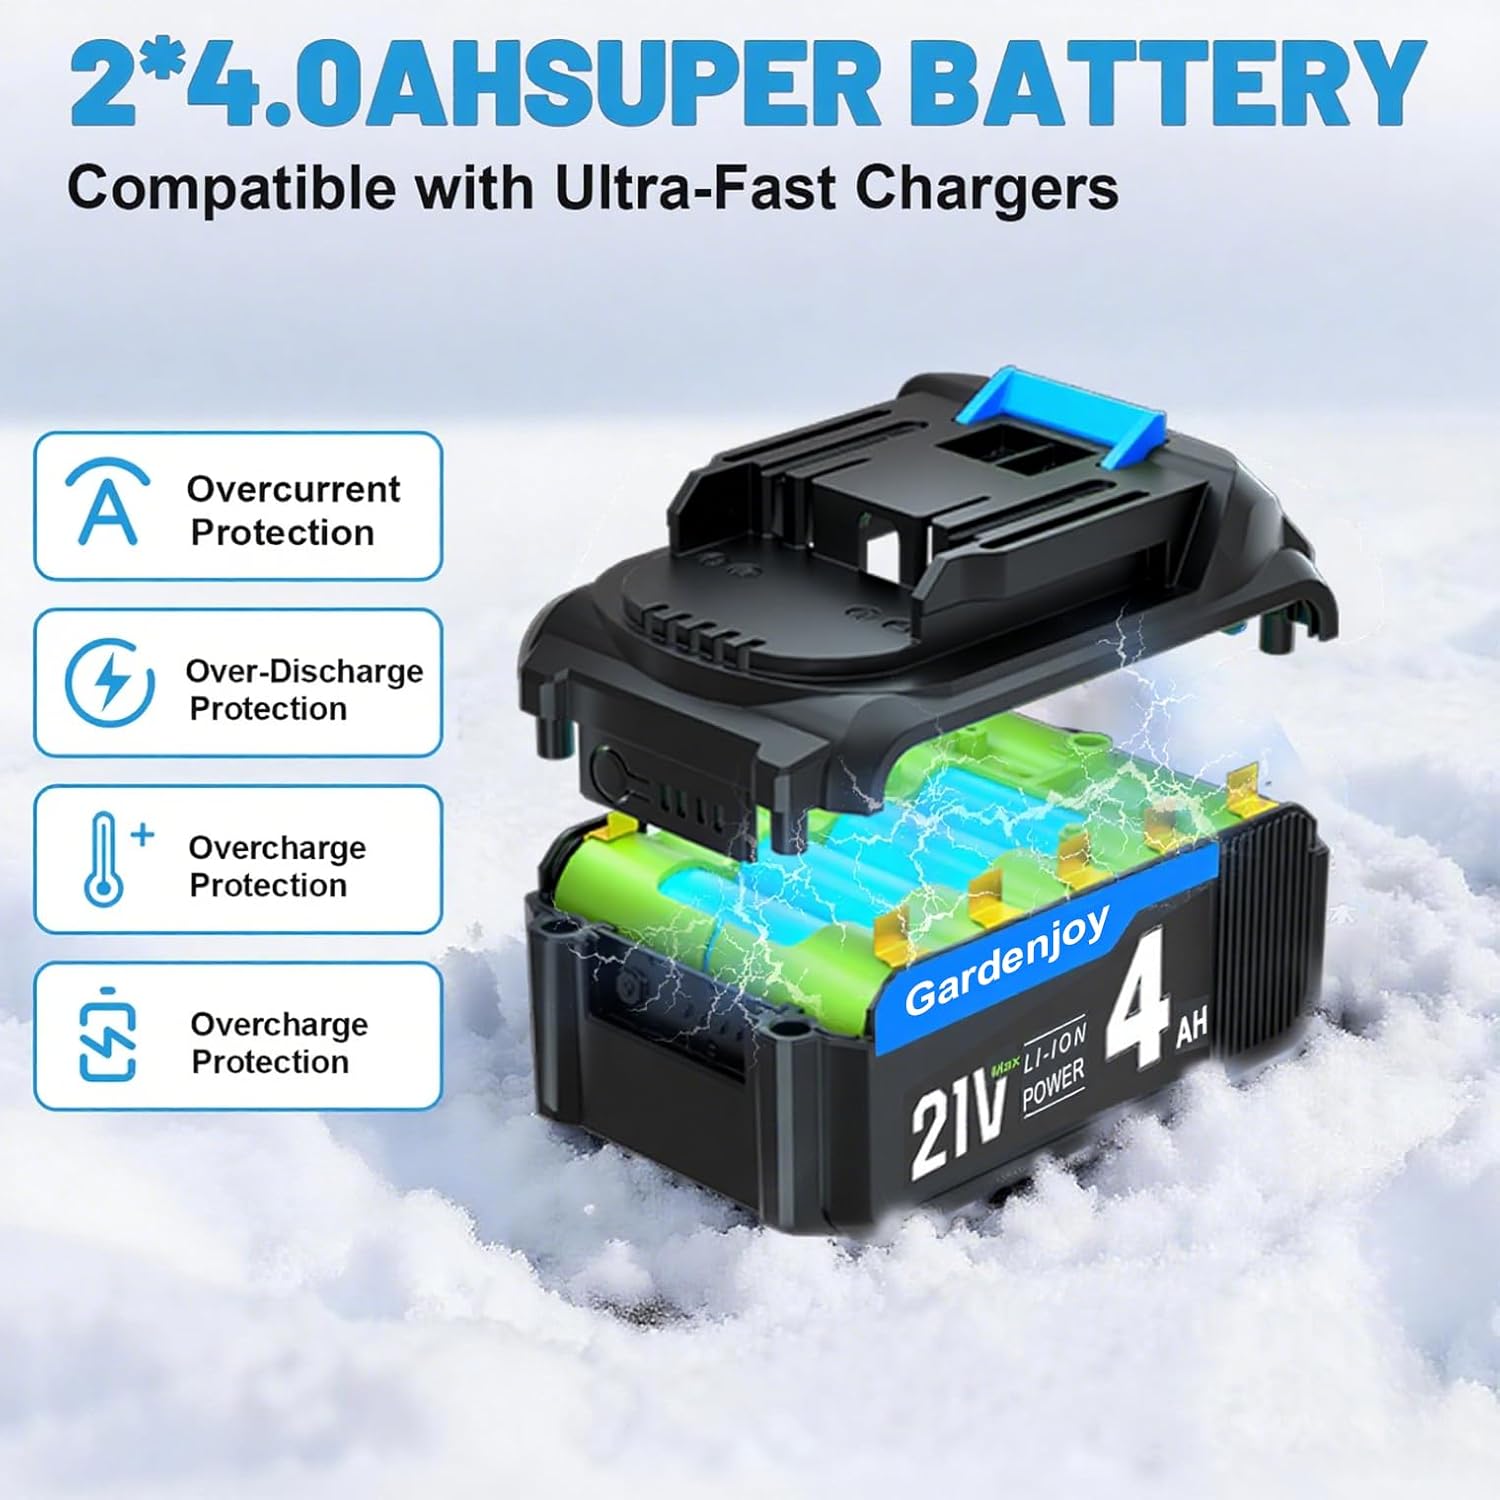
Figure 4.2: The 21V 4.0Ah Li-ion battery is equipped with multiple protection features to ensure safe and reliable operation.
5. Operating Instructions
Follow these steps for safe and effective snow removal.
5.1 Starting the Snow Shovel
- Ensure the battery is fully charged and securely installed.
- Press and hold the safety button located on the handle.
- While holding the safety button, squeeze the trigger switch to start the motor. Release the trigger to stop the motor.

Figure 5.1: The safety button must be pressed before engaging the trigger to start the snow shovel, preventing accidental operation.
5.2 Snow Clearing Techniques
- Push the snow shovel forward at a steady pace, allowing the auger to clear the snow.
- The shovel can clear snow up to 6.3 inches deep and 12.5 inches wide in a single pass.
- Snow can be thrown up to 27 feet away.
- The discharge chute angle can be adjusted ±45° left/right for precise snow placement.
- This snow shovel is suitable for clearing driveways, sidewalks, steps, patios, and other small to medium-sized areas. It performs well on wet, heavy, dry, and slushy snow.

Figure 5.2: The rotating plate allows for effortless adjustment of the snow throwing angle.
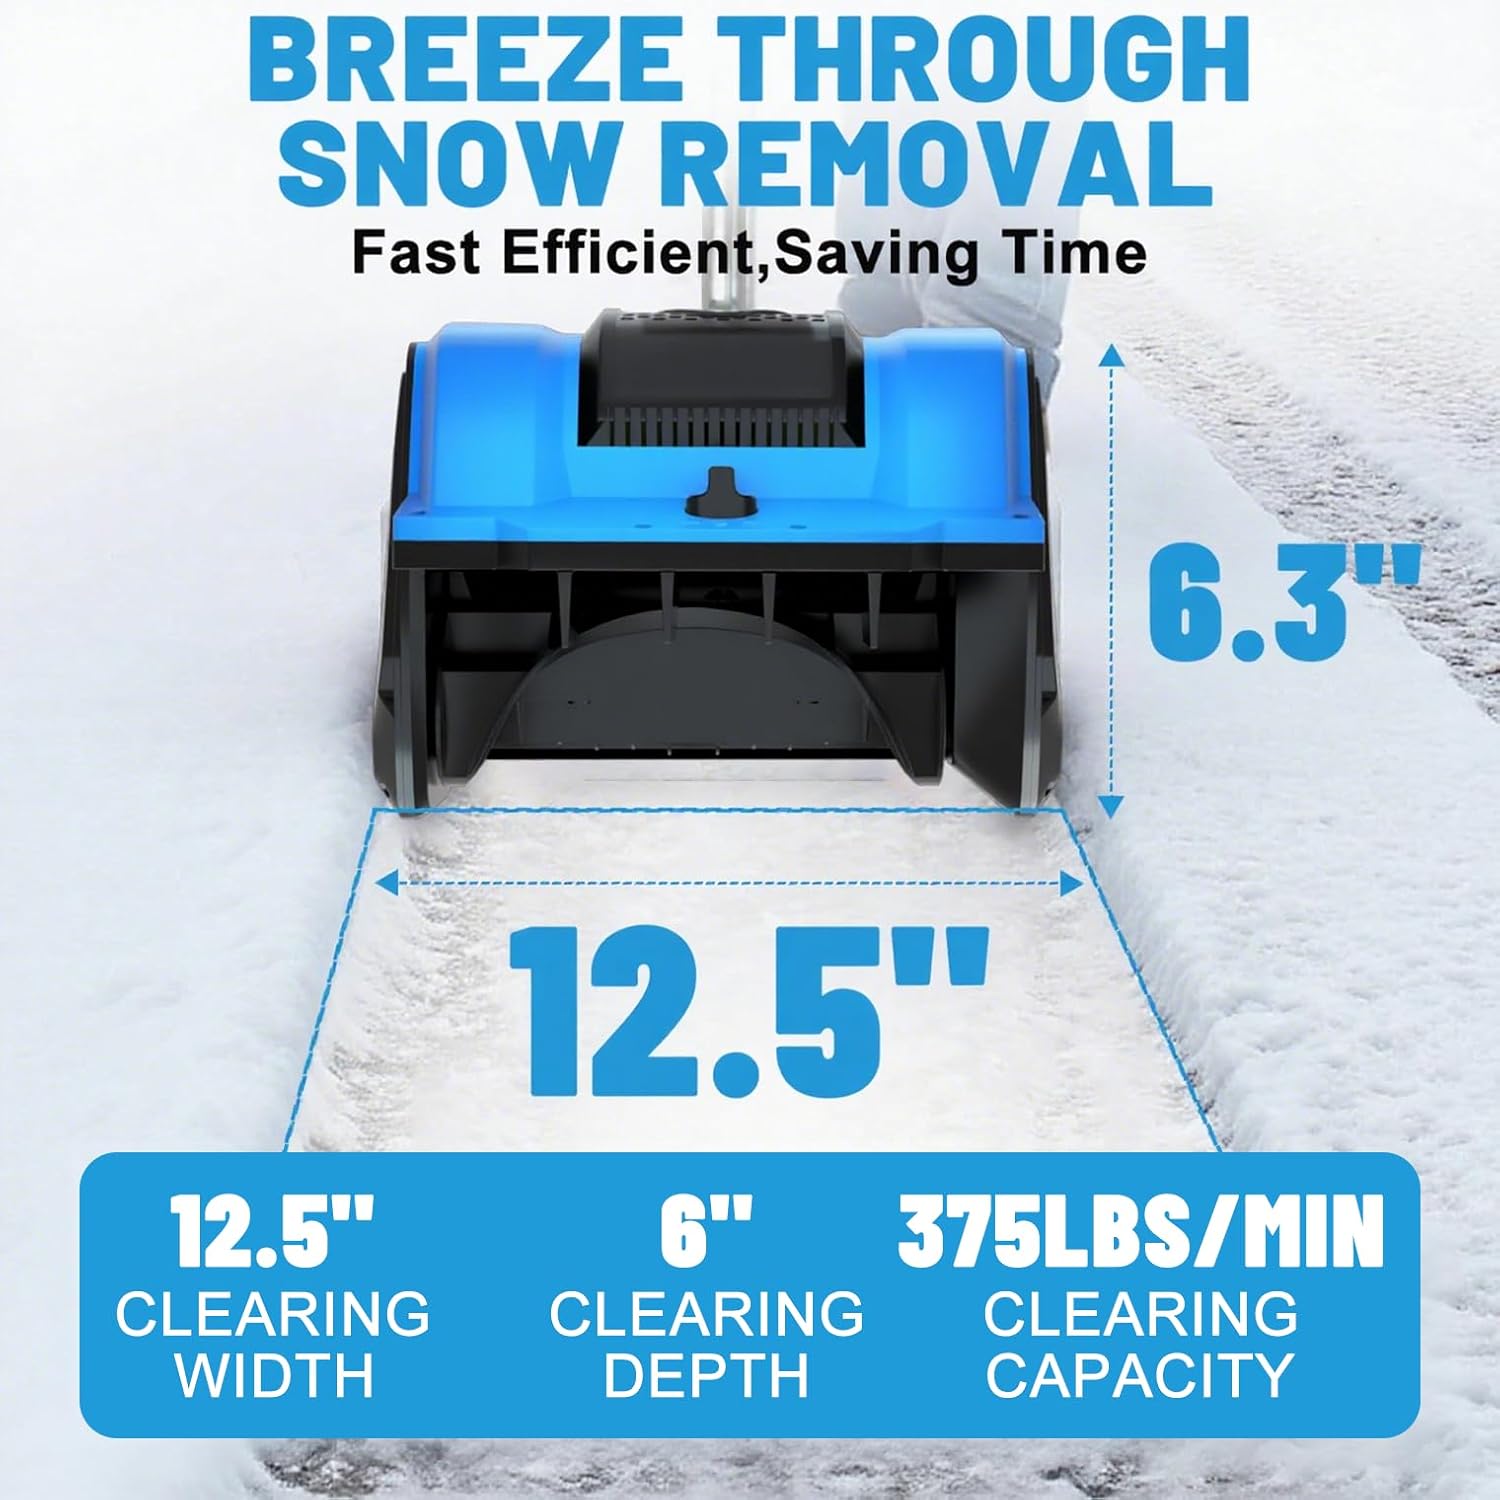
Figure 5.3: The snow shovel clears a path 12.5 inches wide and up to 6.3 inches deep, with a capacity of 375 lbs per minute.
Video 5.4: This video segment demonstrates the snow shovel in action, clearing snow from steps and a paved area, showcasing its throwing distance and maneuverability.
Video 5.5: This short video shows the snow shovel clearing snow from a driveway, highlighting its ease of use and effectiveness.
6. Maintenance
Regular maintenance ensures the longevity and optimal performance of your snow shovel.
- Cleaning: After each use, disconnect the battery and clean any snow, ice, or debris from the auger housing and discharge chute. Use a damp cloth to wipe down the exterior. Do not use harsh chemicals.
- Storage: Store the snow shovel in a dry, protected area away from direct sunlight and extreme temperatures. Ensure the battery is removed and stored separately in a cool, dry place.
- Battery Care: For long-term storage, charge the battery to approximately 50% capacity. Recharge every 3-6 months to maintain battery health.
7. Troubleshooting
Refer to this section for common issues and their solutions.
| Problem | Possible Cause | Solution |
|---|---|---|
| Snow shovel does not start. | Battery not charged or improperly installed. Safety button not pressed. | Ensure battery is fully charged and securely inserted. Press the safety button before squeezing the trigger. |
| Reduced snow throwing distance or clearing efficiency. | Battery low on charge. Wet or heavy snow. Obstruction in the auger or chute. | Recharge the battery. Clear snow in smaller passes for very wet/heavy snow. Disconnect battery and clear any obstructions. |
| Motor stops unexpectedly. | Overload protection activated. Battery depleted. | Reduce the load on the shovel. Recharge or replace the battery. |
8. Specifications
| Feature | Detail |
|---|---|
| Brand | GardenJoy |
| Model Number | SS1 |
| Power Source | Battery Powered (21V Li-ion) |
| Product Dimensions | 15"D x 8"W x 19"H |
| Color | Blue |
| Ideal Snow Depth | Up to 6.3 Inches |
| Clearing Width | 12.5 Inches |
| Item Weight | 9.9 lbs (without battery) / 11.4 lbs (with battery) |
| Throw Distance | Up to 27 Feet |
| Battery Runtime | 15-25 minutes (per 4.0Ah battery) |
| Motor | 5000RPM Brushless High Speed Motor |
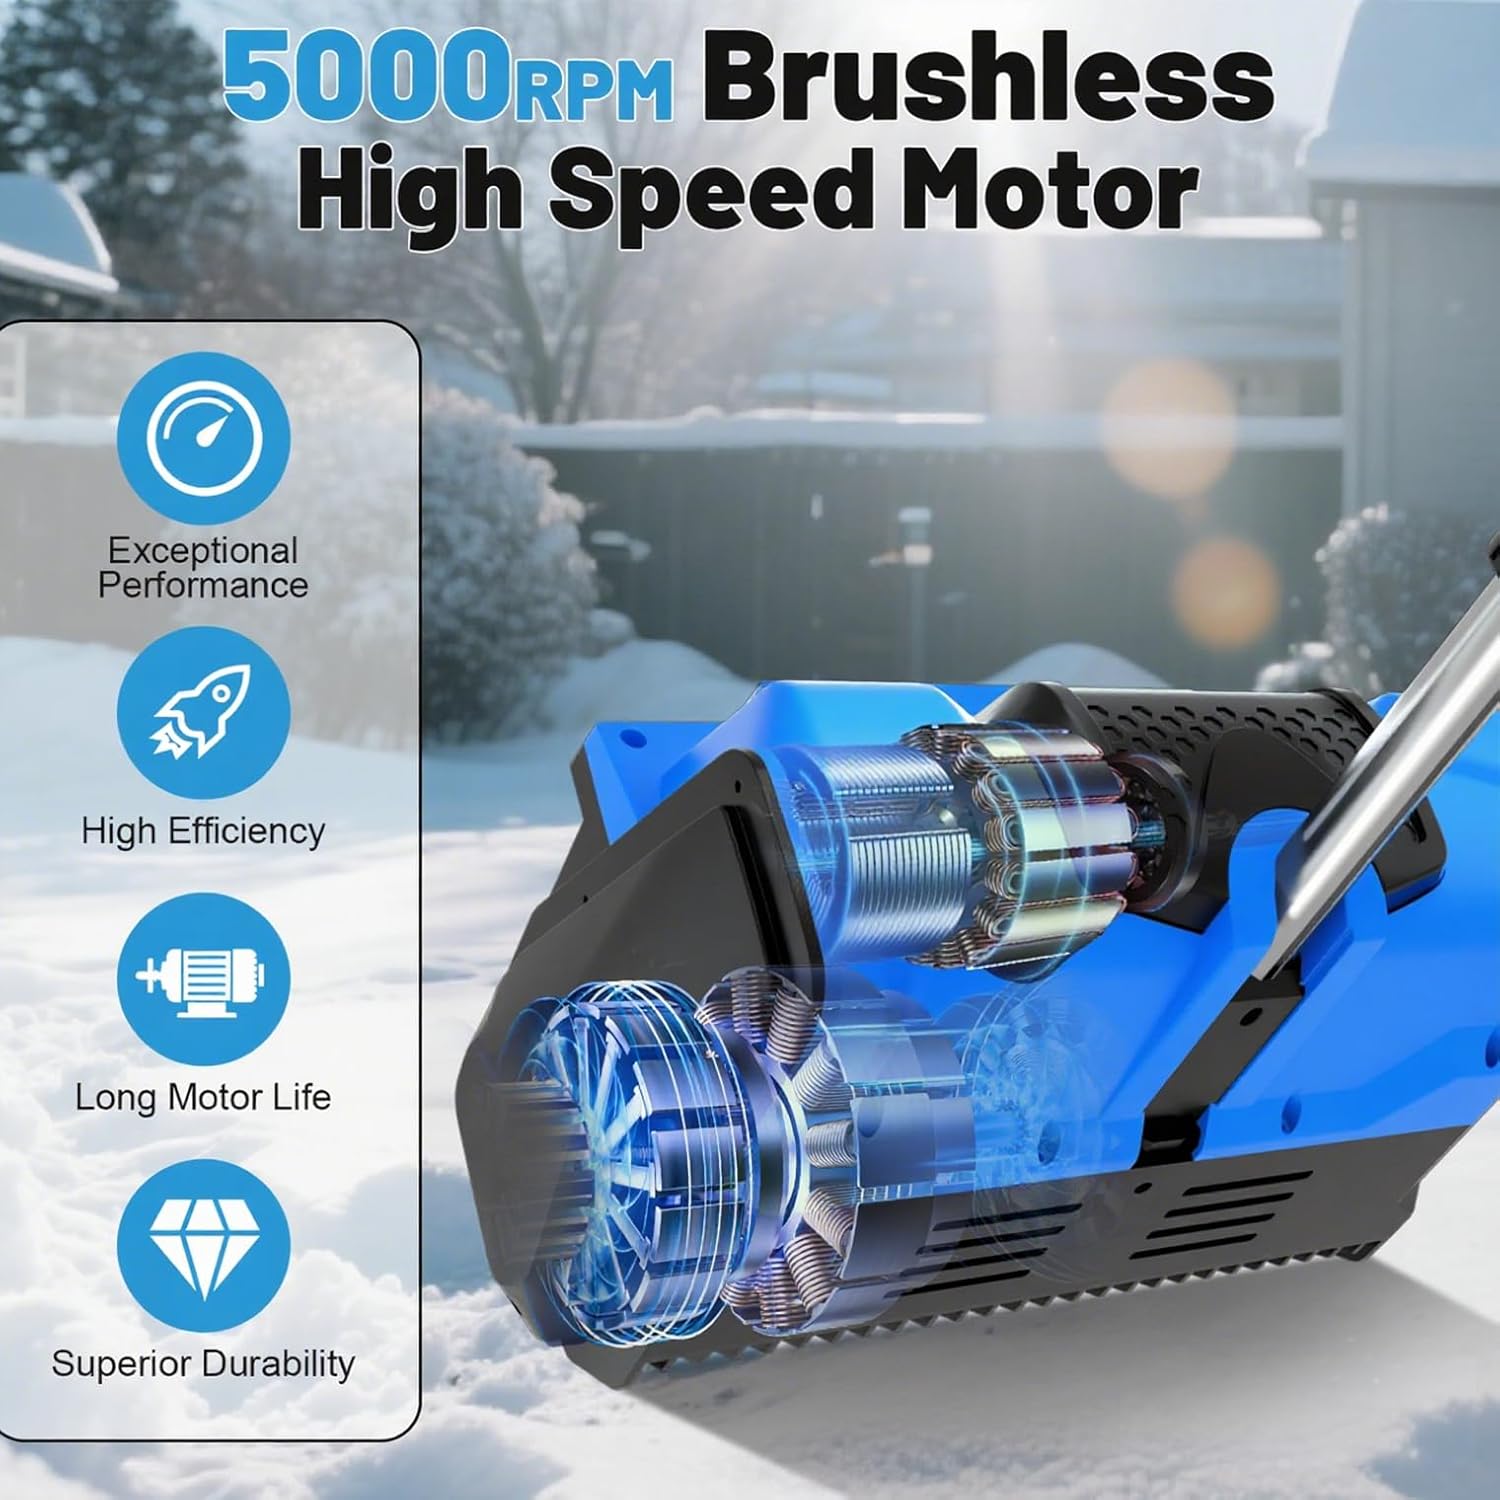
Figure 8.1: The snow shovel is equipped with a 5000RPM brushless motor, offering exceptional performance, high efficiency, long motor life, and superior durability.
9. Warranty and Support
For warranty information, technical support, or to order replacement parts, please refer to the contact information provided with your product packaging or visit the official GardenJoy website. Keep your purchase receipt as proof of purchase.


