1. Introduction
The AWithZ H5 is a compact, handheld spot welder designed for assembling various battery packs, including 18650, 21700, 26650, and 32650 lithium batteries, as well as cell phone, button, nickel-metal hydride, and nickel-cadmium batteries. It features a 5000mAh internal battery, 99 adjustable power levels, and a 7-language user interface, making it suitable for both professional and DIY battery projects. Its integrated design allows for easy one-handed operation.
2. Safety Information
Please read all safety instructions carefully before operating the device.
- Always wear appropriate personal protective equipment, including eye protection, when operating the spot welder.
- Ensure adequate ventilation in your workspace to dissipate any fumes.
- Handle batteries with care to prevent short circuits, which can cause fire or explosion.
- Do not operate the device if it is damaged or if any components are missing.
- Keep the device away from flammable materials and liquids.
- The device has a built-in temperature detector and will automatically shut down if the internal temperature reaches 60°C (140°F). Allow the unit to cool down before resuming operation.
- Keep out of reach of children.
3. Package Contents
Verify that all items listed below are included in your package:
- AWithZ H5 Portable Spot Welder Unit
- 2M Nickel-Plated Sheet
- Type-C Charging Cable
- One Pair of Replaceable Welding Pen Tips
- Sandpaper

This image displays the complete package contents of the AWithZ H5 Portable Spot Welder. It includes the main spot welder unit, a roll of 2-meter nickel-plated sheet, a Type-C charging cable, a pair of spare welding needle tips, and sandpaper. These accessories ensure you have everything needed to begin your spot welding projects.
4. Product Overview
4.1. Device Components
The AWithZ H5 features an integrated design, combining the power supply and welding pen into a single unit for convenient one-handed operation. The device includes a digital display and two control buttons on the top surface.

This image shows the AWithZ H5 Portable Spot Welder. It features a sleek, black, integrated design with a digital display on the top surface. The welding tips are visible at the front, indicating its readiness for use. The device is designed for one-handed operation.
4.2. Display Interface
The minimalist OLED display provides real-time information and allows for various settings adjustments. Functions displayed include:
- Temperature display
- Mode selection (Auto/Manual)
- Preheat time
- Trigger time
- Power level selection (Gear 01-99)
- Language selection (7 languages)
- Sound on/off
- Display brightness adjustment
- Automatic power-off time setting
This image illustrates the internal components and the OLED display of the AWithZ H5 Spot Welder. The display shows various settings such as Preheat, Trigger Time, Mode, and Gear. The internal structure highlights the battery and circuit board, emphasizing the integrated design and advanced technology for smooth and firm solder joints.
5. Setup
5.1. Charging the Device
Before first use, fully charge the spot welder using the provided Type-C charging cable and a compatible USB power adapter (not included). The display will indicate the charging status.
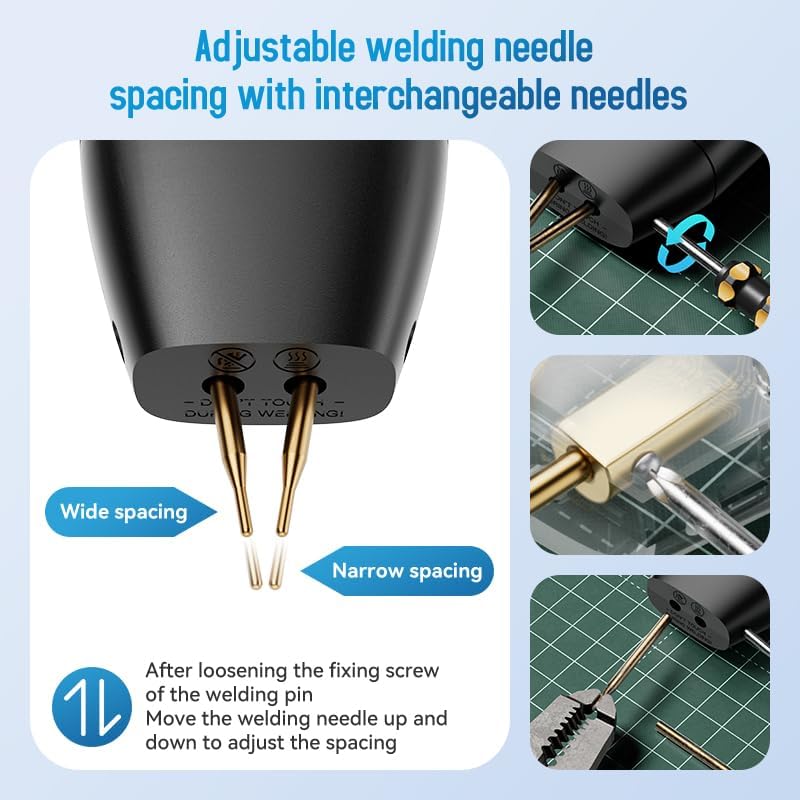
5.2. Welding Tip Adjustment
The welding needle spacing can be adjusted to suit different applications. To adjust:
- Locate the fixing screw near the welding pins.
- Loosen the fixing screw.
- Move the welding needles up or down to achieve the desired spacing (wide or narrow).
- Tighten the fixing screw to secure the needles in place.

This image demonstrates how to adjust the spacing of the welding needles on the AWithZ H5 Spot Welder. By loosening a fixing screw, the welding pins can be moved up or down to achieve either a wide or narrow spacing, accommodating different welding needs. This allows for interchangeable needles.
6. Operating Instructions
6.1. Power On/Off
Press and hold the power button (usually one of the two buttons on top) for a few seconds to turn the device on or off.
6.2. Navigating the User Interface
The two buttons on the top of the spot welder are used for navigation and parameter adjustment. One button typically serves as a selection/menu button, while the other is for confirming or triggering in manual mode.
6.3. Parameter Adjustment
The AWithZ H5 offers extensive control over the welding process. Use the buttons to navigate through the display options and adjust the following parameters:
- Mode: Select between Automatic and Manual welding modes. In Automatic mode, the weld triggers automatically when contact is made. In Manual mode, you press a button to trigger the weld.
- Preheat Time: (0.1-0.5ms) Adjusts the duration of the initial pulse to prepare the material.
- Pause: (1-20ms) Sets the delay between welding pulses.
- Gear (Power Level): (01-99) Controls the welding power. Start with lower settings and gradually increase until a strong weld is achieved.
- Trigger Time: (0.5-5s) Sets the duration the welding current flows.
- Stitch Welding: (1-2) Determines the number of welding pulses per trigger.

This image details the various adjustable parameters of the AWithZ H5 Spot Welder, which allow for precise welding control. These parameters include Mode (Auto/Manual), Preheat time (0.1-0.5ms), Pause (1-20ms), Gear (power level 01-99), Trigger Time (0.5-5s), and Stitch Welding (1-2 pulses). The diagram shows how these settings contribute to the welding output for battery pack assembly.
6.4. Welding Process
- Prepare Surfaces: Ensure the nickel strip and battery terminals are clean and free of oxidation. Use the provided sandpaper if necessary.
- Select Settings: Based on the material thickness (e.g., 0.1mm to 0.2mm pure nickel), adjust the 'Gear' (power level) and other parameters. It is recommended to perform test welds on scrap material first.
- Position Tips: Place the welding tips firmly and squarely onto the nickel strip, ensuring good contact with both the strip and the battery terminal underneath. Apply moderate pressure.
- Initiate Weld: If in Automatic mode, the weld will trigger automatically upon proper contact. If in Manual mode, press the designated trigger button.
- Inspect Weld: After welding, gently pull on the nickel strip to check the strength of the weld. A good weld will be strong and difficult to remove. Adjust settings if the weld is too weak or burns through the material.
7. Maintenance
- Cleaning Welding Tips: Regularly inspect and clean the welding tips. Use the provided sandpaper to gently remove any residue or oxidation that may accumulate, ensuring optimal conductivity. Replace tips when they become excessively worn.
- Charging: Keep the internal battery charged. If the device is not used for extended periods, charge it every 3-6 months to maintain battery health.
- Storage: Store the spot welder in a dry, cool place, away from direct sunlight and extreme temperatures.
- General Cleaning: Wipe the device exterior with a soft, dry cloth. Do not use abrasive cleaners or solvents.
8. Troubleshooting
| Problem | Possible Cause | Solution |
|---|---|---|
| Device not turning on | Low battery; Device malfunction | Charge the device fully. If the problem persists, contact support. |
| Weak or inconsistent welds | Insufficient power setting; Dirty/worn welding tips; Poor contact; Material too thick | Increase the 'Gear' (power level). Clean or replace welding tips. Ensure firm, even contact. Use appropriate material thickness (0.1-0.3mm). |
| Weld burns through material | Excessive power setting | Decrease the 'Gear' (power level). |
| Device overheats and shuts down | Prolonged continuous use; High ambient temperature | Allow the device to cool down completely. Avoid continuous operation for extended periods. Ensure adequate ventilation. |
| Display not working correctly | Software glitch; Hardware issue | Try restarting the device. If the issue persists, contact support. |
9. Specifications
| Feature | Specification |
|---|---|
| Brand | AWithZ |
| Model | H5 |
| Battery Capacity | 5000mAh |
| Welding Thickness | 0.1-0.3mm (up to 0.2mm pure nickel) |
| Power Levels | 99 Adjustable |
| Display | 1.5" LCD/OLED |
| User Interface Languages | 7 Languages |
| Weight | Approximately 150g |
| Dimensions | Approx. 7.17 inches (L) x 1.87 inches (W) |
| Battery Type | Lithium Polymer (included) |
| Charging Port | Type-C |
| Included Components | Spot Welder, 2M Nickel-Plated Sheet, Charging Cable, Replaceable Pen Tips, Sandpaper |
10. Warranty and Support
For warranty information and technical support, please refer to the product packaging or contact AWithZ customer service directly through their official website or the retailer where the product was purchased. Please have your model number (H5) and purchase details ready when contacting support.


