Introduction
Thank you for purchasing the ONTRIP DS-3826L Large Digital Wall Clock. This clock features a clear LED display, adjustable brightness, night mode, and a memory function to retain settings during power interruptions. It is designed for versatile placement, suitable for both wall mounting and desk use in various environments such as homes, offices, and classrooms. Please read this manual carefully to ensure proper setup and operation of your new digital clock.
Safety Information
- Keep the device away from water and high humidity environments.
- Do not expose the clock to direct sunlight or extreme temperatures.
- Use only the provided USB cable or a certified equivalent for power.
- Do not attempt to disassemble or repair the clock yourself. Contact customer support if issues arise.
- Ensure the clock is securely mounted if placed on a wall to prevent falling.
Package Contents
- ONTRIP DS-3826L Digital Wall Clock
- USB Power Cable
- User Manual
Product Overview
The ONTRIP DS-3826L features a large LED display for clear visibility. The back of the clock includes essential ports and mounting options.
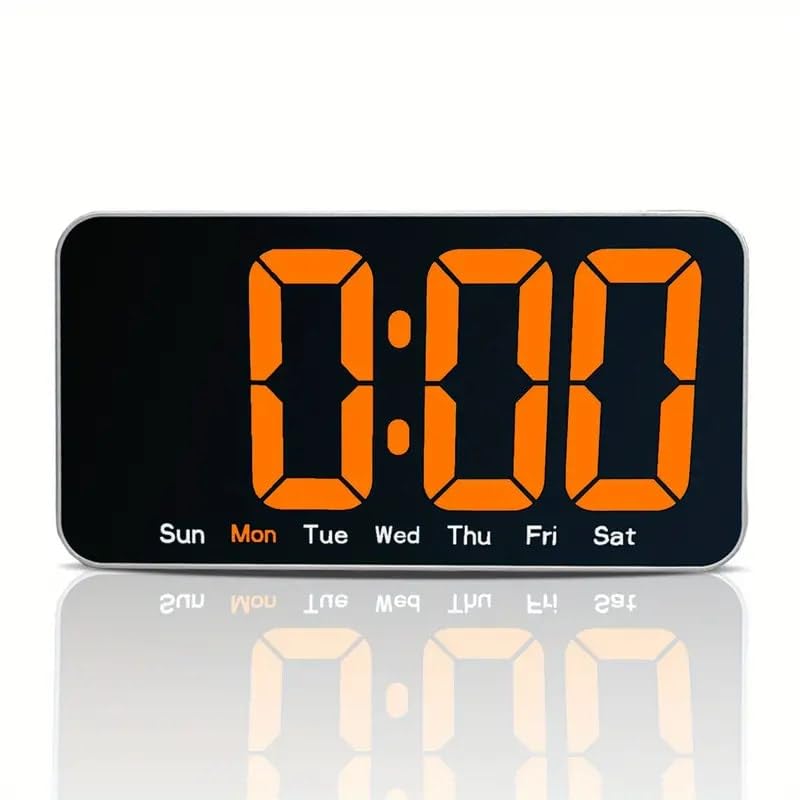
Figure 1: Front view of the ONTRIP DS-3826L Digital Wall Clock. This image shows the large LED display with clear digital numbers and indicators for days of the week (Sun, Mon, Tue, Wed, Thu, Fri, Sat) at the bottom. The character height is approximately 9.64 cm, ensuring excellent readability from a distance.
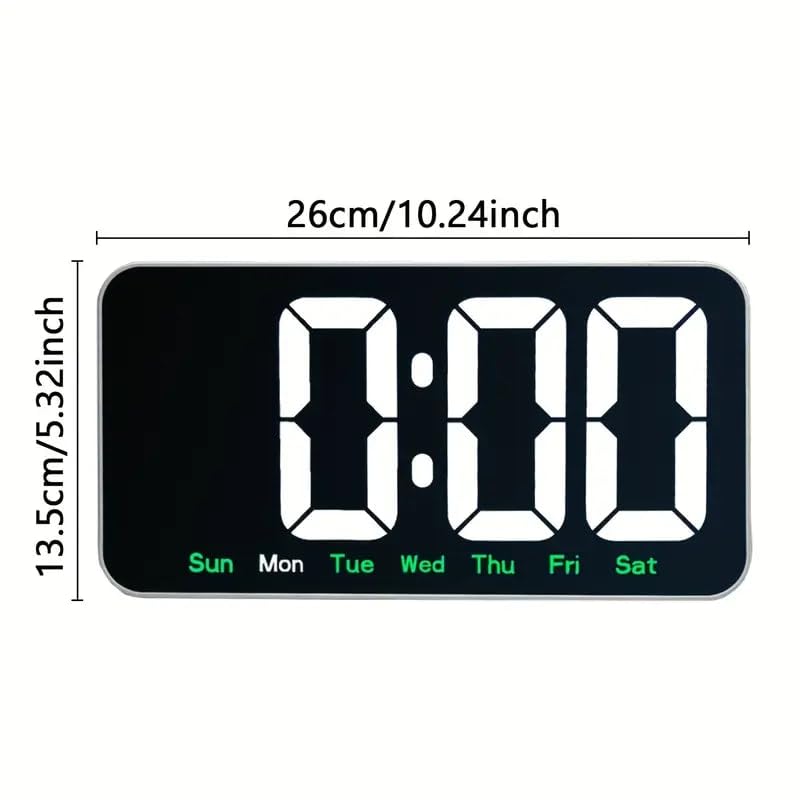
Figure 2: Product Dimensions. The clock measures 26 cm (10.24 inches) in width and 13.5 cm (5.32 inches) in height, providing a substantial yet sleek presence.
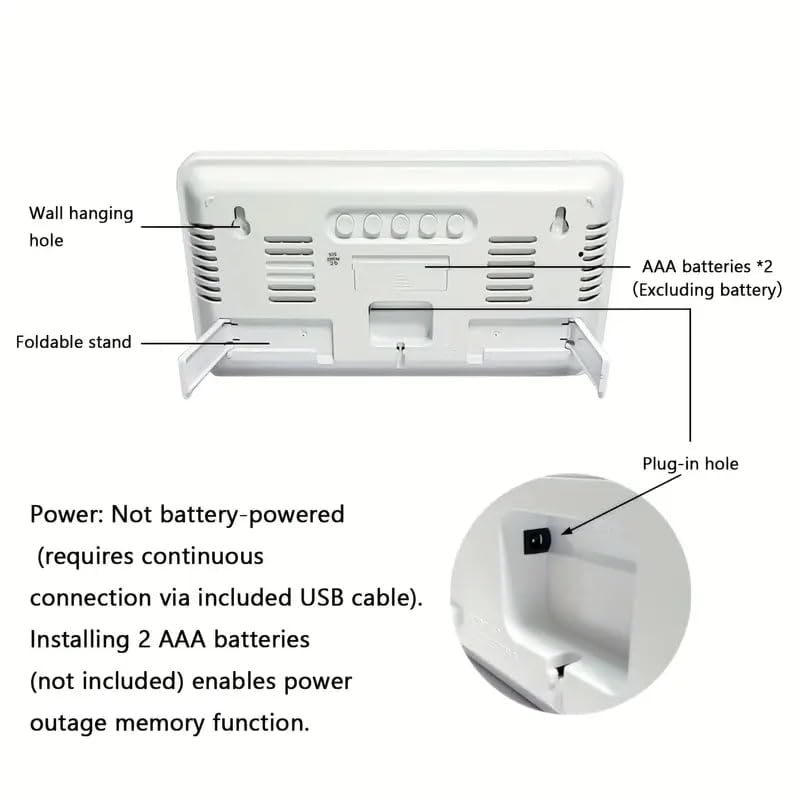
Figure 3: Rear view of the clock. This image illustrates the wall hanging holes for mounting, a foldable stand for desk placement, the compartment for 2 AAA batteries (not included) for memory function, and the USB plug-in hole for continuous power.
Setup
1. Powering the Clock
- Locate the USB power cable included in the package.
- Insert the small end of the USB cable into the 'Plug-in hole' at the back of the clock (refer to Figure 3).
- Connect the larger end of the USB cable to a standard USB power adapter (not included) or a powered USB port.
- The clock display will illuminate, indicating it is powered on.
Note: The clock requires continuous connection via the USB cable to operate. It is not battery-powered for primary operation.
2. Installing Backup Batteries (for Memory Function)
- Open the battery compartment cover on the back of the clock (refer to Figure 3).
- Insert two (2) AAA batteries (not included) into the compartment, ensuring correct polarity (+/-).
- Close the battery compartment cover.
Purpose of Batteries: The AAA batteries enable the power outage memory function. This means that if the USB power is disconnected, the clock will retain its time and settings, eliminating the need to reset it when power is restored.
3. Mounting the Clock
The ONTRIP DS-3826L offers two mounting options:
- Desk Placement: Extend the foldable stand located on the back of the clock (refer to Figure 3) to place it securely on any flat surface.
- Wall Mounting: Use the wall hanging holes on the back of the clock (refer to Figure 3) to hang it on screws or hooks securely fastened to a wall. Ensure the wall can support the clock's weight and that the power cable can reach a power source.
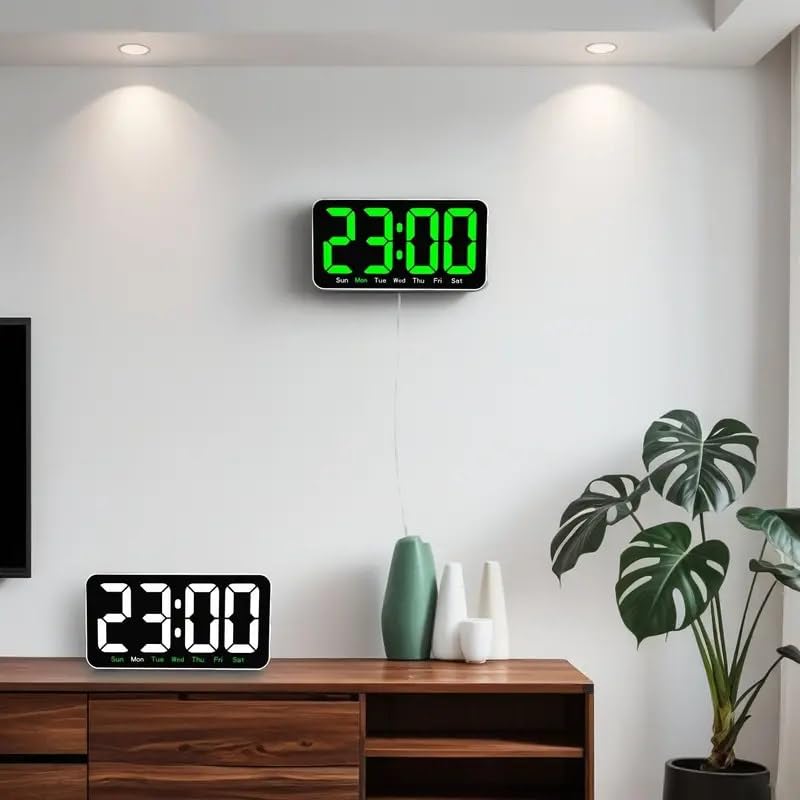
Figure 4: Clock in a room setting, demonstrating both wall-mounted and desk-mounted configurations. This highlights the clock's adaptability to different spaces and preferences.
Operating Instructions
The clock features control buttons, typically located on the back or side, for setting time and adjusting brightness. (Specific button labels and functions are usually detailed on the device itself or in a quick start guide. For this manual, general instructions are provided.)
1. Setting the Time
- Press the SET or MODE button (exact label may vary) to enter time setting mode. The hour digits will typically start flashing.
- Use the UP or DOWN buttons (or similar adjustment buttons) to set the correct hour.
- Press SET or MODE again to move to the minute setting. The minute digits will flash.
- Use the UP or DOWN buttons to set the correct minutes.
- Press SET or MODE one more time to confirm the time and exit setting mode.
2. Adjusting Brightness and Night Mode
The clock offers 3 levels of brightness and a night mode feature.
- Brightness Adjustment: Press the BRIGHTNESS or DIMMER button (or similar) to cycle through the 3 brightness levels (High, Medium, Low).
- Night Mode: This feature automatically dims the display during specific hours to prevent disturbance. To activate or adjust night mode, typically you would press and hold the BRIGHTNESS or MODE button until the night mode setting appears. Then, use the adjustment buttons to set the start and end times for the dimmed display. Refer to the specific button functions on your device for precise steps.
Care and Maintenance
- To clean the clock, gently wipe the surface with a soft, dry cloth.
- Do not use abrasive cleaners, solvents, or chemical sprays, as these can damage the display or casing.
- Ensure the clock is unplugged from power before cleaning.
- If the backup batteries are not used for an extended period, it is recommended to remove them to prevent leakage.
Troubleshooting
- Clock not turning on: Ensure the USB cable is securely connected to both the clock and a working power source. Try a different USB port or power adapter.
- Display is dim or flickering: Check the brightness settings. If night mode is active, the display will be dimmer during the set hours. Ensure the power supply is stable.
- Time is incorrect after power interruption: Verify that AAA backup batteries are correctly installed and not depleted. Replace batteries if necessary.
- Buttons not responding: Unplug the clock from power for a few minutes, then plug it back in to perform a soft reset.
Specifications
| Feature | Specification |
|---|---|
| Model Number | DS-3826L |
| Brand | ONTRIP |
| Product Dimensions | 26W x 13.5H Centimeters |
| Power Source | Corded Electric (USB Powered) |
| Material | Plastic |
| Display Type | LED Digital |
| Brightness Levels | 3-Level Dimmer + Night Mode |
| Memory Function | Yes (requires 2x AAA batteries, not included) |
| Mounting Options | Desk (foldable stand) / Wall Mountable |
| Item Weight | 450 Grams |
| Country of Origin | China |
Warranty and Support
For warranty information or technical support, please refer to the retailer's policy or contact ONTRIP customer service through their official channels. Keep your purchase receipt for any warranty claims.


