1. Introduction
This manual provides essential information for the safe and efficient operation of your AOC U32G4U 31.5-inch UHD 160Hz Gaming Monitor. Please read these instructions carefully before using the product and retain them for future reference. The AOC U32G4U monitor features a 31.5-inch Fast IPS panel, offering UHD (3840x2160) resolution at 160Hz, 1ms GtG response time, Adaptive Sync, HDR400 certification, and G-Sync compatibility for a high-performance visual experience. It also includes HDMI 2.1 connectivity and a USB hub.

Figure 1.1: Front view of the AOC U32G4U monitor.
2. Safety Information
- Ensure the monitor is placed on a stable, level surface to prevent accidental falls.
- Use only the power adapter and cables supplied with the monitor.
- Do not block ventilation openings. Maintain adequate space around the monitor for proper airflow.
- Avoid exposing the monitor to extreme temperatures, humidity, or direct sunlight.
- Disconnect the power cable from the outlet before cleaning the monitor.
- Do not attempt to service the monitor yourself. Refer all servicing to qualified service personnel.
3. Package Contents
Verify that all items are present in the package:
- AOC U32G4U Monitor Display
- Monitor Stand Base
- Monitor Stand Neck
- Power Cable (IEC C13)
- HDMI Cable
- DisplayPort Cable
- USB-B to USB-A Cable (for USB Hub functionality)
- Quick Setup Guide
4. Setup Instructions
4.1 Assembling the Stand
- Carefully remove the monitor and stand components from the packaging.
- Attach the stand neck to the stand base, ensuring it clicks securely into place or is fastened with the provided screw.
- Align the assembled stand with the mounting area on the back of the monitor.
- Gently push the stand into the monitor until it locks securely.

Figure 4.1: Back view of the monitor with the stand attached.
4.2 Connecting the Monitor
Connect the necessary cables to the corresponding ports on the monitor and your computer or other devices.
- Power Connection: Connect the power cable to the monitor's power input and then to a grounded electrical outlet.
- Video Connection:
- For optimal performance, use the supplied DisplayPort cable to connect to your computer's DisplayPort output.
- Alternatively, use an HDMI 2.1 cable to connect to your computer's or console's HDMI output. The monitor supports two HDMI 2.1 inputs.
- USB Hub Connection: Connect the USB-B to USB-A cable from the monitor's USB-B upstream port to an available USB port on your computer. This enables the monitor's integrated USB 3.2 hub.
- Audio Output: Connect headphones or external speakers to the 3.5mm headphone output jack if desired.
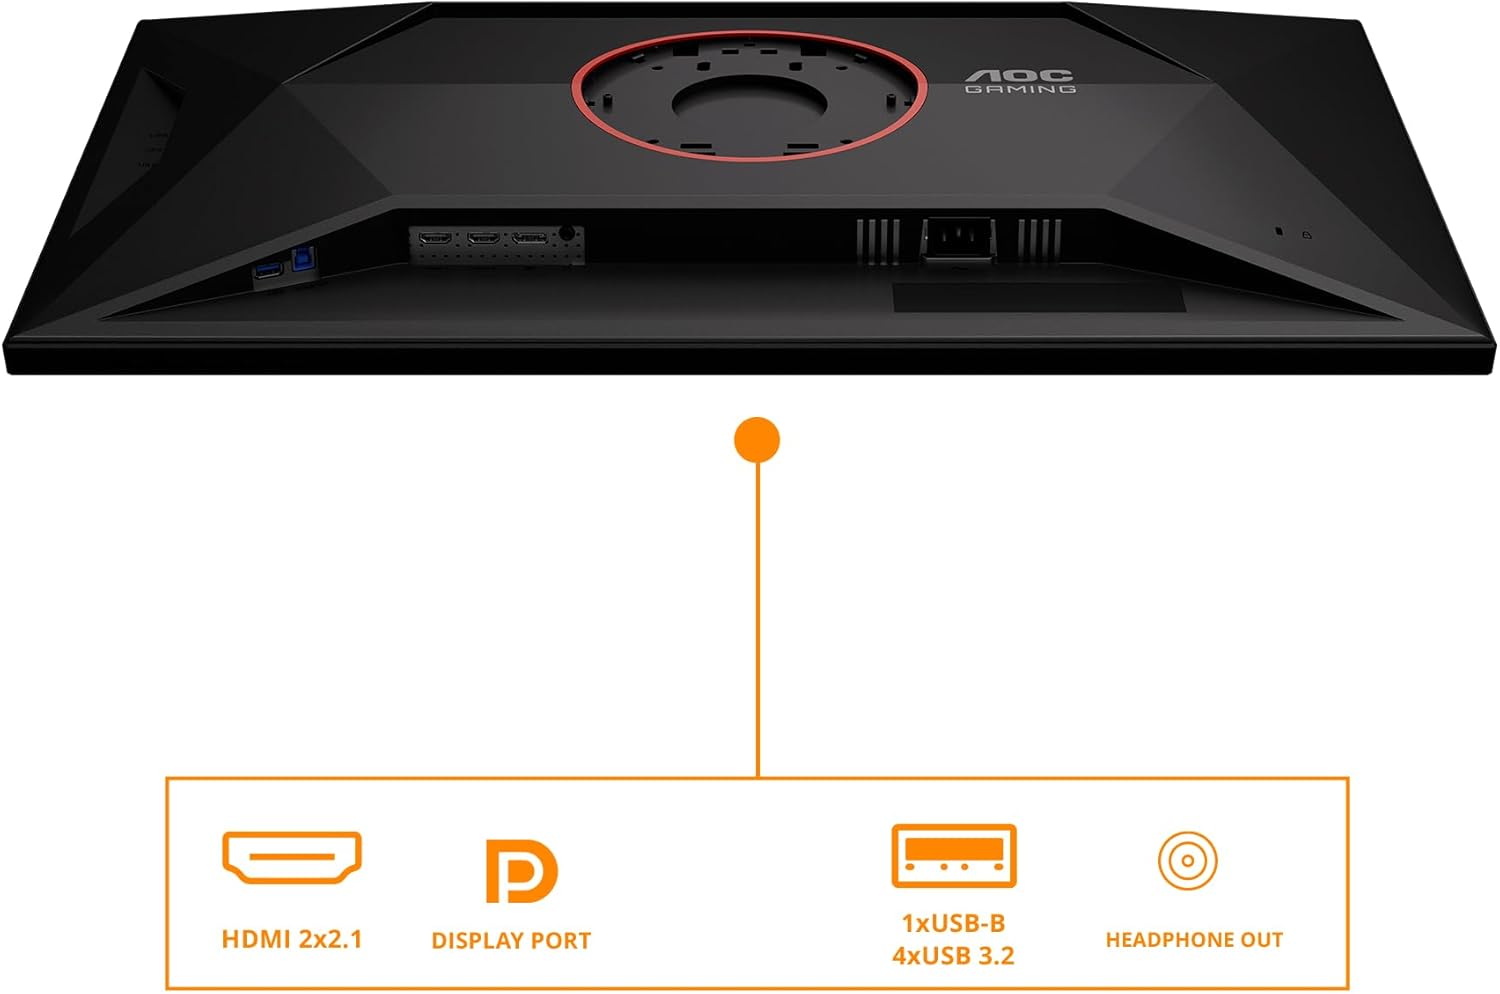
Figure 4.2: Monitor input and output ports.
4.3 Initial Power On
After connecting all cables, press the power button located on the monitor to turn it on. The monitor should automatically detect the active input source. If not, you may need to manually select the input source using the OSD menu.
5. Operating the Monitor
5.1 On-Screen Display (OSD) Controls
The monitor features a joystick control located on the back or bottom-right for navigating the On-Screen Display (OSD) menu. This joystick allows you to adjust various settings.
- Push In: Activates the OSD menu or confirms a selection.
- Move Up/Down: Navigates through menu options.
- Move Left/Right: Adjusts values or navigates sub-menus.
5.2 Navigating the OSD Menu
The OSD menu provides access to settings for picture quality, color, input selection, and more.
- Luminance: Adjusts brightness, contrast, and gamma.
- Color Setup: Controls color temperature, sRGB mode, and other color-related settings.
- Picture Boost: Enhances specific areas of the screen.
- OSD Setup: Configures OSD language, transparency, and timeout.
- Game Setting: Accesses gaming-specific features like Game Mode, Shadow Control, Low Input Lag, and Adaptive Sync.
- Input Select: Manually switches between HDMI 1, HDMI 2, and DisplayPort inputs.
- Extra: Contains information about the current resolution and refresh rate, and options for resetting settings.
5.3 Adjusting Ergonomics
The monitor stand allows for ergonomic adjustments to optimize your viewing comfort.
- Height Adjustment: Gently push or pull the monitor up or down along the stand neck to adjust its height. The monitor offers up to 130mm of height adjustment.
- Tilt Adjustment: Hold the top and bottom edges of the monitor and gently tilt it forward or backward to achieve your desired viewing angle.

Figure 5.1: Monitor height adjustment.
6. Maintenance
6.1 Cleaning the Monitor
- Always disconnect the power cord before cleaning.
- Use a soft, lint-free cloth slightly dampened with water or a mild, non-abrasive screen cleaner.
- Do not spray cleaner directly onto the screen. Apply it to the cloth first.
- Avoid using benzene, thinner, ammonia-based cleaners, or abrasive materials, as these can damage the screen or casing.
6.2 Storage
If storing the monitor for an extended period, ensure it is powered off, disconnected from all cables, and stored in a cool, dry place, preferably in its original packaging to protect it from dust and physical damage.
7. Troubleshooting
Refer to the table below for common issues and their solutions.
| Problem | Possible Cause | Solution |
|---|---|---|
| No Power | Power cable not connected; Power outlet not working. | Ensure power cable is securely connected to monitor and outlet. Test outlet with another device. |
| No Signal | Video cable not connected; Incorrect input source selected. | Check video cable connections (HDMI/DP). Use OSD menu to select correct input source. Ensure computer is on. |
| Image is too dark/bright | Brightness/Contrast settings are incorrect. | Adjust Brightness and Contrast settings via the OSD menu. |
| Flickering or distorted image | Loose video cable; Graphics card driver issue; Incorrect refresh rate. | Reseat video cable. Update graphics card drivers. Check display settings for correct refresh rate (160Hz for UHD). |
| USB ports not working | USB upstream cable not connected. | Ensure the USB-B to USB-A cable is connected from the monitor to your computer. |
8. Specifications
Key technical specifications for the AOC U32G4U monitor:
| Feature | Specification |
|---|---|
| Screen Size | 31.5 Inches |
| Panel Type | Fast IPS |
| Max Resolution | 3840 x 2160 Pixels (UHD) |
| Refresh Rate | 160Hz (UHD), 320Hz (FHD) |
| Response Time | 1ms GtG, 0.5ms MPRT |
| HDR Support | HDR400 Certified |
| Adaptive Sync | Yes (G-Sync Compatible) |
| Aspect Ratio | 16:9 |
| Viewing Angles | 178° (Horizontal/Vertical) |
| Video Inputs | 2x HDMI 2.1, 1x DisplayPort 1.4 |
| USB Hub | 1x USB-B (upstream), 4x USB 3.2 (downstream) |
| Audio Output | 1x Headphone Out (3.5mm) |
| Speakers | Integrated Stereo Speakers |
| Ergonomics | Height Adjustment (130mm), Tilt |
| VESA Mount | Supported (Mounting hardware not included) |
| Dimensions (LxWxH) | 10.61 x 28.19 x 18.19 inches (with stand) |
| Weight | 22 pounds (with stand) |
9. Warranty and Support
For detailed warranty information, please refer to the warranty card included with your product or visit the official AOC website. Technical support and customer service contact information can also be found on the AOC website. Please have your monitor's model number (U32G4U) and serial number ready when contacting support.
Online Resources: For the latest drivers, software, and FAQs, please visit the official AOC support page.


