1. Introduction
This manual provides detailed instructions for the installation, operation, and maintenance of your GIGABYTE M27UP 27-inch UHD Gaming Monitor. To ensure optimal performance and safety, please read this manual thoroughly before using your monitor and retain it for future reference.
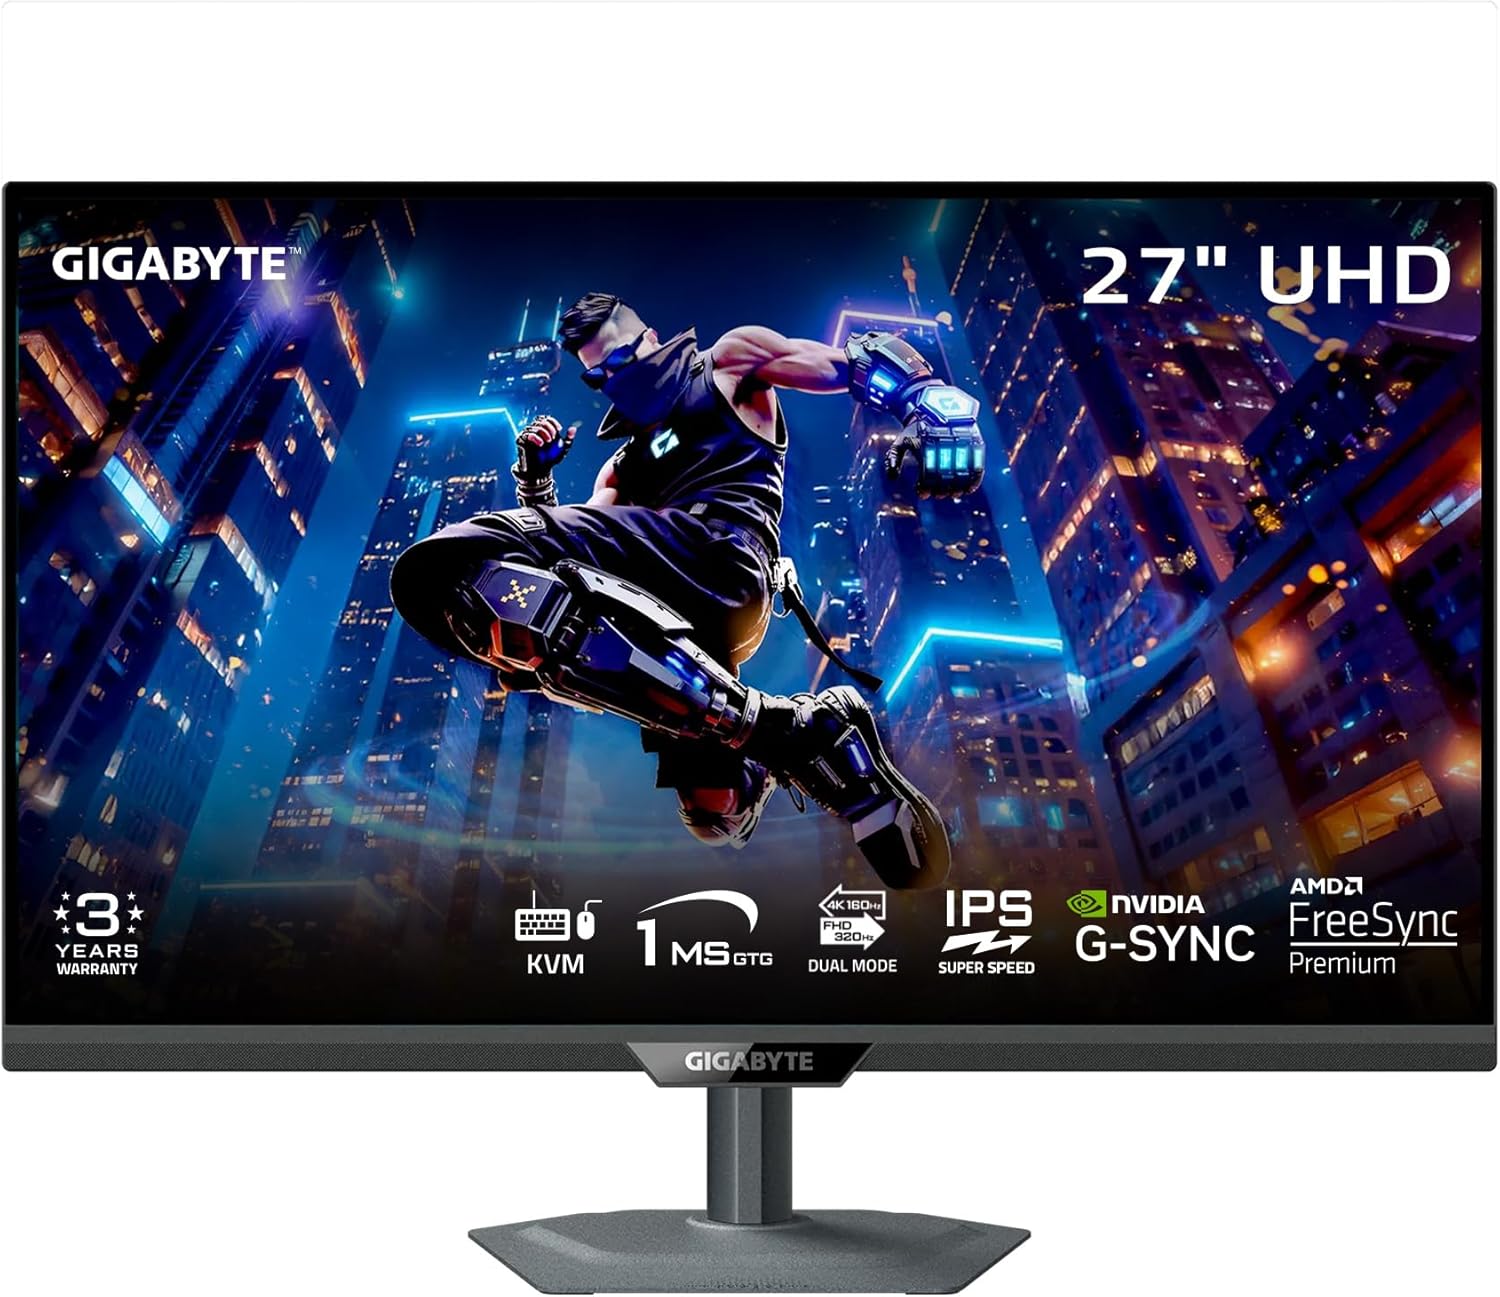
Figure 1: Front view of the GIGABYTE M27UP monitor.
2. Safety Information
Observe the following safety guidelines to prevent damage to the monitor and ensure user safety:
- Do not expose the monitor to rain or moisture to avoid fire or shock hazards.
- Do not open the monitor casing. There are no user-serviceable parts inside. Refer all servicing to qualified personnel.
- Ensure proper ventilation. Do not block ventilation openings.
- Use only the power adapter and cables provided by GIGABYTE.
- Place the monitor on a stable, flat surface to prevent it from falling.
- Disconnect the power plug from the wall outlet if the monitor will not be used for an extended period.
3. Package Contents
Verify that all items listed below are present in your product package:
- GIGABYTE M27UP Monitor
- Power Cable
- HDMI 2.1 Cable
- DisplayPort (DP) Cable
- USB Cable (USB 3.2 Gen 1 Upstream)
- Quick Start Guide (QSG)
- Warranty Card

Figure 2: GIGABYTE M27UP monitor and its retail packaging.
4. Setup
4.1 Assembling the Monitor Stand
- Carefully remove the monitor and stand components from the packaging.
- Attach the stand base to the stand neck, securing it with the provided screw.
- Align the assembled stand with the mounting slot on the back of the monitor and gently push until it clicks into place. Ensure it is securely fastened.
Alternatively, the monitor supports VESA wall mount (100x100mm) for alternative mounting solutions. Refer to your VESA mount instructions for installation.

Figure 3: Rear view of the GIGABYTE M27UP monitor with stand attached.
4.2 Connecting Cables
Connect the necessary cables to the corresponding ports on the monitor and your computer or other devices.
- Power Connection: Connect the power cable to the monitor's power input and then to a power outlet.
- Video Input: Connect either an HDMI 2.1 cable or a DisplayPort 1.4 cable from your computer's graphics card to the monitor. For devices supporting USB Type-C video output, use a USB Type-C cable.
- USB Upstream: Connect the provided USB cable from your computer's USB port to the monitor's USB 3.2 Gen 1 Upstream port to enable the monitor's USB downstream ports and KVM functionality.
- USB Downstream: Connect USB peripherals (keyboard, mouse, USB drives) to the monitor's USB 3.2 Gen 1 Downstream ports.
- Earphone Jack: Connect headphones or external speakers to the earphone jack for audio output.
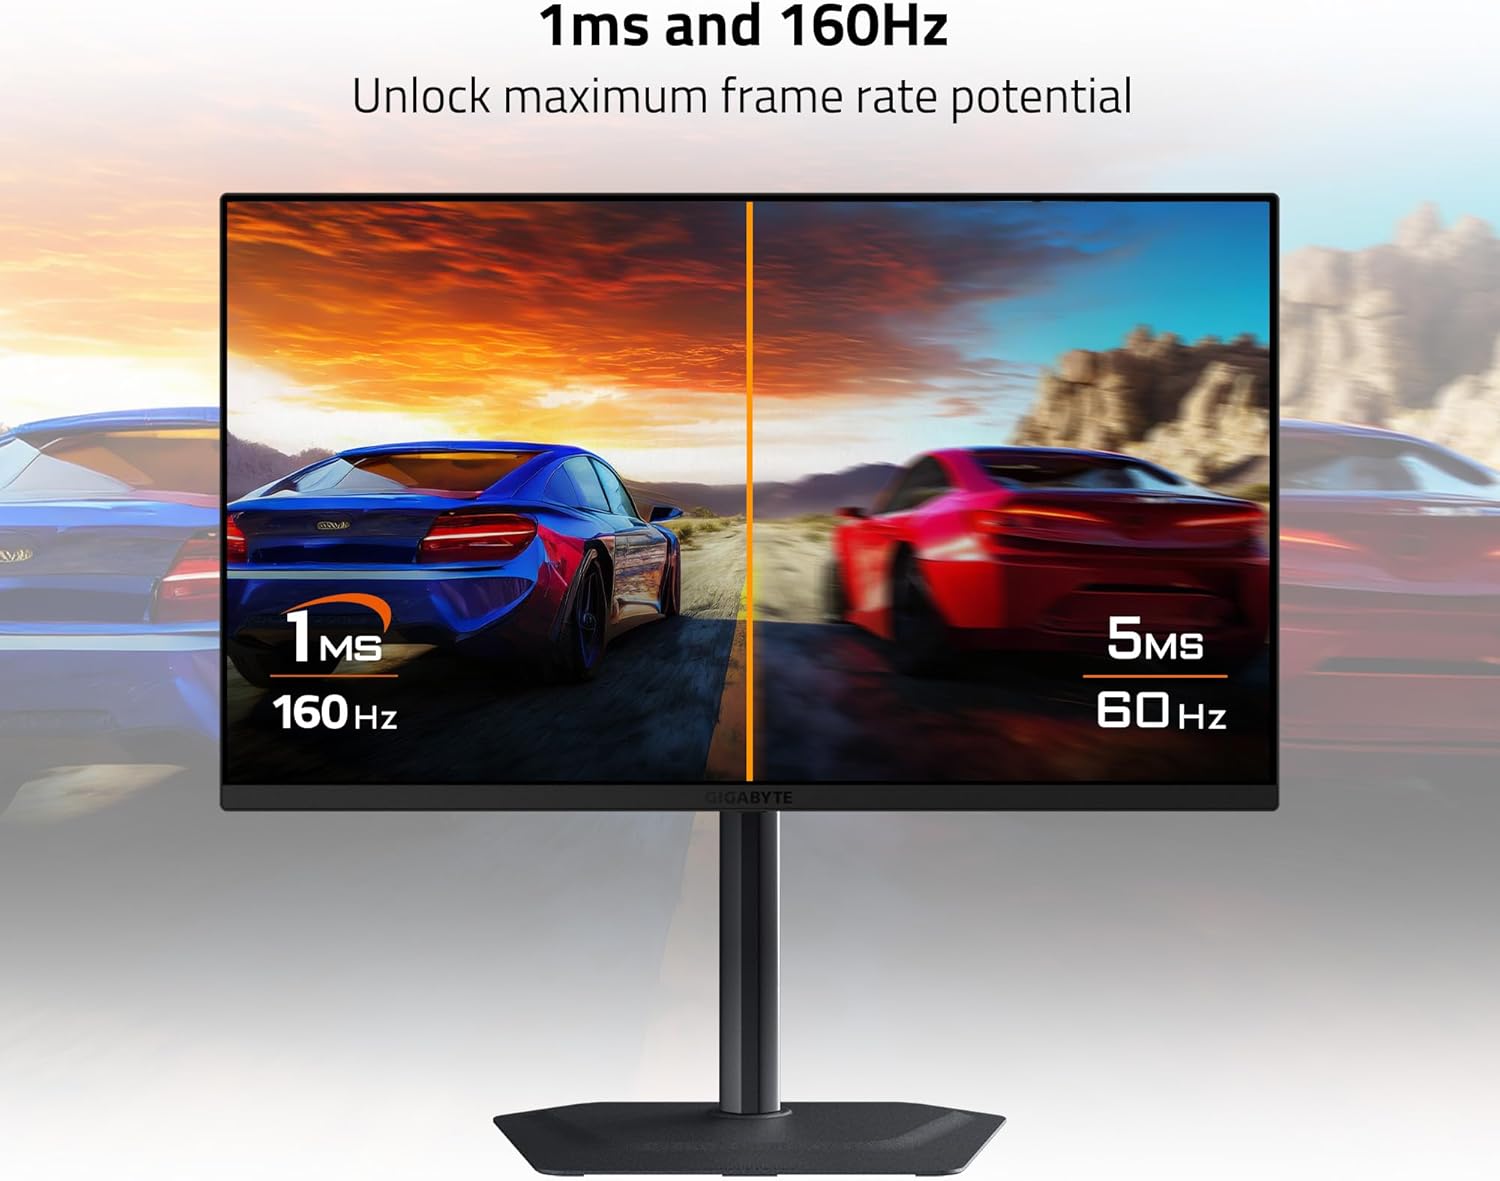
Figure 4: Diagram illustrating the input/output ports on the rear of the monitor, including HDMI 2.1, USB Type-C, DisplayPort 1.4, USB 3.2, and Earphone Jack.
5. Operating Instructions
5.1 Power On/Off
Press the power button, typically located on the back or bottom of the monitor, to turn the monitor on or off. The power indicator light will illuminate when the monitor is on.
5.2 On-Screen Display (OSD) Navigation
The monitor features a joystick control, usually located on the back, to navigate the On-Screen Display (OSD) menu. Push the joystick in to access the main menu, then move it up/down/left/right to select and adjust settings.
5.3 Input Selection
From the OSD menu, navigate to the 'Input' section to manually select between HDMI 1, HDMI 2, DisplayPort, or USB Type-C inputs based on your connected device.
5.4 KVM Functionality
The GIGABYTE M27UP features a built-in KVM (Keyboard, Video, Mouse) switch. When devices are connected via USB Type-C and another video input (HDMI/DP) with the USB upstream cable, you can switch between controlling two different computers using a single keyboard and mouse connected to the monitor's USB downstream ports. This function is typically activated via a dedicated button or an OSD setting.

Figure 5: Diagram illustrating the KVM function, allowing control of two devices with one keyboard and mouse.
5.5 Display Settings
Adjust various display settings through the OSD menu:
- Picture: Brightness, Contrast, Sharpness, Gamma, Color Temperature.
- Gaming: Overdrive, Aim Stabilizer, Black Equalizer, Refresh Rate.
- Resolution & Refresh Rate: The monitor supports UHD 3840x2160 resolution at up to 160Hz refresh rate. Ensure your graphics card and cables support these specifications.
- Adaptive Sync: Enable AMD FreeSync Premium or G-SYNC Compatible features for tear-free gaming, if supported by your graphics card.
- HDR: The monitor supports VESA DisplayHDR 400. Enable HDR in your operating system settings for compatible content.
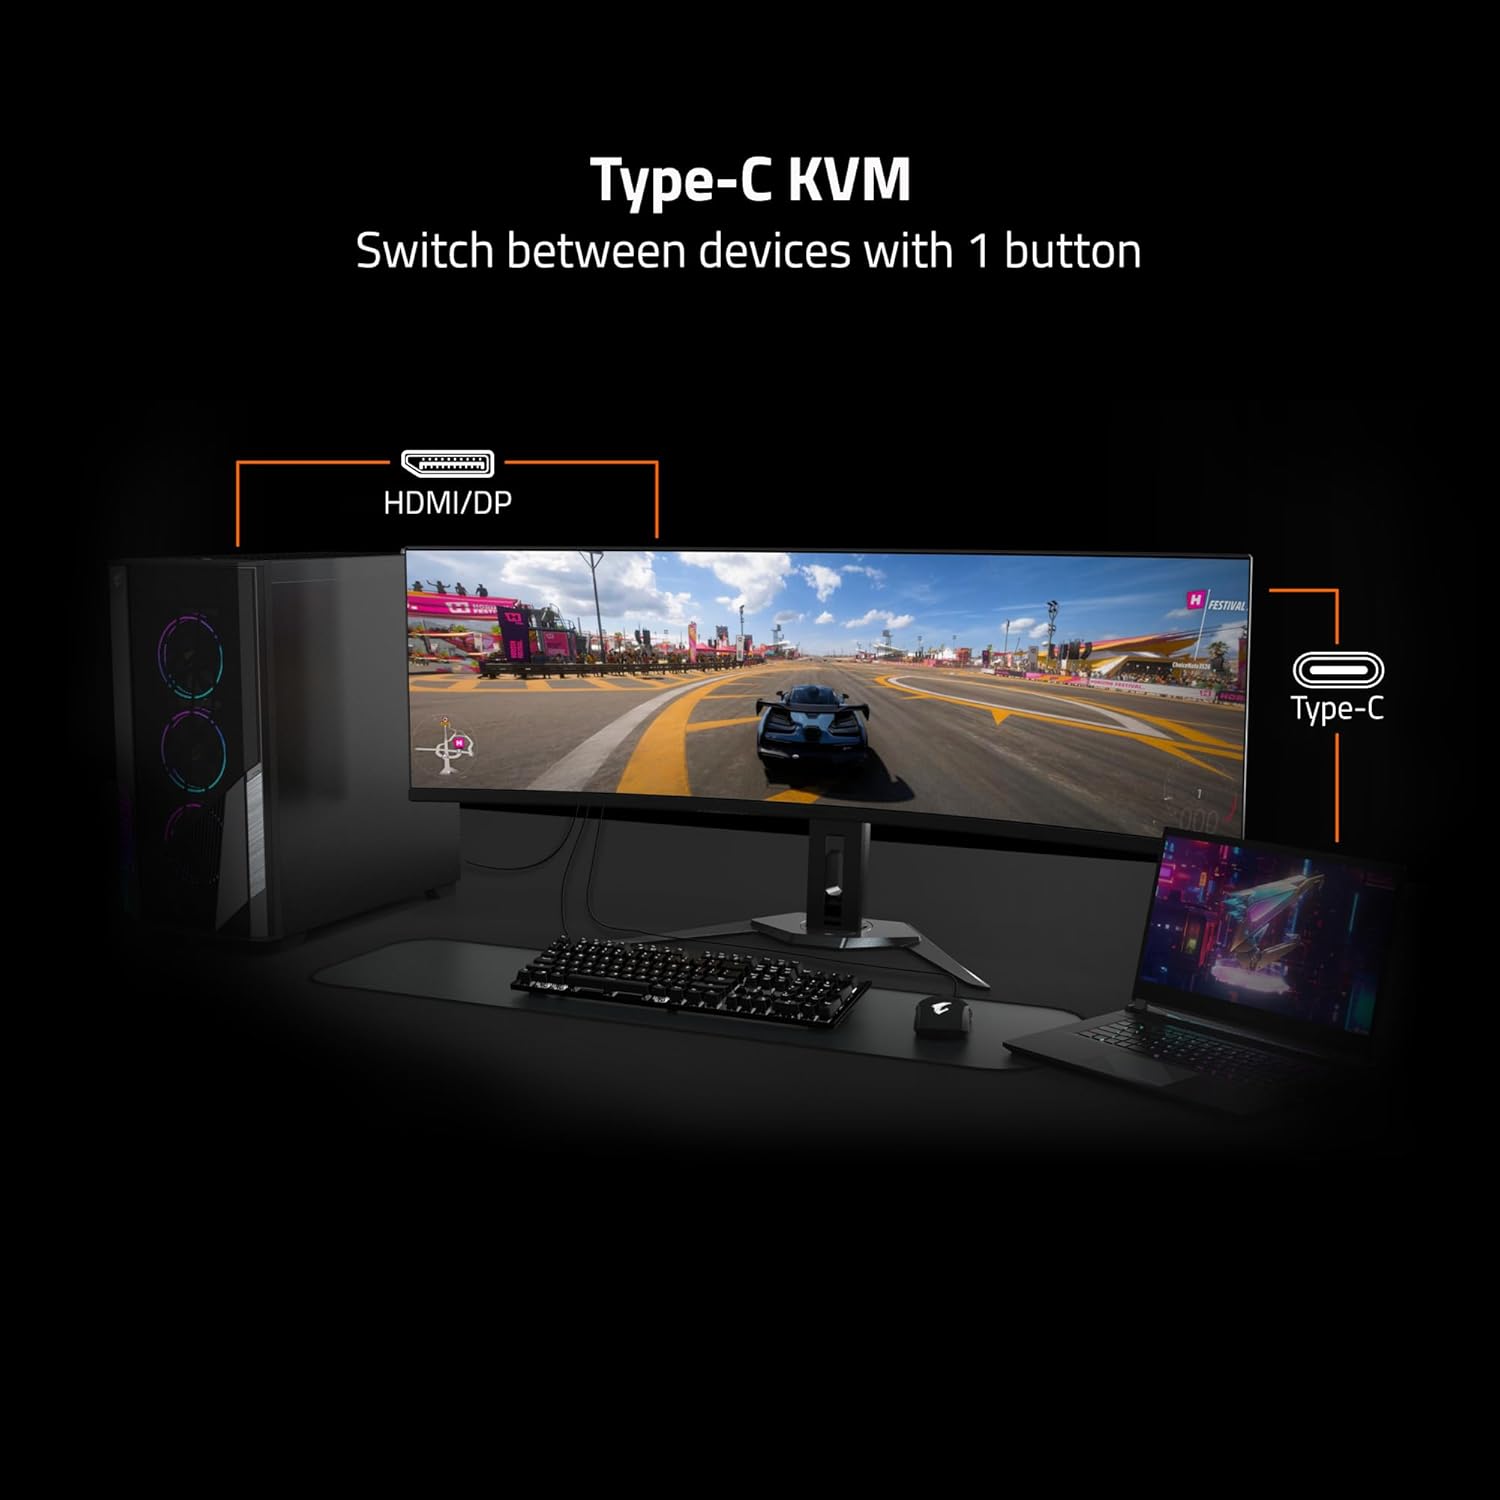
Figure 6: Visual comparison highlighting the smoother motion achieved with 1ms response time and 160Hz refresh rate.
5.6 Stand Adjustments
The monitor stand allows for ergonomic adjustments:
- Height Adjustment: Gently push or pull the monitor up or down to adjust its height.
- Tilt Adjustment: Tilt the monitor screen forward or backward to achieve your desired viewing angle.
6. Maintenance
6.1 Cleaning the Monitor
To clean the monitor screen and casing:
- Turn off the monitor and unplug the power cord.
- Use a soft, lint-free cloth lightly dampened with water or a mild, non-abrasive screen cleaner.
- Do not spray cleaner directly onto the screen.
- Avoid using harsh chemicals, alcohol, or abrasive materials, as these can damage the screen or finish.
6.2 Storage
If storing the monitor for an extended period, ensure it is powered off, unplugged, and stored in a cool, dry environment, preferably in its original packaging to protect it from dust and physical damage.
7. Troubleshooting
If you encounter issues with your monitor, refer to the following common troubleshooting steps:
- No Power: Ensure the power cable is securely connected to both the monitor and a working power outlet. Check if the power indicator light is on.
- No Signal: Verify that the video cable (HDMI, DisplayPort, or USB-C) is correctly connected to both the monitor and your computer. Ensure the correct input source is selected in the OSD menu.
- Flickering or Distorted Image: Check the video cable for damage. Ensure your graphics card drivers are up to date. Try adjusting the refresh rate in your operating system display settings.
- Incorrect Resolution: Adjust the display resolution in your operating system settings to 3840x2160.
- KVM Not Working: Ensure the USB upstream cable is connected from the monitor to the primary computer, and the USB Type-C cable is connected to the secondary device (if applicable). Verify KVM settings in the OSD.
If the problem persists after trying these steps, please contact GIGABYTE customer support.
8. Specifications
Key technical specifications for the GIGABYTE M27UP monitor:
| Feature | Specification |
|---|---|
| Screen Size | 27 Inches |
| Panel Type | SS IPS |
| Resolution | UHD 3840x2160 |
| Refresh Rate | 160Hz |
| Response Time | 1ms GTG |
| Color Accuracy | 125% sRGB, 8-bit color |
| HDR Support | VESA DisplayHDR 400 |
| Adaptive Sync | AMD FreeSync Premium, G-SYNC Compatible |
| Connectivity | 2x HDMI 2.1, 1x DisplayPort 1.4, 1x USB Type-C, 1x USB 3.2 Gen 1 Upstream, 3x USB 3.2 Gen 1 Downstream, 1x Earphone Jack |
| KVM Function | Yes |
| VESA Mount | 100x100mm |
| Dimensions (LxWxH) | 2.3 x 24.1 x 14.6 inches (without stand) |
| Weight | 20.4 pounds (with stand) |
9. Warranty and Support
The GIGABYTE M27UP monitor is covered by a 3-year warranty from the date of purchase. This warranty covers manufacturing defects and ensures reliable operation under normal use conditions.
For warranty claims, technical assistance, or further product information, please visit the official GIGABYTE website or contact their customer support department. Keep your purchase receipt as proof of purchase.
GIGABYTE Support: https://www.gigabyte.com/Support


