
Introduction
This manual provides detailed instructions for the installation, operation, and maintenance of your Lian Li VG4v4 ATX PC Case 4 Slots Vertical GPU Kit. This kit allows for vertical mounting of your graphics processing unit (GPU) within compatible ATX cases, featuring a PCIe 5.0 riser cable, adjustable height, and tilt functions, along with an anti-sag support arm and integrated ARGB lighting.
Safety Information
- Always disconnect power from your PC before installing or removing any components.
- Handle components with care to avoid damage from static electricity. Use an anti-static wrist strap if available.
- Ensure all screws are tightened securely but do not overtighten.
- Keep small parts away from children.
- Refer to your PC case and GPU manuals for additional compatibility and installation guidelines.
Package Contents
Verify that all components listed below are present in your package:
- Vertical GPU Mounting Bracket (VG4v4)
- PCIe 5.0 x16 Riser Cable (200mm)
- Anti-Sag Support Arm (with RGB lighting)
- Mounting Hardware (screws, standoffs, etc.)
- E-ATX Extension Arm (for E-ATX motherboards)

Image: All components of the Lian Li VG4v4 Vertical GPU Kit, showing both black and white versions for reference. Includes the main bracket, riser cable, anti-sag support, and various mounting accessories.
Setup and Installation
Follow these steps carefully to install the vertical GPU kit in your PC case.
1. Prepare Your PC Case
- Ensure your ATX case has at least 6 available PCIe slots for standard vertical mounting or 7 slots for tilted configurations.
- Remove the necessary PCIe slot covers from your case.
- Disconnect your existing GPU and any other components that may obstruct installation.
2. Install the Vertical GPU Bracket
- Position the vertical GPU bracket inside your PC case, aligning its mounting holes with the case's PCIe slot area.
- Secure the bracket using the provided screws.
3. Adjust GPU Height (Optional)
The bracket offers three height adjustments for optimal clearance and aesthetics.
- Level 1: Standard position, ideal for showcasing AIO liquid coolers with built-in displays.
- Level 2: Elevated by 10.16mm from Level 1, improves compatibility with bottom-mounted fans or radiators.
- Level 3: Elevated by 20.32mm from Level 1, provides maximum clearance for bottom-mounted components.
Select the desired height level and ensure the bracket is securely fastened. Once adjusted, ensure the screw is properly secured.

Image: Visual representation of the three-level height adjustment feature, illustrating how different levels provide clearance for various PC configurations, including bottom-mounted fans and AIO coolers.
4. Install the PCIe 5.0 Riser Cable
- Connect one end of the 200mm PCIe 5.0 riser cable to the PCIe x16 slot on your motherboard.
- Connect the other end of the riser cable to the vertical GPU bracket's PCIe slot.
5. Mount Your GPU
- Carefully insert your GPU into the PCIe slot on the vertical mounting bracket.
- Secure the GPU to the bracket using the GPU's original mounting screws or those provided with the kit.
6. Adjust GPU Display Angle (Optional)
The kit supports three display angles: Forward, Neutral, and Backward. These adjustments are tool-free and utilize dedicated mounting holes on the support arm.
- Forward: Improves airflow by angling the GPU towards the front of the case, allowing cooler air to enter more efficiently.
- Neutral: Standard vertical position.
- Backward: Angles the GPU towards the back of the case, often used to showcase the GPU's aesthetic.

Image: Illustration of the three display angles (Forward, Neutral, Backward) for the vertically mounted GPU, demonstrating how the GPU can be positioned for optimal airflow or visual appeal.
7. Install the Anti-Sag Support Arm
The anti-sag support arm prevents GPU sag and provides stability.
- Attach the support arm to a motherboard standoff. The kit includes #6-32 thread screws for improved compatibility.
- For E-ATX motherboards, use the provided E-ATX extension arm for proper alignment and clearance.
- Adjust the support arm to firmly support the GPU, preventing any sag.
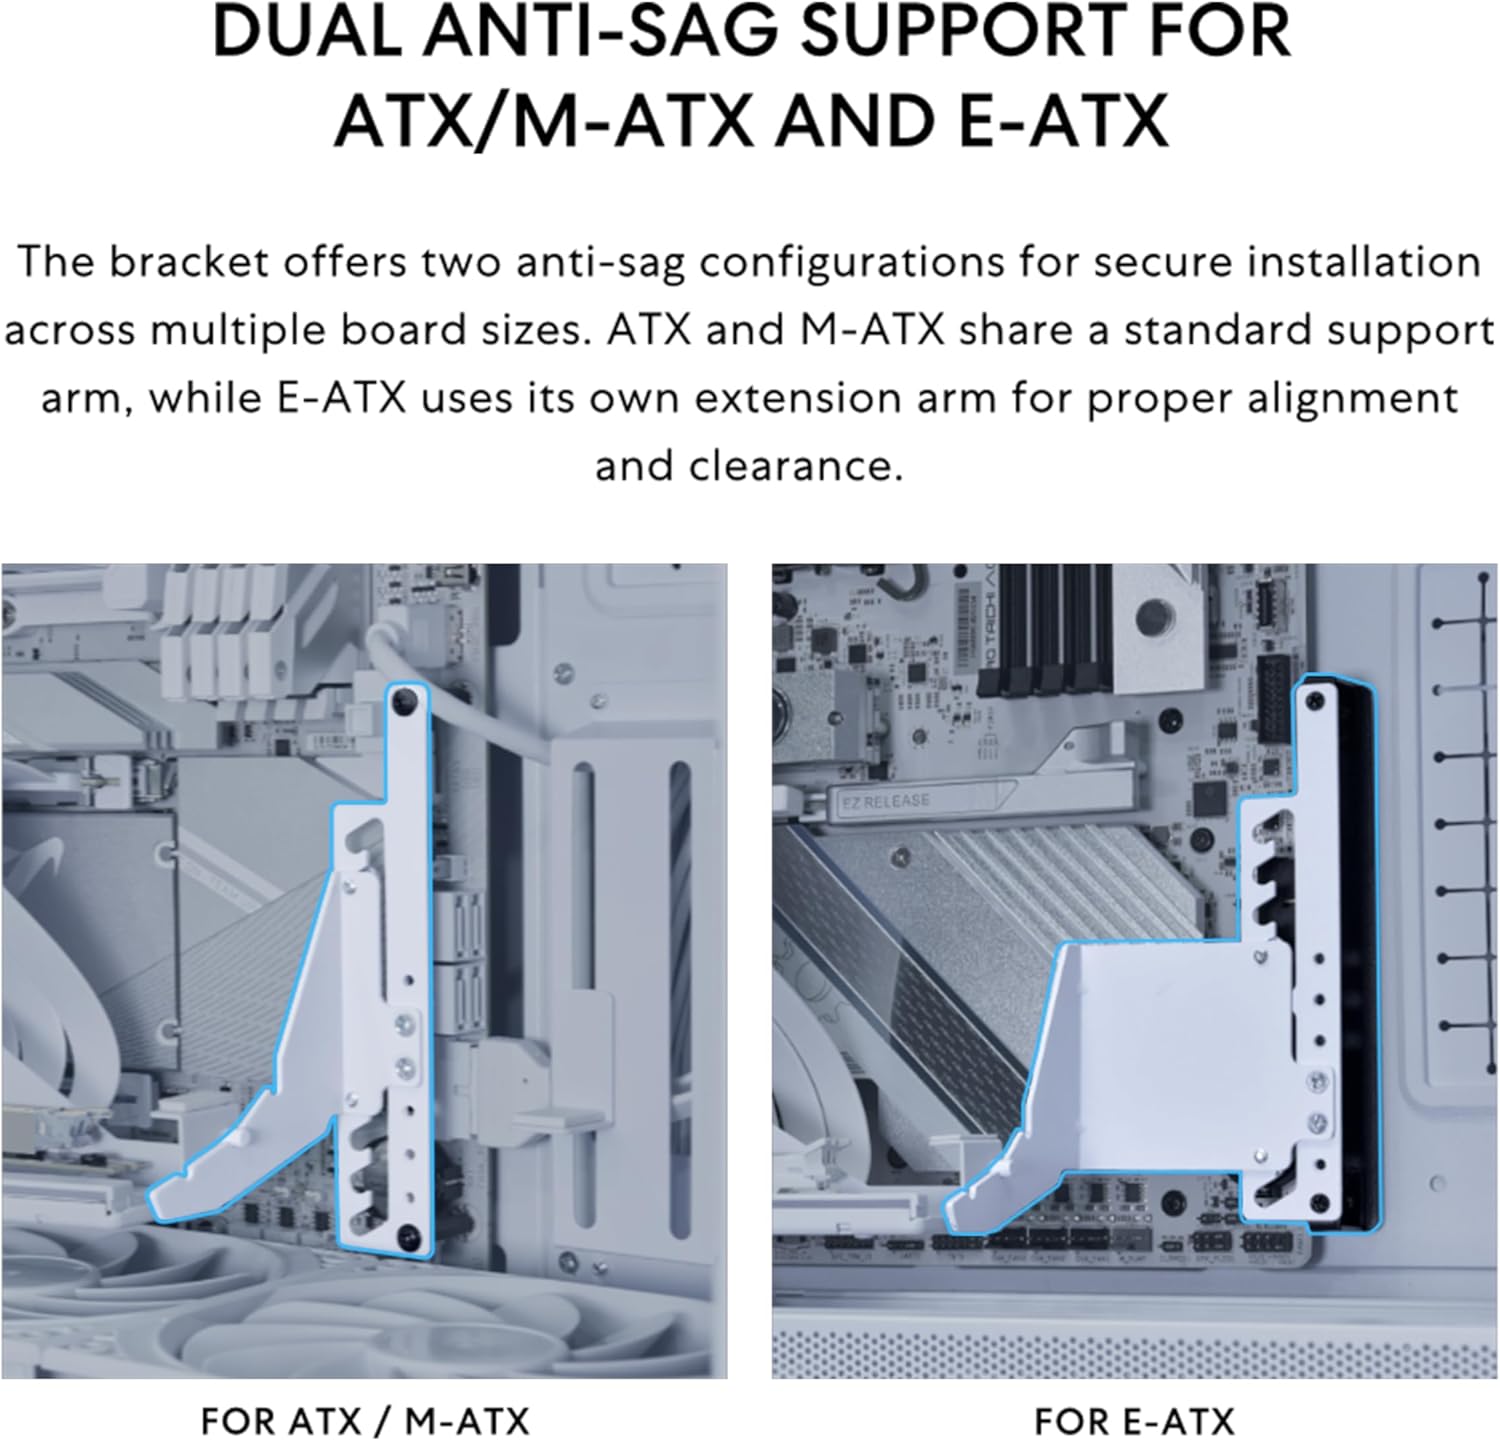
Image: Comparison of anti-sag support configurations for ATX/M-ATX and E-ATX motherboards, highlighting the use of an extension arm for E-ATX setups.

Image: Depiction of the flexible support arm placement, illustrating how it can be adjusted to suit various GPU configurations and ensure stability.
8. Connect ARGB Lighting
- Locate the 5V ARGB connector on your motherboard.
- Connect the ARGB cable from the anti-sag support arm to the motherboard's 5V ARGB header.

Image: Close-up view of the integrated 5V ARGB lighting on the vertical GPU kit, showcasing its visual effect when connected to a compatible motherboard.
Operating
Once installed, the vertical GPU kit operates passively, providing a secure mount and high-speed data transfer for your GPU.
ARGB Lighting Control
The integrated 5V ARGB lighting can be controlled via your motherboard's lighting software (e.g., ASUS Aura Sync, MSI Mystic Light Sync, Gigabyte RGB Fusion, ASRock Polychrome Sync). Refer to your motherboard's manual for specific instructions on controlling ARGB devices.
Maintenance
Regular maintenance ensures optimal performance and longevity of your vertical GPU kit.
- Cleaning: Periodically clean the bracket and riser cable with a soft, dry cloth to remove dust. Avoid using liquid cleaners directly on electronic components.
- Cable Inspection: Occasionally check the PCIe riser cable for any signs of wear or damage. Ensure it is securely connected.
- Screw Tightness: Verify that all mounting screws, especially those securing the GPU and anti-sag arm, remain tight.
Troubleshooting
If you encounter issues, refer to the following common problems and solutions:
| Problem | Possible Cause | Solution |
|---|---|---|
| GPU not detected by system. | Loose PCIe riser cable connection; Incorrect BIOS settings; Faulty riser cable. | Ensure riser cable is fully seated at both motherboard and GPU ends. Check BIOS for PCIe slot settings (e.g., set to Gen 4 or Auto if Gen 5 causes issues). Test with another riser cable if possible. |
| GPU sag despite anti-sag arm. | Anti-sag arm not properly adjusted or secured; Extremely heavy GPU. | Re-adjust and firmly secure the anti-sag arm. Ensure it is supporting the GPU effectively. Verify motherboard standoff is correctly installed. |
| ARGB lighting not working. | Loose ARGB cable connection; Incorrect motherboard ARGB header; Software issue. | Check ARGB cable connection to motherboard. Ensure it's connected to a 5V ARGB header (not 12V RGB). Verify motherboard lighting software is installed and configured correctly. |
| Interference with HDMI/DisplayPort cables. | GPU I/O port alignment. | The VG4v4 features a larger cutout for GPU I/O. Ensure cables are properly routed and not obstructed. Adjust GPU tilt angle if necessary to provide more clearance. |
Specifications
| Feature | Detail |
|---|---|
| Model Name | VG4v4 |
| Riser Cable Type | PCIe 5.0 x16 |
| Riser Cable Length | 200mm |
| GPU Slot Support | Up to 4 slots thick |
| Case Compatibility | Most ATX cases (requires 6 PCIe slots for standard, 7 for tilted) |
| Height Adjustments | 3 levels (0mm, +10.16mm, +20.32mm from base) |
| Display Angles | Forward, Neutral, Backward |
| Anti-Sag Support | Yes, with dedicated E-ATX extension arm |
| Lighting | Integrated 5V ARGB |
| Dimensions (Product) | 16.79 x 14.76 x 23.5 cm; 1.08 kg |
Warranty and Support
Lian Li products are manufactured to high-quality standards. For warranty information and technical support, please visit the official Lian Li website or contact your local distributor. Keep your proof of purchase for warranty claims.
Official Website: www.lian-li.com