Introduction
This manual provides essential information for the assembly, operation, and maintenance of your EROMMY Rattan Nightstand. This nightstand features two storage drawers and an integrated charging station, designed for convenience and style in various living spaces.
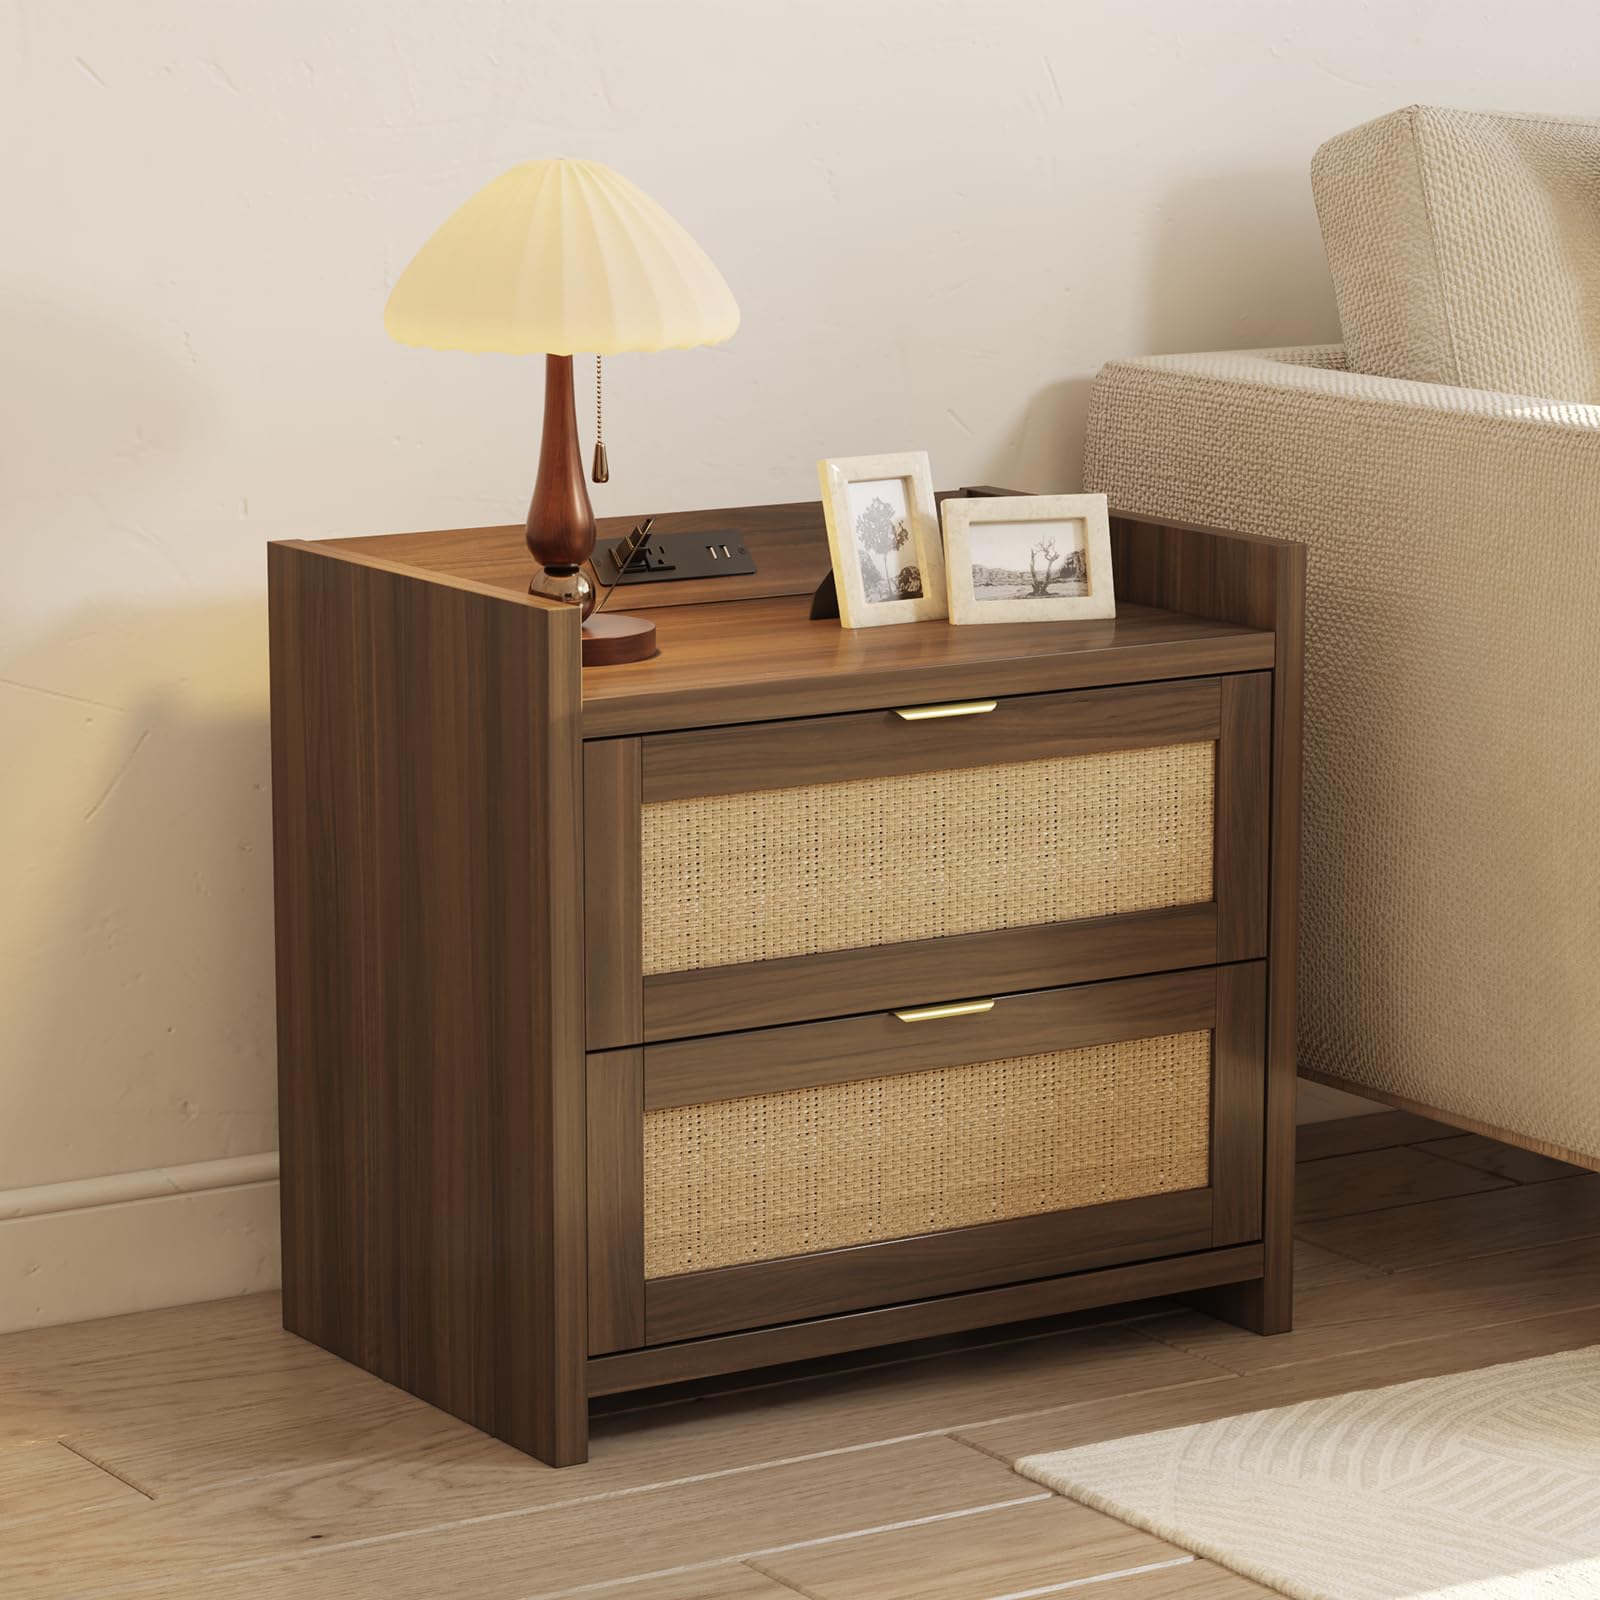
Image: The EROMMY Rattan Nightstand in Walnut, featuring two drawers with rattan fronts and a top surface.
Safety Information
- Read all instructions carefully before assembly and use.
- Keep all small parts and packaging materials away from children.
- Assemble the nightstand on a soft, clean surface to prevent scratches.
- Ensure all connections are secure before using the nightstand.
- Do not overload the drawers or the top surface. The maximum weight recommendation for the top surface is 100 pounds.
- Only use the charging station with compatible devices and within specified electrical ratings (125V/12A for AC outlets, 5V/2.1A for USB ports).
- Avoid exposing the nightstand to excessive moisture or direct sunlight.
Package Contents
Verify that all components are present before beginning assembly. If any parts are missing or damaged, please contact customer support.
- Nightstand Panels (Top, Bottom, Sides, Back)
- Drawer Panels (Fronts with Rattan, Sides, Back, Bottom)
- Drawer Slides
- Gold-Finished Handles
- Charging Station Unit (with 2 AC outlets, 2 USB ports, and 5.1 FT power cord)
- Assembly Hardware (Screws, dowels, cam locks, etc.)
- Assembly Guide
Setup and Assembly Instructions
Assembly is designed to be straightforward. Follow the included Assembly Guide for detailed, step-by-step instructions. A screwdriver is recommended for assembly.
- Unpack Components: Carefully remove all parts from the packaging and lay them out on a protected surface.
- Identify Parts: Refer to the Assembly Guide to identify each panel and piece of hardware.
- Assemble Frame: Attach the side panels to the bottom and back panels using the provided hardware. Ensure all connections are snug.
- Install Drawer Slides: Secure the drawer slides to the inner side panels of the nightstand frame.
- Assemble Drawers: Construct the two drawers by attaching the side, back, and bottom panels to the rattan drawer fronts. Install the gold-finished handles.
- Insert Drawers: Carefully slide the assembled drawers onto the installed drawer slides.
- Install Charging Station: Place the charging station unit into its designated slot on the top surface of the nightstand. Ensure the power cord is accessible.
- Final Check: Verify that all screws are tightened and the nightstand is stable.
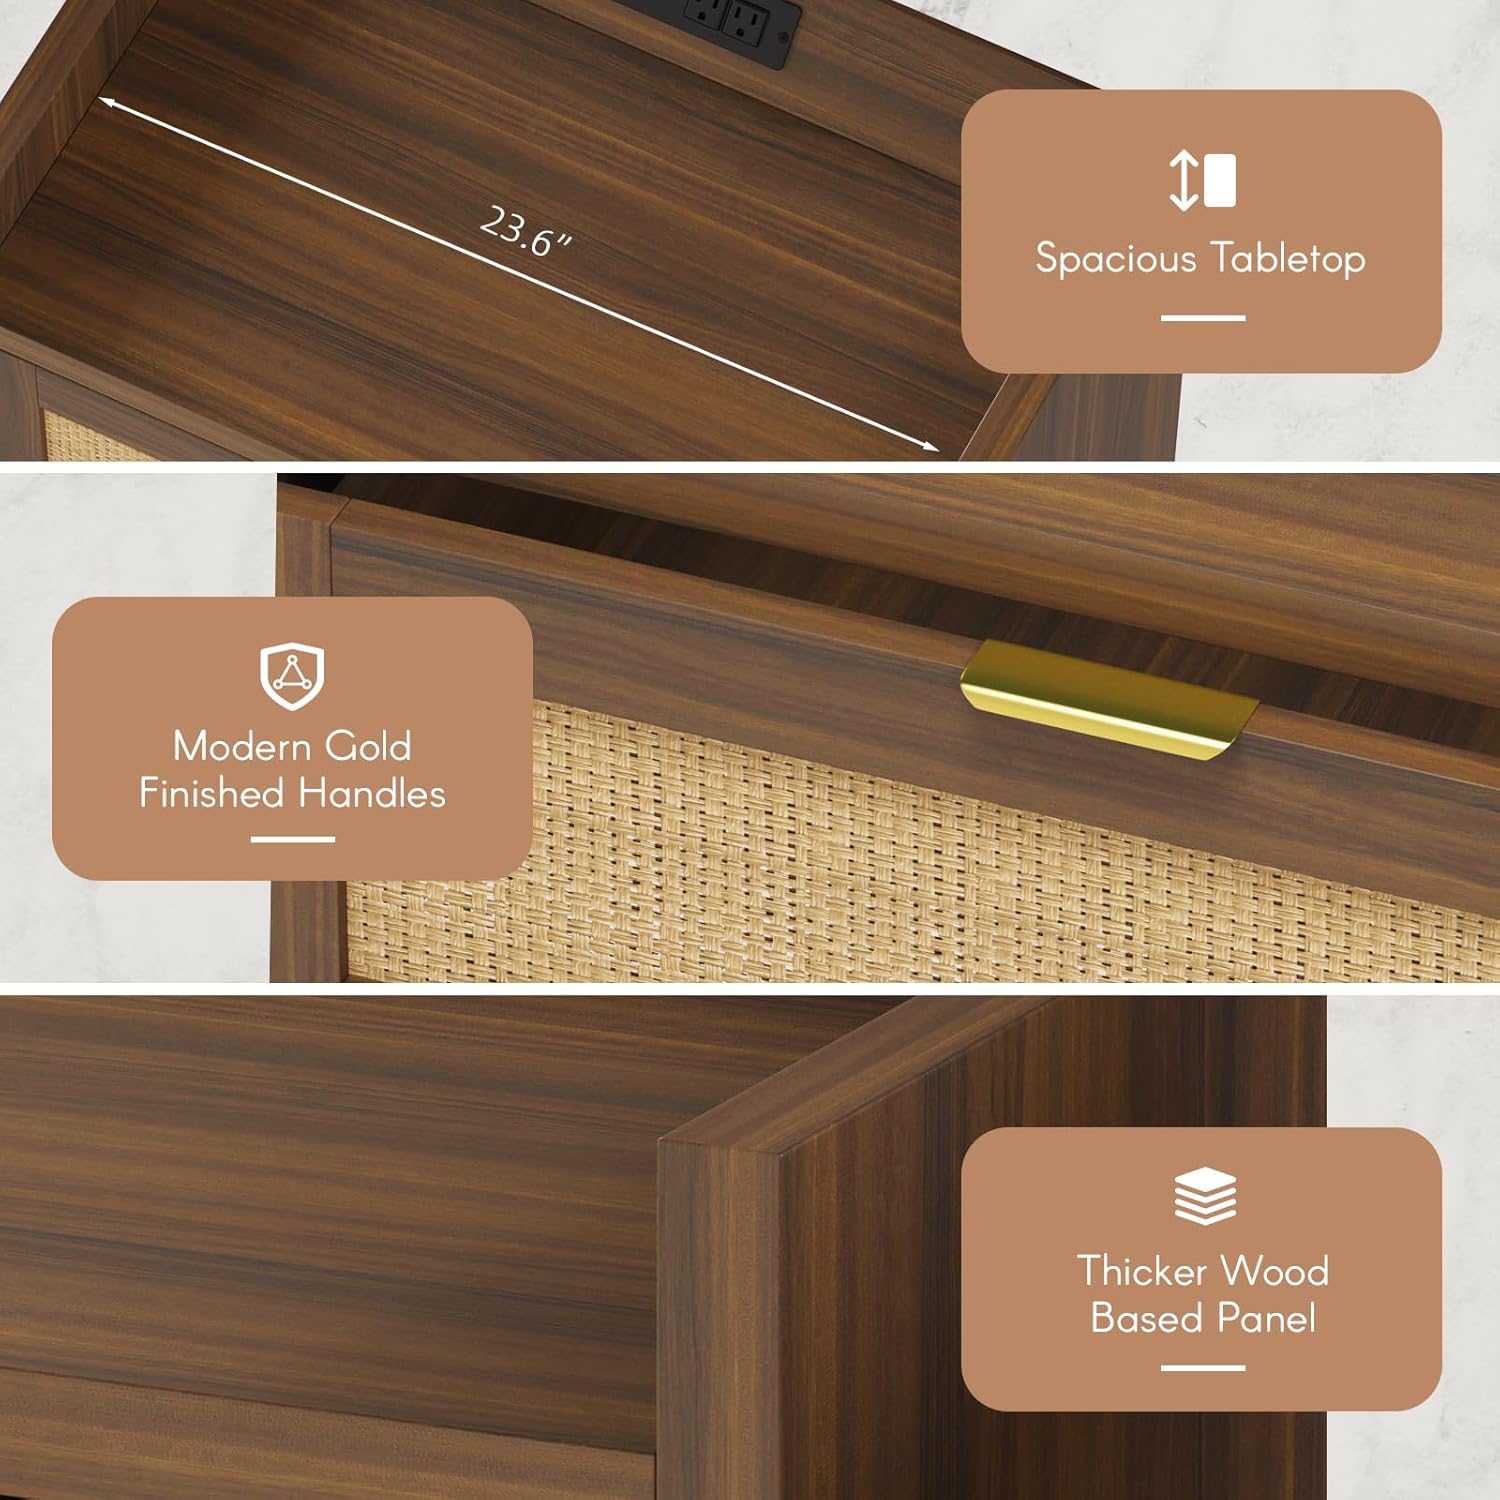
Image: Detailed view highlighting the spacious tabletop, modern gold-finished handles, and the construction with thicker wood-based panels.
Operating Instructions
Using the Charging Station
The integrated charging station provides convenient power access for your electronic devices.
- Plug the nightstand's 5.1 FT power cord into a standard 125V wall outlet.
- Use the 2 AC outlets (125V/12A) to power lamps, laptops, or other small appliances.
- Use the 2 USB ports (5V/2.1A) to charge smartphones, tablets, smartwatches, and other USB-powered devices.
- Ensure devices are compatible with the specified voltage and current ratings.

Image: The built-in charging station with 2 AC outlets and 2 USB ports, demonstrating its use with a tablet and smartphone.
Utilizing Storage Drawers
The two drawers offer ample space for organized storage.
- Pull the gold-finished handles to open the drawers smoothly.
- Store books, electronics, personal items, or other daily essentials.
- Organize items within the drawers to maintain a tidy space.
- Avoid placing excessively heavy items in the drawers; each drawer has a maximum load capacity of 50 pounds.

Image: The two drawers of the nightstand are shown open, illustrating their capacity for storing various items like books, cosmetics, and headphones.
Maintenance
- Cleaning: Wipe surfaces with a soft, damp cloth. Avoid harsh chemicals or abrasive cleaners that could damage the finish or rattan.
- Spills: Clean spills immediately to prevent staining, especially on the wood finish.
- Rattan Care: Gently dust the rattan panels with a soft brush or cloth. Avoid excessive moisture.
- Hardware: Periodically check and tighten all screws and connections to ensure stability.
- Charging Station: Keep the charging ports free of dust and debris. Do not attempt to disassemble the charging unit.
Troubleshooting
- Nightstand is Wobbly: Ensure all assembly screws are fully tightened. Check that the nightstand is placed on a level surface.
- Drawers Do Not Slide Smoothly: Verify that the drawer slides are correctly installed and aligned. Ensure no obstructions are in the drawer tracks.
- Charging Station Not Working: Check if the nightstand's power cord is securely plugged into a functional wall outlet. Test the wall outlet with another device. Ensure your devices are properly connected to the AC outlets or USB ports.
- Missing Parts: If any parts were missing upon arrival, refer to the customer support section for assistance.
Specifications
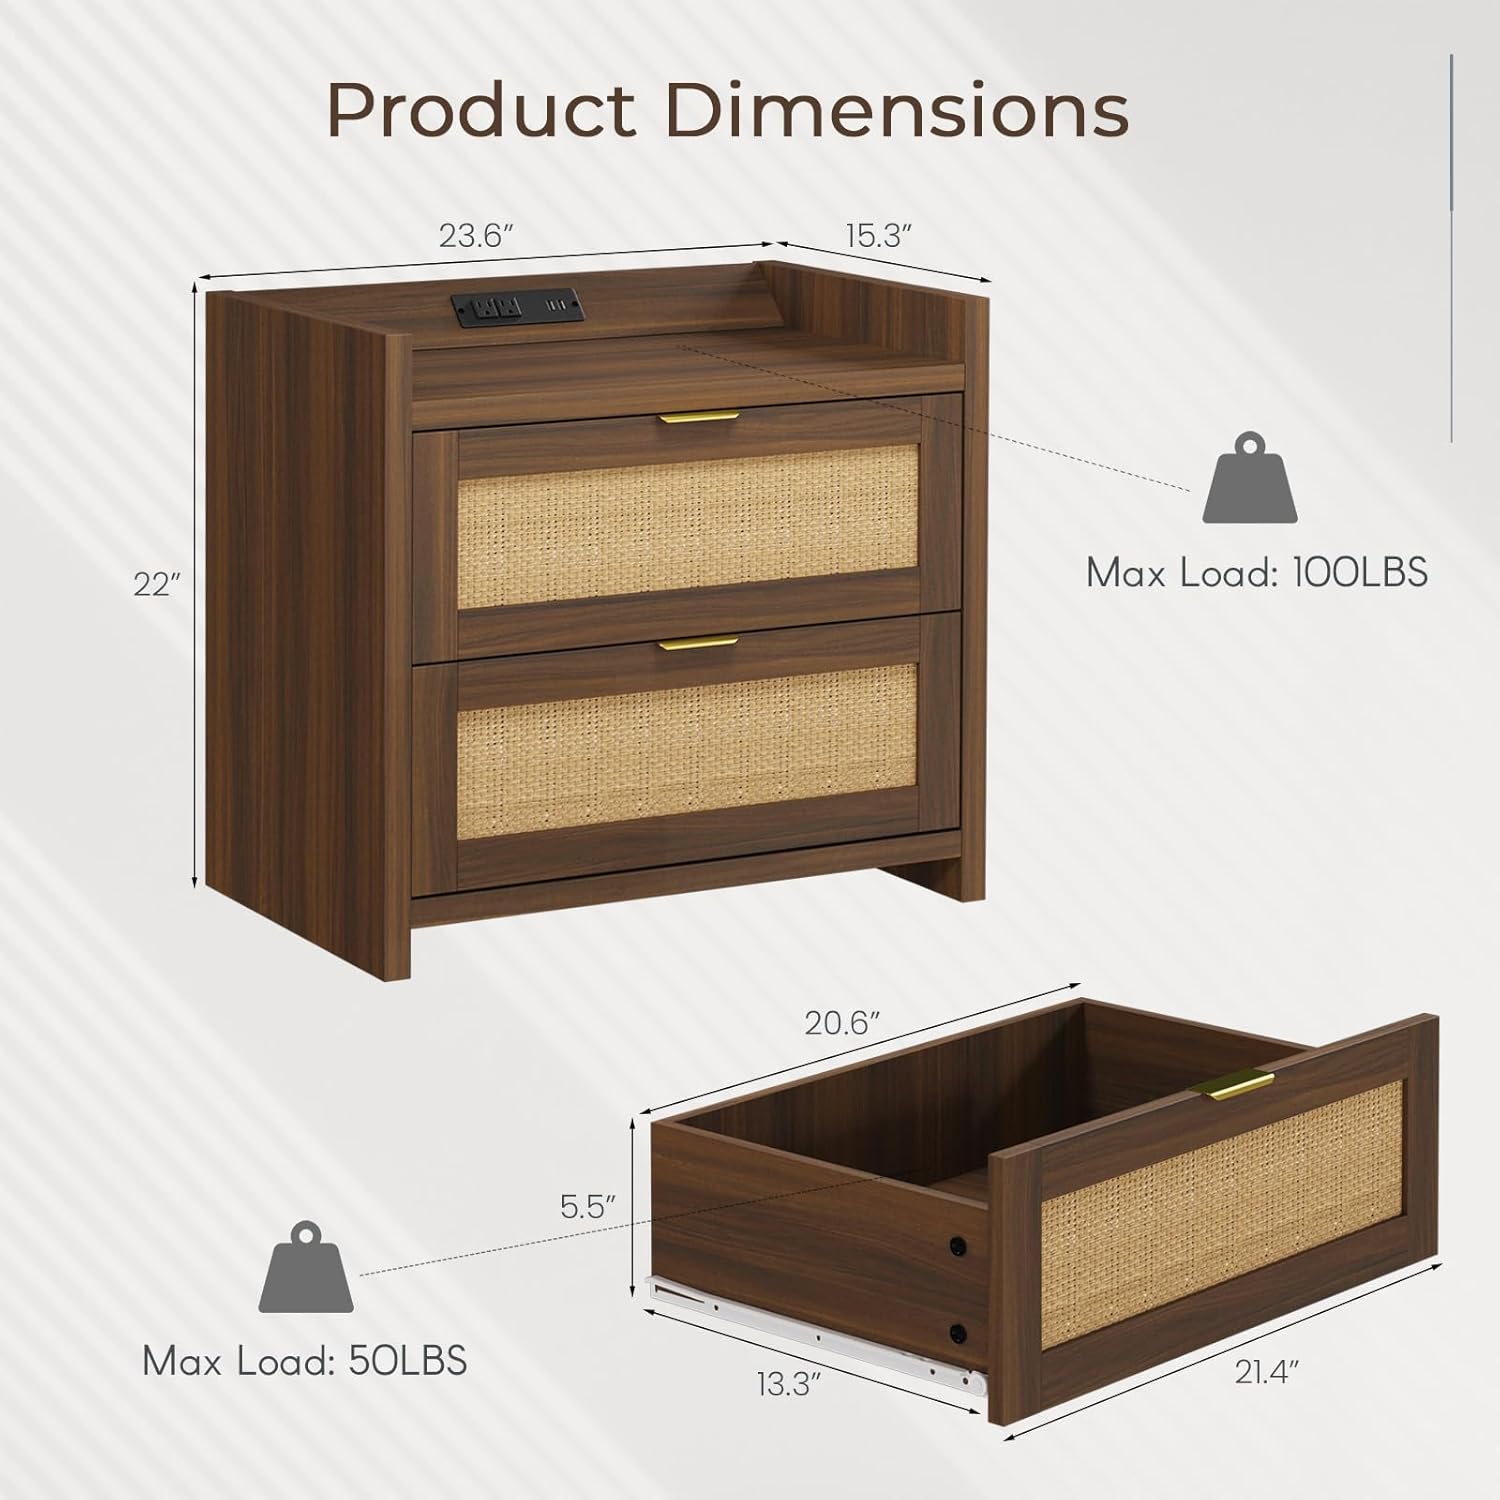
Image: Detailed diagram illustrating the overall product dimensions and individual drawer dimensions, along with maximum load capacities.
| Feature | Detail |
|---|---|
| Brand | EROMMY |
| Model Name | Rattan Nightstand |
| Product Dimensions (D x W x H) | 15.3" x 23.6" x 22" |
| Item Weight | 36 Pounds |
| Maximum Weight Recommendation (Top) | 100 Pounds |
| Frame Material | Wood (Engineered Wood) |
| Handle Material | Metal |
| Number of Drawers | 2 |
| Charging Station | 2 AC Outlets (125V/12A), 2 USB Ports (5V/2.1A) |
| Power Cord Length | 5.1 FT |
| Color | Walnut |
| Style | Bohemian |
| Indoor/Outdoor Usage | Indoor |
Warranty Information
EROMMY products are manufactured with quality and care. For specific warranty details regarding your Rattan Nightstand, please refer to the documentation included with your purchase or contact EROMMY customer support directly. Keep your proof of purchase for warranty claims.
Customer Support
If you have any questions, require assistance with assembly, or encounter any issues with your EROMMY Rattan Nightstand, please do not hesitate to contact our customer support team. Refer to the contact information provided in your product packaging or visit the official EROMMY website for support options.
We are committed to providing you with a satisfactory experience.


