
1. Introduction
This manual provides essential instructions for the safe assembly, operation, and maintenance of your Garden Tailor 8x6 FT Metal Outdoor Storage Shed. Please read this manual thoroughly before beginning assembly and retain it for future reference.

Figure 1.1: The Garden Tailor 8x6 FT Metal Outdoor Storage Shed, designed for robust outdoor storage.
2. Safety Information
Always prioritize safety during assembly and use. Failure to follow these instructions may result in injury or damage to the product.
- Read All Instructions: Before assembly, carefully read and understand all steps.
- Wear Protective Gear: Always wear gloves and eye protection during assembly to prevent cuts and scrapes.
- Two-Person Assembly: Assembly requires at least two adults for safety and ease of installation.
- Level Surface: Ensure the shed is assembled on a flat, solid, and level surface or an elevated foundation to ensure stability and proper door alignment.
- Secure Foundation: Anchor the shed securely to the ground or foundation to prevent wind damage.
- Sharp Edges: Metal components may have sharp edges. Handle with care.
- Ventilation: Do not store flammable liquids or hazardous materials without proper ventilation.
- Children and Pets: Keep children and pets away from the assembly area.
- Electrical Safety: Do not install electrical wiring or appliances inside the shed without consulting a qualified electrician and ensuring proper grounding and weatherproofing.
3. Package Contents
Before beginning assembly, verify that all parts listed in the packing list (usually included in the box) are present and undamaged. If any parts are missing or damaged, contact customer support immediately.
Typical components include:
- Galvanized Steel Wall Panels
- Roof Panels
- Double Hinged Door Panels
- Door Frame Components
- Floor Frame Components (if included)
- Ventilation Panels
- Hardware Kit (screws, bolts, nuts, washers)
- Assembly Manual
4. Setup and Assembly
The Garden Tailor 8x6 FT Metal Outdoor Storage Shed is designed for straightforward assembly with pre-cut and pre-drilled components. Follow these steps carefully.
4.1 Site Preparation
- Choose Location: Select a flat, level area in your backyard, patio, or lawn.
- Clear Area: Remove any debris, rocks, or vegetation from the chosen site.
- Foundation: For extended durability and stability, it is recommended to place the shed on a solid, level foundation such as a concrete slab, wooden platform, or gravel base. Ensure the foundation is slightly larger than the shed's footprint.
4.2 Assembly Steps
Refer to the numbered instructions and diagrams provided in your physical assembly manual for detailed visual guidance. The general sequence is as follows:
- Base Frame Assembly: Assemble the base frame components according to the diagrams. Ensure all corners are square and secure.
- Wall Panel Installation: Attach the galvanized steel wall panels to the base frame, starting from a corner. Secure each panel using the provided hardware.
- Door Frame and Door Installation: Assemble the door frame and attach it to the designated opening. Install the double hinged doors, ensuring they open and close smoothly.
- Roof Frame Assembly: Construct the roof frame on the ground, then carefully lift and secure it onto the top of the wall panels. This step typically requires two people.
- Roof Panel Installation: Attach the roof panels to the roof frame, ensuring proper overlap for rain protection.
- Ventilation Panel Installation: Install the integrated ventilation panels as indicated in the manual.
- Final Checks: Verify all screws and bolts are tightened. Ensure doors operate correctly and the shed is stable.
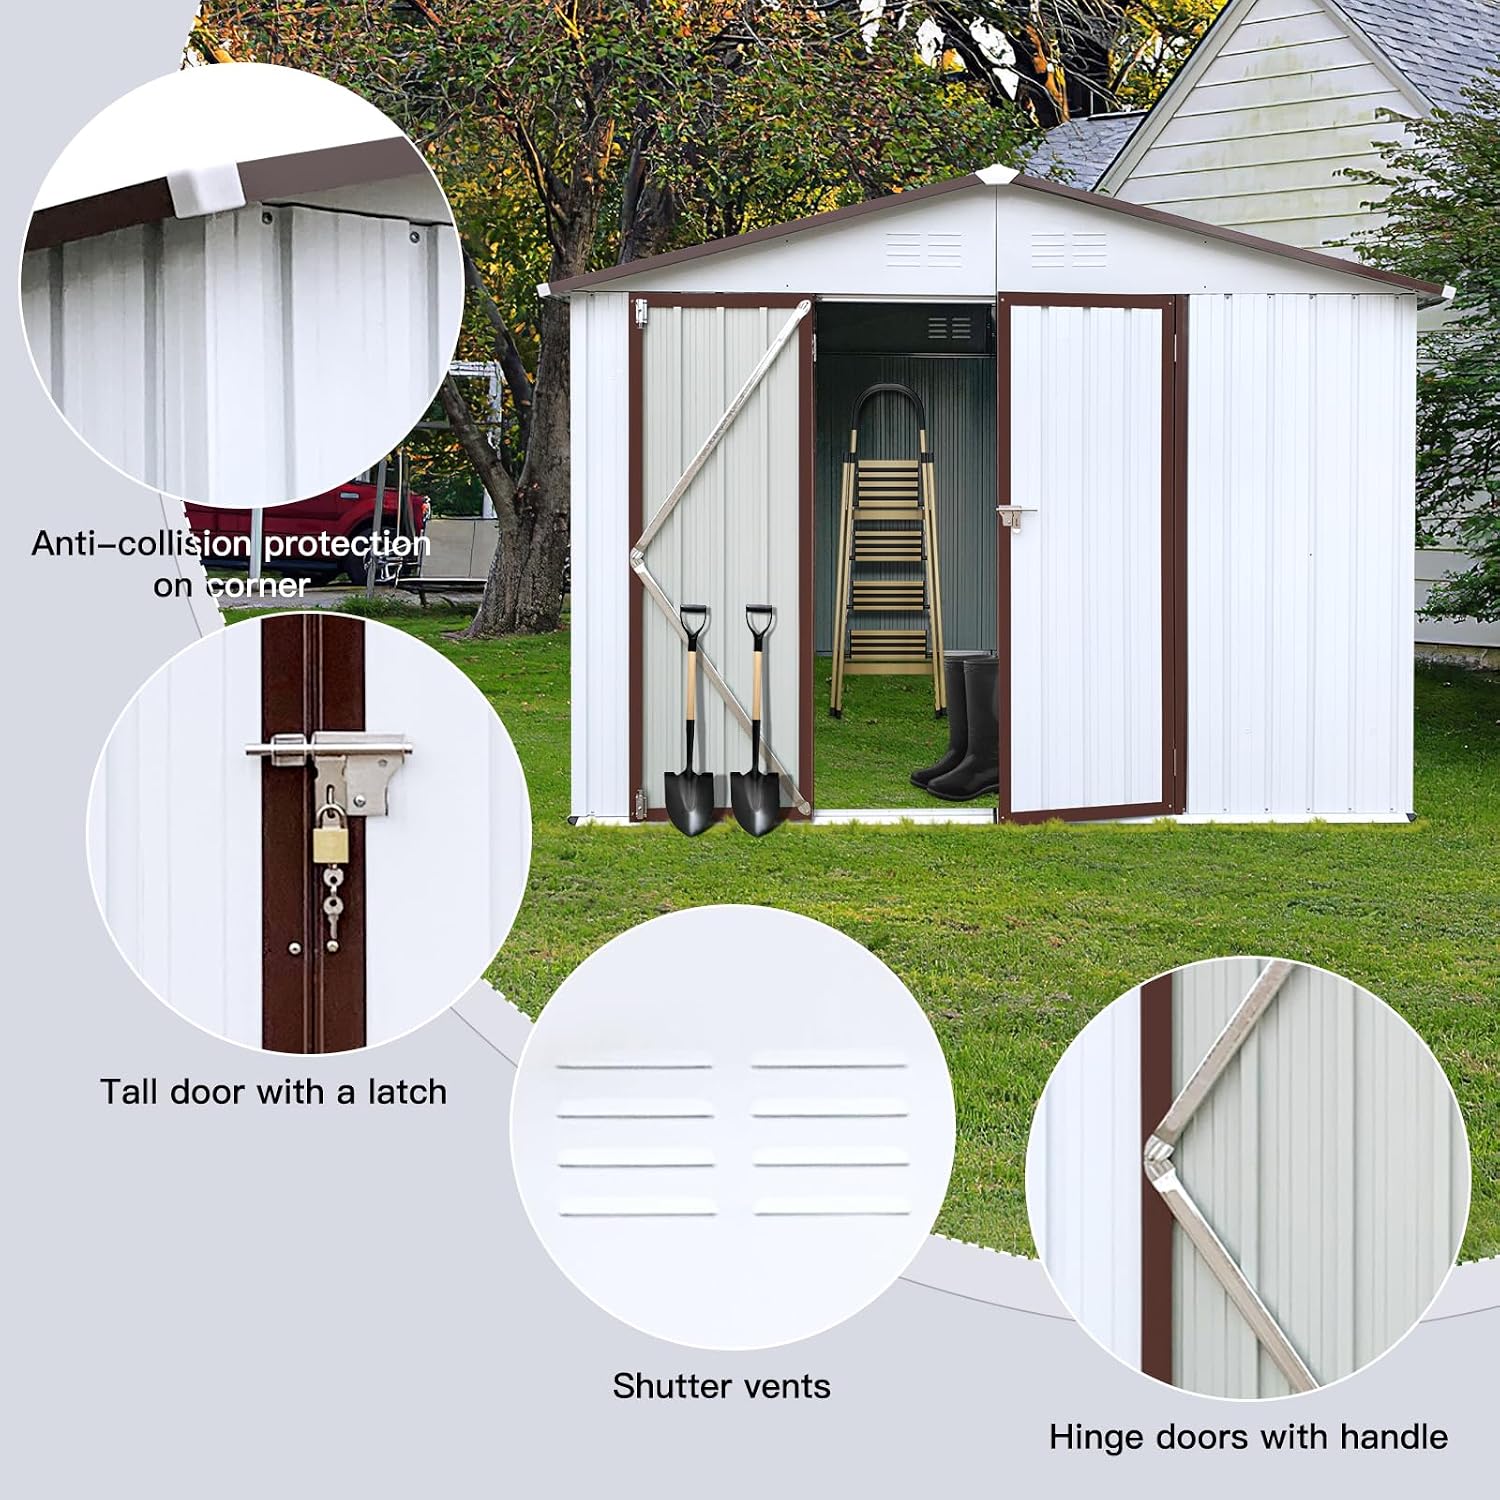
Figure 4.1: The shed with its double hinged doors open, showcasing interior space.

Figure 4.2: Detailed view of key components: anti-collision protection on corners, a tall door with a latch for security, shutter vents for air circulation, and robust hinge doors with handles.
5. Operation
5.1 Door Usage
- The shed features double hinged doors for wide access. Open both doors fully when moving large items in or out.
- To secure the shed, close both doors and engage the lockable latch. A padlock (not included) can be used for added security.
5.2 Ventilation
- The integrated ventilation panels promote air circulation, reducing moisture buildup inside the shed. Ensure these vents are not obstructed.
6. Maintenance
Regular maintenance will extend the lifespan and preserve the appearance of your storage shed.
- Cleaning: Clean the exterior of the shed periodically with mild soap and water. Avoid abrasive cleaners or harsh chemicals that could damage the galvanized steel finish.
- Inspection: Annually inspect all fasteners (screws, bolts) and tighten if necessary. Check for any signs of rust or damage to the panels.
- Drainage: Ensure the area around the shed remains clear of debris to allow for proper water drainage and prevent moisture accumulation at the base.
- Snow Removal: In areas with heavy snowfall, regularly clear snow from the roof to prevent excessive weight buildup.
- Door Lubrication: Lubricate door hinges and latch mechanism annually with a silicone-based lubricant to ensure smooth operation.

Figure 6.1: The shed's design provides protection against rain and sun, highlighting its weather-resistant properties.
7. Troubleshooting
This section addresses common issues you might encounter with your storage shed.
| Problem | Possible Cause | Solution |
|---|---|---|
| Doors do not close or align properly. |
|
|
| Water leakage inside the shed. |
|
|
| Shed feels unstable or wobbly. |
|
|
8. Specifications
Technical details for the Garden Tailor 8x6 FT Metal Outdoor Storage Shed.
| Brand | Garden Tailor |
| Model Number | 8x6 FT Metal Shed |
| Material | Galvanized Steel |
| Color | Brown |
| Product Dimensions (D x W x H) | 70.9" x 99.6" x 75.6" (180cm x 253cm x 192cm) |
| Item Weight | 145.5 Pounds (66 kg) |
| Door Style | Double Hinged, Lockable |
| Door Width | 42.5 Inches (108 cm) |
| Door Height | 62.7 Inches (159 cm) |
| Water Resistance Level | Water Resistant |
| Assembly Required | Yes |

Figure 8.1: Detailed product dimensions including width, depth, and height measurements in both centimeters and inches.
9. Warranty and Support
For specific warranty information, please refer to the documentation included with your purchase or contact Garden Tailor customer support. If you have any questions regarding assembly, missing parts, or product operation, please reach out to the seller or manufacturer directly.
You can often find support contact information on the product packaging or through the retailer where the product was purchased.