1. Introduction
The GODOX X3 Pro C is a compact and advanced TTL wireless flash trigger designed for Canon cameras. It features a vibrant touchscreen interface, 2.4GHz Wireless X System, and Bluetooth integration for seamless control of your GODOX flashes. This manual provides detailed instructions for setup, operation, and maintenance to help you maximize the potential of your X3 Pro C trigger.

Image: GODOX X3 Pro C TTL Wireless Flash Trigger for Canon, showcasing its compact design and touchscreen.
2. Key Features
- Vibrant Touchscreen Interface: Displays four lighting groups simultaneously for real-time monitoring and control.
- 2.4GHz Wireless X System: Provides wide transmission range and interference-resistant performance for reliable flash triggering.
- Bluetooth Integration & APP Control: Connects to the Godox Flash App for remote adjustment of power, group settings, and triggering flashes.
- Creative Shutter Control: Program single-shot, time-lapse, and long-exposure sequences directly from the touchscreen.
- HSS Delay (Sync Delay) Function: Offers granular control for high-speed sync shots.
- Built-in AF Assist Lamp: Ensures swift and accurate autofocus in low-light conditions.
- Half-Press for Autofocus: Mimics camera's shutter button in Shutter Release Mode for natural shooting.
- USB-C Port: For fast charging and firmware upgrades.
- Built-in Lithium Battery: Offers extended standby time and quick recharge.
3. Product Overview and Controls
Familiarize yourself with the physical components and controls of your GODOX X3 Pro C trigger.

Image: Detailed diagram of the GODOX X3 Pro C, highlighting its LCD touchscreen, select dial, menu/power button, test/shutter button, indicator light, 2.5mm sync port, USB-C port, focus assist beam, and hot shoe.
- LCD Touch Screen: Main interface for settings and adjustments.
- Select Dial: Used for navigating menus and adjusting values.
- Menu/Power Button: Accesses the main menu and powers the device on/off.
- Test/Shutter Button: Triggers flashes or camera shutter.
- Indicator: Green for camera focus, Red for flash trigger/camera shutter.
- Detaching Button: Releases the trigger from the hot shoe.
- 2.5mm Sync Port: For wired connections.
- USB-C Port: For charging and firmware updates.
- Focus Assist Beam: Aids camera autofocus in low light.
- Hot Shoe: Mounts the trigger onto your camera.
4. Setup
4.1 Installing the Flash Trigger
- Hold the hot-shoe lock button on the X3 Pro C.
- Slide the trigger into your camera's hot shoe until it locks securely.
4.2 Powering On/Off
Press and hold the Menu/Power button until the GODOX logo appears on the screen to power on. Repeat to power off.
4.3 Charging the Battery
The X3 Pro C features a built-in lithium battery. Connect the included USB-C cable to the USB-C port on the trigger and to a suitable USB power source for charging. A full charge takes approximately 2 hours.

Image: The GODOX X3 Pro C connected via USB-C cable for charging, displaying battery percentage on screen.
5. Operating Instructions
5.1 Basic Navigation and Adjustments
The X3 Pro C features an intuitive touchscreen for easy navigation. Tap on screen elements to select, and use the select dial or swipe gestures to adjust values.
5.2 2.4GHz Wireless X System Control
The trigger utilizes the GODOX 2.4GHz Wireless X System to communicate with compatible flashes. Ensure your flashes are set to the same channel and ID as the X3 Pro C for proper operation. Use the 'Wireless' option in the menu to configure channels and IDs.

Image: The GODOX X3 Pro C on a camera wirelessly triggering an off-camera GODOX V100 flash, demonstrating the 2.4GHz Wireless X System.
5.3 Bluetooth & APP Control
For enhanced control, connect your X3 Pro C to the Godox Flash App via Bluetooth. This allows you to adjust power, group settings, and trigger flashes directly from your smartphone or tablet. The default password for initial connection is 000000.
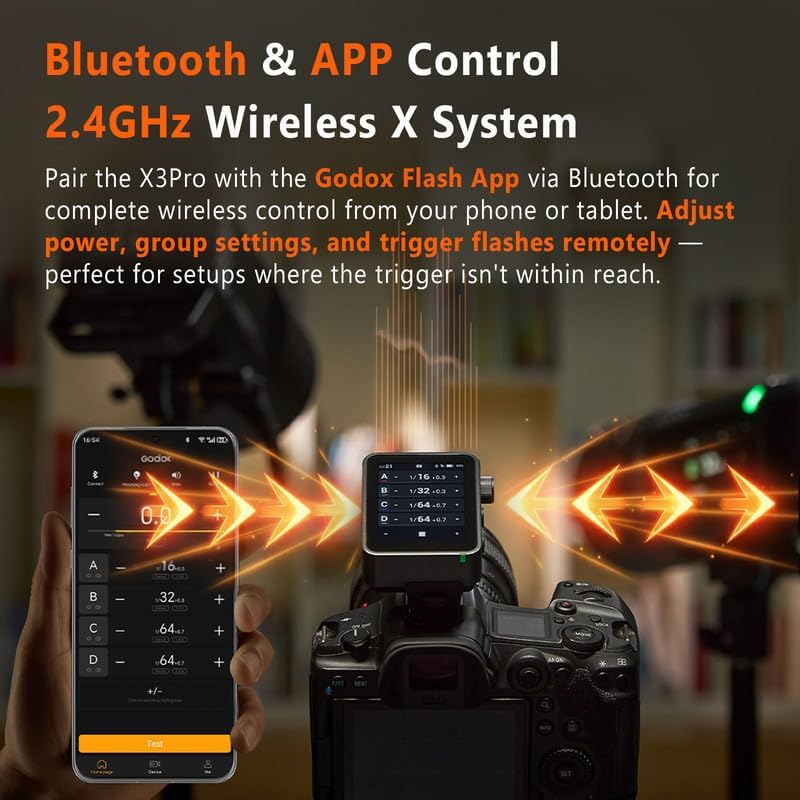
Image: A smartphone displaying the Godox Flash App interface, connected via Bluetooth to the X3 Pro C trigger mounted on a camera, showing remote control capabilities.
5.4 Multi-Group and Individual Group Adjustment
The touchscreen displays up to four lighting groups simultaneously. You can apply unified parameters across multiple units or adjust individual groups for fine-tuned refinement. Effortlessly manage TCM, Zoom Value, and Modeling Lamp for each group.

Image: A photographer using the GODOX X3 Pro C to adjust multiple off-camera flashes in an outdoor setting, demonstrating group control.
5.5 Creative Shutter Control
Access the 'Shutter Control' function from the menu to program advanced shooting sequences. This includes single-shot, time-lapse, and long-exposure sequences, minimizing camera shake. A PC Sync Port is also available for triggering via external receivers.

Image: The GODOX X3 Pro C screen showing settings for delay, long exposure, and interval for creative shutter control, with a cityscape background.
5.6 Specialized Shooting Modes
The X3 Pro C offers three specialized modes for various scenarios:
- One-Shoot: Triggers a single flash signal for simple setups.
- All-Shoot: Applies settings and trigger signals to groups or multiple photographers.
- L-858 Mode: Seamlessly syncs with Sekonic L-858 light meters for precise flash control.

Image: The GODOX X3 Pro C displaying its three specialized modes: One-Shoot, All-Shoot, and L-858 Mode, with examples of different shooting scenarios.
5.7 HSS Delay and AF Assist Lamp
Utilize the HSS Delay function for precise high-speed sync shots. The built-in AF Assist Lamp automatically activates in challenging low-light conditions to ensure your camera achieves accurate focus.
5.8 Using the Godox Flash App (Video Demonstration)
Video: A demonstration by TechHighWay on how to use the Godox X3 Pro trigger, including app control and various settings.
5.9 Overview of X3 Pro Features (Video Demonstration)
Video: A brief overview of the Godox X3 Pro trigger's design and key functionalities by TechHighWay.
5.10 Detailed Feature Walkthrough (Video Demonstration)
Video: A comprehensive walkthrough of the GODOX X3 Pro Flash Trigger's features and user interface by LetWell.
6. Specifications
| Feature | Detail |
|---|---|
| Model Number | X3Pro for Canon |
| Brand | GODOX |
| Compatible Mountings | Canon E-TTL, Canon E-TTL II |
| Flash Sync Speed | 1/250 or 1/200 |
| Item Weight | 7 ounces |
| Package Dimensions | 4.13 x 4.02 x 2.32 inches |
| Batteries | 1 D batteries required (internal rechargeable) |
7. What's in the Box
- GODOX X3 PRO TRIGGER
- WHITE CLOTH
- USB Cable
- BAG
8. Troubleshooting
If you encounter issues with your GODOX X3 Pro C, consider the following:
- No Flash Triggering: Ensure the trigger and flash units are on the same channel and ID. Check battery levels on both devices.
- Connectivity Issues: Verify Bluetooth is enabled on your smartphone and the X3 Pro C. Re-pair the device if necessary.
- Screen Unresponsive: Ensure the screen is not locked. Press and hold the lock icon for 2 seconds to unlock.
- Firmware Update: Check the GODOX official website for the latest firmware and update via the USB-C port if issues persist.
9. Maintenance
To ensure the longevity and optimal performance of your GODOX X3 Pro C:
- Keep the device clean using a soft, dry cloth.
- Avoid exposing the device to extreme temperatures, humidity, or direct sunlight.
- Store the device in its protective bag when not in use.
- Regularly check for and install firmware updates.
10. Warranty and Support
For warranty information and technical support, please refer to the official GODOX website or contact your local GODOX distributor. Keep your purchase receipt as proof of purchase for warranty claims.


