
Senna S Stages 360
Generic Senna S Stages 360 Car Seat User Manual
Model: Senna S Stages 360
Important Safety Information
Please read this entire manual carefully before installing and using the Senna S Stages 360 Car Seat. Failure to follow these instructions could result in serious injury or death to your child.
- Always secure your child in the car seat, even for short journeys.
- Never leave your child unattended in the car seat.
- Ensure the car seat is correctly installed according to the instructions for your vehicle and the child's weight/age group.
- Do not use the car seat if it has been involved in an accident, even if there is no visible damage.
- Do not modify the car seat or use accessories not approved by the manufacturer.
- Keep this manual in a safe place for future reference.
Product Overview
The Senna S Stages 360 Car Seat is designed to provide safety and comfort for children from birth up to approximately 12 years old (0-36 kg). It features a 360-degree rotation function, multiple recline positions, and IsoFix installation for secure fitting.

Figure 1: Front View of Car Seat with Infant Insert. This image shows the car seat from the front, highlighting the padded infant insert, the 5-point harness system, and the "360 rotation" indicator on the base. The headrest is in a lower position, suitable for newborns.
Key Features:
- 360-Degree Rotation: Allows easy access for placing and removing your child.
- IsoFix Installation: Provides a secure and stable connection to your vehicle's IsoFix anchor points.
- Multi-Stage Use: Suitable for Group 0+ (0-13 kg, rear-facing), Group I (9-18 kg, rear or forward-facing), and Group II/III (15-36 kg, forward-facing).
- Adjustable Recline: Multiple recline positions for optimal comfort and safety.
- Height-Adjustable Headrest and Harness: Grows with your child.
Setup and Installation
1. IsoFix Installation (All Groups)
- Place the car seat on the vehicle seat.
- Locate the IsoFix anchor points in your vehicle.
- Extend the IsoFix connectors from the car seat base by pressing the release buttons (usually red or grey) and pulling them out.
- Align the IsoFix connectors with the vehicle's anchor points and push firmly until you hear a "click" and the indicators turn green.
- Push the car seat firmly against the vehicle seat back to ensure a tight fit.
- Extend the support leg to the vehicle floor until it is firmly in place. Ensure the indicator on the support leg shows it is correctly positioned (usually green).
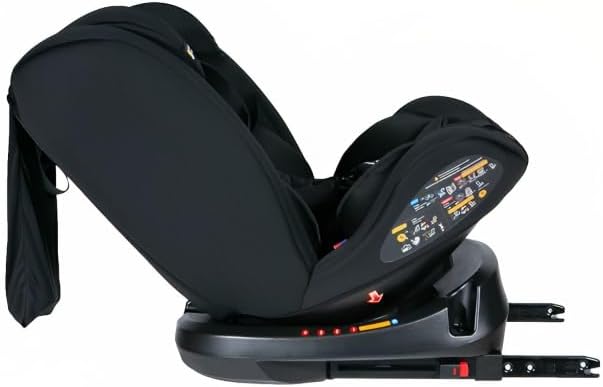
Figure 2: IsoFix Connectors and Support Leg. This image displays the car seat from the side, showing the extended IsoFix connectors ready for attachment to the vehicle's anchor points. The adjustable support leg is also visible, extended downwards to provide stability.
2. Rear-Facing Installation (Group 0+ / I: 0-18 kg)
For infants and toddlers up to 18 kg, the car seat must be installed in a rear-facing position.
- Ensure the car seat is rotated to the rear-facing position.
- Adjust the recline to the most reclined position suitable for newborns (refer to recline indicator).
- Place the infant insert (if applicable) for proper head and body support.
- Secure the child using the 5-point harness system.
3. Forward-Facing Installation (Group I / II / III: 9-36 kg)
For children from 9 kg up to 36 kg, the car seat can be installed in a forward-facing position.
- Ensure the car seat is rotated to the forward-facing position.
- Adjust the recline to an appropriate position for the child's age and comfort.
- For Group I (9-18 kg), use the integrated 5-point harness.
- For Group II/III (15-36 kg), remove the 5-point harness and use the vehicle's 3-point seat belt to secure the child and the car seat. Ensure the vehicle belt passes through the designated belt guides.

Figure 3: Car Seat without Infant Insert, Headrest Raised. This image shows the car seat configured for an older child, with the infant insert removed and the headrest adjusted to a higher position. This demonstrates its adaptability for various age groups.
4. Adjusting Headrest and Harness
The headrest and harness height can be adjusted simultaneously. Locate the adjustment lever (usually at the top of the headrest or behind the backrest). Squeeze the lever and slide the headrest up or down until the shoulder straps are at or just below the child's shoulders for rear-facing, or at or just above the child's shoulders for forward-facing.
Operating Instructions
1. Using the 360-Degree Rotation
To rotate the car seat, ensure the seat is not reclined to its maximum position (some recline positions may restrict rotation). Locate the rotation release lever (usually at the front of the base). Pull the lever and rotate the seat to the desired position (rear-facing, forward-facing, or side-facing for loading/unloading). Release the lever and ensure the seat locks securely into place.
2. Securing Your Child
- Place your child in the car seat.
- Bring the shoulder straps over your child's shoulders and connect the two buckle tongues into the central buckle until you hear a "click".
- Pull the harness adjustment strap (located at the front of the seat) to tighten the harness until it is snug against your child's body. You should not be able to pinch any slack in the harness straps at the shoulder.
- Position the chest clip at armpit level.
3. Adjusting Recline Positions
The car seat offers multiple recline positions. Locate the recline adjustment handle (usually at the front or side of the base). Pull the handle and adjust the seat to the desired recline angle. Release the handle and ensure the seat locks into the chosen position. Always check that the recline angle is appropriate for your child's age and the direction of travel (rear-facing or forward-facing).

Figure 4: Car Seat in Upright Recline Position. This side view illustrates the car seat in one of its more upright recline settings, suitable for older children in forward-facing mode. The base and recline mechanism are visible.
Maintenance
1. Cleaning Instructions
- Fabric Covers: The fabric covers are removable. Refer to the care label on the fabric for specific washing instructions. Typically, they can be hand-washed in cold water with mild soap and air-dried. Do not machine wash, bleach, iron, or tumble dry.
- Plastic Parts: Wipe plastic parts with a damp cloth and mild soap. Do not use abrasive cleaners or solvents.
- Harness Straps: Wipe harness straps with a damp cloth. Do not immerse in water or use harsh cleaners, as this may weaken the webbing.
2. Inspection
Regularly inspect the car seat for any signs of wear, damage, or loose parts. Check the harness, buckles, IsoFix connectors, and support leg for proper function. If any part is damaged, discontinue use and contact customer support.
Troubleshooting
| Problem | Possible Cause | Solution |
|---|---|---|
| Car seat does not rotate. | Rotation lock engaged; seat reclined too far. | Ensure rotation release lever is fully pulled. Adjust recline to a less reclined position. |
| Harness is difficult to tighten/loosen. | Harness straps twisted; child's clothing interfering. | Untwist straps. Ensure no clothing is caught in the buckle mechanism. |
| IsoFix indicators not showing green. | Connectors not fully engaged. | Push connectors firmly into vehicle anchor points until a "click" is heard and indicators turn green. |
| Car seat feels loose after installation. | IsoFix not fully tightened; support leg not properly extended. | Push car seat firmly against vehicle seat. Ensure support leg is firmly on the floor with green indicator. |
Specifications
| Feature | Detail |
|---|---|
| Model Name | Senna S Stages 360 |
| Weight Group | Group 0+/I/II/III (0-36 kg) |
| Age Range | Birth to approximately 12 years |
| Installation Type | ISOFIX with Support Leg |
| Orientation | Rear-facing (0-18 kg), Forward-facing (9-36 kg) |
| Rotation | 360-degree |
| Recline Positions | Multiple (4-position recline mentioned in product description) |
| Harness Type | 5-point inner adjusting harness |
| Material | Plastic, Polystyrene (as per product specifications) |
| Product Dimensions (D x W x H) | 46.5D x 46.5W x 76.5H centimetres |
Warranty and Support
This product comes with a manufacturer's warranty against defects in materials and workmanship. Please refer to the warranty card included with your purchase or visit the manufacturer's official website for detailed warranty terms and conditions.
For technical support, spare parts, or warranty claims, please contact your retailer or the manufacturer directly. Keep your proof of purchase for warranty service.
Manufacturer: Chelino (as per product specifications)
Website: [Manufacturer Website] (Please refer to packaging for specific URL)
Ask a question about this manual
Ask about setup, troubleshooting, compatibility, parts, safety, or missing instructions. Manuals+ will review the question and use this page’s manual context to help answer it.