1. Introduction
The Portta VHS to Digital Converter (Model CHR202P-U3) is designed to convert analog video and audio signals into digital formats. This device allows you to preserve content from various analog sources such as VHS tapes, VCRs, DVRs, DVDs, Hi8 camcorders, Mini DV tapes, and retro gaming consoles by converting them into MP4 video or MP3 audio files. It features a 5-inch HD screen for real-time preview and playback, and supports direct storage to a USB drive or TF card.

Image 1.1: The Portta VHS to Digital Converter unit, showing the 5-inch display, control buttons, remote control, and included USB flash drive.
2. Package Contents
Verify that all items listed below are included in your package:
- Video Recorder (Portta CHR202P-U3) x1
- USB 3.0 Flash Drive (128GB) x1
- Power Adapter x1
- USB Type-A to Type-C Cable x1
- Remote Control x1 (2*AAA Batteries Not Included)
- AV Cable (RCA) x1
- YPbPr Cable (Component) x1
- 3.5mm Audio Cable x1
- User Manual x1

Image 2.1: All components included in the Portta VHS to Digital Converter package, laid out for inspection.
3. Product Overview
Familiarize yourself with the various ports and controls on the Portta VHS to Digital Converter.

Image 3.1: Detailed diagram illustrating the front, side, and top panel components and their functions, including input/output ports, control buttons, and the 5-inch screen.
3.1 Front Panel
- 5-inch HD Screen: Displays video preview, recorded content, and menu options.
- Volume +/- Buttons: Adjusts the audio output volume.
- Menu/Home Button: Accesses the main menu or returns to the home screen.
- Backward Button: Navigates back in menus or during playback.
- Power ON/OFF Button: Turns the device on or off.
- REC/STOP Button: Initiates or stops recording.
- Snapshot Button: Captures a still image from the video.
- Input Selection Button: Cycles through available input sources (AV, YPbPr, AUX).
- Navigation (OK) Buttons: Used for menu navigation and selection.
3.2 Side and Top Panels
- To PC Port: USB-C port for connecting to a computer for data transfer or use as a capture device.
- 12V/1A Power Port: Connects to the included power adapter.
- HDTV Output: HDMI output for connecting to an external display.
- AV/CVBS Input: RCA composite video (yellow) and stereo audio (red/white) input.
- YPbPr Input: Component video (red, green, blue) and stereo audio (red/white) input.
- AUX 3.5mm Input & Output: 3.5mm jack for auxiliary audio input or output.
- USB Slot: For connecting USB flash drives or external hard drives.
- TF Card Slot: For inserting TF (MicroSD) cards.
- Built-in Speaker: For audio playback.
- IR Receiver: For remote control operation.
4. Setup Guide
Follow these steps to set up your Portta VHS to Digital Converter for first use. This example uses an AV input and a USB flash drive.
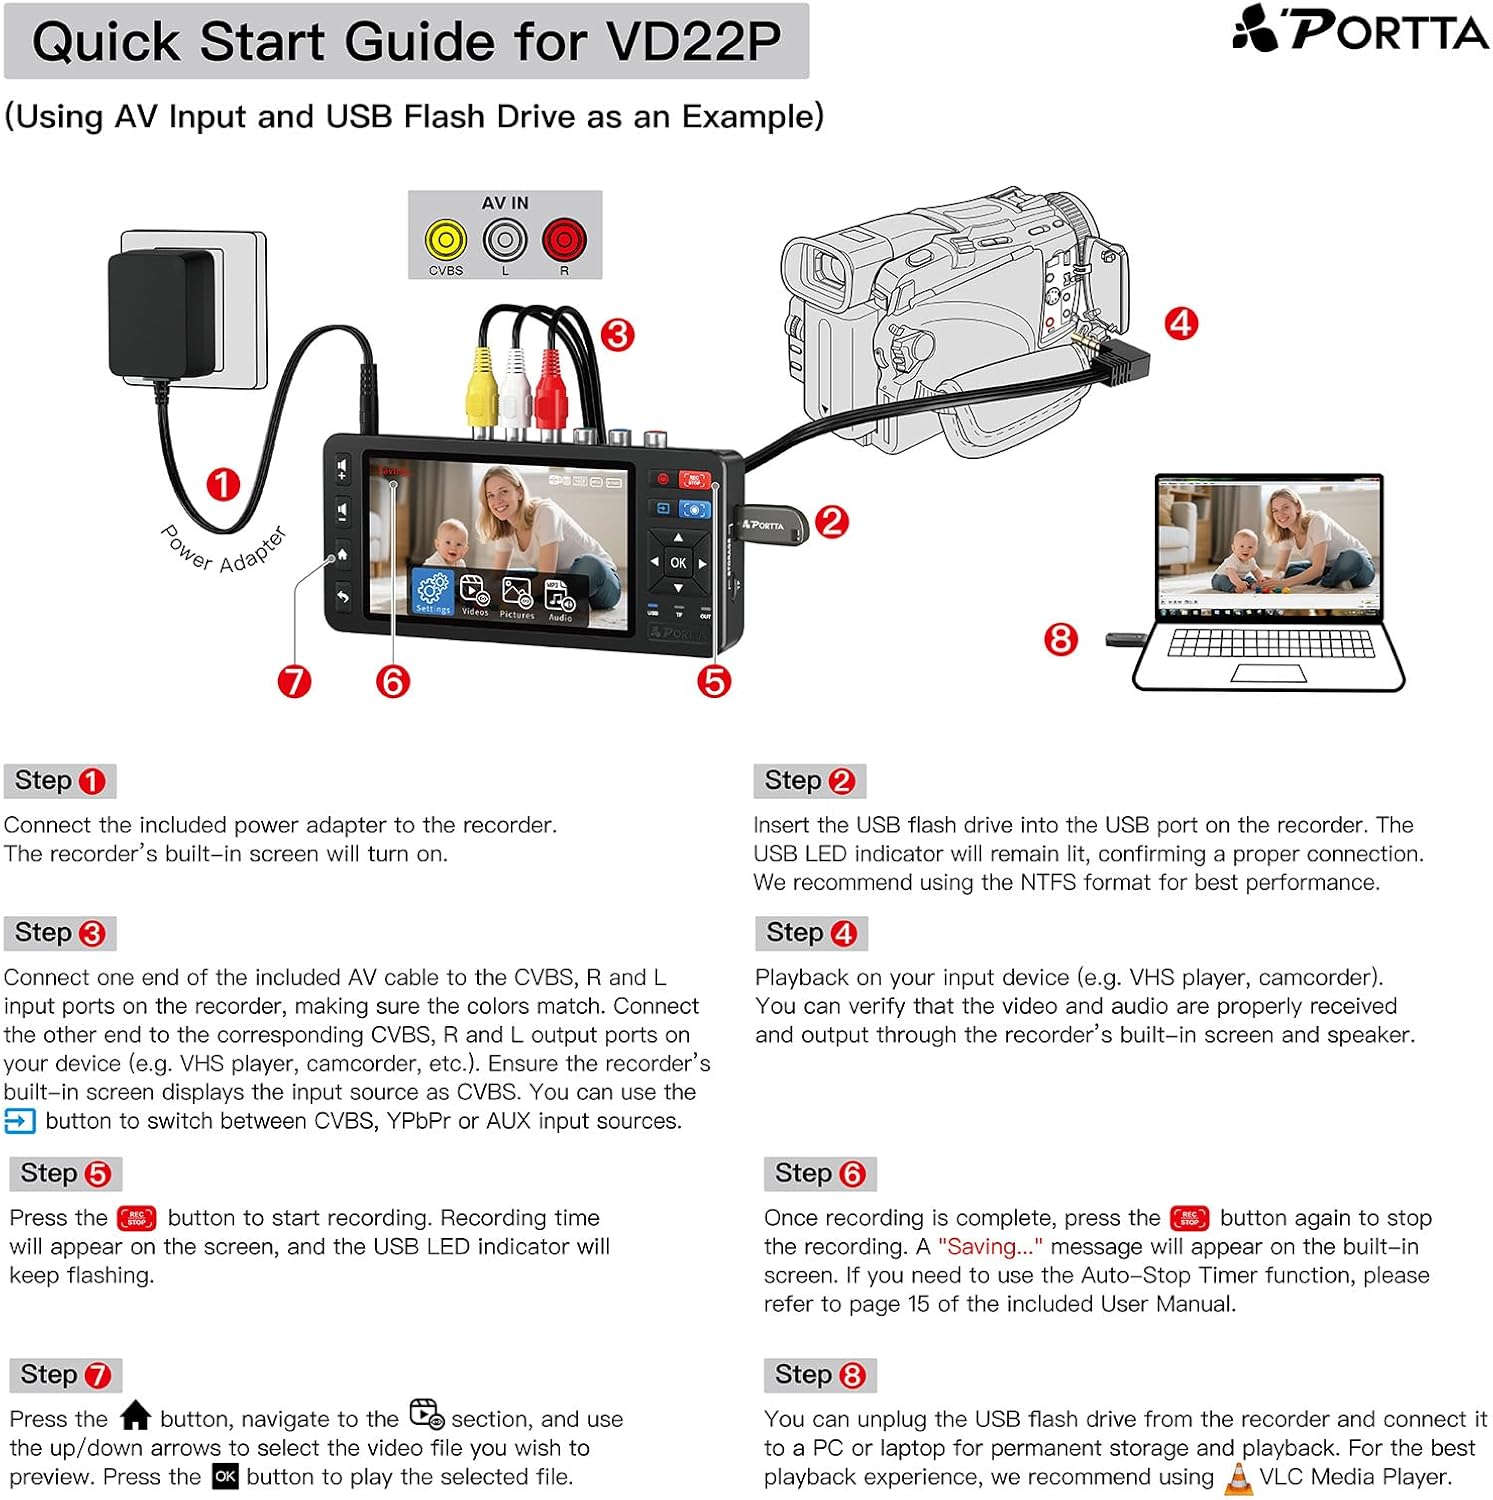
Image 4.1: Visual quick start guide demonstrating the connection process for an AV source (camcorder) to the converter and then to a USB flash drive and computer.
- Connect Power: Connect the included power adapter to the converter's 12V/1A Power Port and then to a power outlet. The device's built-in screen will turn on.
- Insert Storage: Insert the USB flash drive into the USB port on the converter. The USB LED indicator will light up, confirming a proper connection. For optimal performance, format the USB drive to NTFS.
- Connect Source Device: Connect one end of the appropriate AV cable (CVBS+R/L, YPbPr+R/L, or 3.5mm AUX) to the corresponding input ports on the converter, ensuring color matching. Connect the other end to the output ports of your source device (e.g., VHS player, camcorder). Ensure the converter's built-in screen displays the input source. Use the Input Selection button to switch between CVBS, YPbPr, or AUX inputs as needed.
- Verify Input: Playback content on your input device (e.g., VHS player, camcorder). Verify that the video and audio are properly received and output through the converter's built-in screen and speaker.
5. Operating Instructions
5.1 Recording Video/Audio
The converter supports recording video in MP4 format and audio in MP3 format from various analog sources.
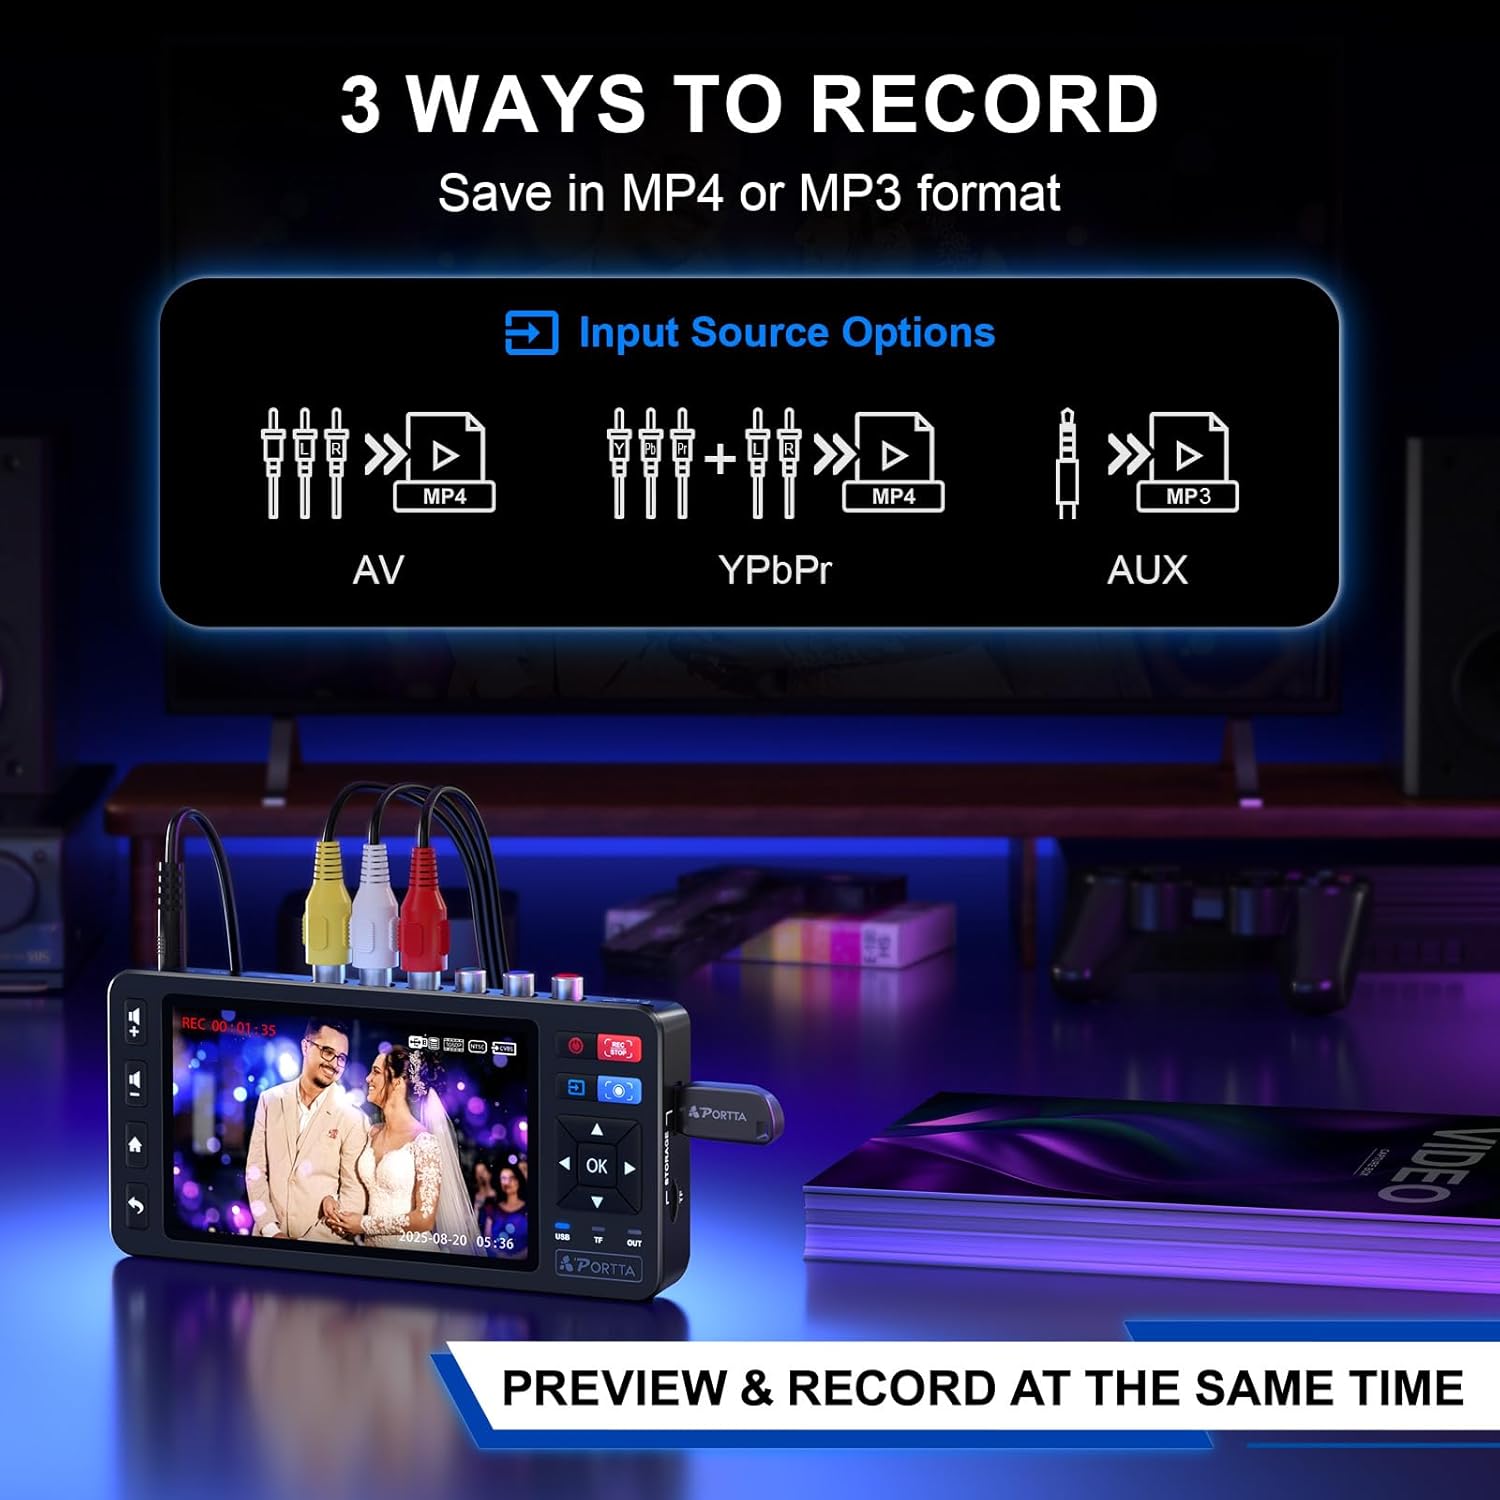
Image 5.1: Illustration of the three primary input options (AV, YPbPr, AUX) for recording video (MP4) or audio (MP3) files.
- Start Recording: Once the input source is displayed on the screen, press the REC/STOP button to begin recording. A recording indicator will appear on the built-in screen, and the USB LED indicator will flash.
- Stop Recording: To stop recording, press the REC/STOP button again. A "Saving..." message will appear on the screen.
- Snapshot: During recording or preview, press the Snapshot button to capture a still image.

Image 5.2: The Portta converter actively recording a video at 1080p@60Hz, with the content simultaneously displayed on a connected television.
5.2 Playback Recorded Files
You can play back recorded video and audio files directly on the converter's screen.
- Access Files: Press the Menu/Home button, then navigate to the "Storage" or "Files" section using the navigation buttons.
- Select File: Use the up/down arrows to select the desired video or audio file. Press OK to play the selected file.
5.3 System Settings
Access the system settings to configure various options.
- Video-IN-Volume and AUX-IN-Volume: Ensure these are unmuted for the selected input source in the settings (HOME -> Settings).
- Image Settings: Adjust brightness, contrast, and saturation to improve video quality, especially for older tapes.
- Aspect Ratio: Choose between 4:3 (classic) or 16:9 (modern) aspect ratios for video output.
- Auto-Stop Timer: Configure an automatic stop timer for recordings if needed. Refer to the full user manual for detailed instructions.

Image 5.3: Screenshot of the image settings menu, showing options for adjusting brightness, contrast, and saturation levels.

Image 5.4: Visual comparison demonstrating the difference between 4:3 and 16:9 aspect ratios for video display.
6. Storage Options
The Portta converter offers flexible storage solutions for your digitized content.
- USB Flash Drive: The device includes a 128GB USB 3.0 flash drive. You can use any compatible USB drive.
- TF Card: A TF (MicroSD) card slot is available for additional storage (TF card not included).
- External Hard Drives: Supports USB hard drives and SSDs. Drives over 5TB may require an external power source.
When both a USB drive and TF card are connected, the USB storage takes priority.

Image 6.1: Display of compatible storage devices including USB flash drives, TF cards, USB hard drives, and portable SSDs.
7. Compatibility
The Portta VHS to Digital Converter is compatible with a wide range of analog video and audio sources.
7.1 Input Sources
- VHS Players
- VCR Players
- DVR Players
- DVD Players
- Hi8 Camcorders
- Mini DV Camcorders
- Cassette Tape Players
- Retro Gaming Consoles (e.g., PS3, Wii, N64)
- Portable Players with analog output
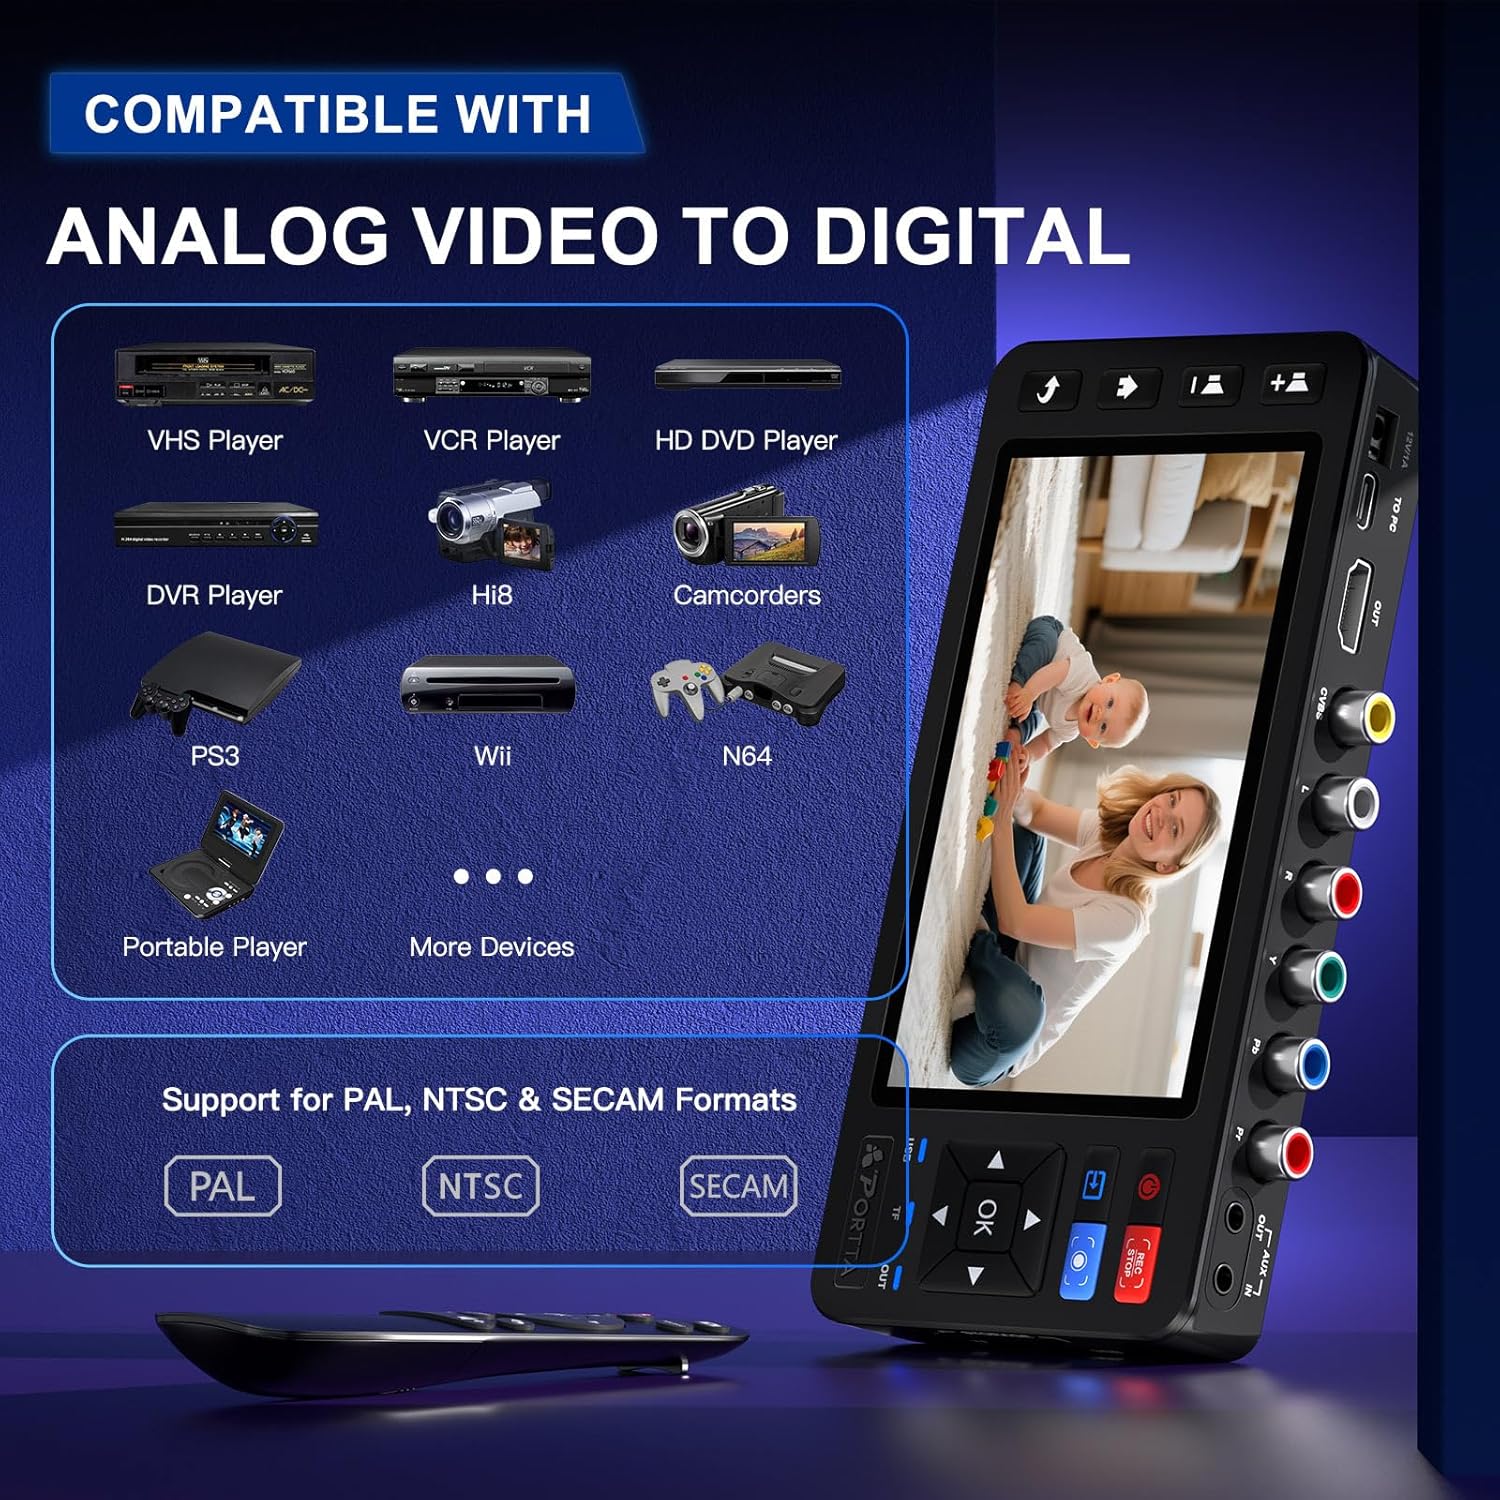
Image 7.1: Visual representation of various analog devices, such as VHS players, VCRs, camcorders, and gaming consoles, that are compatible with the converter.
7.2 Video and Audio Formats
- Video Output: MP4 format, up to 1080P 60Hz recording resolution.
- Audio Output: MP3 format, up to 48KHz sampling rate with uncompressed 2-channel LPCM digital audio.
- Supported TV Formats: NTSC-M/J 3.58, NTSC 4.43, PAL B/G/H/I/D (PAL/N), SECAM. The device automatically detects the input source format.

Image 7.2: Illustrates the difference between PAL/SECAM (50Hz) and NTSC (60Hz) video formats, highlighting the converter's multi-format compatibility.
7.3 PC Connection (Capture Box Mode)
The device can function as a capture box when connected to a PC via the "To PC Port" (USB-C). It is optimized for OBS Studio (Windows only) and supports UVC/UAC standards.

Image 7.3: The Portta converter connected to a laptop, demonstrating its use as a capture device with OBS Studio for live streaming or advanced recording.
8. Troubleshooting
If you encounter issues, refer to the following common problems and solutions:
| Problem | Possible Cause | Solution |
|---|---|---|
| No video/audio on screen | Incorrect input selection; loose cable connections; muted audio input. | Press the Input Selection button to cycle through inputs. Check all cable connections. In settings (HOME -> Settings), ensure Video-IN-Volume and AUX-IN-Volume are unmuted. |
| Recording fails or stops unexpectedly | Insufficient storage space; incompatible USB drive format; power interruption. | Ensure your USB drive or TF card has enough free space. Format the storage device to NTFS. Ensure a stable power supply. |
| Poor video quality (blurry, distorted) | Poor quality source material; incorrect image settings. | Adjust Brightness, Contrast, and Saturation in the Image Settings menu. Ensure the source device is playing back content clearly. |
| Remote control not working | Batteries not installed or depleted; obstruction to IR receiver. | Install 2*AAA batteries (not included). Replace old batteries. Ensure no objects are blocking the line of sight between the remote and the device's IR receiver. |
9. Specifications
| Feature | Detail |
|---|---|
| Model Number | CHR202P-U3 |
| Product Dimensions | 6.85 x 3.23 x 0.91 inches |
| Item Weight | 7.9 ounces |
| Display | 5-inch HD LCD Screen |
| Video Input | AV/RCA (CVBS+R/L), Component (YPbPr+R/L) |
| Audio Input | AUX-IN (3.5mm), RCA (R/L) |
| Video Output Format | MP4 |
| Audio Output Format | MP3 |
| Recording Resolution | Up to 1080P 60Hz |
| Supported TV Formats | NTSC-M/J 3.58, NTSC 4.43, PAL B/G/H/I/D (PAL/N), SECAM |
| Storage Media | USB Flash Drive (128GB included), TF Card, External USB HDD/SSD |
| PC Connection | USB-C (UVC/UAC compatible, optimized for OBS Studio on Windows) |
| Power Supply | 12V/1A DC Adapter |
| Color | Black |
10. Maintenance
Proper care and maintenance will ensure the longevity of your Portta VHS to Digital Converter.
- Cleaning: Use a soft, dry cloth to clean the device. Do not use liquid cleaners or abrasive materials.
- Storage: Store the device in a cool, dry place away from direct sunlight and extreme temperatures.
- Handling: Avoid dropping the device or subjecting it to strong impacts.
- Power: Always use the provided power adapter. Disconnect power when the device is not in use for extended periods.
11. Warranty and Support
The Portta VHS to Digital Converter comes with a hassle-free 2-year warranty and lifetime technical support.
- Warranty Period: 2 years from the date of purchase.
- Technical Support: Lifetime technical support is available for all product-related inquiries.
- Contact: For any questions or support needs, please reach out to Portta customer service. Refer to the contact information provided in your product packaging or on the official Portta website.


