1. Introduction
This manual provides detailed instructions for the installation, operation, and maintenance of your Aublinto 7-inch Android 13 Car Stereo. This unit is designed specifically for Chevrolet Colorado models from 2004 to 2012, offering advanced features such as Wireless/Wired Carplay, Android Auto, GPS Navigation, Bluetooth connectivity, FM/RDS Radio, backup camera support, and steering wheel control integration.
Please read this manual thoroughly before installation and use to ensure proper operation and to prevent damage to the unit or your vehicle.
2. Safety Information
- Professional Installation Recommended: Installation of this car stereo requires cutting wires and is not a plug-and-play process. Professional installation is highly recommended to avoid damage to the unit or vehicle's electrical system.
- Power Supply: Ensure the unit is connected to a 12V DC power supply with negative grounding. Incorrect voltage can cause damage.
- Wiring: Before connecting, ensure all wires are correctly identified and connected according to the wiring diagram. Incorrect wiring can lead to malfunctions or electrical hazards.
- Driving Safety: Do not operate the unit in a way that distracts you from driving. Always prioritize road safety.
- Temperature: Avoid exposing the unit to extreme temperatures or direct sunlight for prolonged periods.
- Moisture: Keep the unit away from water and excessive moisture to prevent electrical shock or damage.
3. Package Contents
Verify that all items listed below are included in your package:
- Aublinto 7-inch Android 13 Car Stereo Head Unit
- Power Cable
- GPS Antenna
- AHD Backup Camera
- RCA Input and Output Cables
- External Microphone
- 2 x USB Cables
- Instruction Manual
- Fixed Bracket

Figure 3.1: Included components of the Aublinto Car Stereo system.
4. Installation Guide
Important Note: This unit is NOT plug and play. Installation requires cutting and splicing wires. If you are not experienced with car audio installation, professional assistance is strongly recommended.

Figure 4.1: Important notice regarding installation requirements.
4.1 Pre-Installation Checks
- Disconnect the vehicle's negative battery terminal to prevent electrical shorts.
- Remove the factory radio from your Chevrolet Colorado (2004-2012).
- Confirm the center console dimensions match the new head unit.
4.2 Wiring Connections
Refer to the provided wiring diagram in the included instruction manual for specific connections. General connections include:
- Power Cable: Connect the main power harness to the vehicle's power supply, ensuring correct positive, negative, and accessory wire connections.
- GPS Antenna: Connect the GPS antenna and mount it in a location with a clear view of the sky (e.g., dashboard).
- Backup Camera: Connect the AHD backup camera. The camera typically requires power from the reverse light circuit and a video signal connection to the head unit's RCA input.
- USB Cables: Connect the two USB cables for external device connectivity.
- External Microphone: Connect the external microphone for improved call quality.
- RCA Input/Output: Use these for connecting external amplifiers, subwoofers, or other audio/video sources.
- Steering Wheel Control (SWC): Connect the SWC wires to your vehicle's steering wheel control interface (if applicable) to retain factory steering wheel button functionality.
4.3 Mounting the Head Unit
- Secure the head unit into the dashboard opening using the provided fixed brackets.
- Ensure all cables are neatly routed and not pinched.
- Reconnect the vehicle's negative battery terminal.
- Test the unit's functionality before fully reassembling the dashboard.
5. Operating Instructions
This section details the primary functions and how to operate your Aublinto Car Stereo.
5.1 Initial Power On and System Navigation
Upon first power-on, the system will boot to the Android home screen. Navigate using the touchscreen interface. Swipe, tap, and drag just like a tablet or smartphone.
Video 5.1: Demonstration of the car stereo's main interface, GPS navigation, Carplay/Android Auto, reversing image, FM/RDS radio, equalizer settings, Bluetooth, and mirroring functions.
5.2 Wireless/Wired Carplay & Android Auto
Connect your smartphone to the head unit for seamless integration of your phone's features. This unit supports both wireless and wired connections.
- Wireless Connection: Enable Bluetooth and Wi-Fi on your phone. Pair your phone with the car stereo via Bluetooth. Follow the on-screen prompts to initiate Wireless Carplay or Android Auto.
- Wired Connection: Connect your phone to one of the USB ports using a data cable. The system will automatically detect and launch Carplay or Android Auto.
Access phone contacts, emails, notifications, online maps, music, and other applications directly from the car stereo's display. Voice control is also supported.

Figure 5.2: Wireless/Wired Carplay and Android Auto interface.
Figure 5.3: Carplay, Android Auto, and Mirror Link options.
5.3 GPS Navigation & WiFi Connection
The unit supports both online and offline navigation. Connect to a Wi-Fi network to download offline maps or use online navigation services.
- WiFi Connection: Go to Settings > Network & Internet > Wi-Fi. Select your desired network and enter the password.
- Online Navigation: Use pre-installed apps like Google Maps or download others from the app store.
- Offline Navigation: Download map data for your region via Wi-Fi for navigation without an internet connection.

Figure 5.4: GPS Navigation and WiFi connectivity features.

Figure 5.5: GPS Navigation and WiFi Hotspot capabilities.
5.4 Bluetooth Functionality
Pair your phone via Bluetooth for hands-free calling and audio streaming.
- Pairing: Go to Bluetooth settings on the head unit and your phone. Search for available devices and select "CarBT" (or similar name). Enter the PIN if prompted (usually 0000).
- Hands-Free Calling: Make and receive calls directly from the stereo. The built-in microphone captures your voice.
- Audio Streaming: Play music from your phone through the car stereo speakers.
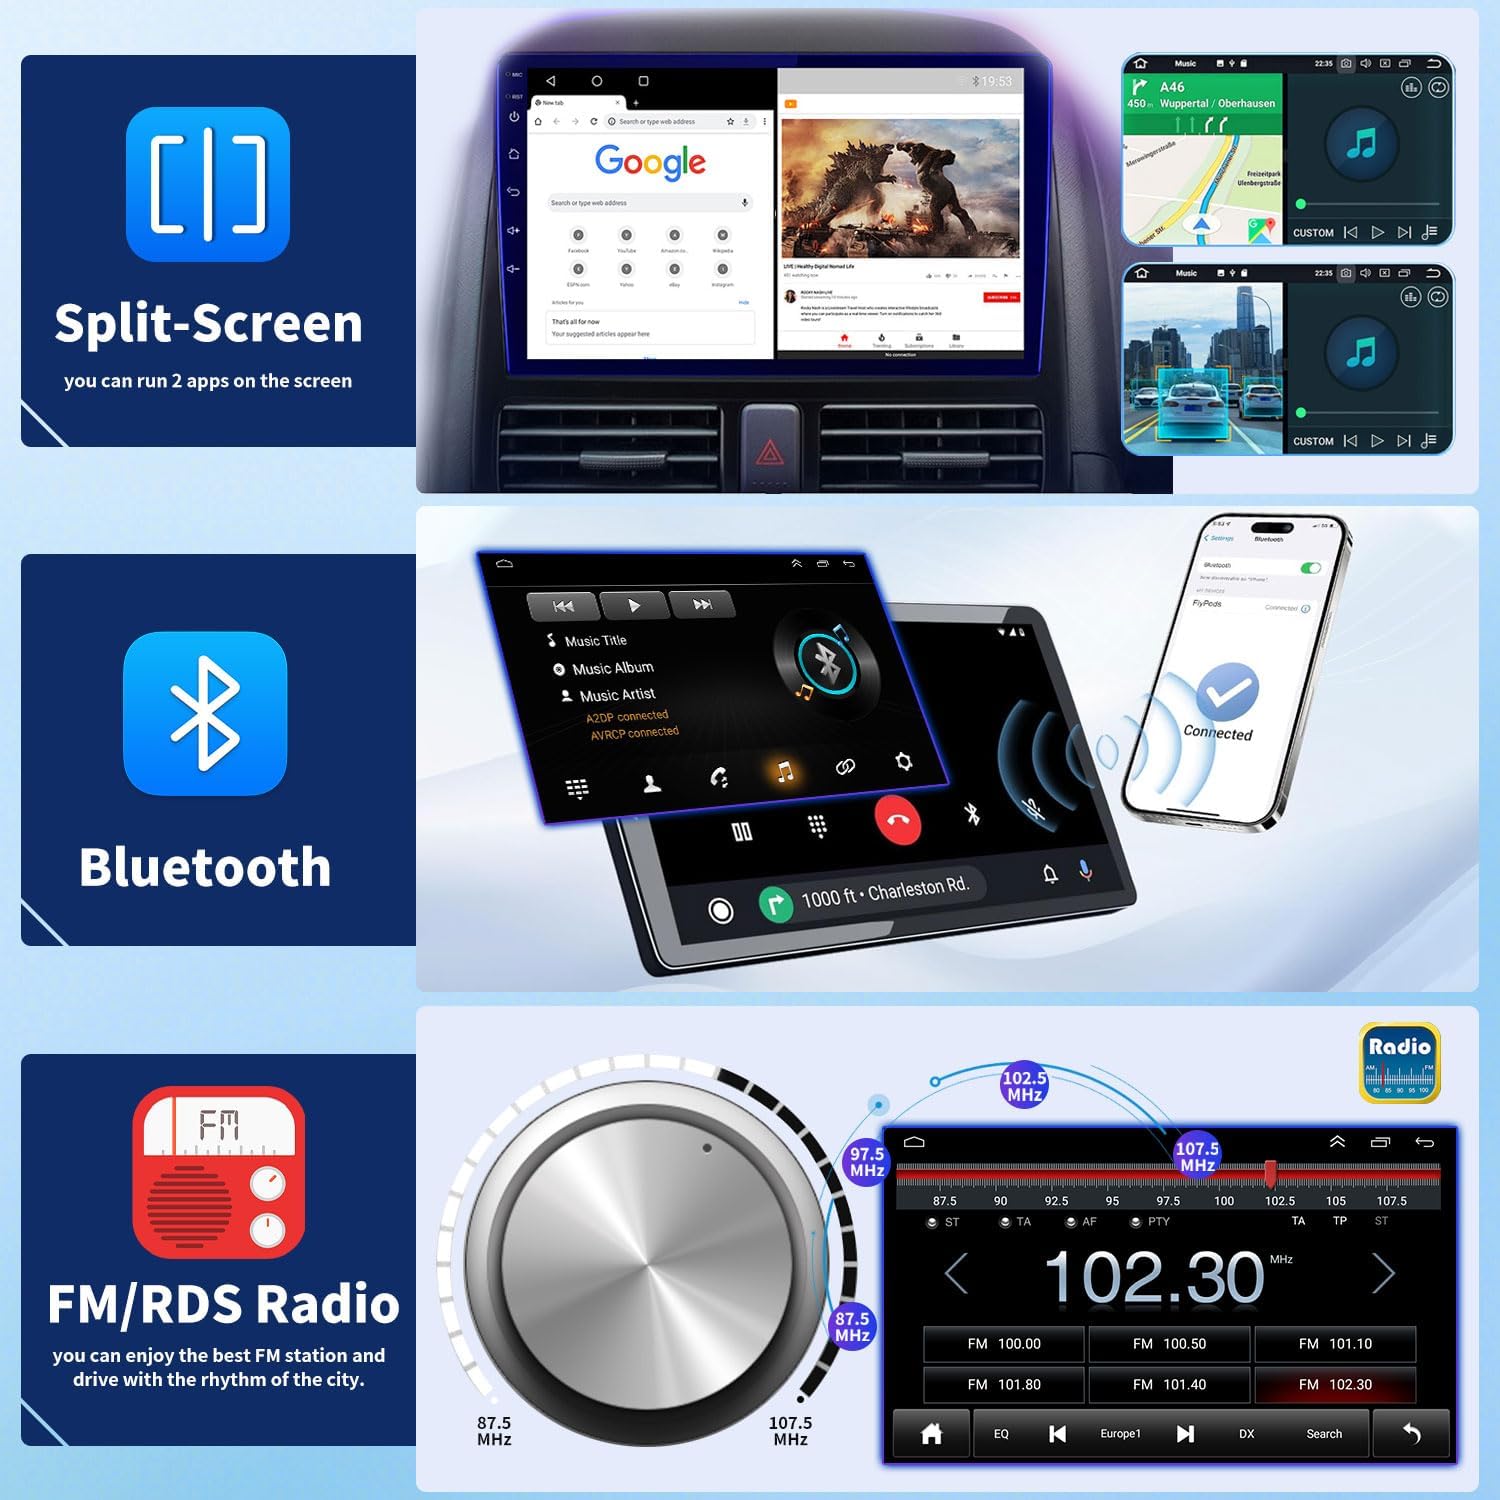
Figure 5.6: Bluetooth interface for calls and music.
5.5 FM/RDS Radio
Enjoy your favorite radio stations with the high-quality digital stereo FM tuner with RDS (Radio Data System).
- Station Search: Use the automatic or semi-automatic search function to find and save radio stations.
- RDS Features: RDS provides additional information like station name, program type, and traffic announcements (where available).
- Equalizer: Adjust audio settings using the stereo EQ for a personalized listening experience.

Figure 5.7: FM/RDS Radio interface with sound adjustments.
5.6 Backup Camera Support
The unit supports rear camera video input, automatically displaying the rear view when the vehicle is in reverse gear.
- Automatic Display: When shifting into reverse, the screen will automatically switch to the backup camera view.
- Parking Guidelines: Dynamic parking guidelines assist with safe parking maneuvers.
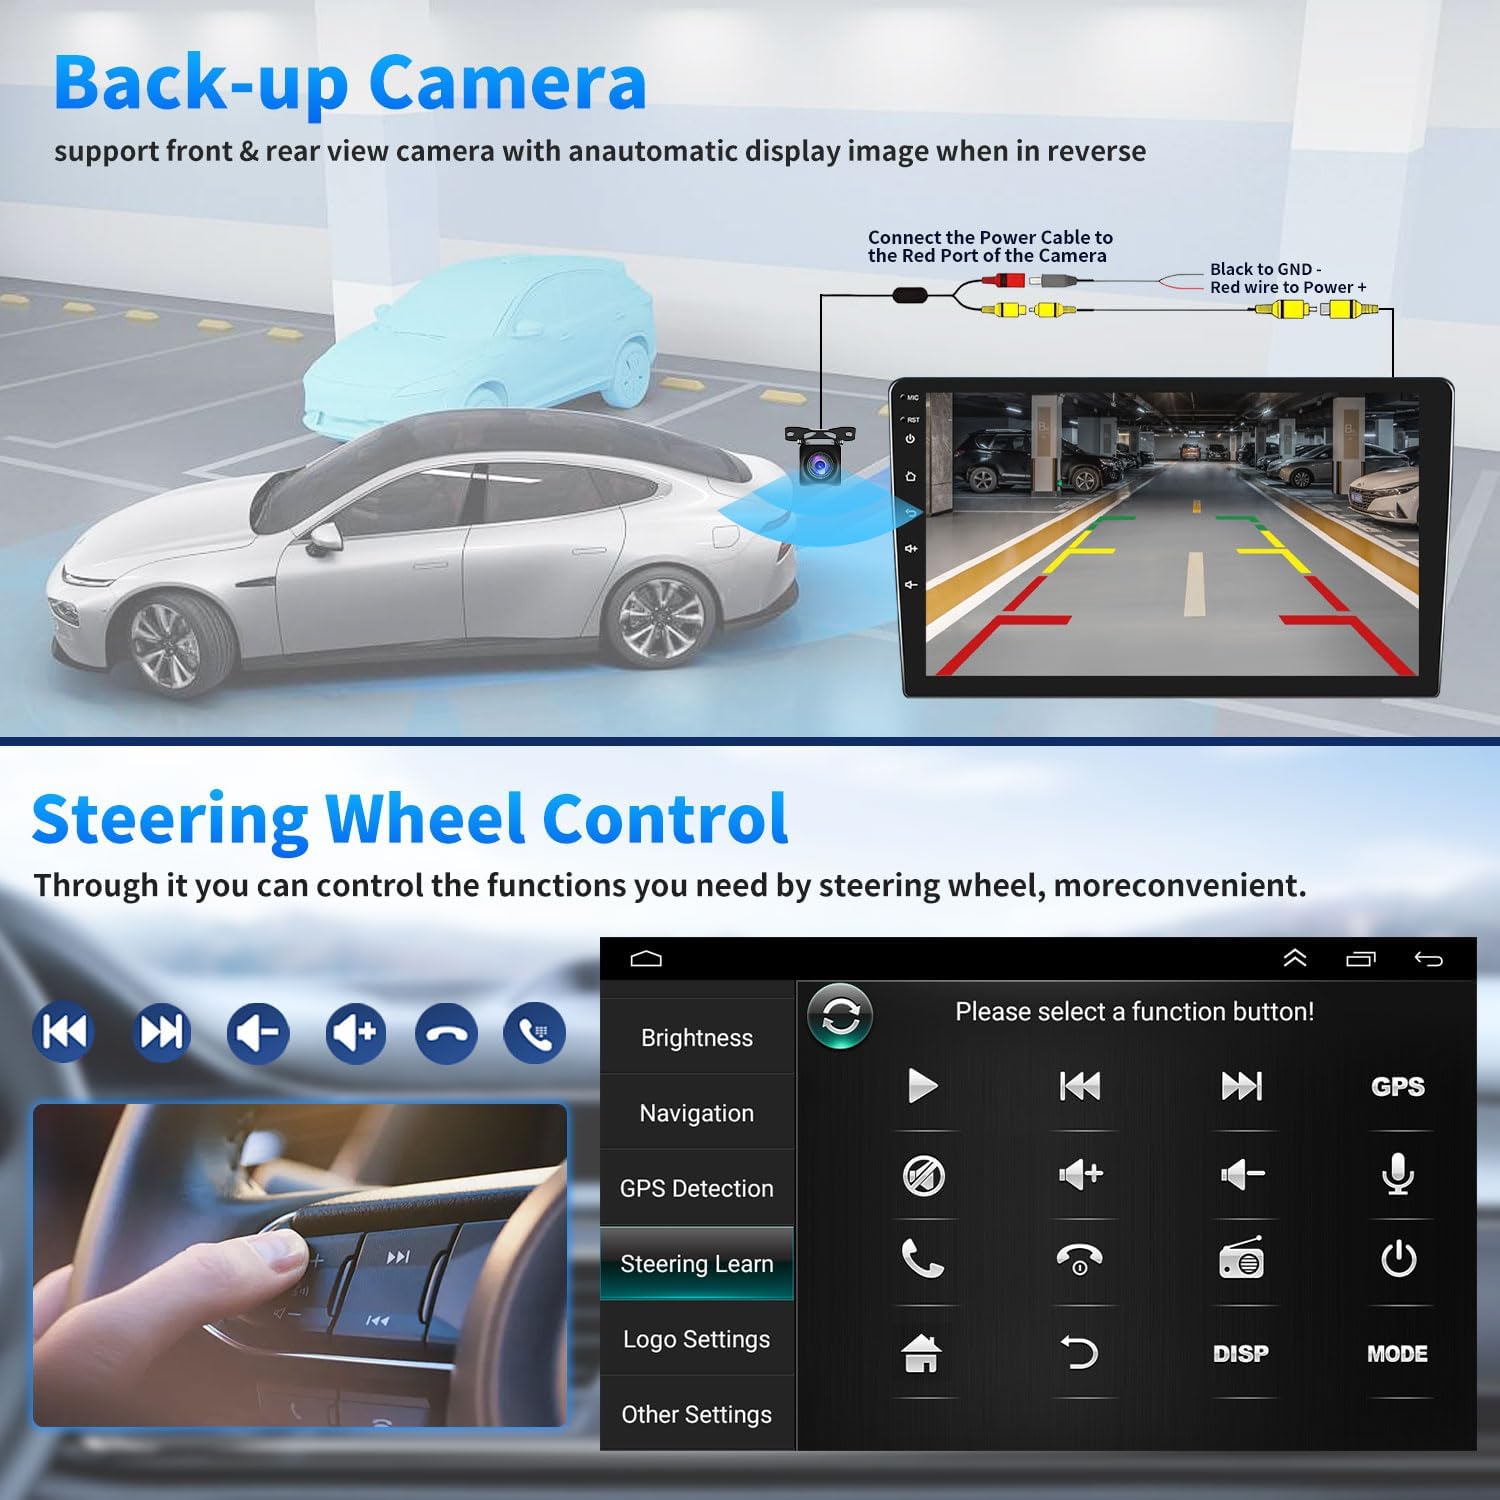
Figure 5.8: Backup camera display with parking assistance.

Figure 5.9: Rear View Camera, Steering Wheel Control, and Split Screen features.
5.7 Steering Wheel Control (SWC)
If properly wired during installation, you can control various functions of the car stereo using your vehicle's original steering wheel buttons.
- Learning Function: Access the "Steering Learn" menu in the unit's settings to program your steering wheel buttons. Follow the on-screen instructions to assign functions like volume up/down, track skip, mode change, and call answer/end.
Figure 5.10: Steering Wheel Control learning interface.
5.8 Split Screen Functionality
The split-screen feature allows you to run two applications simultaneously on the display.
- Activating Split Screen: While an app is open, long-press the recent apps button or drag an app to one side of the screen (depending on the Android version) to activate split-screen mode.
- Usage: For example, you can have navigation running on one side and music playback on the other.
Figure 5.11: Split-screen mode displaying two applications simultaneously.
5.9 HD IPS Touchscreen
The unit features an HD IPS touchscreen for clear visuals and responsive interaction.
- Features: Anti-glare, scratch-resistant, and full touch capabilities.

Figure 5.12: HD IPS Touchscreen features.
6. Maintenance
- Cleaning the Screen: Use a soft, lint-free cloth to gently wipe the touchscreen. Do not use abrasive cleaners or solvents.
- Software Updates: Periodically check for system software updates via Wi-Fi to ensure optimal performance and access to new features.
- Avoid Extreme Conditions: Protect the unit from extreme heat, cold, and direct prolonged sunlight.
7. Troubleshooting
| Problem | Possible Cause | Solution |
|---|---|---|
| Unit does not power on. | Incorrect power wiring; Blown fuse; Loose connection. | Check power cable connections. Verify vehicle fuse. Ensure battery is connected. |
| No sound. | Volume too low; Mute activated; Speaker wiring incorrect. | Increase volume. Check if mute is active. Verify speaker wire connections. |
| GPS signal weak or unavailable. | GPS antenna not properly installed or obstructed. | Ensure GPS antenna is mounted in a clear, unobstructed location. |
| Bluetooth connection issues. | Phone not in pairing mode; Incorrect pairing code; Interference. | Ensure phone's Bluetooth is on and discoverable. Re-pair the device. Move away from other wireless devices. |
| Backup camera not displaying. | Camera power or video cable disconnected; Reverse trigger wire not connected. | Check camera power and video connections. Ensure reverse trigger wire is correctly connected to the vehicle's reverse light circuit. |
| Steering Wheel Controls not working. | SWC wires incorrectly connected; SWC learning not performed. | Verify SWC wiring. Perform the "Steering Learn" procedure in the settings. |
8. Specifications
| Feature | Detail |
|---|---|
| Model Compatibility | Chevrolet Colorado 2004-2012 |
| Operating System | Android 13 |
| Display Size | 7 Inches |
| Display Type | HD IPS Touchscreen (Anti-glare, Scratch Resistant) |
| Memory Storage Capacity | 32 GB (Internal) |
| Connectivity Technology | Bluetooth, USB, Wi-Fi |
| Special Features | Wireless Carplay, Wired Android Auto, Mirror Link, GPS Navigation, FM/RDS Radio, EQ, Backup Camera Support, Steering Wheel Control |
| Item Weight | 3.52 pounds |
| Package Dimensions | 8.66 x 5.51 x 5.51 inches |
9. Warranty and Support
For warranty information and technical support, please refer to the contact details provided with your purchase or visit the official Aublinto website. Protection plans are available for purchase separately to extend coverage beyond the standard warranty period.
- 2-Year Protection Plan: Available for $15.99
- 3-Year Protection Plan: Available for $21.99
- Complete Protect: Monthly plan available for $16.99/month, covering eligible past and future purchases.
These protection plans are offered by third-party providers and are separate from any manufacturer's warranty.