
GODOX X3 Pro N
Contents
Godox X3 Pro N TTL Wireless Flash Trigger
Model: X3 Pro N | Brand: GODOX
Overview
The Godox X3 Pro N is an advanced TTL wireless flash trigger designed for Nikon cameras, offering precise control over your lighting setup. Featuring a responsive touchscreen interface, robust 2.4GHz wireless X system, and seamless Bluetooth integration for APP control, this compact transmitter enhances your photography workflow with efficiency and versatility.
Key Features
- Command Center at Your Fingertips: Touchscreen interface displays four lighting groups simultaneously for real-time monitoring, supporting control of up to 16 groups.
- Shape Light Group by Group: Empowers precise control over each lighting group, enabling independent adjustment of TCM, Zoom Value, and Modeling Lamp.
- Godox 2.4GHz Wireless X System: Delivers a wide transmission range, interference-resistant channel scanning, and supports 16 groups and 32 channels for rock-solid triggering.
- Bluetooth Integration & APP Control: Pair with the Godox Flash App via Bluetooth for complete wireless control from your phone or tablet.
- Creative Shutter Control: Program single-shot, time-lapse, and long-exposure sequences through an intuitive touchscreen interface.
- Pro Performance, Compact Design: Reduces weight and volume for effortless portability without sacrificing durability or full-function interfaces.
- Fast Charging, Long Runtime: Built-in lithium battery provides up to a month of standby time and a 2-hour full recharge via USB-C.
What's in the Box
- Flash Trigger x 1
- Storage Bag x 1
- USB-C Charging Cable x 1

Image: The Godox X3 Pro N flash trigger, a grey drawstring storage bag, and a black USB-C charging cable.
Setup
Installing the Flash Trigger
To install the Godox X3 Pro N, hold the hot-shoe lock button and slide the trigger onto your camera's hot shoe. Ensure it clicks securely into place.
Video: An unboxing and initial setup demonstration of the Godox X3 Pro TTL Flash Trigger, showing how to install it on a camera.

Image: The Godox X3 Pro N flash trigger securely mounted on the hot shoe of a Nikon camera.
Powering On
Press and hold the power button (M/O) on the side of the trigger until the Godox logo appears on the screen. The device will then boot up and display the main control interface.
Video: A demonstration on how to power on the Godox X3 Pro trigger and navigate its basic functions.
Operating Instructions
Touchscreen Interface
The X3 Pro N features a full-color touchscreen for intuitive navigation. Swipe left or right to access different menus and settings. Tap on groups or parameters to adjust them. The select dial can also be used for precise adjustments.
Video: A tutorial demonstrating the touchscreen operation and various settings of the Godox X3 Pro N.

Image: The touchscreen interface of the Godox X3 Pro N, showing flash power settings for multiple groups (A, B, C, D).
Multi-Group Adjustment
The touchscreen allows for simultaneous adjustment of multiple groups. Tap the '+' or '-' icons to increase or decrease output power values across selected groups. This feature is ideal for quickly setting up complex lighting scenarios.

Image: A hand interacting with the Godox X3 Pro N touchscreen to adjust flash power for multiple groups simultaneously.
Separate Group Control
For fine-tuned control, tap on an individual group (A, B, C, etc.) to adjust its settings independently. You can modify TCM (TTL Convert to Manual), Zoom Value, and Modeling Lamp intensity for each group.
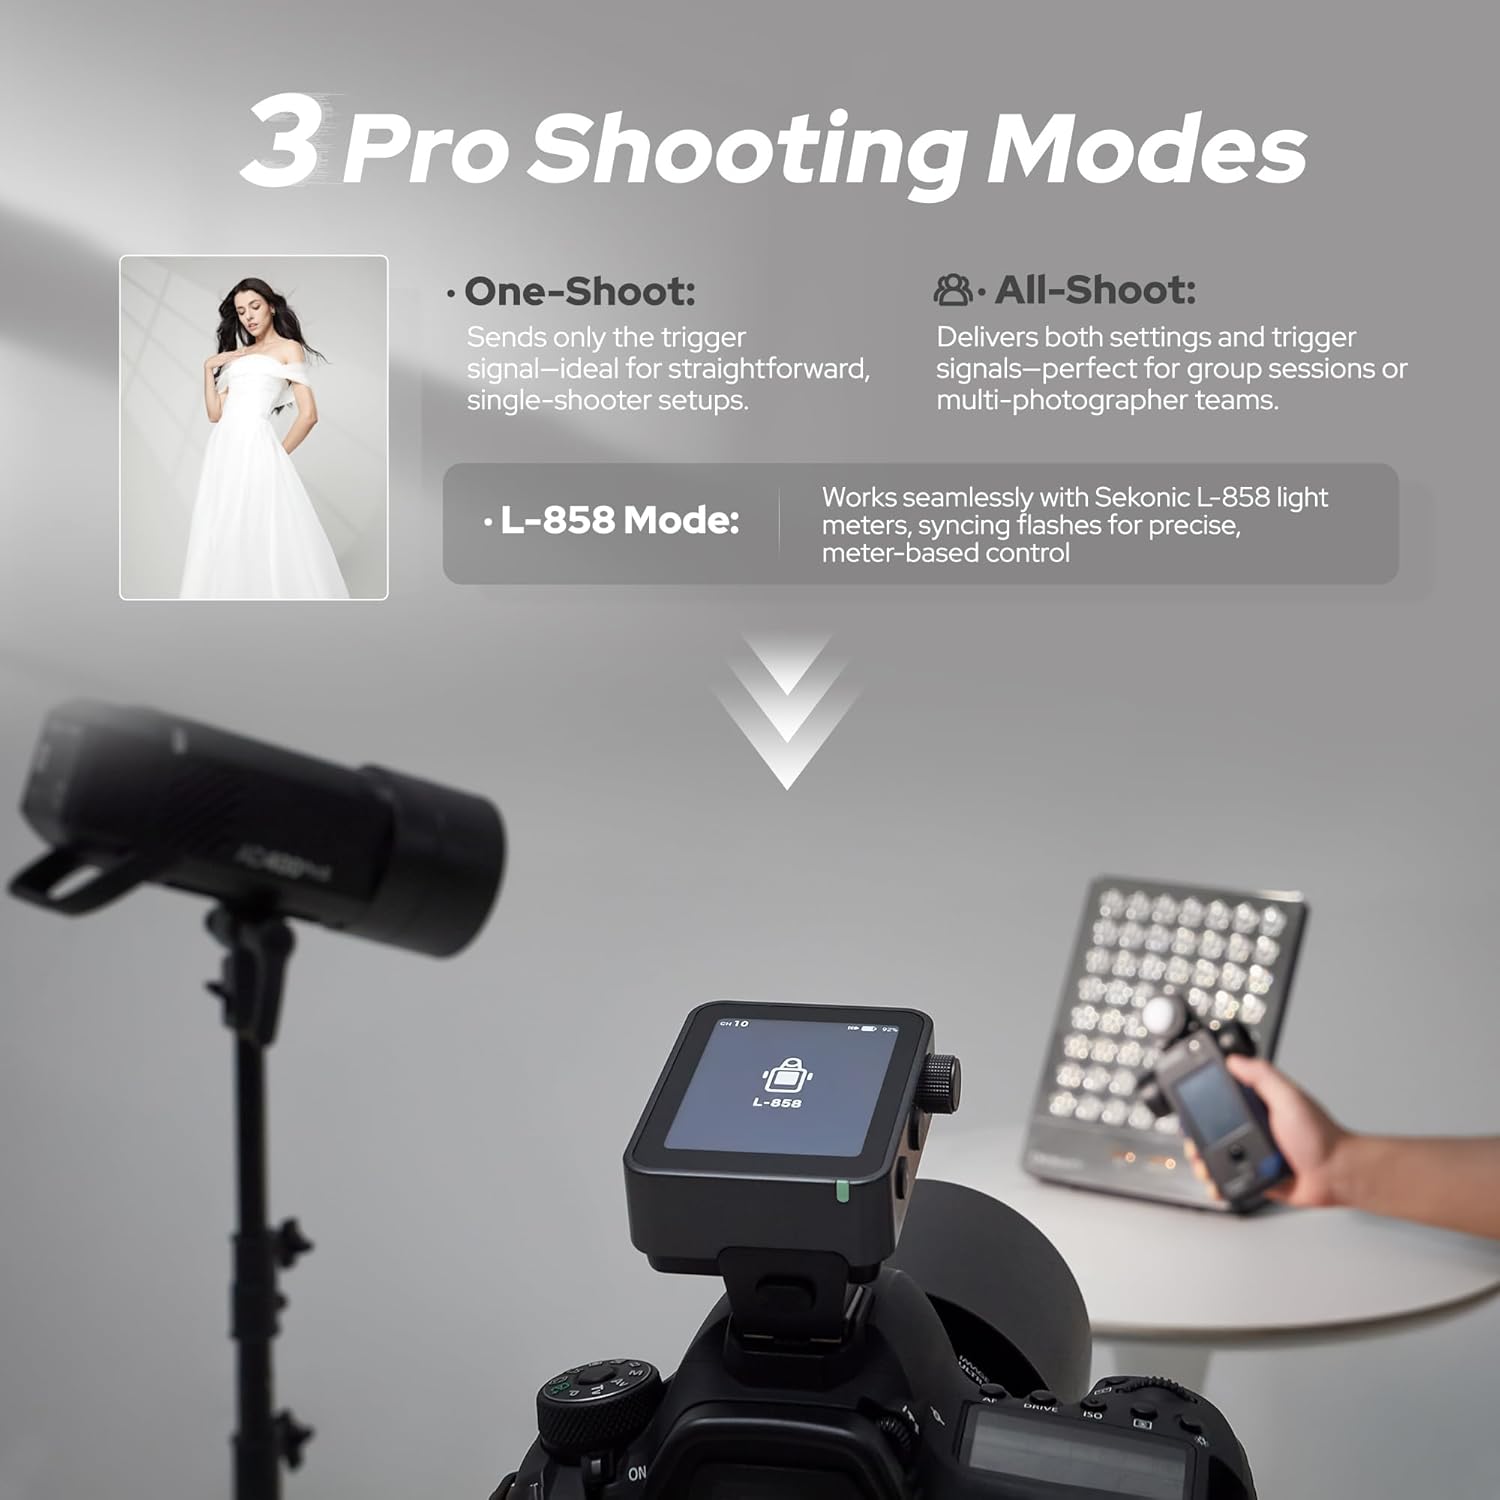
Image: The Godox X3 Pro N touchscreen displaying detailed settings for a single flash group, including TCM, zoom, and modeling lamp controls.
2.4GHz Wireless X System
The X3 Pro N utilizes the reliable Godox 2.4GHz wireless X system. This system supports 16 groups and 32 channels, ensuring stable and interference-resistant triggering of compatible Godox flashes over a wide range. Use the channel scanning feature to find the clearest frequency in busy environments.

Image: A photographer in a studio setting using the Godox X3 Pro N to wirelessly control multiple Godox studio lights, demonstrating the 2.4GHz Wireless X System.
Bluetooth Integration & APP Control
Connect your X3 Pro N to the Godox Flash App on your smartphone or tablet via Bluetooth for remote control. This allows you to adjust power, group settings, and trigger flashes from a distance, which is particularly useful when the trigger is not easily accessible on the camera.

Image: A smartphone displaying the Godox Flash App interface, connected via Bluetooth to the Godox X3 Pro N, which is mounted on a camera, illustrating remote control capabilities.
Creative Shutter Control
The X3 Pro N offers advanced shutter control features, including single-shot, time-lapse, and long-exposure sequences. Customize exposure duration, intervals, and shot count directly from the intuitive touchscreen. Triggering can also be done via the PC sync port or optional Godox XR/TR-RX receivers to minimize camera vibration.
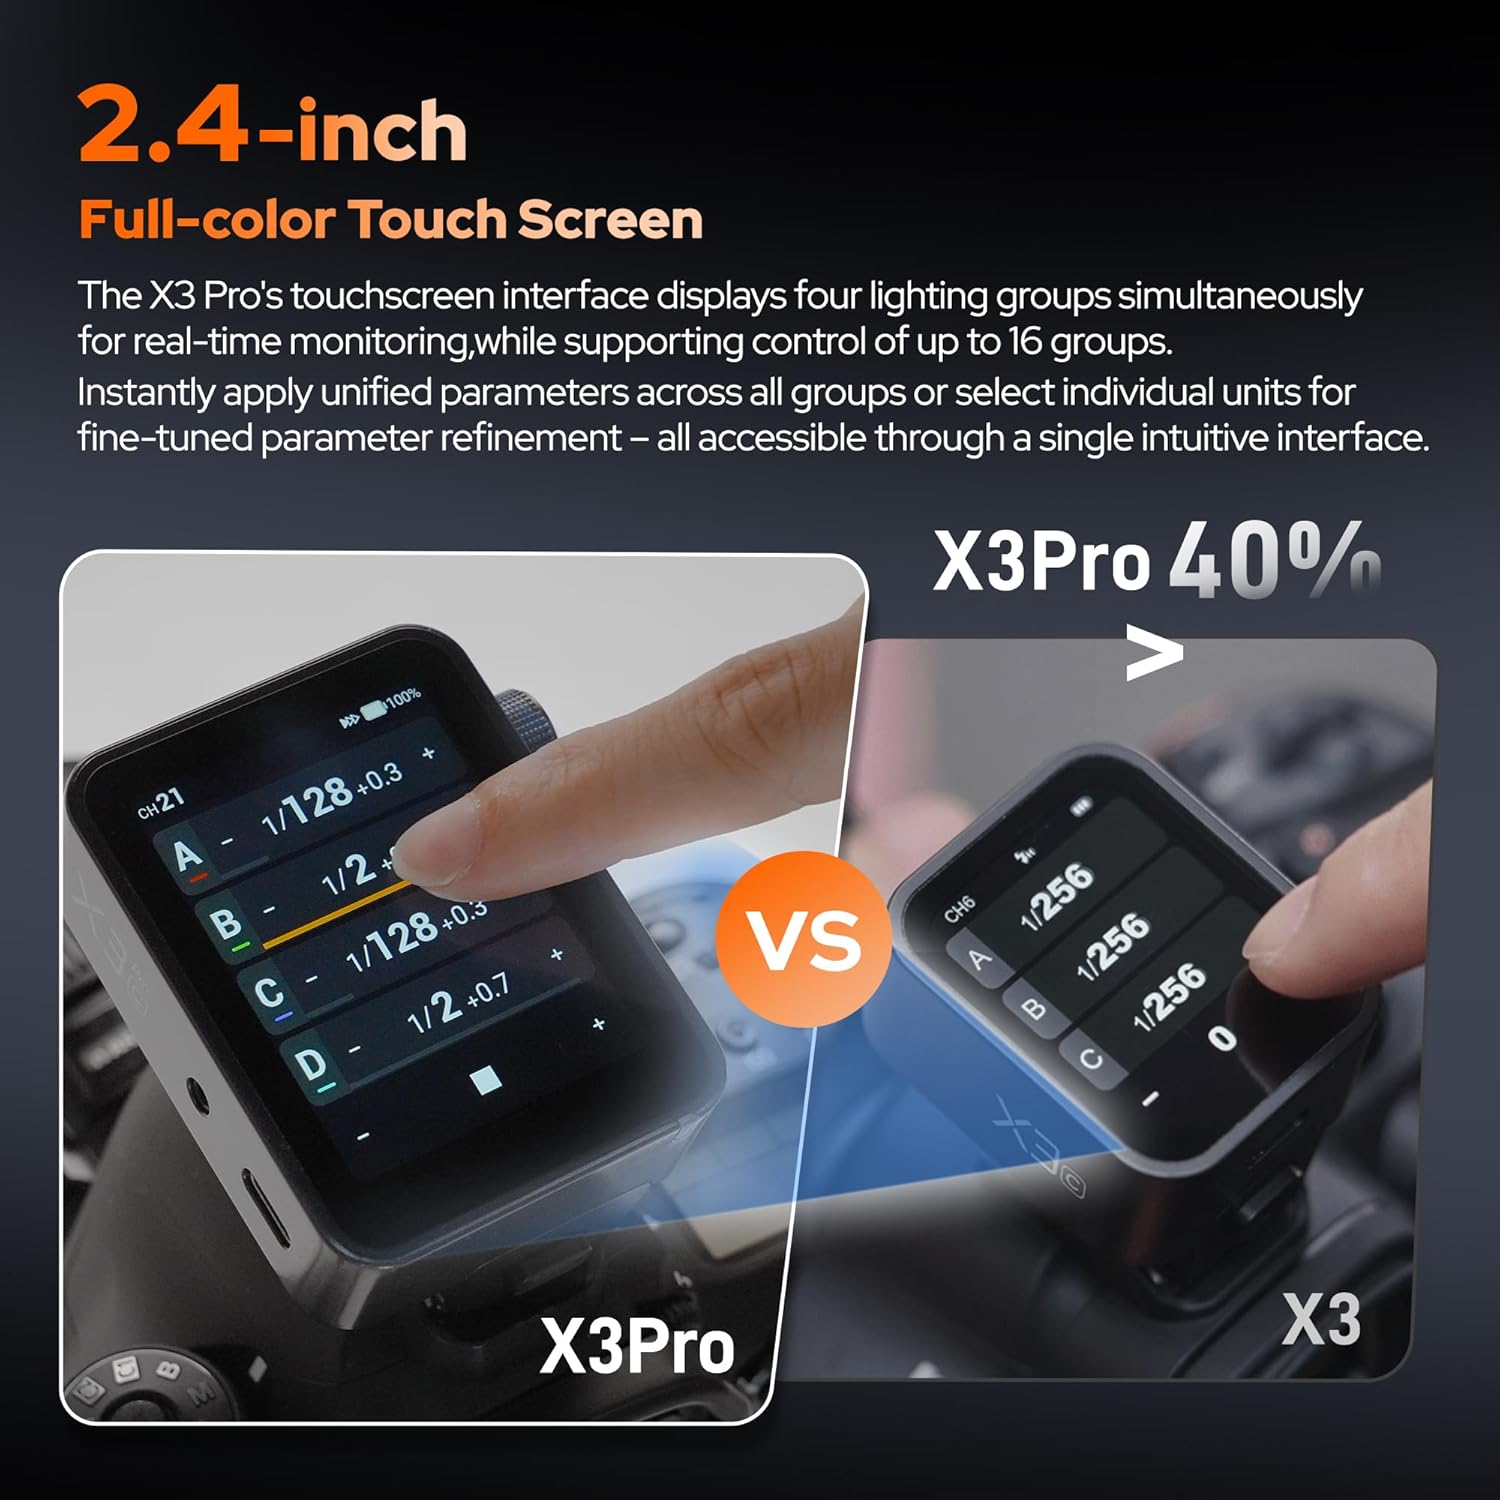
Image: The Godox X3 Pro N on a camera, with examples of time-lapse and long exposure photography, highlighting its creative shutter control features.
2-Second Memory Function
Settings are automatically stored 2 seconds after your last operation and can be recovered after a restart. This ensures that your preferred configurations are always readily available, saving time during shoots.

Image: The Godox X3 Pro N display with an overlay indicating its 2-second memory function, which saves settings automatically.
Optional XR Receiver
For enhanced wireless shutter control and universal flash triggering, you can add the optional Godox XR/XR S TTL Wireless Receiver. This allows you to gain precise remote control of your camera and wirelessly trigger various Canon, Nikon, and Sony flashes, or activate studio strobes via the sync port.

Image: The Godox X3 Pro N being used to control a camera and an external flash unit, with an optional XR receiver shown for extended functionality.
Maintenance
- Keep the device dry. Do not handle with wet hands or immerse in water.
- Avoid sudden temperature changes, which may cause condensation.
- Clean the device regularly with a soft, dry cloth. Do not use harsh chemicals or solvents.
- Store in a cool, dry place away from direct sunlight and extreme temperatures.
- Protect the touchscreen from scratches by using a screen protector or the included storage bag.
Troubleshooting
- Device not powering on: Ensure the built-in lithium battery is charged. Connect the device to a USB-C power source.
- Flash not firing: Check that the trigger is securely mounted on the camera's hot shoe. Verify that the flash unit and trigger are set to the same channel and group. Ensure the flash unit is powered on and ready to fire.
- Poor wireless connection: Perform a channel scan on the trigger to find a clear channel with minimal interference. Ensure the trigger and flash unit are within the effective operating range.
- Touchscreen unresponsive: Restart the device. If the issue persists, ensure the screen is clean and dry.
- App control issues: Ensure Bluetooth is enabled on your mobile device and the X3 Pro N is paired correctly. Update the Godox Flash App to the latest version.
Specifications
| Feature | Specification |
|---|---|
| Product Dimensions | 1.61 x 2.6 x 1.61 inches |
| Item Weight | 6.7 ounces |
| Item Model Number | GD-X3Pro-WSJ250911 |
| Batteries | 1 D batteries required. (included) - Note: Product features built-in lithium battery. 'D batteries' may be a listing error. |
| Manufacturer | GODOX |
| Compatible Mountings | Nikon |
| Battery Life | 35 days (standby) |
| Camera Flash | Hotshoe |
| Flash Sync Speed | 1/250 or faster |
Warranty and Support
For warranty information, technical support, or service inquiries, please refer to the official GODOX website or contact your authorized GODOX dealer. Keep your purchase receipt as proof of purchase for warranty claims.
You can visit the official GODOX store for more products and support: GODOX Store
Ask a question about this manual
Ask about setup, troubleshooting, compatibility, parts, safety, or missing instructions. Manuals+ will review the question and use this page’s manual context to help answer it.