Introduction
Thank you for choosing the OXO Brew 9 Cup Coffee Maker. This appliance is designed to deliver rich, flavorful coffee with ease and precision. Featuring BetterBrew™ precision technology, a double-wall thermal carafe, programmable settings, and a unique Rainmaker™ showerhead, this coffee maker ensures an optimal brewing experience. This manual provides essential information for the safe and efficient use of your new coffee maker.
Important Safeguards
Please read all instructions carefully before using this appliance. Failure to follow these instructions may result in electric shock, fire, or serious injury.
- Do not touch hot surfaces. Use handles or knobs.
- To protect against fire, electric shock, and injury to persons, do not immerse cord, plugs, or appliance in water or other liquid.
- Close supervision is necessary when any appliance is used by or near children.
- Unplug from outlet when not in use and before cleaning. Allow to cool before putting on or taking off parts, and before cleaning the appliance.
- Do not operate any appliance with a damaged cord or plug, or after the appliance malfunctions or has been damaged in any manner.
- The use of accessory attachments not recommended by the appliance manufacturer may result in fire, electric shock, or injury to persons.
- Do not use outdoors.
- Do not let cord hang over edge of table or counter, or touch hot surfaces.
- Do not place on or near a hot gas or electric burner, or in a heated oven.
- Always attach plug to appliance first, then plug cord into the wall outlet. To disconnect, turn any control to "off", then remove plug from wall outlet.
- Do not use appliance for other than intended use.
- This appliance is for household use only.
What's in the Box
Upon unboxing, ensure all components are present and undamaged:
- OXO Brew 9 Cup Coffee Maker Base Unit
- Double-Wall Thermal Carafe
- Brew Basket
- Water Tank with Lid
- Coffee Scoop
- User Manual (this document)
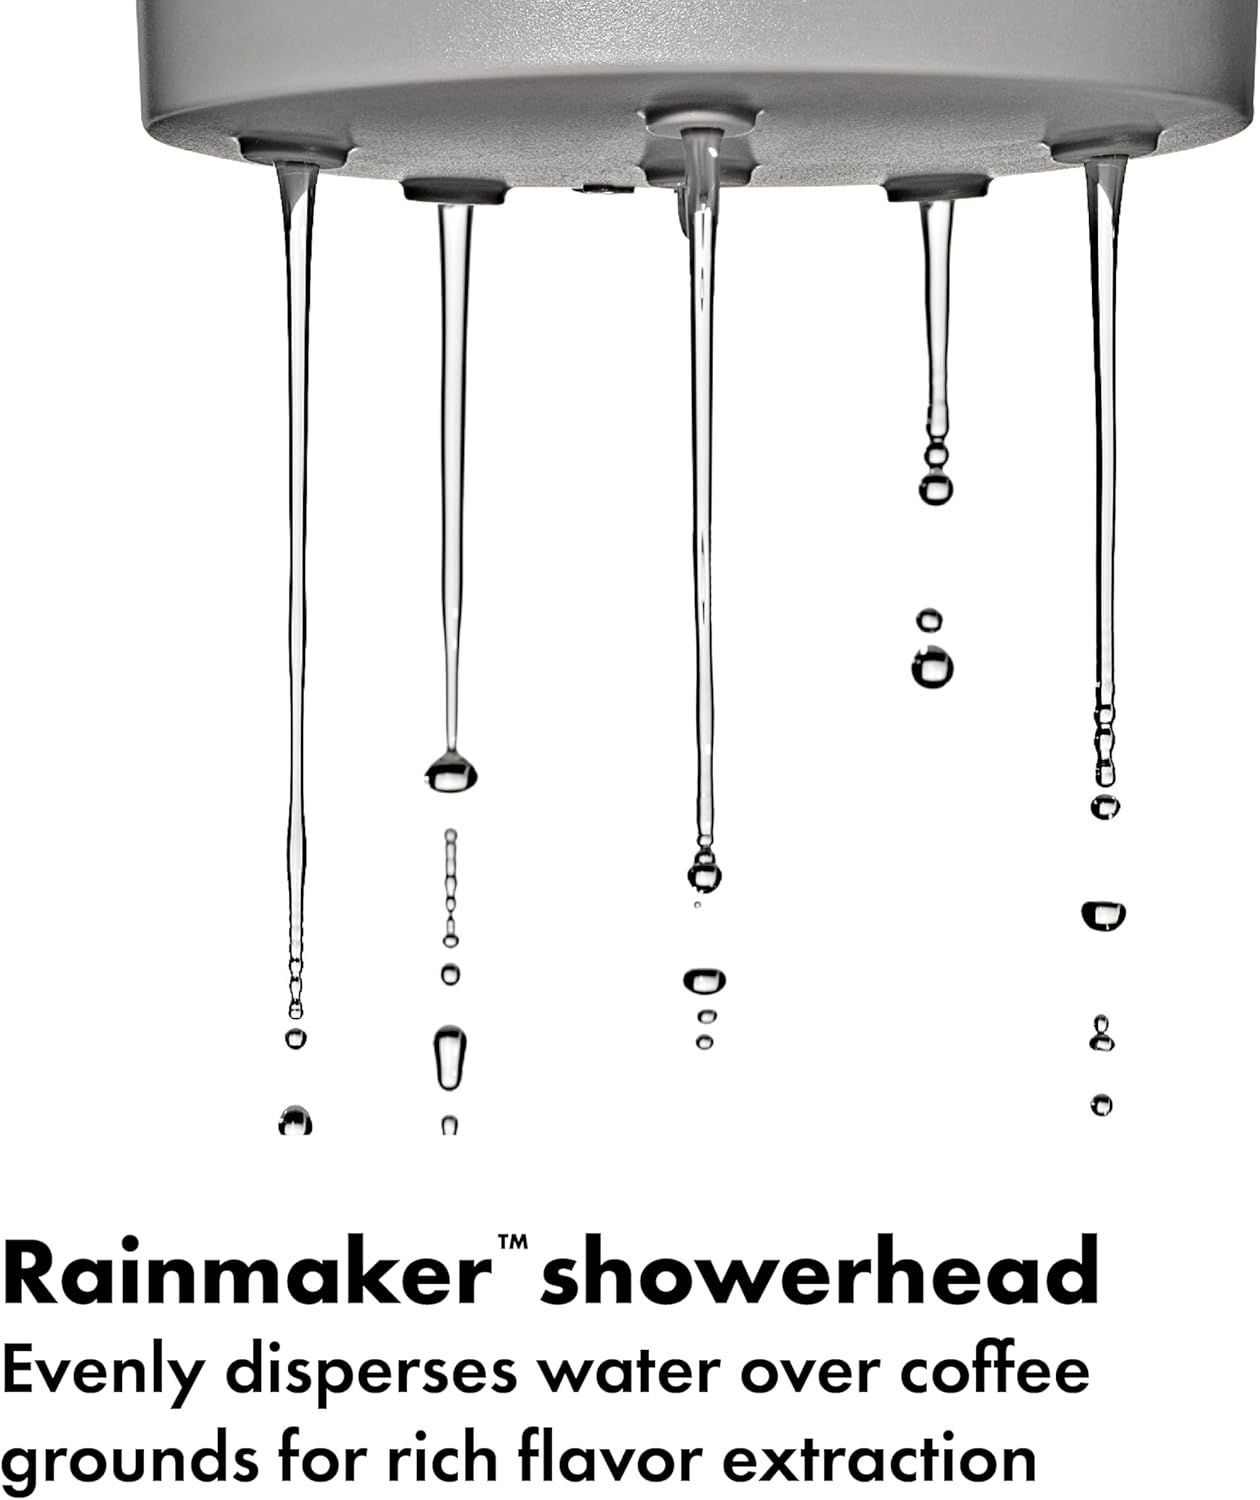
Image: The retail packaging for the OXO Brew 9 Cup Coffee Maker, showing the product name and key features.
Setup
- Unpack and Place: Remove all packaging materials. Place the coffee maker on a flat, stable, heat-resistant surface. Ensure there is adequate clearance above the unit for the water tank lid.
- Initial Cleaning: Before first use, wash the thermal carafe, brew basket, and coffee scoop with warm, soapy water. Rinse thoroughly and dry. Wipe the exterior of the main unit with a damp cloth.
- First Brew Cycle (Cleaning):
- Fill the water tank with fresh, cold water up to the 9-cup mark.
- Place an empty paper filter (size #4 cone filter) into the brew basket.
- Place the thermal carafe on the heating plate.
- Press the dial button to start a full brewing cycle with only water.
- Discard the hot water after the cycle is complete. Your coffee maker is now ready for use.

Image: The OXO Brew 9 Cup Coffee Maker in Matte Black, fully assembled and ready for use, showing the water reservoir and thermal carafe.
Operating Instructions
- Add Water: Open the water tank lid and fill the reservoir with fresh, cold water to your desired cup level (2-9 cups). The water level markings are visible on the side of the tank.
- Add Coffee Grounds: Place a #4 cone paper filter into the brew basket. Add your preferred amount of ground coffee. A general guideline is 1 scoop (provided) per cup, adjusting to taste.
- Place Carafe: Ensure the thermal carafe is properly seated on the base.
- Select Cups: Turn the dial on the front of the unit to select the number of cups you wish to brew. The display will show the selected amount.
- Start Brewing: Press the dial button to begin the brewing process. The coffee maker will preheat water to the optimal temperature (194°F to 205°F) before dispensing it over the grounds via the Rainmaker™ showerhead.
- Pause & Pour: You can temporarily remove the carafe during brewing to pour a cup. The brewing process will pause and resume once the carafe is returned.
- Programmable Timer: To set a delayed brew time, hold the dial button for a few seconds until the clock icon flashes. Turn the dial to set the desired brew time, then press the dial to confirm. The coffee maker will automatically brew at the set time.

Image: The water reservoir of the OXO Brew Coffee Maker, showing water bubbling as it preheats to the optimal brewing temperature.

Image: Close-up of the programmable dial on the OXO Brew Coffee Maker, displaying the time and indicating its ease of use for setting brew preferences.

Image: A hand pouring freshly brewed coffee from the double-wall thermal carafe into a white mug, highlighting the carafe's design and functionality.

Image: Close-up of the Rainmaker™ showerhead evenly dispersing water, illustrating its role in superior flavor extraction.
Cleaning and Maintenance
Regular cleaning ensures the best coffee flavor and extends the life of your appliance.
Daily Cleaning:
- Wash the thermal carafe and brew basket with warm, soapy water after each use. Rinse thoroughly.
- Wipe the exterior of the coffee maker with a soft, damp cloth. Do not use abrasive cleaners or scouring pads.
- The thermal carafe is not dishwasher safe. Hand wash only.
Descaling:
Mineral deposits from water can build up over time, affecting performance and flavor. The coffee maker features a descaling reminder. When the descaling indicator illuminates, it's time to descale.
- Empty the water tank and carafe.
- Fill the water tank with a descaling solution (e.g., white vinegar or a commercial descaling agent) according to the product's instructions.
- Place an empty paper filter in the brew basket.
- Place the empty carafe on the base.
- Initiate a full brew cycle. Some models may have a dedicated descaling cycle; refer to the on-screen prompts or manufacturer's website for specific instructions.
- After the cycle, discard the descaling solution.
- Run 2-3 full cycles with fresh water to rinse the system thoroughly.
Troubleshooting
| Problem | Possible Cause | Solution |
|---|---|---|
| Coffee not brewing. | No water in reservoir; carafe not properly placed; power issue. | Fill water tank; ensure carafe is correctly seated; check power connection. |
| Weak coffee. | Insufficient coffee grounds; coarse grind; too much water. | Increase coffee grounds; use a finer grind; reduce water amount. |
| Coffee overflows from brew basket. | Too many coffee grounds; filter not seated correctly; clogged filter. | Reduce coffee grounds; ensure filter is flat; use a fresh filter. |
| Coffee is not hot enough. | Carafe not preheated (for small batches); descaling needed. | Preheat carafe with hot water before brewing small batches; descale the machine. |
| "Carafe not in place" indicator. | Carafe is not on the base or not correctly aligned. | Ensure the carafe is fully and correctly seated on the base. |
Specifications
- Brand: OXO
- Model Name: 9 Cup Coffee Maker
- Model Number: 8725000
- Color: Matte Black
- Capacity: 9 Cups
- Product Dimensions: 8.4"D x 15.2"W x 17.4"H
- Item Weight: 10.98 pounds
- Power Source: AC adapter
- Coffee Input Type: Ground
- Special Feature: Programmable
- Operation Mode: Fully Automatic
- UPC: 840097786438

Image: Diagram showing the dimensions of the OXO Brew 9 Cup Coffee Maker, including height, width, and depth measurements.
Warranty and Support
The OXO Brew 9 Cup Coffee Maker comes with a 2-year warranty from the date of purchase, covering defects in materials and workmanship. Please retain your proof of purchase for warranty claims.
For technical support, troubleshooting assistance, or to inquire about warranty service, please contact OXO Customer Service:
- Website: Visit the official OXO website for FAQs and support resources.
- Phone: Refer to the contact information provided on the OXO website or product packaging.
- Email: Use the contact form or email address available on the OXO support page.
When contacting support, please have your model number (8725000) and purchase date available.


