1. Introduction
Thank you for choosing the Electrolux EW9H39A 9 Kg Heat Pump Dryer. This manual provides essential information for the safe and efficient use of your appliance. Please read it thoroughly before installation and operation, and keep it for future reference.
This heat pump dryer is designed for domestic use, offering efficient drying with a 9 kg capacity and advanced Inverter technology for optimal performance and energy savings.
2. Safety Information
General Safety:
- Read all instructions before using the appliance.
- Keep packaging materials out of reach of children.
- This appliance is not intended for use by persons (including children) with reduced physical, sensory or mental capabilities, or lack of experience and knowledge, unless they have been given supervision or instruction concerning use of the appliance by a person responsible for their safety.
- Children should be supervised to ensure that they do not play with the appliance.
- Do not allow children to play with the appliance.
Installation Safety:
- Ensure the appliance is installed on a firm, level surface.
- Do not install the appliance behind a lockable door, a sliding door or a door with a hinge on the opposite side to that of the tumble dryer, in such a way that a full opening of the tumble dryer door is restricted.
- The appliance must be connected to an earthed power supply.
- Do not use an extension cord or multiple socket adapter.
- Ensure adequate ventilation around the appliance to prevent overheating.
- The ambient temperature for operation should be between 5 °C and 35 °C.
Operation Safety:
- Never dry unwashed items in the tumble dryer.
- Items that have been soiled with substances such as cooking oil, acetone, alcohol, petrol, kerosene, spot removers, turpentine, waxes and wax removers should be washed in hot water with an extra amount of detergent before being dried in the tumble dryer.
- Remove all objects from pockets such as lighters and matches.
- Do not stop a tumble dryer before the end of the drying cycle unless all items are quickly removed and spread out so that the heat is dissipated.
- Clean the lint filter after every cycle.
- Empty the water container after every cycle.
3. Product Overview
The Electrolux EW9H39A is a freestanding, front-loading heat pump dryer with a 9 kg capacity. It features an intuitive control knob and a built-in display for easy program selection and monitoring.
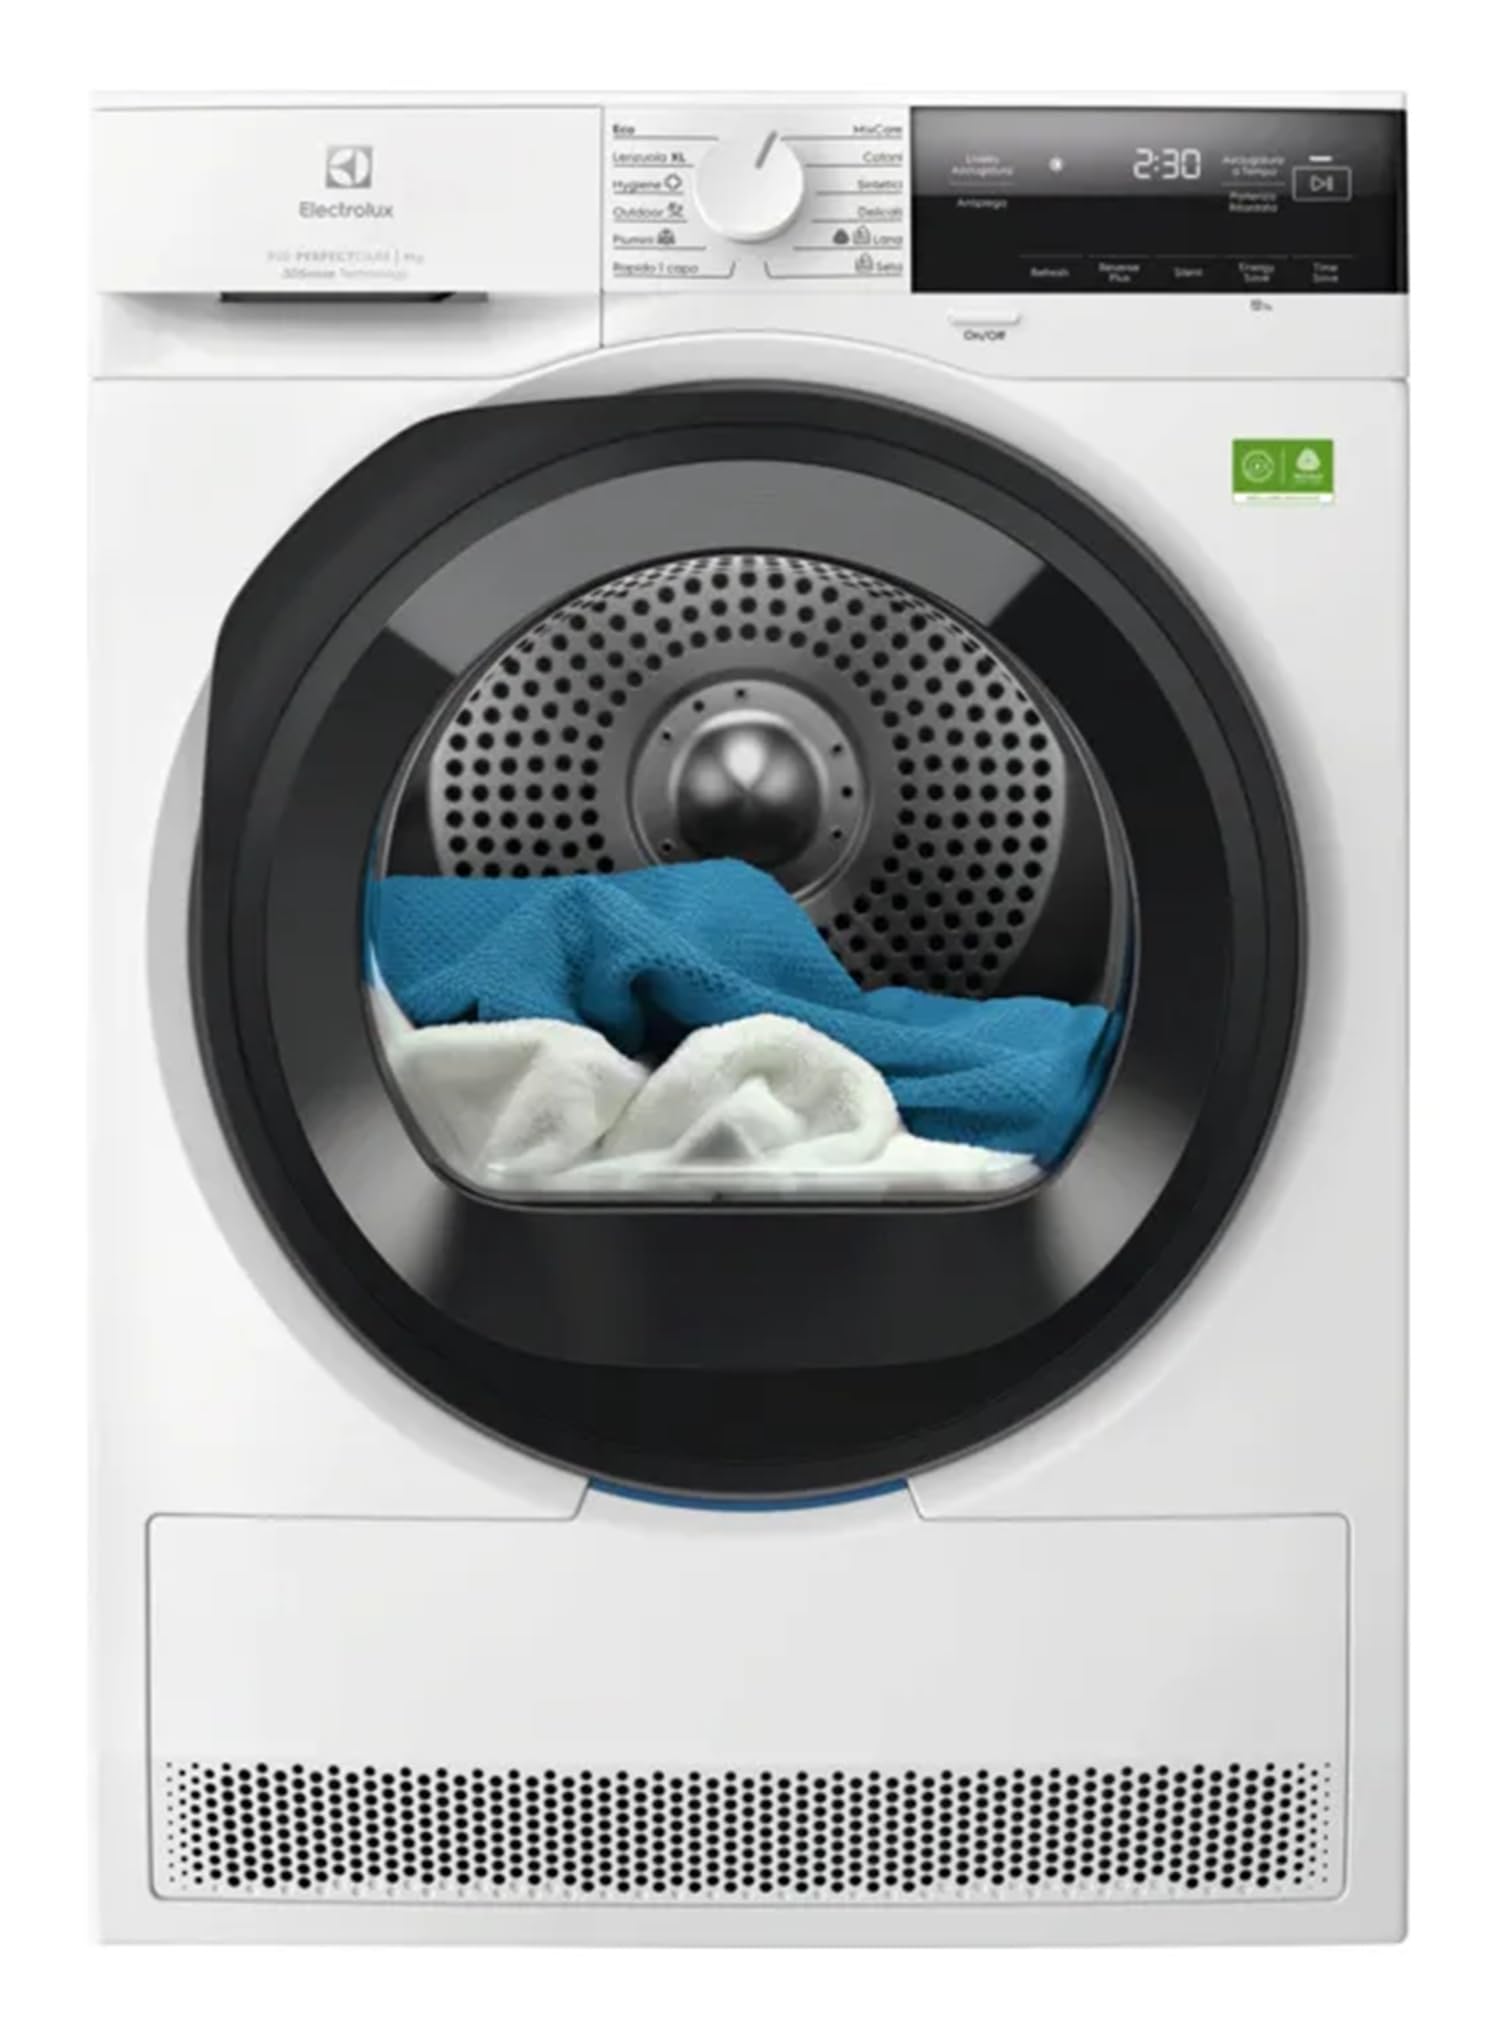
Figure 1: Front view of the Electrolux EW9H39A Heat Pump Dryer. This image shows the control panel with a central knob, the display, and the large black door for loading laundry.
Key Features:
- Heat Pump Technology: Energy-efficient drying at lower temperatures.
- 9 kg Capacity: Suitable for large loads.
- Inverter Technology: Ensures quiet operation and durability.
- 12 Drying Programs: Including Cotton, Delicates/Silk, Duvet, Eco, Hygiene/Allergy Care, Mix, Outdoor/Sport, Quick, Refresh, Silent, Synthetic, Timed, and Wool.
- Anti-Crease Function: Reduces wrinkles for easier ironing (90 min cycle).
- Internal Drum Light: For better visibility when loading and unloading.
- Child Lock: Prevents accidental changes to settings.
- Adjustable Feet: For stable installation on uneven surfaces.
Control Panel:
The control panel typically consists of:
- Program Selector Knob: To choose the desired drying program.
- Display: Shows program status, remaining time, and error codes.
- Function Buttons: For options like delayed start, anti-crease, or half load.
- Start/Pause Button: To begin or temporarily stop a cycle.
- On/Off Button: To power the appliance.
4. Setup and Installation
Proper installation is crucial for the safe and efficient operation of your dryer. If in doubt, consult a qualified technician.
4.1 Unpacking
- Carefully remove all packaging materials, including polystyrene blocks and any protective film.
- Check the appliance for any transport damage. Report any damage to your retailer immediately.
- Ensure all accessories are present.
4.2 Positioning
- Place the dryer on a solid, level floor.
- Ensure there is sufficient space around the appliance for ventilation. Do not block the ventilation openings.
- Avoid installing the dryer in rooms where the temperature can fall below 5 °C or rise above 35 °C.
- The door hinge is on the right side. Ensure this orientation is suitable for your space.
4.3 Leveling
- Use a spirit level to check if the appliance is perfectly level.
- Adjust the adjustable feet at the bottom of the dryer by turning them clockwise or anti-clockwise until the appliance is stable and level.
4.4 Electrical Connection
- Connect the appliance to a properly earthed power socket.
- The power supply should be 230 V AC, 50 Hz.
- Do not use multi-plugs or extension cables.
- Ensure the plug is accessible after installation.
4.5 Drain Hose Installation (if applicable)
Your dryer collects condensed water in a container. For continuous drainage, you can connect a drain hose (if provided or purchased separately) to a suitable drain point. Refer to the specific instructions in the full manual for this procedure.
5. Operating Instructions
Follow these steps for optimal drying results and to prolong the life of your appliance.
5.1 Preparing Laundry
- Sort laundry by fabric type and desired dryness level.
- Check care labels for drying instructions.
- Close zippers, hooks, and fastenings to prevent damage.
- Remove any foreign objects from pockets.
- Do not overload the dryer; respect the 9 kg capacity.
5.2 Loading the Dryer
- Open the door and load the laundry into the drum.
- Ensure items are not tangled.
- Close the door firmly until it clicks shut.
5.3 Selecting a Program
- Press the On/Off button to power on the dryer.
- Turn the Program Selector Knob to choose the appropriate drying program (e.g., Cotton, Synthetics, Delicates, Wool). The selected program will be shown on the display.
- Available programs include: Cotone (Cotton), Delicati/Seta (Delicates/Silk), Piumino/piumone (Duvet), Eco, Igiene/Allergy Care (Hygiene/Allergy Care), Mix, Outdoor/sport, Rapido (Quick), Refresh, Silent, Sintetico (Synthetic), Programmato (Timed), Lana (Wool).
5.4 Adjusting Options (if needed)
- Use the function buttons to select additional options such as:
- Delayed Start: To postpone the start of the cycle.
- Anti-Crease: To reduce wrinkles at the end of the cycle.
- Half Load: For smaller loads to save energy.
5.5 Starting the Cycle
- Press the Start/Pause button to begin the drying cycle.
- The display will show the estimated remaining time.
5.6 End of Cycle
- The dryer will signal the end of the cycle.
- Open the door and remove the dry laundry.
- Clean the lint filter and empty the water container after every use.
- Press the On/Off button to switch off the appliance.
6. Maintenance and Cleaning
Regular maintenance ensures optimal performance and extends the lifespan of your dryer.
6.1 Cleaning the Lint Filter
- The lint filter must be cleaned after every drying cycle.
- Open the dryer door. The filter is usually located inside the door opening or at the bottom of the drum.
- Remove the filter and gently brush off any accumulated lint.
- Rinse the filter under running water if necessary, and ensure it is completely dry before reinserting.
6.2 Emptying the Water Container
- The water container collects condensed water and should be emptied after every cycle.
- Pull out the water container, usually located at the top left of the control panel.
- Pour the water into a sink.
- Push the container back into its position until it clicks.
6.3 Cleaning the Condenser
- The condenser should be cleaned periodically (e.g., every few months or as indicated by the appliance).
- Refer to the full instruction manual for detailed steps on how to access and clean the condenser unit. This typically involves opening a lower panel and rinsing the condenser fins.
- Ensure the condenser is dry before reassembling.
6.4 Cleaning the Drum and Exterior
- Wipe the drum interior with a damp cloth if necessary.
- Clean the exterior surfaces with a soft, damp cloth. Do not use abrasive cleaners or solvents.
7. Troubleshooting
Before contacting customer service, please check the following common issues and solutions:
| Problem | Possible Cause | Solution |
|---|---|---|
| Dryer does not start. | No power supply; Door not closed properly; Program not selected; Start button not pressed. | Check power plug and fuse; Ensure door is firmly closed; Select a program; Press the Start/Pause button. |
| Drying results are unsatisfactory. | Lint filter blocked; Water container full; Condenser dirty; Incorrect program selected; Overloaded. | Clean lint filter; Empty water container; Clean condenser; Select appropriate program; Reduce load size. |
| Dryer stops during cycle. | Water container full; Power outage; Overheating. | Empty water container; Check power supply; Clean filters and condenser to prevent overheating. |
| Unusual noise. | Foreign objects in drum; Appliance not level. | Check drum for loose items; Adjust adjustable feet to level the dryer. |
| Display shows an error code. | Specific fault detected. | Refer to the full user manual for a list of error codes and their solutions, or contact customer service. |
8. Technical Specifications
| Feature | Specification |
|---|---|
| Model | EW9H39A |
| Brand | Electrolux |
| Appliance Placement | Freestanding |
| Loading Type | Front-loading |
| Drying System | Heat Pump |
| Capacity | 9 kg |
| Energy Efficiency Class | A (Scale A to G) |
| Condensation Efficiency Class | A |
| Energy Consumption (100 cycles) | 79 kWh |
| Energy Consumption (per cycle) | 1.84 kWh |
| Noise Emission Class | A |
| Noise Level | 60 dB |
| Cycle Duration | 255 min |
| Drum Volume | 118 L |
| Inverter Technology | Yes |
| Control Type | Rotary knob |
| Display | Yes |
| Door Hinge | Right |
| Internal Drum Light | Yes |
| Child Lock | Yes |
| Adjustable Feet | Yes |
| Refrigerant | R290 |
| Min. Ambient Temperature | 5 °C |
| Max. Ambient Temperature | 35 °C |
| Power Connection | 900 W |
| AC Input Voltage | 230 V |
| AC Input Frequency | 50 Hz |
| Dimensions (H x W x D) | 850 mm x 596 mm x 636 mm |
| Weight | 52.8 kg |
9. Warranty and Support
Warranty:
Your Electrolux EW9H39A dryer comes with a manufacturer's warranty. The terms and conditions of the warranty are detailed in the separate warranty document provided with your appliance. Please retain your proof of purchase for any warranty claims.
Customer Support:
For technical assistance, spare parts, or service requests, please contact Electrolux customer service. You can find contact information on the official Electrolux website or in the warranty booklet. When contacting support, please have your model number (EW9H39A) and serial number ready.
You can visit the official Electrolux store for more information: Electrolux Store


