
1. Introduction
This manual provides essential information for the safe and efficient operation of your VEVOR 14-inch Wall Mounted Exhaust Fan. This fan is designed to rapidly vent stale air, dirt, heat, and odors, maintaining fresh indoor air quality. It features a smart controller with temperature and humidity triggers, offering up to 10 speed settings that automatically adjust to changing conditions. The fan is constructed from durable all-metal steel and includes automatic shutters for weather protection.

Image: The VEVOR 14-inch Exhaust Fan, highlighting its ability to keep spaces cool and comfortable with 2000 CFM airflow, EC motor, high-durability steel, and easy airflow adjustment.
2. Safety Information
Please read all safety instructions carefully before installation and operation. Failure to follow these instructions may result in electric shock, fire, or serious injury.
- Always disconnect power before servicing or cleaning the unit.
- Ensure the fan is installed by a qualified electrician in accordance with all local and national electrical codes.
- Do not operate the fan with a damaged cord or plug.
- Keep hands and foreign objects away from the fan blades during operation.
- This fan is designed for ventilation purposes only. Do not use it for exhausting hazardous or explosive materials.
- Ensure proper grounding to prevent electrical shock.
3. Package Contents
Verify that all components are present upon unpacking:
- 1 x Shutter Exhaust Fan
- 1 x Controller
- 1 x Audio Cable (3 m)
- 1 x Temperature & Humidity Sensor Cable (2.5 m)
- 4 x Screws
- 4 x Rubber Plugs
- 1 x Remote (if applicable to your model)
4. Specifications
| Feature | Specification |
|---|---|
| Model Number | HA-350ME |
| Rated Voltage | 100-240V~ 50/60Hz |
| RPM | 1500 RPM |
| Airflow Capacity | 2000 CFM |
| Air Speed | 7.2 m/s |
| Noise Level | ≤68 dB(A) |
| Power | 80W |
| Number of Speeds | 10 |
| Blade Length | 14 inches |
| Product Dimensions (D x W x H) | 16.54"D x 7.09"W x 16.54"H |
| Net Weight | 10.58 lbs / 4.8 kg |
| Material | Metal |
| Motor Type | Brushless EC Motor |
| Installation Type | Wall Mounted |
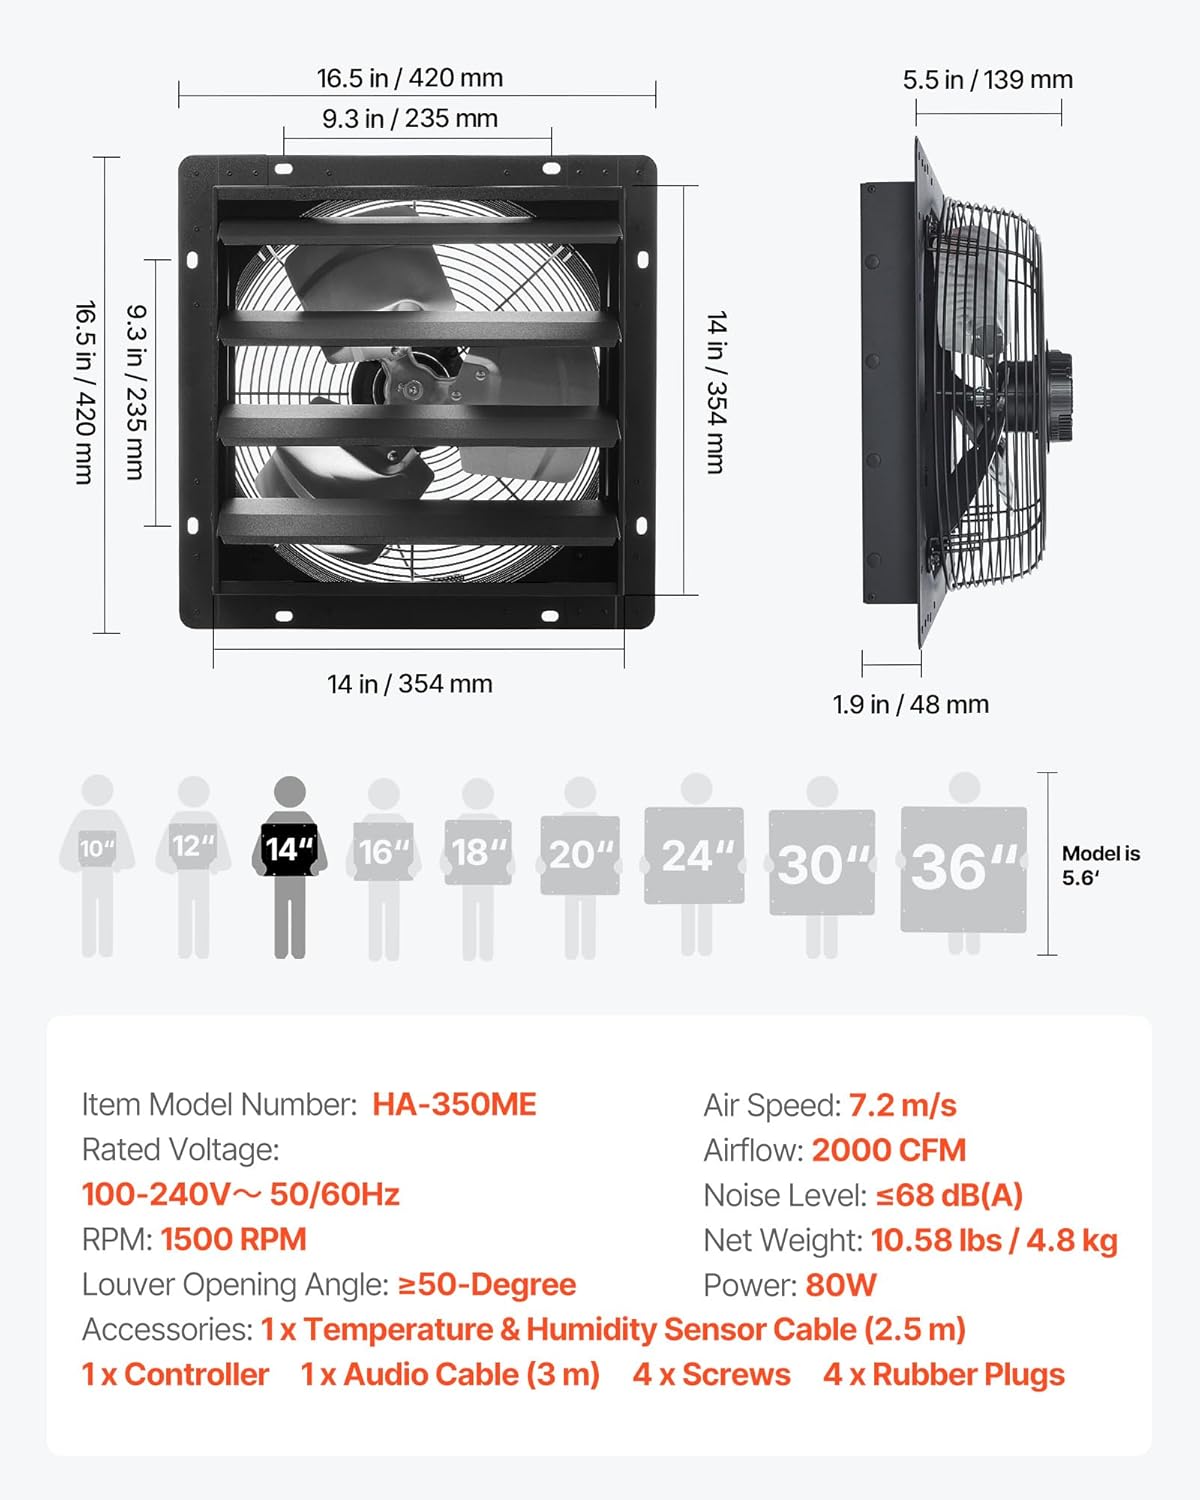
Image: Detailed diagram illustrating the dimensions and key specifications of the VEVOR 14-inch Shutter Exhaust Fan, including rated voltage, RPM, airflow, noise level, and included accessories.
5. Setup and Installation
The VEVOR exhaust fan is designed for straightforward wall mounting. Follow these steps for proper installation:
- Prepare the Opening: Create a suitable opening in the wall for the fan. Ensure the opening matches the fan's dimensions (approximately 14x14 inches for this model) and provides adequate clearance.
- Mount the Fan: Position the fan in the opening. Use the provided screws and rubber plugs to securely fasten the fan to the wall. Ensure the fan is level and stable.
- Connect the Controller: Connect the audio cable from the fan to the controller. Then, connect the temperature and humidity sensor cable to the controller.
- Power Connection: Plug the fan's power cord into a compatible electrical outlet. Ensure the power source matches the fan's rated voltage (100-240V~ 50/60Hz).

Image: A visual guide demonstrating the two main steps for easy installation: mounting the fan and connecting the power.
The fan is suitable for various applications, including attics, garages, barns, and greenhouses, to improve air quality and regulate temperature/humidity.

Image: The VEVOR exhaust fan installed in a gable vent, demonstrating a typical application for attic ventilation.
6. Operating Instructions
Your VEVOR exhaust fan comes with a smart controller for precise environmental management.
Controller Overview

Image: The VEVOR smart controller displaying current temperature, humidity, and fan speed settings, along with various control buttons.
Basic Operation
- Power On/Off: The fan will activate when plugged in and the controller is connected.
- Mode Setting: Use the 'MODE BUTTON' on the controller to cycle through different operating modes (e.g., Auto Mode, Timer Mode).
- Temperature & Humidity Control: In Auto Mode, the fan automatically adjusts speed based on the detected temperature and humidity levels. You can set desired thresholds using the 'UP' and 'DOWN' buttons.
- Fan Speed Adjustment: Manually adjust the fan speed (1-10 levels) using the 'UP' and 'DOWN' buttons when not in Auto Mode or to override automatic settings.
- Timer Function: Set specific operating times using the timer function for scheduled ventilation.
- Alarm Function: The controller may feature an alarm to alert you when set temperature or humidity thresholds are exceeded.
Automatic Shutter Function
The fan features automatic shutters that open when the fan is powered on for ventilation and close when the fan is powered off. This mechanism helps block rain, debris, and small animals from entering the ventilated space.

Image: A side-by-side comparison showing the fan with its shutters open when powered on for ventilation and closed when powered off to block rain and debris.
Official Product Video: Smart Thermostat Control
Video: An official VEVOR video demonstrating the smart thermostat control features of the exhaust fan, including setting temperature and humidity thresholds and adjusting fan speed.
7. Maintenance
Regular maintenance ensures optimal performance and longevity of your VEVOR exhaust fan.
- Cleaning: Periodically clean the fan blades and shutters to prevent dust and debris buildup, which can reduce efficiency. Use a soft cloth and mild detergent. Ensure the fan is unplugged before cleaning.
- Inspection: Regularly inspect the power cord, plug, and controller for any signs of damage. Check the mounting screws for tightness.
- Motor: The fan features a brushless EC motor designed for long-term, stable, and energy-efficient operation, requiring minimal maintenance.

Image: An internal view of the brushless motor, emphasizing its energy-efficient and stable design for smooth, long-lasting operation.
8. Troubleshooting
If you encounter issues with your VEVOR exhaust fan, refer to the following common problems and solutions:
| Problem | Possible Cause | Solution |
|---|---|---|
| Fan does not turn on | No power, loose connection, faulty outlet | Check power cord, ensure secure connections, test outlet with another device, check circuit breaker. |
| Low airflow | Blocked intake/exhaust, dirty blades, incorrect speed setting | Clear any obstructions, clean fan blades, increase fan speed setting on the controller. |
| Excessive noise | Loose mounting, foreign object in fan, worn motor bearings | Tighten mounting screws, inspect for and remove foreign objects, contact support if motor noise persists. |
| Shutters not opening/closing | Obstruction, mechanism fault | Check for and remove any obstructions around the shutters. Ensure the fan is receiving power. |
| Controller display not working | Loose cable, power issue | Ensure the audio cable and sensor cable are securely connected to the controller and the fan is powered. |
9. Warranty and Support
VEVOR products are designed for durability and performance. For warranty information, technical support, or service inquiries, please refer to the official VEVOR website or contact their customer service directly.
You can visit the official VEVOR store for more information: VEVOR Official Store
For additional resources, you may also find the official User Manual (PDF) helpful: Download PDF Manual


