1. Introduction
The AUTO-VOX T11 is a state-of-the-art mirror dash cam designed to enhance driving safety and convenience. It features a high-resolution display, advanced Sony IMX662 sensors with STARVIS2 ultra-night vision for clear recording day and night, and integrated CarPlay/Android Auto functionality. This manual provides essential information for proper installation, operation, and maintenance of your device.

Image: AUTO-VOX T11 Mirror Dash Cam showcasing its main unit and separate cameras.
2. Package Contents
Please verify that all items listed below are included in your package:
- AUTO-VOX T11 Mirror Dash Cam Unit
- Front Camera
- Rear Camera
- GPS Module
- Parking Surveillance Power Cable
- Video Data Cable
- Mounting Adapters (various types)
- Installation Tools (e.g., screwdriver, pry tool)
- User Manual (this document)

Image: All components included in the AUTO-VOX T11 package.
3. Setup and Installation
Proper installation is crucial for optimal performance. Please follow these steps carefully. It is recommended to perform a functional test before final installation.
3.1 Pre-Installation Checklist
- Verify compatibility of the mirror mount with your vehicle.
- Connect the device to power and confirm all functions are operational before permanent installation.
- Ensure the mirror's angle and fixed state are stable.
- Plan the cable routing path in advance for a neat installation.
- Confirm all accessories are present.
3.2 Mirror Mount and Front Camera Installation
The AUTO-VOX T11 is designed as a genuine mirror replacement. Remove your original rearview mirror and attach the T11 unit using the appropriate mounting adapter for your vehicle. The separate front camera can be affixed to the windshield using adhesive tape, ensuring it does not obstruct your view or vehicle sensors.

Image: Attaching the AUTO-VOX T11 to the vehicle's mirror mount.

Image: The separate front camera being installed on the windshield.
3.3 Wiring Routing
Carefully route all cables (power, rear camera, GPS) along the vehicle's interior trim and weather stripping to conceal them and prevent interference with driving. Ensure cables are securely fixed and do not impede airbags or other safety features.
3.4 Rear Camera Installation
Mount the rear camera on the rear window or license plate area. Connect the rear camera cable to the main unit. If connecting the reverse signal trigger wire, ensure it is properly connected to your vehicle's reverse light power source for automatic display of the rear view when reversing.
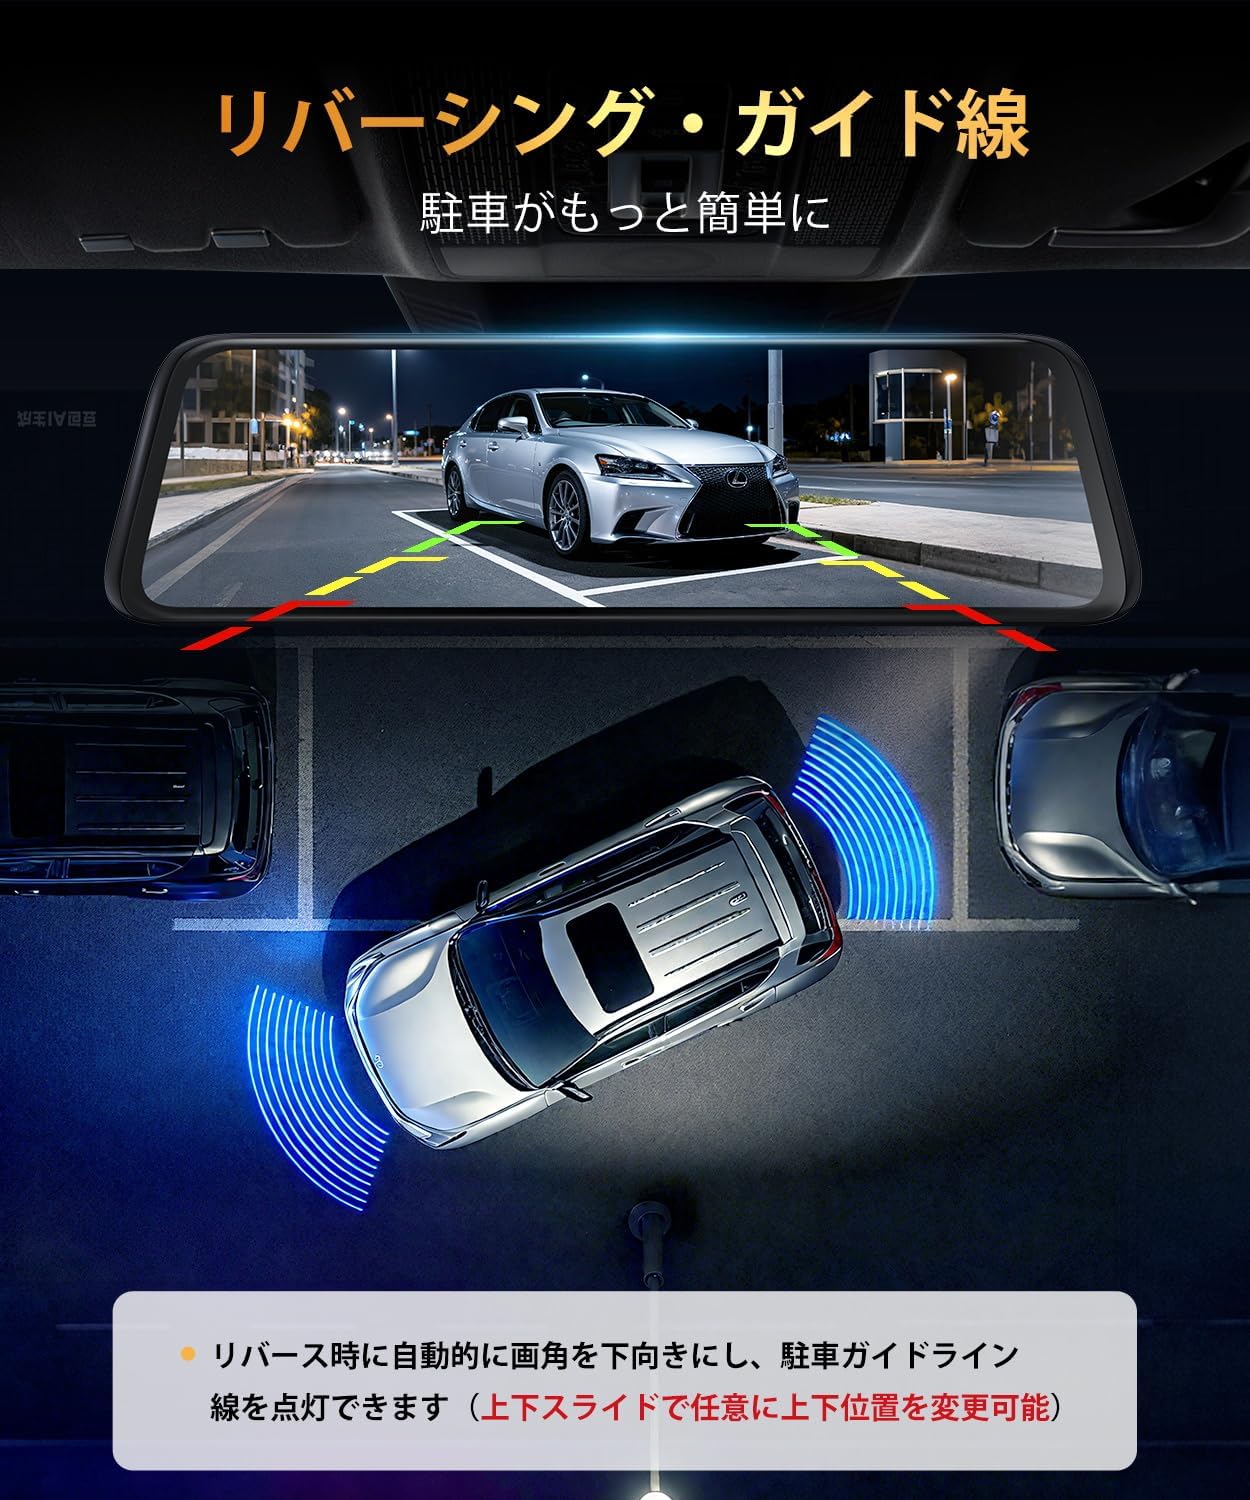
Image: Rear camera view with adjustable guide lines for parking assistance.
3.5 Power Connection
Connect the power cable to your vehicle's fuse box. The yellow wire (BAT+) should be connected to a constant power source (always on), and the red wire (ACC) to an accessory power source (on when the engine is running). The black wire (GND) should be connected to a metal part of the vehicle chassis for grounding. Fuse taps are provided for various vehicle types.
Video: Detailed installation guide for the AUTO-VOX T11, covering mirror mount, camera placement, wiring, and power connections.
4. Operating Instructions
4.1 Basic Functions
The T11 features a 10-inch touch screen for intuitive control. Swipe gestures allow switching between front, rear, and split-screen views. Icons on the screen provide quick access to recording, settings, and other features.
4.2 CarPlay and Android Auto Connection
The T11 supports both wireless CarPlay and Android Auto. To connect:
- Tap the CarPlay or Android Auto icon on the T11 display to open the connection screen.
- On your smartphone, enable Wi-Fi and Bluetooth.
- Search for the device name displayed on the T11 screen in your phone's Bluetooth settings and pair.
- Confirm the pairing request on both devices.
- Once connected, CarPlay or Android Auto will automatically launch on the T11 display.
Video: Demonstration of connecting an iOS device for CarPlay functionality.
Video: Demonstration of connecting an Android device for Android Auto functionality.
4.3 Automatic Brightness Adjustment
The T11 is equipped with an ambient light sensor that automatically adjusts screen brightness based on surrounding light conditions. This ensures optimal visibility during the day and reduces glare at night, minimizing eye strain during long drives.

Image: The automatic brightness adjustment feature adapting to different light environments.
4.4 Parking Surveillance and G-Sensor
With the engine off, the T11 provides 24-hour parking surveillance. It automatically detects vibrations or impacts and initiates recording, securing evidence in case of hit-and-runs or other incidents. The G-sensor function automatically locks and saves video footage during sudden impacts or collisions while driving, preventing it from being overwritten.

Image: Illustration of the 24-hour parking surveillance feature protecting the vehicle.
5. Maintenance
To ensure the longevity and optimal performance of your AUTO-VOX T11, follow these maintenance guidelines:
- Cleaning: Use a soft, dry cloth to clean the screen and camera lenses. Avoid abrasive materials or chemical cleaners that could damage the surfaces.
- Cable Management: Periodically check that all cables are securely routed and not pinched or damaged.
- Firmware Updates: Check the AUTO-VOX website or app for available firmware updates to ensure your device has the latest features and bug fixes.
- Storage: If storing the device for an extended period, ensure it is kept in a cool, dry place away from direct sunlight.
6. Troubleshooting
If you encounter issues with your AUTO-VOX T11, please refer to the following common solutions:
- Device Not Powering On: Check all power connections, including the fuse box connections (BAT+, ACC, GND). Ensure the vehicle's ignition is on if connecting to ACC power.
- CarPlay/Android Auto Not Connecting: Ensure Wi-Fi and Bluetooth are enabled on your smartphone and the correct device is selected for pairing. Restart both the T11 and your smartphone.
- Poor Video Quality: Clean camera lenses. Ensure the protective film has been removed from the lenses. Check the resolution settings in the device menu.
- Rear Camera Not Displaying: Verify the rear camera cable is securely connected. If using the reverse signal trigger, ensure it is correctly wired to the reverse light.
- GPS Signal Issues: Ensure the GPS module is installed in a location with a clear view of the sky, free from obstructions.
- Screen Flickering/Lag: Ensure the device firmware is up to date. If using CarPlay/Android Auto, some older phone models or specific app combinations might cause minor performance variations.
If the problem persists, please contact AUTO-VOX customer support for further assistance.
7. Specifications
| Feature | Specification |
|---|---|
| Model Name | T11 |
| Brand | AUTO-VOX |
| Screen Size | 10 inches |
| Display Type | LCD |
| Video Capture Resolution | 2560P |
| Image Sensor | Sony IMX662 (Front & Rear) |
| Night Vision Technology | STARVIS2 |
| Connectivity | CarPlay, Android Auto, GPS |
| Mounting Type | Front Glass Mount (Genuine Mirror Replacement) |
| Control Method | Touch Screen |
| Special Features | Automatic Brightness Adjustment, 24-hour Parking Surveillance, G-Sensor |
| Product Dimensions | 1.3 x 25.5 x 7.5 cm |
| Product Weight | 1.32 kg |
8. Warranty and Support
The AUTO-VOX T11 comes with an 18-month manufacturer's warranty, ensuring peace of mind regarding product quality and performance.
For technical support, troubleshooting assistance, or warranty claims, please contact AUTO-VOX customer service. You can find more information and contact details on the official AUTO-VOX brand store: AUTO-VOX Brand Store.