
Introduction
This manual provides comprehensive instructions for the installation, operation, and maintenance of your XIANJU Smart Deadbolt Fingerprint Door Lock with Handle. Please read this manual thoroughly before installation and use to ensure proper function and security.
The XIANJU Smart Deadbolt offers multiple unlocking methods, advanced security features, and convenient app control for enhanced home access management.
Package Contents

Image: Overview of all components included in the XIANJU Smart Deadbolt package. This includes the exterior keypad assembly, interior deadbolt unit, exterior handle, traditional keys, and M1 access cards.
Verify that all components are present before beginning installation:
- Exterior Keypad Assembly
- Interior Deadbolt Unit
- Exterior Handle with Lever
- Mounting Hardware (screws, spindle)
- Strike Plate and Reinforcement Plate
- Traditional Keys
- M1 Access Cards
- Installation Template
Setup and Installation
The XIANJU Smart Deadbolt is designed for straightforward installation, typically fitting standard door preparations without requiring new drilling. Ensure your door thickness and backset are compatible before proceeding.

Image: Detailed dimensions of the exterior keypad, interior unit, and handle components, including measurements in inches and millimeters. This assists in verifying compatibility with existing door preparations.
Pre-Installation Checks:
- Confirm door thickness is between 1.38 inches (35mm) and 2.17 inches (55mm).
- Verify backset (distance from door edge to center of bore hole) is 2.36 inches (60mm) or 2.76 inches (70mm).
- Ensure the door frame is prepared for the strike plate.
Installation Steps:
- Prepare the Door: Remove any existing lock hardware. Ensure the bore holes are clean and smooth.
- Install Latch Bolt: Insert the latch bolt into the door edge. Ensure the latch is oriented correctly for your door's swing.
- Install Exterior Assembly: Place the exterior keypad assembly onto the door, aligning the spindle through the latch bolt.
- Install Interior Mounting Plate: Secure the interior mounting plate to the exterior assembly using the provided screws. Route the cable through the plate.
- Connect Cables: Connect the cable from the exterior assembly to the interior deadbolt unit.
- Install Interior Deadbolt Unit: Attach the interior deadbolt unit to the mounting plate, ensuring the thumb turn spindle engages correctly. Secure with screws.
- Install Handle: Attach the exterior handle and interior lever according to the instructions, ensuring smooth operation.
- Install Strike Plate: Install the strike plate and reinforcement plate on the door frame, aligning with the latch bolt.
- Insert Batteries: Open the battery cover on the interior unit and insert 4 AA batteries (not included).
- Initial Setup: The lock will perform an automatic door direction detection. Follow voice prompts for initial setup, including setting a master PIN code.

Image: Visual representation of the lock's ability to automatically detect and adapt to both left-handed and right-handed door installations, simplifying the setup process.
Operating Instructions
Unlocking Methods:
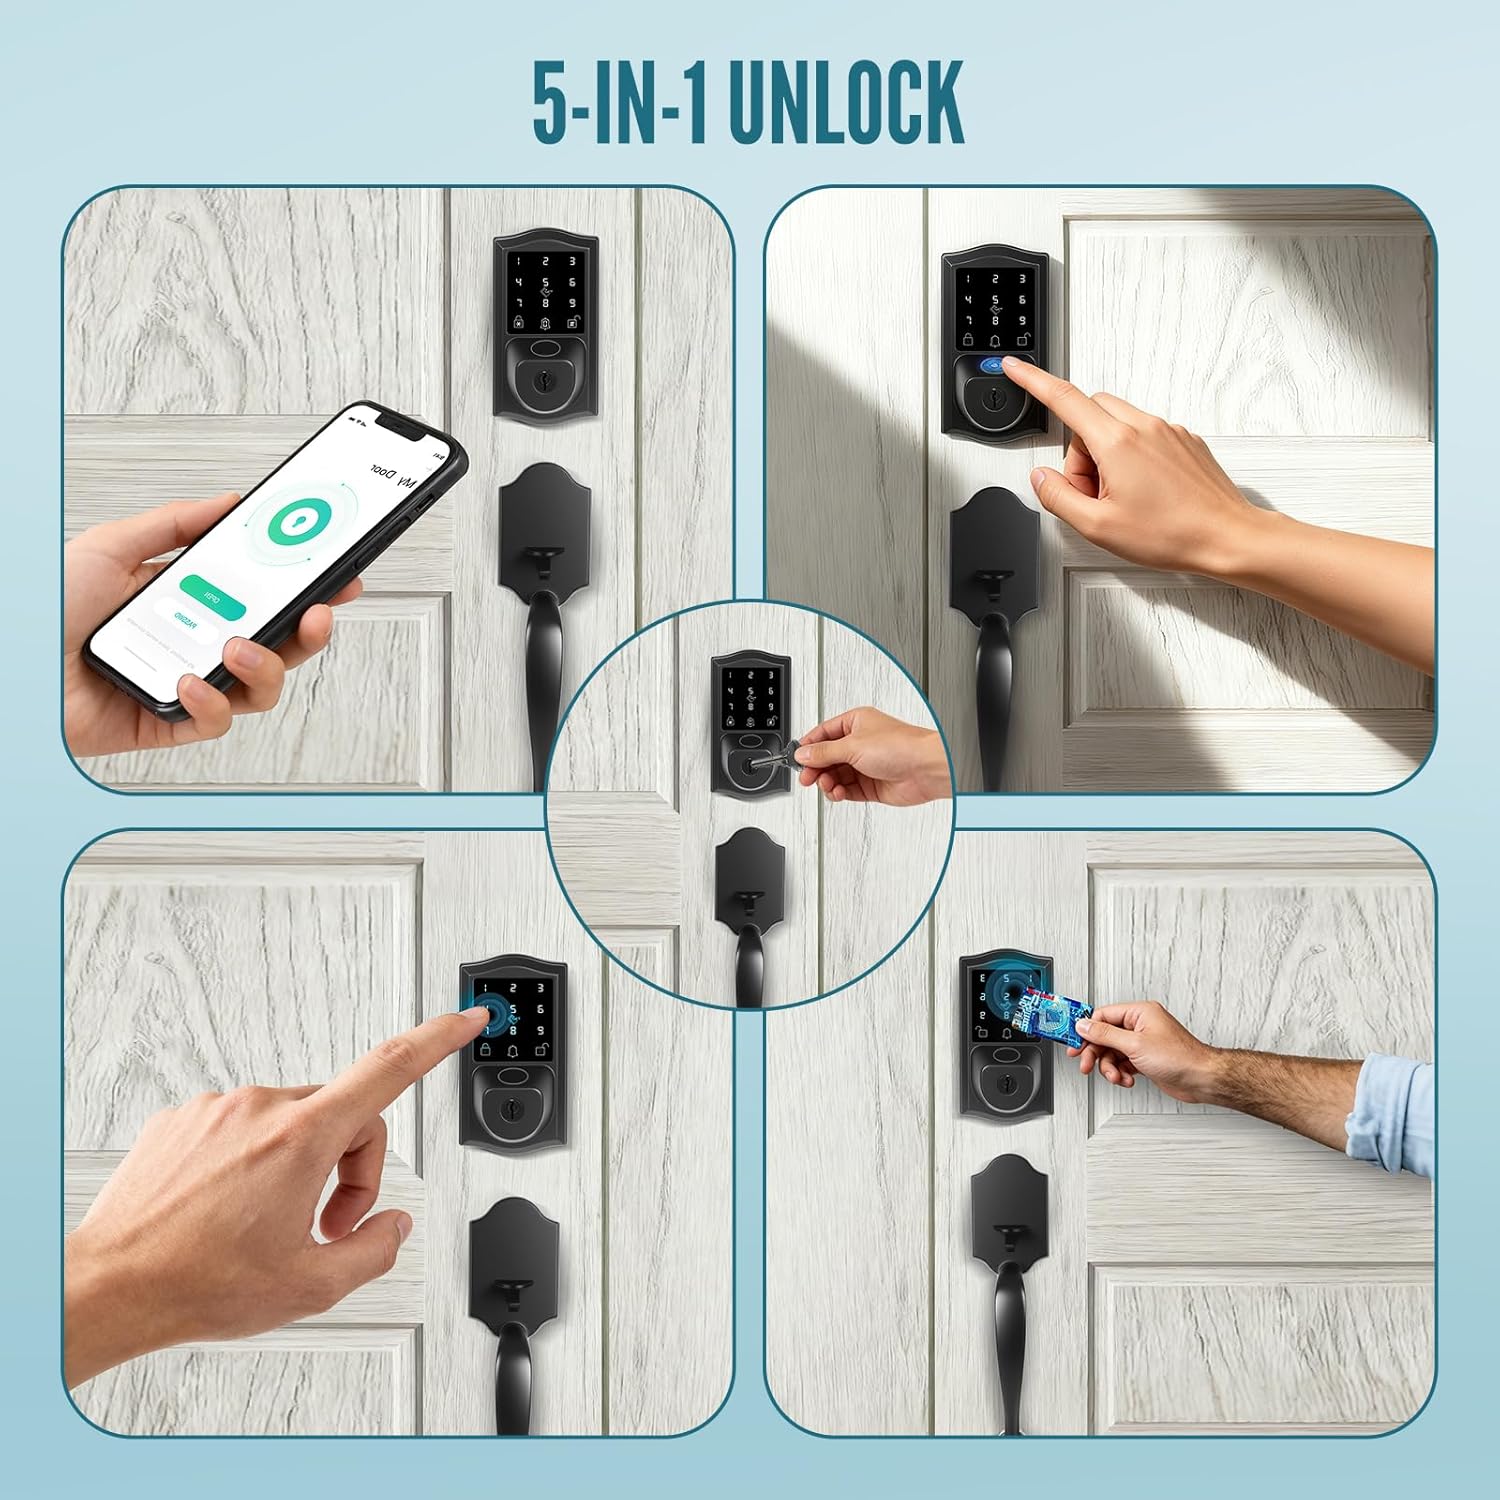
Image: Depiction of the five primary unlocking methods: using a smartphone app, entering a code on the keypad, using a traditional key, scanning a fingerprint, and tapping an M1 access card.
- Fingerprint: Place a registered finger on the fingerprint sensor. The lock will unlock upon successful recognition.
- Keypad Code: Enter your registered PIN code on the touchscreen keypad, followed by the '#' key.
- M1 Card: Present a registered M1 card to the card reader area on the keypad.
- Mobile App: Use the dedicated mobile application to remotely unlock the door.
- Traditional Key: Insert and turn the physical key in the keyhole for manual unlocking.

Image: The lock's fingerprint sensor and internal components, highlighting its capacity to store over 100 unique fingerprint inputs for multiple users.
App Control and User Management:
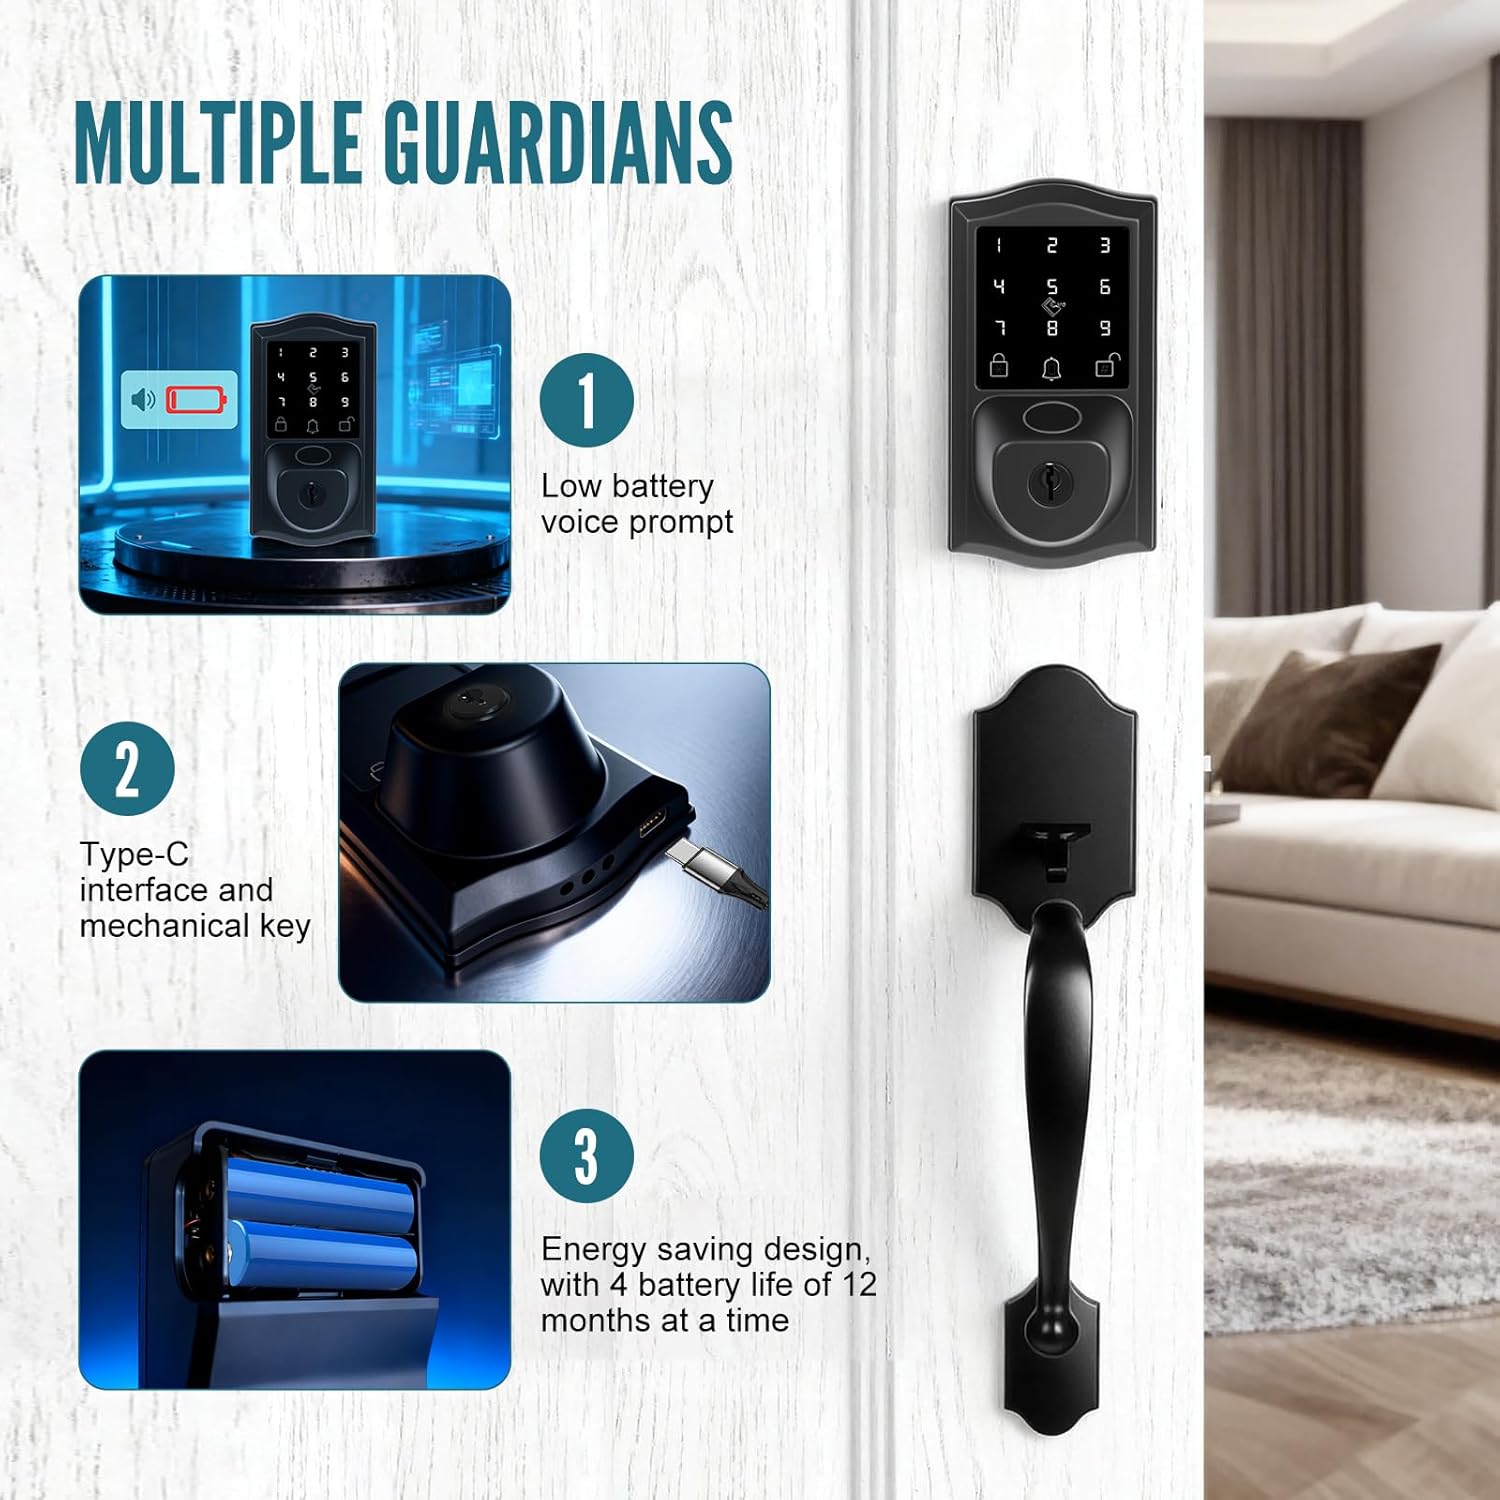
Image: A smartphone screen showing successful door unlocking via the app, highlighting key features like auto-lock, multi-user support, anti-peep codes, IP55 weather resistance, voice prompts, and overall app control.
The mobile application allows for comprehensive management of your lock:
- User Capacity: Supports over 300 users, including administrators, normal users, and temporary access.
- Permission Management: Assign different access levels and types (e.g., permanent, timed, one-time codes).
- Remote Unlock: Unlock the door from anywhere with an internet connection.
- One-Time Passwords: Generate temporary codes for guests or service providers.
- Access Logs: View a history of who entered and when.
- Anti-Peep Virtual Code: Enter random digits before or after your actual code to prevent others from guessing your PIN.
- Auto-Lock: Configure the lock to automatically secure the door after a set period.

Image: Illustration of the various permission types available: Admin Code for full management, Normal User for unlimited access, Time Limit Code for access during specific periods, and One-Time Code for single use.

Image: Demonstrates the remote unlock feature, allowing users to grant access to their door from any location with network connectivity.

Image: Example of generating and sharing a one-time password for temporary access, shown with a person receiving the code on their phone.
Voice Prompts and Navigation:

Image: A visual guide to the voice navigation menu, listing common prompts such as low battery alerts, automatic door direction detection, setup success confirmations, passage mode activation, and voice control options.
The lock provides clear voice prompts for various operations and status updates, making setup and daily use more intuitive.

Image: A user interacting with the smart lock, demonstrating how the voice navigation system guides through setup and operation with clear audio cues.
Maintenance
Battery Replacement:

Image: Illustrates the lock's power management features, including a low battery voice prompt, the Type-C emergency power port, and the energy-efficient design that allows 4 AA batteries to last up to 12 months.
The lock operates on 4 AA batteries (not included). When the battery level is low, you will receive a voice prompt. Replace all four batteries simultaneously with new, high-quality alkaline batteries.
- To replace, slide open the battery cover on the interior unit.
- Remove old batteries and insert new ones, ensuring correct polarity.
- Close the battery cover.
Emergency Power:
In case of complete battery depletion, the lock features a Type-C emergency power port. Connect a portable power bank to this port to temporarily power the lock and gain access.
Cleaning:
Wipe the lock's exterior surfaces with a soft, damp cloth. Avoid abrasive cleaners or solvents that could damage the finish or electronic components.
Troubleshooting
- Lock not responding: Check battery levels. If batteries are depleted, use the Type-C emergency power or the physical key.
- Fingerprint not recognized: Ensure your finger is clean and dry. Try re-registering your fingerprint from different angles.
- Keypad code not working: Ensure you are entering the correct code followed by '#'. If multiple incorrect attempts are made, the lock will temporarily disable the keypad.
- Automatic Locking: The lock will automatically lock after five incorrect attempts to prevent unauthorized access. A hijack alarm will also alert the family's app if configured.
- App connectivity issues: Ensure your smartphone's Bluetooth is enabled and you are within range. Check your home Wi-Fi connection if using remote access features.
- Doorbell function not working: Verify the doorbell button is clean and unobstructed. Check app settings for doorbell notifications.
Specifications
| Feature | Detail |
|---|---|
| Model Number | XJ-D5TFCWC5-BLK-1 |
| Material | Zinc Alloy |
| Color | Matte Black |
| Lock Type | Deadbolt Lock, Keypad Lock |
| Unlocking Methods | Fingerprint, Keypad Code, M1 Card, App, Traditional Key |
| User Capacity | 300+ (Fingerprints, Codes, Cards) |
| Power Supply | 4 x AA Batteries (not included) |
| Emergency Power | Type-C USB Port |
| Battery Life | Up to 12 months (approx. 100,000 unlocks) |
| Operating Temperature | Weatherproof (IP55 rated) |
| Product Dimensions | 11 x 7.79 x 2.79 inches (approx.) |
| Item Weight | 2.99 pounds |

Image: Summary of key performance specifications, including the lock's durability (over 100,000 unlocks), extended battery life, after-sales support period, and IP55 weather resistance rating.
Warranty and Support
XIANJU provides 365 days of after-sales service for this product. For technical support, warranty claims, or further assistance, please refer to the contact information provided with your purchase or visit the official XIANJU website.
Please retain your proof of purchase for warranty purposes.