
1. Introduction
This manual provides essential instructions for the safe and efficient operation of your YOHOOLYO H1 Tattoo Stencil Printer. Please read this manual thoroughly before using the device to ensure proper setup, usage, and maintenance. This thermal printer is designed for creating precise tattoo stencils without the need for ink, offering portability and ease of use for both artists and beginners.
2. What's Included (Kit Contents)
Verify that all items listed below are present in your package:
- H1 Tattoo Printer Machine x 1
- Premium Tattoo Transfer Paper x 10 sheets
- USB-C Cable x 1
- User Manual x 1

3. Product Overview
The YOHOOLYO H1 Tattoo Stencil Printer is a compact and portable thermal printer designed for high-resolution stencil creation. Key features include:
- Thermal Printing Technology: Ink-free operation, producing crisp and detailed stencils.
- High Resolution: 203 DPI for accurate transfer of fine details.
- Bluetooth Connectivity: Seamless connection to iOS and Android devices via the "Tattoo Go" app.
- Portable Design: Lightweight and compact with a 2000mAh rechargeable battery for extended use.
- Anti-Wrinkle Precision System: Ensures paper remains flat during printing to maintain design clarity.


4. Setup Instructions
4.1 Charging the Printer
Before first use, ensure the printer is fully charged. Connect the provided USB-C cable to the printer's charging port and to a compatible power source. The indicator light will show charging status.
4.2 Downloading the "Tattoo Go" App
The printer operates via the "Tattoo Go" app. Download it from your device's app store (iOS App Store or Android Google Play Store).

4.3 Connecting via Bluetooth
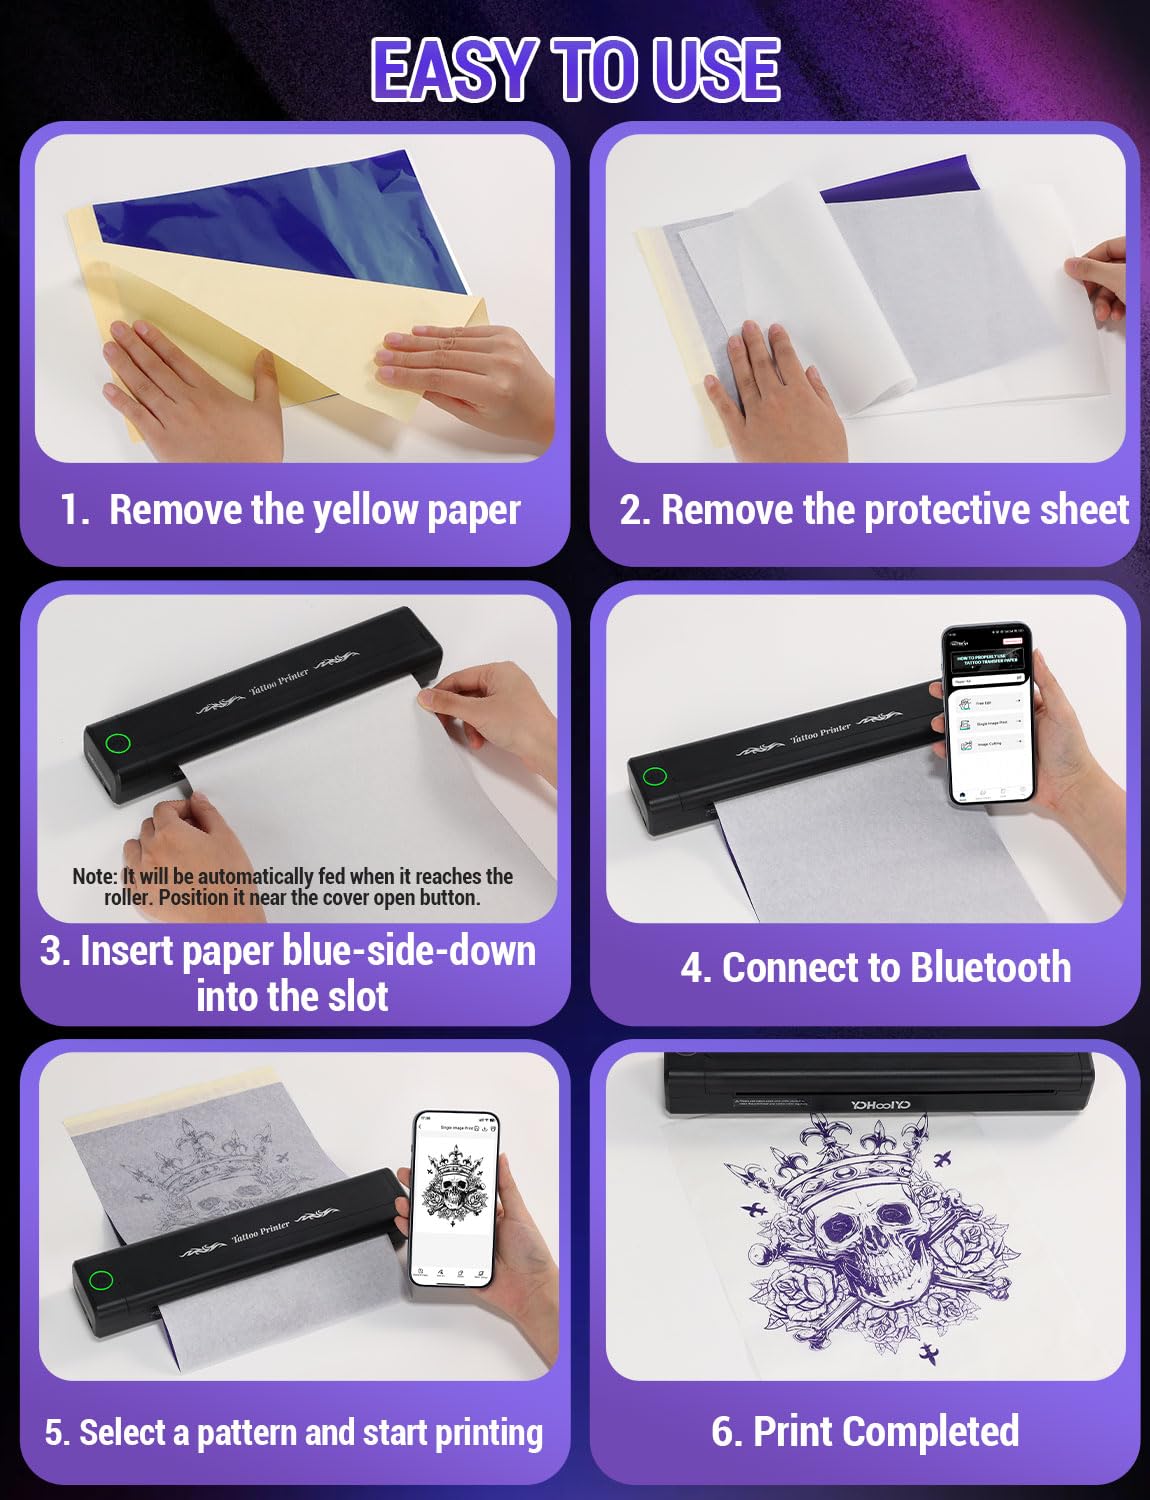
Turn on the printer by pressing and holding the power button. Open the "Tattoo Go" app on your smartphone or tablet and follow the in-app instructions to connect to the printer via Bluetooth.
5. Operating Instructions
5.1 Preparing Transfer Paper
The printer uses specialized tattoo transfer paper. Each sheet typically consists of multiple layers: a white tracing sheet, a removable protective sheet, a blue carbon sheet, and a yellow backing. Carefully separate the layers as instructed by the app or the paper packaging. For optimal results, ensure the paper is flat and free of wrinkles.
5.2 Loading Transfer Paper
Open the printer's cover. Insert the prepared transfer paper (blue side down) into the paper slot. The printer will automatically feed the paper when it detects it. Ensure the paper is aligned correctly to prevent jams and crooked prints.
5.3 Printing Stencils
Using the "Tattoo Go" app, select or design your desired tattoo pattern. The app allows for editing, cropping, and precise previews. Once your design is ready, initiate the print command from the app. The printer will produce a high-resolution stencil on the transfer paper.

5.4 Applying the Stencil
After printing, carefully remove the stencil from the printer. Apply a small amount of transfer gel (not included) to the skin where the tattoo will be placed. Press the printed stencil firmly onto the prepared skin for a few seconds, then gently peel it off to reveal the transferred design.

6. Maintenance
To ensure the longevity and optimal performance of your YOHOOLYO H1 Tattoo Stencil Printer, follow these maintenance guidelines:
- Cleaning: Regularly wipe the exterior of the printer with a soft, dry cloth. Avoid using harsh chemicals or abrasive materials.
- Print Head Care: The thermal print head should be kept clean. Refer to the app or specific instructions for cleaning the print head if print quality degrades.
- Storage: Store the printer in a cool, dry place away from direct sunlight and extreme temperatures.
- Battery: For long-term storage, charge the battery to approximately 50-70% and recharge every few months to prevent deep discharge.
7. Troubleshooting
If you encounter issues with your printer, refer to the following common troubleshooting steps:
- Printer Not Turning On: Ensure the battery is charged. Connect the printer to a power source using the USB-C cable.
- Bluetooth Connection Issues:
- Ensure Bluetooth is enabled on your device and the printer is powered on.
- Restart both the printer and your mobile device.
- Forget the device in your Bluetooth settings and re-pair.
- Ensure the "Tattoo Go" app has Bluetooth permissions.
- Poor Print Quality (Faint/Blurry):
- Ensure you are using genuine tattoo transfer paper.
- Check if the paper is loaded correctly (blue side down).
- Clean the thermal print head.
- Adjust print density settings within the "Tattoo Go" app.
- Paper Jams:
- Ensure the paper is inserted straight and centered.
- Use undamaged transfer paper.
- Gently pull out any jammed paper in the direction of printing.
If problems persist, consult the "Tattoo Go" app's help section or contact YOHOOLYO customer support.
8. Specifications
| Feature | Detail |
|---|---|
| Brand | YOHOOLYO |
| Model Number | H1 |
| Printing Technology | Thermal Printing (Ink-free) |
| Resolution | 203 DPI |
| Connectivity | Bluetooth (iOS, Android) |
| Battery | 2000mAh Rechargeable Lithium Ion |
| Dimensions (L x W x H) | 29.2 x 6.2 x 4.2 cm |
| Item Weight | 850 g |
| Material | Plastic |
| Color | Black |
| Print Media | Thermal Paper |
9. Warranty and Support
For warranty information and customer support, please refer to the documentation included in your product packaging or visit the official YOHOOLYO website. Keep your purchase receipt as proof of purchase for warranty claims.
10. Safety Information
This product is intended for external use only for creating tattoo stencils. Do not ingest any parts or materials. Keep out of reach of children. Use only as directed in this manual.