
1. Introduction
Product Overview
The NU Aqua 8-Stage Countertop Reverse Osmosis Water Filter System with UV provides purified water through an advanced filtration process. This system is designed for ease of use and maintenance, featuring a smart touch display, multiple cup size options, and automatic filter replacement reminders. Its compact design allows for versatile placement in various environments.

Image: The NU Aqua 8-Stage Countertop RO Water Filter System, showcasing its sleek design and compact footprint on a kitchen counter.
Filtration Stages
This system employs an 8-stage filtration process to ensure water purity:
- Stainless Steel in Reservoir: Initial contact point for raw water.
- Mesh Filter: Removes larger particles.
- Sediment Filter: Further removes sediment and suspended solids.
- Mesh Filter: Additional particle removal.
- Carbon Filter: Reduces chlorine, odors, VOCs, and improves taste.
- Mesh Filter: Fine particle filtration.
- RO Membrane: Removes up to 99.99% of total dissolved solids (TDS), heavy metals, salts, PFAS, nitrates, and fluoride.
- UV-C Treatment: Provides ultraviolet sterilization to eliminate microorganisms.
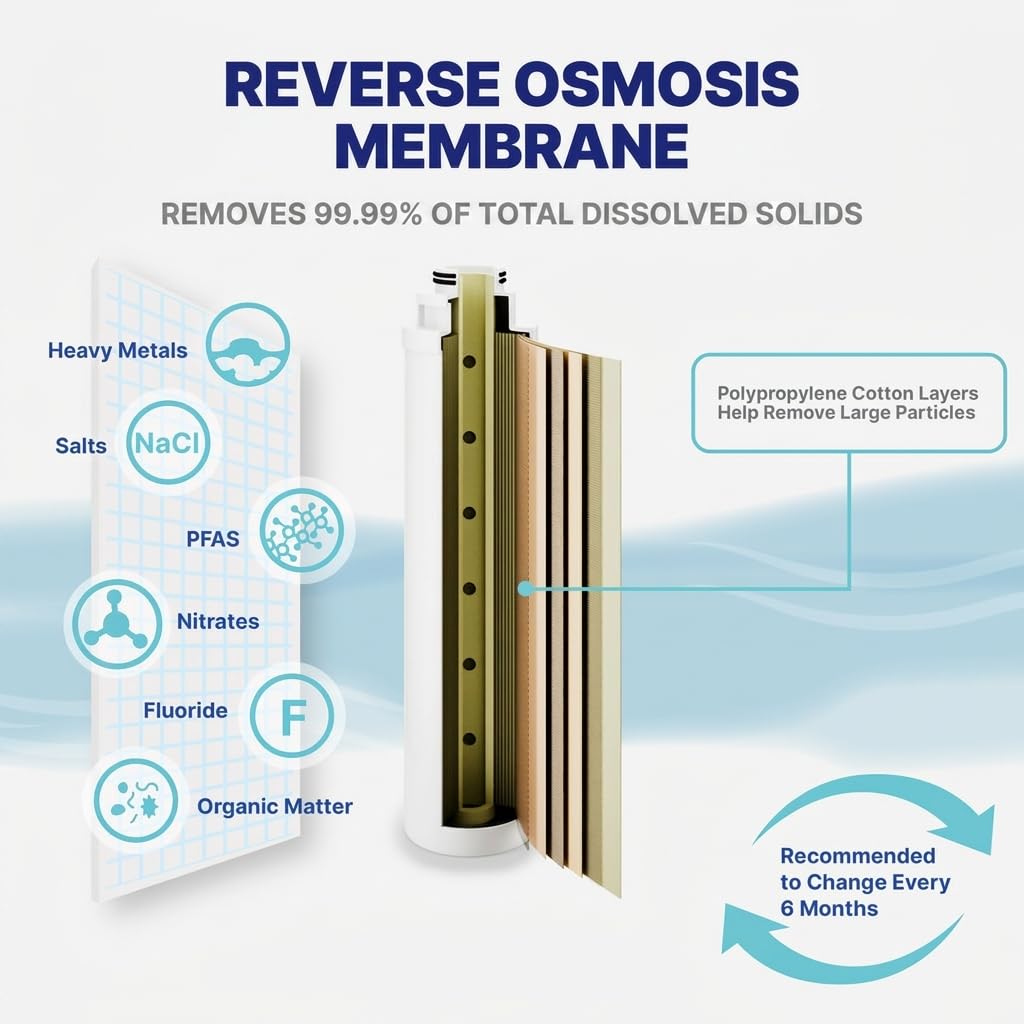
Image: A visual representation of the 8-stage filtration process, detailing each layer from stainless steel to UV-C treatment.

Image: Examples of suitable locations for the portable countertop water filter, including home kitchens, apartments, RVs, and offices.
2. Setup
Unpacking and Placement
- Carefully remove all components from the packaging.
- Place the system on a flat, stable surface. Ensure adequate clearance around the unit for ventilation and access to the water tank.
- No plumbing installation is required.
Initial Use
- Remove the raw water tank from the back of the unit.
- Fill the raw water tank with tap water. Do not exceed the maximum fill line.
- Place the filled tank back into the unit securely.
- Plug the power cord into a standard electrical outlet.
- The system will initiate a self-flushing cycle automatically. Allow this cycle to complete before dispensing water.

Image: A visual guide demonstrating the simple, tool-free filter installation process, highlighting the plug-and-play nature of the system.
3. Operating Instructions
Control Panel Overview
The system features a smart touch display for intuitive control:
- Water Quality Indicator: Displays the current water quality (TDS levels).
- Filter Replacement Reminder: Alerts when filters need changing.
- Low Water Level Indicator: Notifies when the raw water tank is low.
- UV Functioning Status: Indicates if the UV-C sterilization is active.
- Quick Touch Auto Flushing: Initiates a flushing cycle.
- Filter Change Reset Button: Resets filter life indicators after replacement.
- Multiple Cup Sizes: Allows selection of preset dispensing volumes.
- Simple One Touch Water Dispensing: Starts and stops water flow.

Image: Close-up of the smart touch display, highlighting indicators for water quality, filter replacement, UV status, and dispensing controls.
Dispensing Water
- Ensure the raw water tank is filled.
- Place a cup or container under the dispenser spout.
- Select the desired water volume using the 'Water Volume' button (e.g., 4 oz, 8 oz, 12 oz, 16 oz).
- Press the 'Dispense' button to start the water flow.
- The system will automatically stop once the selected volume is dispensed. To stop dispensing manually, press the 'Dispense' button again.
4. Maintenance
Filter Replacement
The system will indicate when filters require replacement. Filter changes are tool-free and designed for simplicity.
- Unplug the unit from the power outlet.
- Open the filter compartment cover.
- Twist the old filter counter-clockwise to unlock and pull it out.
- Insert the new filter, aligning the arrows, and twist clockwise to lock it into place.
- Close the filter compartment cover.
- Plug the unit back in. Press and hold the 'Filter Change Reset' button until the indicator resets.

Image: Detailed view of the Sediment + Carbon PPC filter, which removes bad taste, odors, chlorine, VOCs, rust, and sediment.

Image: Detailed view of the Reverse Osmosis Membrane filter, responsible for removing heavy metals, salts, PFAS, nitrates, fluoride, and organic matter.
Automatic Flushing
The system features a self-flushing function that automatically cleans the internal components daily to prevent mineral buildup and maintain filter efficiency. This process helps prolong the lifespan of the filters and ensures consistent water quality.

Image: Illustration showing the extra-large 1.3-gallon tank capacity and the internal water flow, emphasizing daily auto-cleaning to remove dissolved solids.
Cleaning
- Wipe the exterior of the unit with a soft, damp cloth. Do not use abrasive cleaners.
- Periodically clean the raw water tank and the drip tray with mild soap and water. Rinse thoroughly before reassembling.
5. Troubleshooting
| Issue | Possible Cause | Solution |
|---|---|---|
| No water dispensed | Raw water tank empty; Power not connected; System in flushing cycle | Refill raw water tank; Check power connection; Wait for flushing cycle to complete |
| Slow water flow | Clogged filters; Low water pressure in tank | Replace filters; Ensure raw water tank is adequately filled |
| Unusual taste/odor | Filters need replacement; Initial use (new filter taste) | Replace filters; Dispense and discard a few tanks of water during initial setup |
| Filter replacement indicator active after changing filters | Indicator not reset | Press and hold the 'Filter Change Reset' button until the indicator clears |
| UV indicator off | UV lamp malfunction; System not operating | Contact customer support; Ensure system is powered on and dispensing |
6. Specifications
| Feature | Detail |
|---|---|
| Brand | NU Aqua |
| Model Name | VN-CTRO-AMB |
| Product Dimensions (L x W x H) | 31" x 7" x 31" |
| Item Weight | 10 Pounds |
| Material | Plastic |
| Capacity | 1.3 Gallons |
| Installation Type | Countertop |
| Purification Method | Reverse Osmosis |
| Power Source | Corded Electric |
| Special Features | Change Filter Indicator, Reduce TDS, Self Cleaning, Touch Display |
| Lower Temperature Range | 41 Degrees Fahrenheit |
| Maximum Flow Rate | 0.26 Liters Per Minute |
| Supported Water TDS Level Maximum | 300 PPM |
| Included Components | Countertop RO System, Pre-Installed Sed+PPC Filters |
7. Warranty Information
This product is covered by a manufacturer's warranty. Please refer to the warranty card included in your product packaging for specific terms, conditions, and duration. Retain your proof of purchase for any warranty claims.
8. Customer Support
For technical assistance, replacement parts, or any questions regarding your NU Aqua 8-Stage Countertop RO Water Filter System, please contact NU Aqua customer support. Contact details can typically be found on the manufacturer's website or on the product packaging.