1. Introduction
The Zoom LiveTrak L6max is a versatile 12-channel portable digital mixer and recorder designed for musicians, podcasters, and content creators. It offers high-quality audio recording with 32-bit float technology, multiple input options, built-in effects, and the convenience of battery-powered operation for on-the-go production. This manual provides essential information for setting up, operating, and maintaining your L6max unit.
2. Product Overview
The LiveTrak L6max combines a digital mixer with a multi-track recorder, offering a compact solution for various audio production needs. Key features include:
- Superior Sound Quality: Records audio at 32-bit float/24-bit depth with a 48 kHz sampling frequency.
- Extended Battery Life: Operates for up to 5 hours using lithium batteries.
- Enhanced Portability: Lightweight design (1.48 lbs / 673g without batteries) for easy transport.
- Flexible Input Options: Features 14 input channels, including 4 XLR/TRS combo jacks and 8 TS phone jacks.
- Ample Storage Capacity: Records directly to microSDHC/SDXC memory cards (Class 10 or higher).
- Integrated Features: Includes MIDI connectivity, built-in effects, sound pads, 3-band EQ, bounce track functionality, and AI noise reduction.
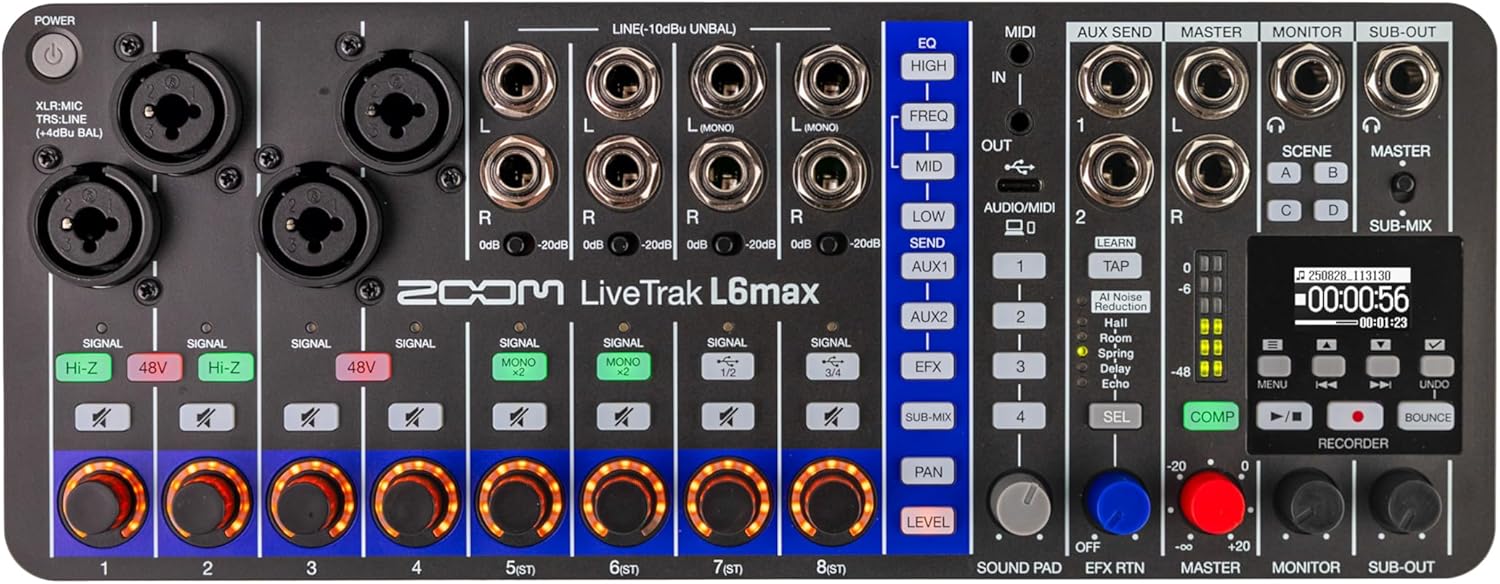
Figure 2.1: Top-down view of the Zoom LiveTrak L6max, showing all controls and input/output jacks.
Controls and Connectors
Familiarize yourself with the various controls and connectors on the L6max for optimal use.
- Input Channels (1-4): XLR/TRS combo jacks for microphones and line-level instruments.
- Input Channels (5-12): TS phone jacks for stereo line-level inputs.
- Gain Knobs: Adjust input sensitivity for each channel.
- EQ Section: High, Mid, Low controls for tone shaping on each channel.
- Effects Send: Controls for sending signal to the built-in effects processor.
- Master Output: Main stereo output for connecting to PA systems or monitors.
- Monitor Outputs: Dedicated outputs for monitoring.
- Headphone Jacks: Multiple headphone outputs with individual level controls.
- Recorder Section: Transport controls (Play, Record, Stop), menu navigation, and display screen.
- USB-C Port: For power and computer connectivity (audio interface/MIDI).
- microSD Card Slot: For recording and playback of audio files.

Figure 2.2: Side view of the L6max, highlighting the microSD card slot and DC5V USB-C power/data port.
3. Setup
3.1 Powering the Unit
The L6max can be powered via a USB-C power adapter (not included) or by four AA batteries.
- USB-C Power: Connect a compatible USB-C power adapter to the DC5V port on the side of the unit.
- Battery Power: Open the battery compartment on the bottom of the unit and insert four AA batteries, ensuring correct polarity. The L6max supports up to 5 hours of operation with lithium batteries.
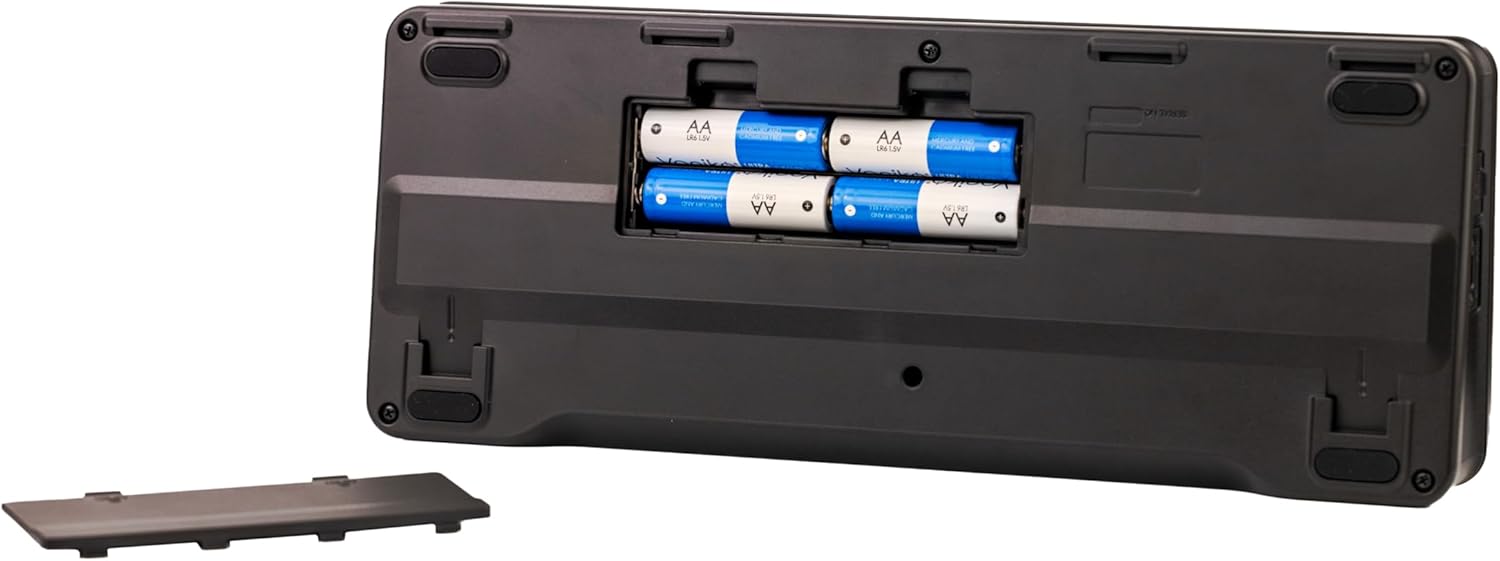
Figure 3.1: Bottom view of the L6max, showing the battery compartment for four AA batteries.
3.2 Inserting a microSD Card
For recording, a microSDHC or microSDXC card (Class 10 or higher) is required.
- Ensure the L6max is powered off.
- Locate the microSD card slot on the side of the unit.
- Insert the microSD card with the contacts facing down until it clicks into place.
- To remove, gently push the card in until it clicks, then release.
3.3 Connecting Inputs and Outputs
Connect your microphones, instruments, and other audio sources to the input channels. Connect your monitoring headphones, speakers, or PA system to the output jacks.
- Microphones/Instruments: Use XLR cables for microphones or TRS/TS cables for instruments and line-level devices into channels 1-4. Use TS cables for stereo line inputs into channels 5-12.
- Headphones: Plug headphones into the dedicated headphone jacks.
- Speakers/PA: Connect the Master Out or Monitor Out to your speakers or PA system using appropriate cables.

Figure 3.2: The L6max connected to a guitar, demonstrating input connectivity.
4. Operating Instructions
4.1 Basic Mixing
Each channel on the L6max features dedicated controls for gain, EQ, and level.
- Gain Adjustment: Use the GAIN knob for each channel to set the input level. Aim for a strong signal without clipping (indicated by the SIGNAL/PEAK LED).
- Equalization (EQ): Adjust the HIGH, MID, and LOW knobs to shape the tone of each input.
- Channel Level: Use the channel faders (or rotary knobs for stereo channels) to set the volume of each input in the main mix.
- Pan: Adjust the PAN knob to position the sound of each channel in the stereo field.
 Figure 4.1: EQ controls allow for precise tone shaping.
4.2 Effects and Sound Pads
The L6max includes a variety of built-in effects and sound pads for enhancing your audio.
- Effects (FX): Use the EFX SEND controls on each channel to send signal to the effects processor. Select and adjust effects (reverb, delay, chorus, etc.) using the dedicated FX section controls.
- Sound Pads: Trigger pre-loaded or custom sound effects and jingles using the sound pads.
 Figure 4.2: Integrated effects processor for audio enhancement.
4.3 AI Noise Reduction
The L6max features AI noise reduction to help clean up your audio in real-time.
- Activating Noise Reduction: Refer to the L6max menu system for options to enable and adjust the AI noise reduction feature on individual channels or the master output.
 Figure 4.3: AI Noise Reduction helps clarify audio recordings.
5. Recording and Playback
5.1 Starting a New Project
Before recording, ensure a formatted microSD card is inserted.
- Press the MENU button to access the system menu.
- Navigate to PROJECT and select NEW PROJECT.
- Confirm your selection to create a new recording project.

Figure 5.1: The L6max display screen showing project details and recording time.
5.2 Recording Tracks
The L6max allows multi-track recording directly to the microSD card.
- Arm the desired tracks for recording by pressing the REC/PLAY button for each channel. The button will illuminate red.
- Press the main RECORD button (red circle) to begin recording.
- Press the STOP button to end recording.
5.3 Playback
To listen to your recorded tracks:
- Ensure all tracks you wish to hear are disarmed (REC/PLAY button not red).
- Press the main PLAY button (triangle).
- Use the REWIND and FAST FORWARD buttons to navigate through the recording.
5.4 Bounce Track Feature
The Bounce Track feature allows you to combine multiple recorded tracks into a single stereo track, freeing up tracks for further recording.
- Prepare the tracks you wish to bounce by setting their levels and pan positions.
- Press the BOUNCE button.
- Follow the on-screen prompts to select the tracks to be bounced and the destination track.

Figure 5.2: The L6max display indicating the Bounce feature is active.
6. Maintenance
Proper maintenance ensures the longevity and optimal performance of your LiveTrak L6max.
- Cleaning: Use a soft, dry cloth to clean the exterior of the unit. Avoid abrasive cleaners or solvents.
- Storage: Store the unit in a cool, dry place away from direct sunlight and extreme temperatures. If storing for an extended period, remove the batteries.
- Firmware Updates: Periodically check the Zoom website for firmware updates to ensure your unit has the latest features and bug fixes.
- Battery Care: Replace batteries when the low battery indicator appears. Use high-quality batteries for best performance.
7. Troubleshooting
This section addresses common issues you might encounter with your L6max.
- No Power:
- Check if the USB-C power adapter is securely connected and functioning.
- If using batteries, ensure they are inserted correctly and are not depleted.
- No Sound Output:
- Verify that input sources are connected correctly and gain levels are set appropriately.
- Check channel faders, master fader, and headphone/monitor levels.
- Ensure output cables are securely connected to speakers/headphones.
- Recording Issues:
- Confirm a microSDHC/SDXC card (Class 10 or higher) is inserted and properly formatted.
- Check available storage space on the microSD card.
- Ensure tracks are armed for recording.
- Poor Sound Quality (Noise/Distortion):
- Adjust input gain to prevent clipping.
- Check cable connections for any loose or faulty connections.
- Utilize the AI noise reduction feature if ambient noise is present.
- Computer Connectivity Problems:
- Ensure the L6max is connected to your computer via a USB-C cable.
- Verify that the L6max is selected as the audio input/output device in your computer's sound settings or DAW.
8. Specifications
| Feature | Specification |
|---|---|
| Model Number | L6max |
| Item Weight | 2.23 pounds (1.01 kg) |
| Product Dimensions | 6.3 x 8.27 x 2.17 inches (16 x 21 x 5.5 cm) |
| Number of Channels | 12 |
| Connectivity Technology | USB |
| Power Source | Battery Powered (AA) / USB-C |
| Frequency | 48 KHz |
| Recording Bit Depth | 32-bit float / 24-bit |
| Storage Media | microSDHC/SDXC (Class 10 or higher) |
9. Warranty and Support
For warranty information and technical support, please refer to the official Zoom website or contact your local distributor. Keep your proof of purchase for warranty claims.
- Online Resources: Visit the Zoom Store on Amazon for product information and support links.
- Product Registration: Register your LiveTrak L6max on the official Zoom website to receive updates and support.


