Introduction
This manual provides essential instructions for the safe and efficient operation of your Yofidra 24 Egg Incubator. Please read this guide thoroughly before initial use and retain it for future reference. Proper setup and maintenance are crucial for successful egg incubation.
Package Contents
Verify that all components are present upon unpacking:
- Incubator Unit (Base, Egg Tray, Transparent Top Cover with Control Panel)
- Power Adapter
- Water Bottles (2)
- Instruction Manual

Image: Contents of the Yofidra 24 Egg Incubator package, including the main unit, power adapter, water bottles, and egg tray.
Setup
1. Incubator Structure Overview
Familiarize yourself with the main parts of the incubator before assembly.

Image: Exploded view showing the incubator's base, mesh, egg tray, clamp strip, transparent top cover, rotation axis, control panel, and exhaust valve.
2. Placement
Place the incubator on a stable, level surface away from direct sunlight, drafts, or extreme temperature fluctuations. Ensure adequate ventilation around the unit.
3. Water Bottle Installation
Attach the provided water bottles to the designated ports on the incubator. These bottles facilitate automatic water refilling to maintain humidity levels.

Image: The Yofidra incubator with two water bottles attached to the side ports, ready for automatic water refill.
4. Power Connection
Connect the power adapter to the incubator and then plug it into a suitable electrical outlet. The digital display will illuminate.
Operation
1. Digital Display and Control Panel
The control panel features an LED screen displaying temperature, humidity, hatching days, and egg turning countdown. Buttons allow for setting adjustments.

Image: A close-up view of the incubator's digital display showing temperature, humidity, hatching days, and egg turning countdown, along with control buttons.
2. Temperature and Humidity Control
The incubator is equipped with a high-precision digital sensor to monitor and maintain the ideal temperature range (±0.1℃). The system includes a low-temperature alarm and an automatic fan for air circulation. Humidity is managed via the external water refill system and can be manually adjusted by filling specific water basins in the base.
3. Egg Placement
Carefully place fertilized eggs into the egg tray. The incubator can accommodate various egg sizes, including chicken, duck, goose, pigeon, quail, and bird eggs, with adjustable dividers.

Image: The incubator tray filled with different types of eggs (chicken, duck, quail) and examples of hatched chicks, illustrating its versatility.
4. Automatic Egg Turning
The incubator automatically turns eggs at selectable intervals (60, 120, or 180 minutes) to ensure even heating and promote embryo development. The turning mechanism will automatically stop 3 days before the expected hatch date.

Image: The incubator's transparent lid showing eggs being turned automatically by the internal mechanism, with arrows indicating 360-degree rotation.
5. Humidity Management
The external water injection ports allow for easy water addition without opening the lid, minimizing temperature fluctuations. For days 1-18, maintain humidity between 55%-70% using Port A (200ml bottle). For days 19-21, increase humidity to 65%-85% using Port B (400ml bottle).

Image: Diagram illustrating the automatic water refill system with two ports for different humidity levels during incubation stages (Day 1-18 and Day 19-21).
6. Egg Candling
A built-in egg candler lamp allows for effortless checking of egg development at any time. Observe the embryo's growth through the shell.
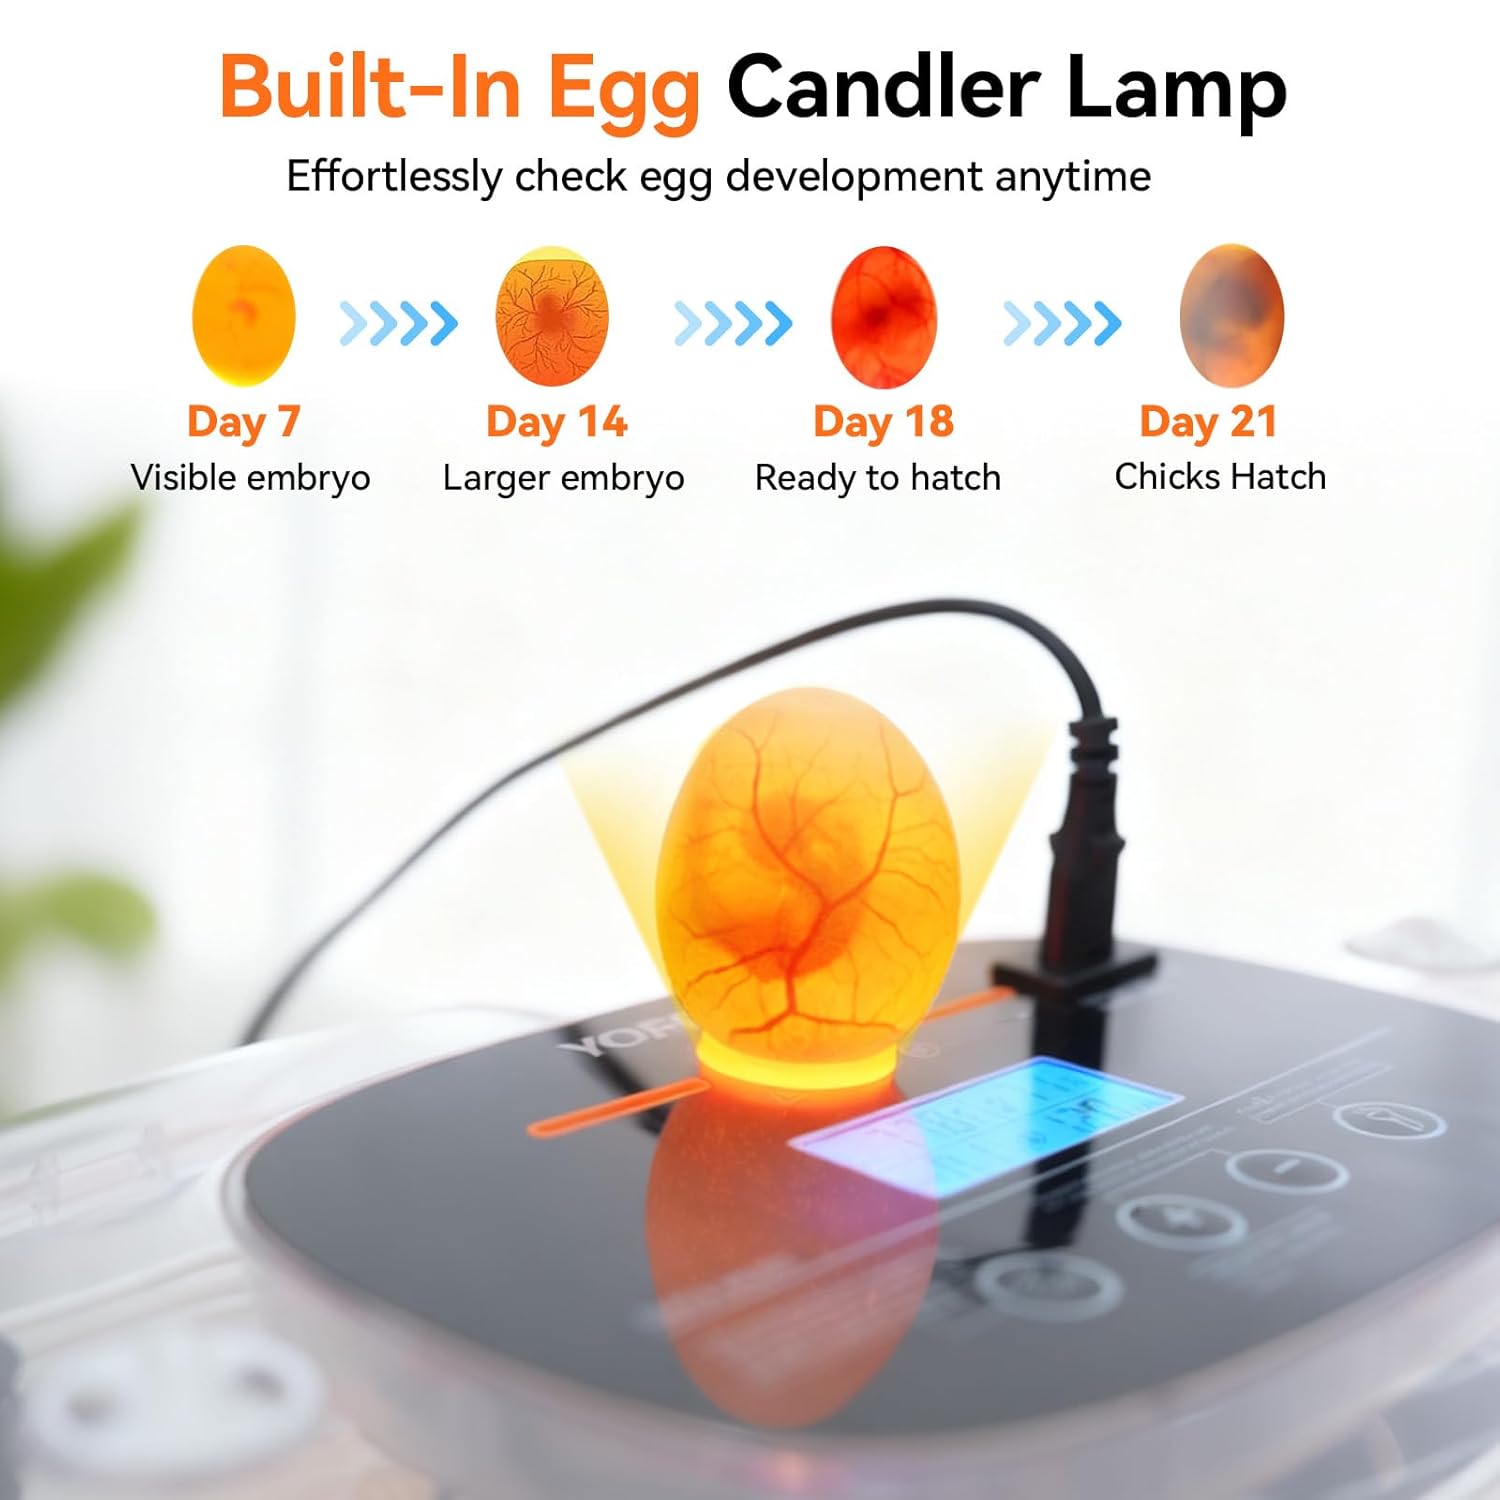
Image: An egg being candled by the built-in lamp on the incubator, revealing the developing embryo inside.
7. Hatching Phase
On the 19th day of incubation, remove the egg tray to prevent further turning. This prepares the eggs for hatching. Ensure humidity is maintained at the higher range (65%-85%) during this period.
8. Instructional Videos
The following videos provide visual guidance on the incubator's operation:
Video: Demonstration of the Yofidra 24 Egg Incubator's features and operation.
Video: Further visual instructions for using the Yofidra 24 Egg Incubator.
Maintenance
1. Cleaning
Regular cleaning is essential for hygiene and optimal performance. The base and egg tray can be rinsed with water. The top cover, including the control panel, should be wiped down with a damp cloth. Do not immerse the top cover or control panel in water.

Image: Visual guide for cleaning the incubator, showing the base being rinsed and the top cover being wiped with a damp cloth.
2. Storage
When not in use, ensure the incubator is clean and dry. Store it in a cool, dry place, protected from dust and direct sunlight.
Troubleshooting
- Temperature/Humidity Alerts: If the incubator displays a low-temperature or humidity alert, check the ambient room temperature and ensure the water bottles are filled correctly. Adjust room conditions or add water as needed.
- Eggs Not Turning: Verify that the egg turning mechanism is properly connected and powered. Ensure the egg tray is correctly seated. Remember that turning stops 3 days before hatching.
- Inconsistent Hatch Rates: Ensure eggs are fertilized and placed in the incubator within 24 hours of purchase for optimal results. Verify that temperature and humidity settings are appropriate for the specific egg type.
Specifications
| Model Number | 4G6442Y |
| Egg Capacity | Up to 24 chicken eggs (varies by egg size) |
| Package Dimensions | 18.85 x 12.5 x 7.25 inches |
| Item Weight | 4.69 pounds |
| Temperature Control Accuracy | ±0.1℃ |
| Power Source | AC 100-120V |

Image: The Yofidra incubator with key dimensions labeled: 44cm/17.32inch length, 26cm/10.24inch width, and 14cm/5.51inch height.
Warranty and Support
Yofidra provides a lifetime warranty for this product. For any questions or concerns regarding your incubator, please contact Yofidra customer support. Contact information can typically be found on the product packaging or the official Yofidra website.


