1. Introduction
This manual provides essential information for the safe and effective operation and maintenance of your FUNMILY Upgrade Walking Pad Folding Treadmill. Please read this manual thoroughly before initial use and retain it for future reference. This versatile fitness equipment is designed for various exercise needs, functioning as an under-desk walking pad, a traditional treadmill, and offering incline training capabilities with a reinforced handle bar.

Image: The FUNMILY Walking Pad Folding Treadmill in both its upright position with a handle bar and its flat, under-desk configuration.
2. Important Safety Instructions
- Always consult with a physician before starting any exercise program.
- Place the treadmill on a flat, stable surface with adequate clearance around it.
- Ensure the safety key is properly attached before operating the treadmill.
- Do not operate the treadmill if it is damaged or malfunctioning.
- Keep children and pets away from the treadmill during operation.
- Wear appropriate athletic footwear and clothing.
- Do not step on or off the treadmill while the belt is moving.
- Use the handle bar for stability, especially when adjusting speed or incline.
- Unplug the treadmill from the power outlet when not in use or before cleaning/maintenance.
3. Package Contents
Verify that all components are present upon unboxing:
- FUNMILY Walking Pad Treadmill (x1)
- Mobile Support (x1)
- Remote Control (x1)
- Lubricating Oil (x1)
- Safety Key (x1)
- Screws (x4)
- Wrench (x1)
- User Manual (x1)
4. Setup
4.1 Unboxing and Initial Assembly
Carefully remove all components from the packaging. The treadmill comes largely pre-assembled. The main step is to secure the handle bar.
- Lift the handle bar to its upright position.
- Align the holes on the handle bar with the corresponding holes on the treadmill base.
- Insert the provided screws and tighten them securely with the wrench.
- Attach the mobile support/device holder to the top of the handle bar.
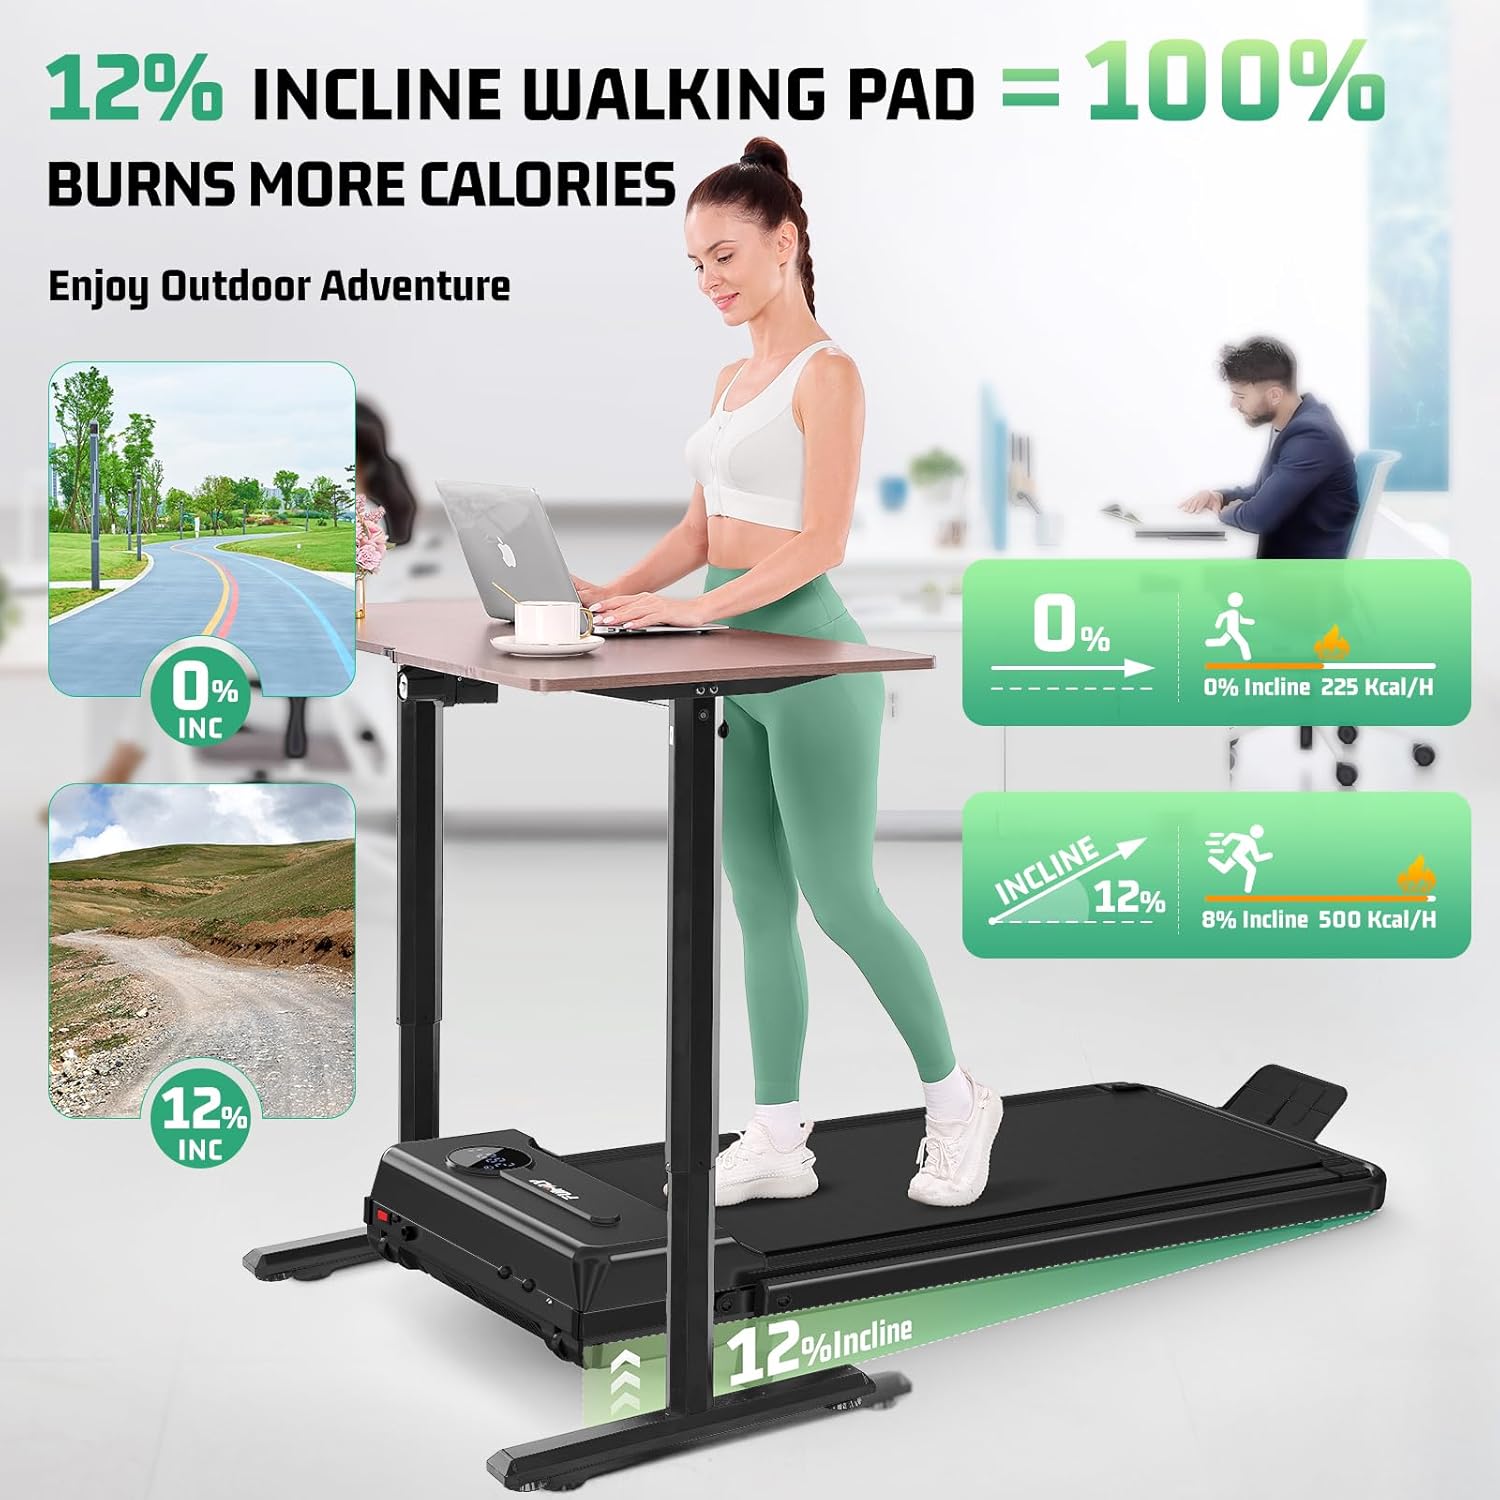
Image: A user securing the handle bar to the treadmill base during assembly.
4.2 Adjusting Incline
The treadmill features a 2-level manually adjustable incline system. To adjust, locate the adjustable feet at the rear of the treadmill. Lift the treadmill slightly and pivot the feet to the desired position for either a flat or inclined workout.
4.3 Power Connection
Plug the power cord into a grounded electrical outlet. Turn on the main power switch located on the treadmill base.
4.4 Setup Demonstration Video
Video: An unboxing and demonstration of the FUNMILY Walking Treadmill, showing the assembly process and initial setup steps.
5. Operating Instructions
5.1 Powering On/Off
After connecting to power and turning on the main switch, the LED display will illuminate. Press the power button on the remote control to start or stop the treadmill.
5.2 Using the Remote Control
The remote control allows you to adjust speed, start/stop, and switch between exercise modes. Use the '+' and '-' buttons to increase or decrease speed. The 'M' button cycles through different modes.
5.3 LED Display
The multi-function LED display clearly shows real-time data including time, calories burned, current speed, and distance covered during your workout.
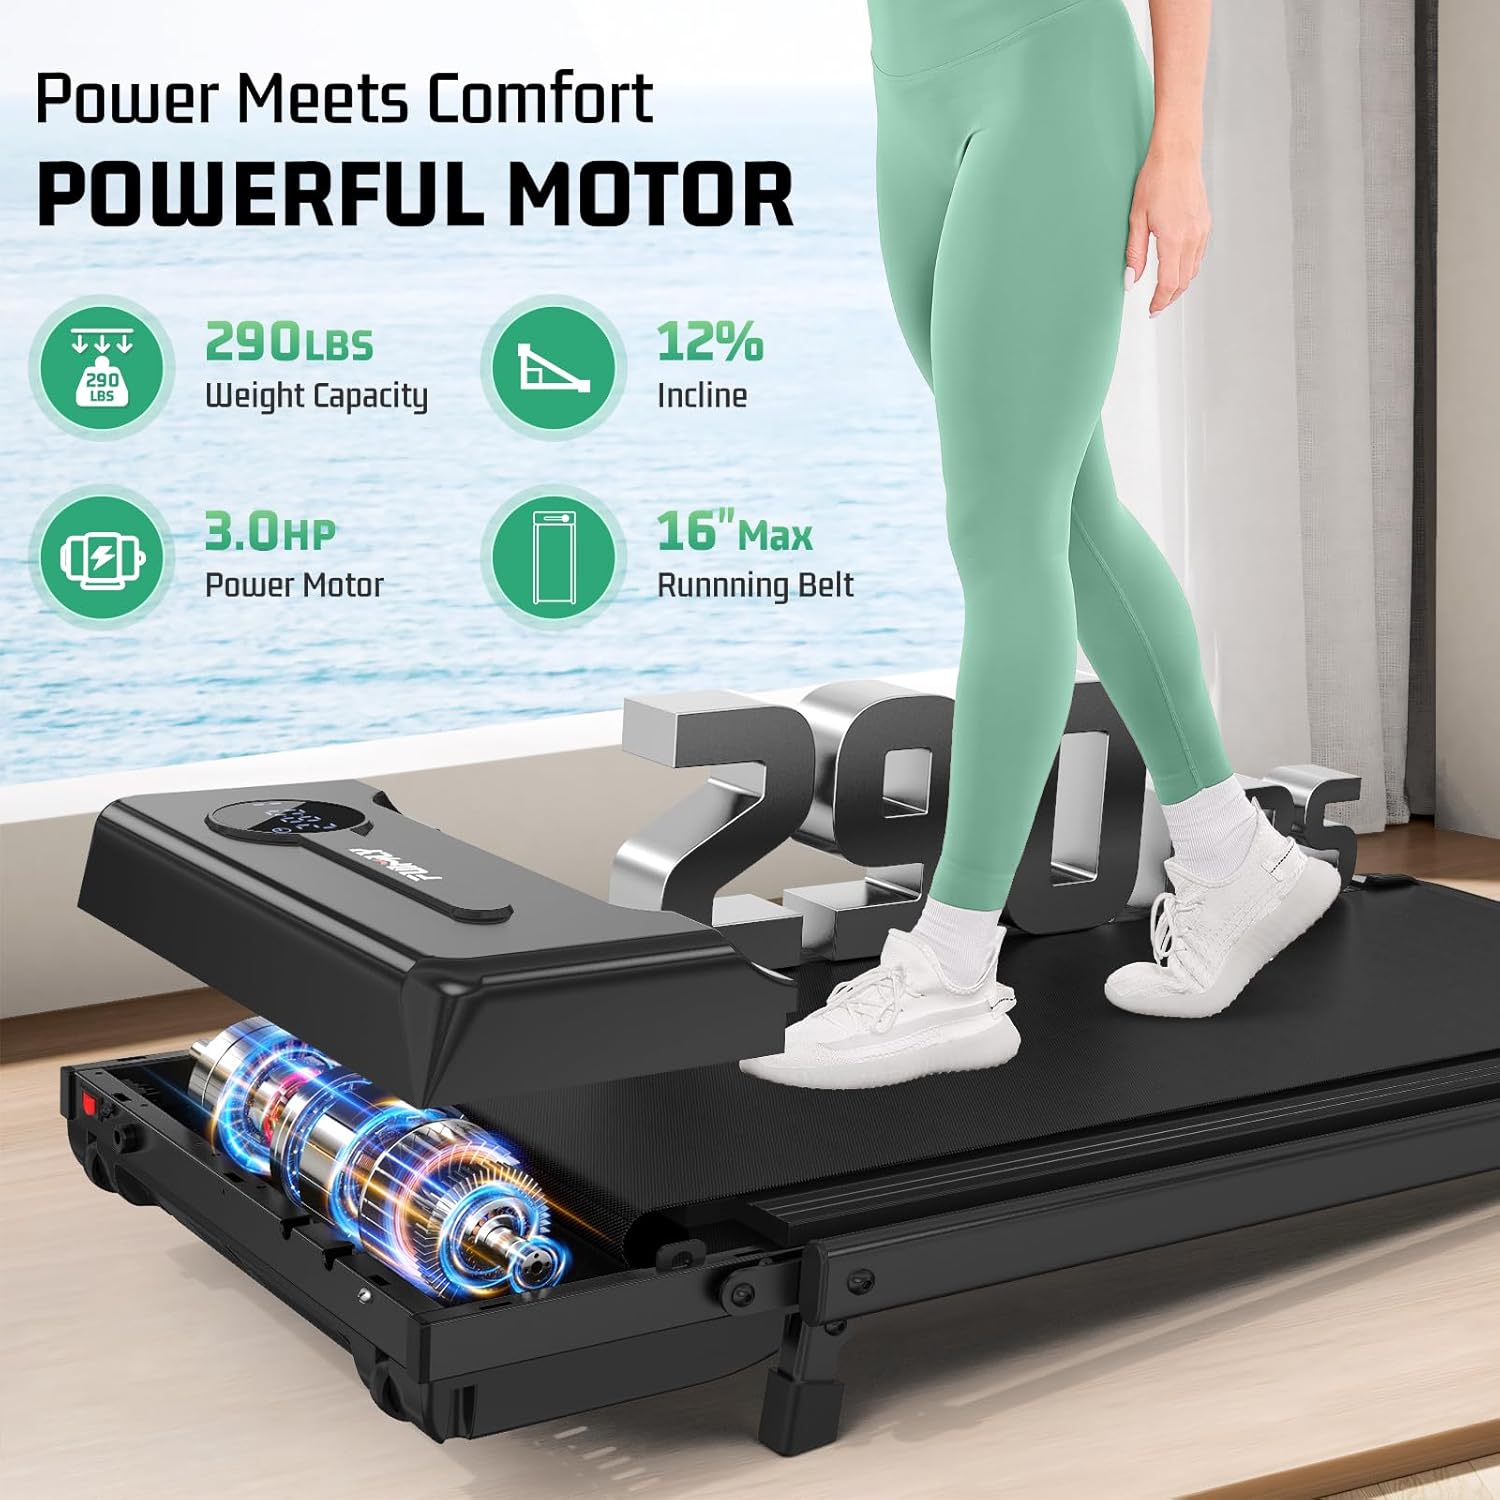
Image: The treadmill's LED display showing various workout metrics and the remote control for operation.
5.4 Exercise Modes
The treadmill supports various exercise modes, including walking, jogging (up to 4.0 MPH), and incline walking. The handle bar can be used for support or folded down for under-desk use.
5.5 Operating Demonstration Video
Video: A demonstration of the foldable walking pad with incline, showcasing its operational features and different modes.
6. Key Features
6.1 4-in-1 Multi-Function Design
This treadmill combines the functionality of an under-desk walking pad, a traditional treadmill, an incline trainer, and a treadmill with a safety handle bar, adapting to various fitness routines and spaces.
Image: The treadmill demonstrating its 4-in-1 versatility, including under-desk use and upright use with a handle bar.
6.2 12% Max Incline Training
Manually adjust the incline up to 12% to simulate uphill walking, engaging specific muscle groups (glutes, calves, core) and potentially burning more calories compared to flat walking.

Image: A user on the treadmill with a visual representation of the 12% incline and its effect on calorie expenditure.
6.3 Enhanced Safety Handle Bar
The reinforced handle bar provides balanced support and stability, reducing the risk of falls and redistributing body weight to protect knees and joints during exercise.

Image: A user demonstrating the use of the handle bar for enhanced safety and support on the treadmill.
6.4 16" Widened Belt with 7-Layer Shock Absorption
The extra-large 16-inch running surface offers ample space for comfortable workouts. Its 7-layer high-tech dual rebound shock absorption system minimizes pressure on joints, ensuring comfort.

Image: A detailed view of the treadmill's 7-layer shock-absorbing running belt, emphasizing joint protection.
6.5 Powerful and Quiet 3.5HP Motor
Equipped with a robust 3.5HP motor, the treadmill provides smooth and consistent performance. Its low-noise operation (under 45dB) allows for use in various environments without disturbance.
6.6 Easy to Move & Store
The foldable design and built-in wheels make the treadmill easy to move and store in compact spaces, such as under a sofa or bed, making it ideal for home or office use.

Image: The treadmill being easily folded and stored, showcasing its space-saving design and built-in wheels.
6.7 Feature Demonstration Video
Video: A comprehensive review demonstrating the 4-in-1 functionality, incline options, and portability of the treadmill.
7. Maintenance
7.1 Cleaning
Regularly wipe down the treadmill with a damp cloth to remove dust and sweat. Avoid using abrasive cleaners or solvents.
7.2 Lubrication
The running belt requires periodic lubrication to ensure smooth operation and prolong its lifespan. Apply the provided lubricating oil under the belt as instructed in the separate lubrication guide (if included) or as recommended by the manufacturer, typically every few months depending on usage.
7.3 Belt Adjustment
If the running belt shifts to one side or feels loose, it may need adjustment. Refer to the specific instructions in the full user manual for proper belt centering and tensioning procedures using the provided wrench.
8. Troubleshooting
- Treadmill not powering on: Ensure the power cord is securely plugged into a working outlet and the main power switch is in the 'ON' position. Check the remote control battery.
- Belt not moving: Verify the safety key is correctly placed. Ensure the remote control is paired and the start button has been pressed.
- Unusual noise or squeaking: Check for proper lubrication of the running belt. Ensure all assembly screws are tightened. If the noise persists, contact customer support.
- Belt slipping or uneven movement: The running belt may require tensioning or centering. Refer to the maintenance section or the full user manual for adjustment instructions.
9. Specifications
| Feature | Detail |
|---|---|
| Product Dimensions (LxWxH) | 54"D x 25.99"W x 5.9"H |
| Material | Metal, Rubber, Plastic |
| Weight Capacity | 400+ lbs |
| Motor Power | 3.5 HP |
| Running Surface Width | 16 inches |
| Incline Levels | 2-level manual (up to 12%) |
| Speed Range | 0.6 - 4.0 MPH |
| Noise Level | < 45 dB |
10. Warranty and Support
Specific warranty details are not provided within this manual. For warranty information, customer support, or to inquire about replacement parts, please refer to the product packaging or contact FUNMILY customer service directly. The treadmill is certified by SGS to meet CE, RoHS, CB, EN 957, and IEC standards, ensuring product quality and safety.


