1. Product Overview
The GIGABYTE B760M DS3H WIFI6E GEN5 is an M-ATX motherboard designed to support 14th and 13th Generation Intel Core Processors. It features an LGA 1700 socket and is built with a focus on performance and connectivity for modern computing needs.
Key Features:
- Intel LGA 1700 Socket: Supports 14th and 13th Gen Intel Core Series Processors.
- DDR5 Compatibility: Features Dual Channel DDR5 memory support across 4 DIMM slots.
- Robust Power Design: Equipped with a Hybrid 8+2+1 Phases Digital VRM Solution for stable power delivery.
- Next-Gen Connectivity: Includes PCIe 5.0, M.2 slots, and USB 3.2 Gen 2x2 Type-C ports.
- High-Speed Networking: Integrated Intel Wi-Fi 6E and 2.5GbE LAN for fast and reliable network connections.
- User-Friendly Features: Incorporates Smart Fan 6 for advanced cooling control and Q-Flash Plus for BIOS updates without CPU, memory, or GPU installation.

Figure 1.1: Top-down view of the GIGABYTE B760M DS3H WIFI6E GEN5 motherboard, showing the LGA 1700 socket, DDR5 DIMM slots, PCIe slots, and M.2 slots.
2. Setup and Installation
This section provides general guidelines for installing your GIGABYTE B760M DS3H WIFI6E GEN5 motherboard. Always refer to the detailed instructions provided with your CPU, cooler, and other components for specific installation steps.
2.1 Component Installation Order
- CPU Installation: Carefully open the LGA 1700 socket lever, align the CPU with the triangular mark on the socket, place the CPU gently, and close the lever to secure it.
- CPU Cooler Installation: Install your chosen CPU cooler according to its manufacturer's instructions. Ensure proper thermal paste application.
- Memory (RAM) Installation: Insert DDR5 memory modules into the DIMM slots. For dual-channel operation, refer to the motherboard manual for recommended slot configurations (typically slots A2 and B2 first). Press firmly until the clips on both ends lock the module in place.
- M.2 SSD Installation: Locate the M.2 slots on the motherboard. Insert the M.2 SSD at an angle and secure it with the provided screw or EZ-Latch mechanism.
- Graphics Card (GPU) Installation: Insert your graphics card into the primary PCIe 5.0 x16 slot. Ensure it is fully seated and secured by the PCIe EZ-Latch.
- Power Supply Connection: Connect the 24-pin ATX power connector and the 8-pin CPU power connector from your power supply to the motherboard.
- SATA Devices: Connect SATA data cables to your storage drives (HDDs/SSDs) and the SATA 6Gb/s ports on the motherboard.
- Front Panel Connectors: Connect the case's front panel headers (power button, reset button, USB ports, audio jacks) to the corresponding pins on the motherboard. Refer to the motherboard's silkscreen labels for correct orientation.
- Antenna Installation: For Wi-Fi functionality, screw the included Wi-Fi antennas onto the rear I/O panel's antenna connectors (WiFi EZ-Plug).

Figure 2.1: Motherboard layout diagram highlighting key connectors such as USB ports, Wi-Fi antenna connectors, HDMI, DisplayPort, LAN, and audio jacks.
3. Operating Instructions
3.1 Initial Boot-Up and BIOS/UEFI Access
- After assembling your system, connect a monitor, keyboard, and mouse.
- Power on your system. During the boot process, repeatedly press the DEL key to enter the BIOS/UEFI setup utility.
- In the BIOS/UEFI, you can configure boot order, enable/disable features, adjust fan speeds (Smart Fan 6), and monitor system status.
3.2 Driver Installation
- After installing your operating system, install the necessary drivers for the motherboard components.
- Drivers can be found on the official GIGABYTE website for your specific motherboard model. Key drivers include chipset, LAN, Wi-Fi, audio, and USB drivers.
3.3 BIOS Update with Q-Flash Plus
- The Q-Flash Plus feature allows you to update the BIOS without installing the CPU, memory, or graphics card.
- Download the latest BIOS file from the GIGABYTE website and rename it to GIGABYTE.bin.
- Copy the renamed BIOS file to a USB flash drive (FAT32 format).
- Insert the USB flash drive into the designated Q-Flash Plus USB port on the rear I/O panel.
- With the power supply connected and turned on (but the system off), press the Q-Flash Plus button. The LED will flash, indicating the update process. Wait until the LED stops flashing.
4. Maintenance
Regular maintenance helps ensure the longevity and optimal performance of your motherboard and system.
- Dust Removal: Periodically clean dust from inside your computer case, especially from heatsinks, fans, and motherboard surfaces, using compressed air. Ensure the system is powered off and unplugged before cleaning.
- BIOS Updates: Keep your BIOS updated to the latest version to benefit from performance improvements, bug fixes, and support for new hardware. Use the Q-Flash Plus feature or the BIOS utility.
- Driver Updates: Regularly check the GIGABYTE website for updated drivers for your motherboard's components.
- Physical Inspection: Occasionally inspect all cable connections (power, SATA, front panel) to ensure they are secure.
5. Troubleshooting
This section addresses common issues you might encounter.
5.1 Common Issues and Solutions
- No Power / System Does Not Turn On:
- Ensure the power supply is connected to the motherboard (24-pin ATX and 8-pin CPU) and the wall outlet.
- Check if the power supply switch is in the ON position.
- Verify that the front panel power button cable is correctly connected to the motherboard.
- No Display / No POST (Power-On Self-Test):
- Confirm that the monitor is connected to the graphics card (or integrated graphics if applicable) and powered on.
- Reseat the RAM modules firmly in their slots. Try booting with only one RAM module.
- Reseat the graphics card in its PCIe slot. Ensure any required PCIe power cables are connected to the GPU.
- Clear the CMOS by removing the CMOS battery for 5-10 minutes or using the Clear CMOS jumper (refer to the full manual for location).
- Operating System Not Booting:
- Check the boot order in the BIOS/UEFI to ensure your primary storage drive is selected.
- Verify that the SATA data and power cables are securely connected to your storage drive.
- If using an M.2 SSD, ensure it is properly seated and detected in the BIOS.
- Network Connectivity Issues:
- For wired LAN, ensure the Ethernet cable is securely connected and the LAN driver is installed.
- For Wi-Fi, ensure the antennas are properly attached to the WiFi EZ-Plug connectors and the Wi-Fi driver is installed.
- Check network settings in your operating system.
If issues persist, consult the comprehensive GIGABYTE user manual or contact technical support.
6. Technical Specifications
| Feature | Detail |
|---|---|
| Brand | GIGABYTE |
| Model Name | B760M DS3H WIFI6E GEN5 |
| CPU Socket | LGA 1700 |
| Compatible Processors | 14th, 13th Gen Intel Core Series Processors |
| Chipset | Intel B760 Express Chipset |
| RAM Memory Technology | DDR5 |
| Memory Slots | 4 x DDR5 DIMM sockets (Dual Channel) |
| Max Memory Speed | Up to 5600 MHz (O.C.) |
| PCIe Slots | 1 x PCIe 5.0 x16 slot, 2 x PCIe 3.0 x1 slots |
| M.2 Connectors | 2 x M.2 connectors (PCIe 4.0 x4) |
| SATA Ports | 4 x SATA 6Gb/s connectors |
| USB Ports (Rear) | 1 x USB 3.2 Gen 2x2 Type-C, 1 x USB 3.2 Gen 2, 2 x USB 3.2 Gen 1, 4 x USB 2.0/1.1 |
| Networking | Intel Wi-Fi 6E, 2.5GbE LAN |
| Audio | Realtek Audio CODEC (High Definition Audio) |
| Video Outputs | 1 x HDMI, 1 x DisplayPort (requires CPU with integrated graphics) |
| Form Factor | Micro ATX (M-ATX) |
| Dimensions (LxWxH) | 8.82 x 8.82 x 1 inches |
| Item Weight | 2 pounds |
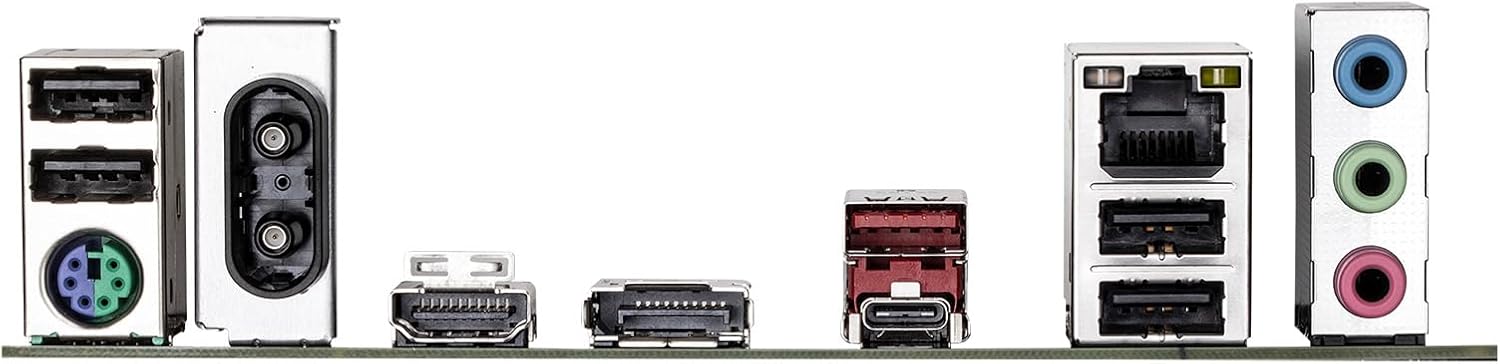
Figure 6.1: Rear I/O panel showing various ports including USB, LAN, Wi-Fi antenna connectors, HDMI, DisplayPort, and audio jacks.
7. Warranty Information
GIGABYTE products are covered by a limited warranty. For detailed and up-to-date warranty terms, conditions, and registration procedures, please refer to the official GIGABYTE website or the warranty card included with your product. Warranty periods may vary by region and product type.
8. Technical Support
For technical assistance, driver downloads, BIOS updates, FAQs, and further product information, please visit the official GIGABYTE support website:
Before contacting support, please have your motherboard model name (B760M DS3H WIFI6E GEN5) and serial number ready.